Free 186 More Best Homemade Tools eBook:  
Get 2,000+ tool plans, full site access, and more.

User Tag List

Page 1 of 2 1 2 LastLast
Results 1 to 10 of 20

Thread: 4 inch bench vice restoration

  1. #1
    Supporting Member olderdan's Avatar
    Join Date
    Jun 2016
    Posts
    782
    Thanks
    1,457
    Thanked 1,538 Times in 466 Posts

    olderdan's Tools

    4 inch bench vice restoration

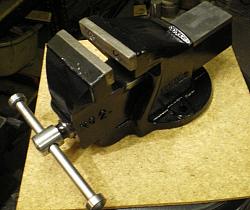
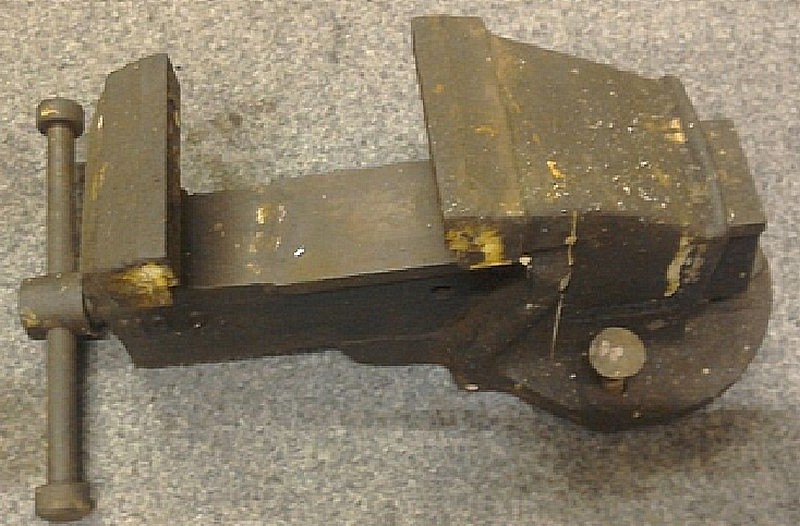
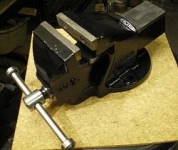
    The house next door was sold for refurbishment and after looking in the builders skip for anything useful I noticed a piece of steel poking out of the rubble, pulling it out I was amazed to find it to be an old bench vice that had been thrown out, I just had to rescue the poor thing as to many vices get miss treated these days. It had not been used much, just left in a leaking garage and very rusty so an electrolysis bath and a strip down was the first step. The strip down proved to be difficult as I could not shift the acme nut in the body as it was dovetailed, peened over and pinned into the fixed part of the vice, determined to separate the two halves I had to make a cut out in the rear of the sliding jaw to clear the nut, as this would normally limit the opening of the jaws I would have to provide some other means to replace this function, tapping the end of the screw for a stop washer sorted that out.
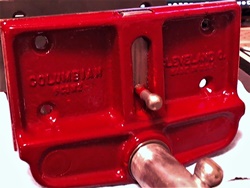
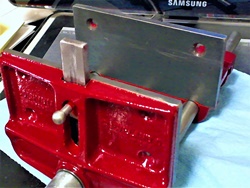
    After cleaning and two coats of paint I now had a good as new vice. It took about a week of spare time but I enjoy this kind of thing.
    I have found a rotating base handy in the past and I have a steel plate that I had planned to make a 3 point steady for my lathe no longer needed, so when I find it I will complete the job and it will replace my long suffering 3 inch one that will get the same refurb treatment.

    4 inch bench vice restoration-screen-shot-02-10-18-12.33-pm-001.jpg

    4 inch bench vice restoration-untitled.jpg

    186 More Best Homemade Tools eBook

  2. The Following 22 Users Say Thank You to olderdan For This Useful Post:

    arbee (Jun 20, 2018), Beserkleyboy (Aug 1, 2020), blkadder (Feb 22, 2018), Captainleeward (Feb 22, 2018), Frank S (Feb 21, 2018), HobieDave (Apr 7, 2020), jjr2001 (Feb 21, 2018), Jon (Jul 31, 2020), LMMasterMariner (Feb 23, 2018), nickyd (Feb 23, 2018), Paul Jones (Feb 21, 2018), piro222 (Feb 22, 2018), PJs (Feb 22, 2018), ranald (Jun 24, 2018), rlm98253 (Oct 18, 2018), rossbotics (Feb 22, 2018), Seedtick (Feb 22, 2018), thehomeengineer (Feb 21, 2018), tonyfoale (Feb 23, 2018), Toolmaker51 (Feb 21, 2018), Tule (Feb 23, 2018), volodar (Jun 21, 2018)

  3. #2
    Supporting Member jjr2001's Avatar
    Join Date
    Jun 2016
    Posts
    915
    Thanks
    1,182
    Thanked 2,044 Times in 553 Posts

    jjr2001's Tools
    Nice job Dan, looks like new.
    Cheers, JR

    2000 Tool Plans

  4. The Following User Says Thank You to jjr2001 For This Useful Post:

    olderdan (Feb 22, 2018)

  5. #3
    Supporting Member thehomeengineer's Avatar
    Join Date
    Nov 2017
    Location
    Berkshire UK
    Posts
    706
    Thanks
    721
    Thanked 2,068 Times in 407 Posts

    thehomeengineer's Tools
    olderdan you are a man after my own heart
    You wouldn't believe it was the same vice. I also like this type of refurb.
    I hope you don’t mind me asking but what paint did you use? nice finish
    Great skip diving.
    The Home Engineer

  6. The Following User Says Thank You to thehomeengineer For This Useful Post:

    olderdan (Feb 22, 2018)

  7. #4
    Supporting Member Toolmaker51's Avatar
    Join Date
    Feb 2016
    Location
    Midwest USA
    Posts
    5,331
    Thanks
    7,042
    Thanked 2,980 Times in 1,893 Posts

    Toolmaker51's Tools
    I too enjoy 'tuning' vises. Probably sold off/ traded 80% of them over the years, maybe 40 total. My favorite peeves; backlash where the jaw doesn't retract with rotation of the screw, and the screw + handle with too much clearance to hold it's setting while loading or re-positioning a part. I like a bench vise to work like a mill vise.
    Fixing those is usually easy; sometimes.
    First, insure the screw is straight.
    Sleeve the pilot to fit the slide bore, flanged with a washer of thickness equal to the backlash - minus a couple thousandths. I've had bronze and a thin steel shim washer, hard copper or just solid mild steel. Avoid materials that gall like stainless steel.
    Before assembling, find a sturdy coil spring with ID that fits screw OD, short enough to fit between stationary jaw and inside of slide with bushing in place.
    Lube with bearing grease and assemble. Moving jaw will now advance or retract with barest rotation of screw AND hold any position you leave it in

    Maybe a half dozen times, slide face not machined square [a spotface, more or less] enough to operate well with reduced clearance. You'll need a good sized 4 jaw, or mill & facing head, or rotary table & angle plate to correct it.

    Again another facet of Toolmaking; measure and engineer processes to remedy unsatisfactory mechanical action.
    Last edited by Toolmaker51; Feb 21, 2018 at 09:39 PM.
    Sincerely,
    Toolmaker51
    ...we'll learn more by wandering than searching...

  8. The Following 8 Users Say Thank You to Toolmaker51 For This Useful Post:

    blkadder (Jun 20, 2018), olderdan (Feb 22, 2018), Paul Jones (Feb 22, 2018), PJs (Feb 22, 2018), Ropetangler (Feb 22, 2018), Scotsman Hosie (Feb 22, 2018), thehomeengineer (Feb 21, 2018), volodar (Jun 21, 2018)

  9. #5
    Supporting Member Scotsman Hosie's Avatar
    Join Date
    Apr 2017
    Location
    Salt Lake City, UTAH
    Posts
    359
    Thanks
    4,937
    Thanked 85 Times in 60 Posts

    Scotsman Hosie's Tools
    Beautiful restoration - on an solid little 3" vise. I can't believe how nicely it cleaned up and shines. (I better look into electrolysis a bit more).
    -
    I just popped a couple photos of a 6" woodworking vise I pulled off a beat-up workbench, in the garage of an estate sale (Gave $10.00 for it). It had equal parts grease 'n grime - and rust. Wish I had documented the restore, but the wife thought I was crazy for buying it.

    Didn't think I'd ever get the bench dog pop-up to free up.) Lots of soap and water, rust chelator (that cost more than the vise), TLC, and Krylon (to make it look better). I also added the thrust washer visible in the pic, to take out the excess play in the screw. (I've yet to build a bench around it.)

    Name:  Picture 97x250.jpg
Views: 1856
Size:  28.1 KB

    Name:  Picture 101x250.jpg
Views: 1867
Size:  33.3 KB

    I should mention that the colors in the pics, just aren't right. It's actually a deep burgundy, in color (over a lighter, brighter, 'flat' red, that acted as an excellent primer for the top coat.)
    Last edited by Scotsman Hosie; Feb 22, 2018 at 02:38 AM. Reason: add detail about color.

  10. The Following 6 Users Say Thank You to Scotsman Hosie For This Useful Post:

    Dimitris Polychronis (May 8, 2019), olderdan (Feb 22, 2018), Paul Jones (Feb 22, 2018), PJs (Feb 22, 2018), Toolmaker51 (Feb 22, 2018), Tule (Feb 23, 2018)

  11. #6
    Content Editor
    Supporting Member
    DIYer's Avatar
    Join Date
    Aug 2013
    Posts
    3,056
    Thanks
    772
    Thanked 1,852 Times in 1,653 Posts


    Thanks olderdan! We've added your Bench Vise Restoration to our Vises category,
    as well as to your builder page: olderdan's Homemade Tools. Your receipt:


  12. #7
    Content Editor
    Supporting Member
    DIYer's Avatar
    Join Date
    Aug 2013
    Posts
    3,056
    Thanks
    772
    Thanked 1,852 Times in 1,653 Posts


    Thanks Scotsman Hosie! We've added your Woodworking Vise Restoration to our Vises category,
    as well as to your builder page: Scotsman Hosie's Homemade Tools. Your receipt:


  13. The Following User Says Thank You to DIYer For This Useful Post:

    Scotsman Hosie (Feb 22, 2018)

  14. #8
    Supporting Member olderdan's Avatar
    Join Date
    Jun 2016
    Posts
    782
    Thanks
    1,457
    Thanked 1,538 Times in 466 Posts

    olderdan's Tools
    Hi Home Engineer,
    After using every type of paint over the years I have settled on a synthetic enamel from Paragon Paints from https://www.stationaryengineparts.com/Paragon-Paints/. Never been a fan of spray cans, they are so wasteful so I brush paint most of my motorcycle parts with this stuff.
    It flows beautifully with no brush marks and dries nicely hard. RAL colours too.
    4 inch bench vice restoration-imgp0021.jpg
    Last edited by olderdan; Feb 22, 2018 at 07:44 AM. Reason: spelling

  15. The Following 6 Users Say Thank You to olderdan For This Useful Post:

    blkadder (Jun 20, 2018), nickyd (Feb 23, 2018), PJs (Feb 22, 2018), Scotsman Hosie (Feb 22, 2018), thehomeengineer (Feb 22, 2018), Toolmaker51 (Feb 22, 2018)

  16. #9
    Supporting Member olderdan's Avatar
    Join Date
    Jun 2016
    Posts
    782
    Thanks
    1,457
    Thanked 1,538 Times in 466 Posts

    olderdan's Tools
    Nice job on that vice even if you did it the hard way.
    There is some posts here on electrolysis, I just use a 12v car battery with a charger connected to keep up the amps. Best part is it will remove paint and free up all those bolts and seized parts as well.

  17. The Following 2 Users Say Thank You to olderdan For This Useful Post:

    Scotsman Hosie (Feb 22, 2018), Toolmaker51 (Feb 22, 2018)

  18. #10
    Supporting Member Scotsman Hosie's Avatar
    Join Date
    Apr 2017
    Location
    Salt Lake City, UTAH
    Posts
    359
    Thanks
    4,937
    Thanked 85 Times in 60 Posts

    Scotsman Hosie's Tools
    "Thanks Scotsman Hosie! We've added your Woodworking Vise Restoration to our Vises category,
    as well as to your builder page:
    Scotsman Hosie's Homemade Tools. Your receipt:"
    -
    I realized - after the fact - that I should've made this a separate forum post - as opposed to a reply. So I appreciate you doing that for me. Thanks again.
    Last edited by Scotsman Hosie; Feb 22, 2018 at 11:17 AM.

Thread Information

Users Browsing this Thread

There are currently 1 users browsing this thread. (0 members and 1 guests)

Bookmarks

Posting Permissions

  • You may not post new threads
  • You may not post replies
  • You may not post attachments
  • You may not edit your posts
  •