Free 186 More Best Homemade Tools eBook:  
Get 2,000+ tool plans, full site access, and more.

User Tag List

Page 1 of 2 1 2 LastLast
Results 1 to 10 of 14

Thread: Alignment cones 2x2.75 x30°

  1. #1
    Supporting Member Frank S's Avatar
    Join Date
    Aug 2015
    Location
    Peacock TX
    Posts
    11,224
    Thanks
    1,985
    Thanked 8,788 Times in 4,207 Posts

    Frank S's Tools

    Alignment cones 2x2.75 x30°

    I am needing to bore the 1" plates I am making for my folding break much larger than I was previously planning on doing .
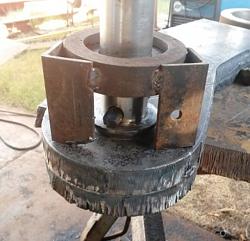
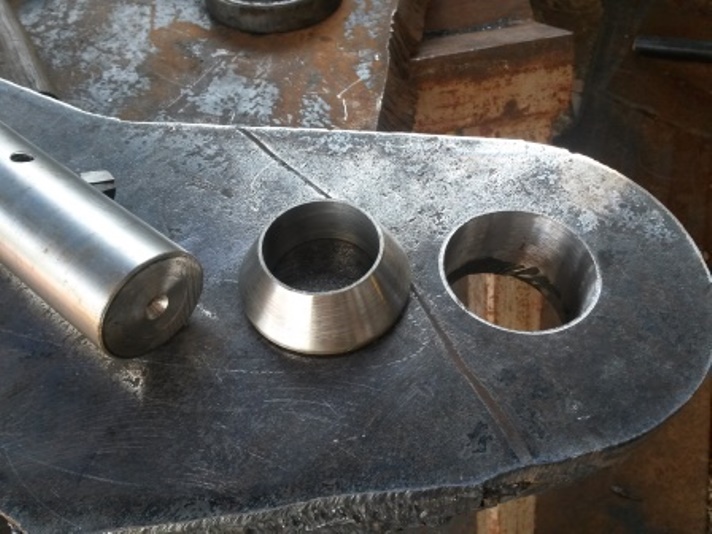
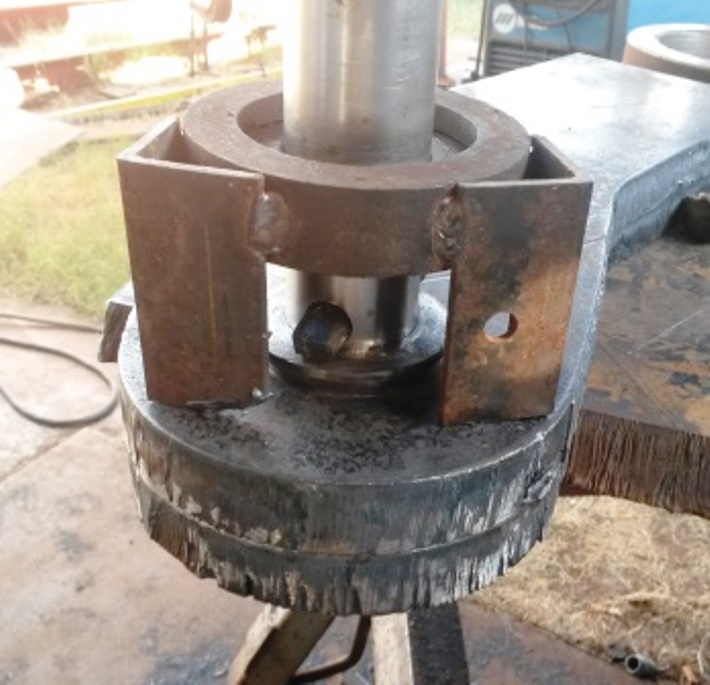
    The boring head for the mill was doing a fine job but I am too impatient to bore at a .005 to .010" at a time through the 2" of hard steel in order to take the bore form 2.300 out to 2.625" this is why I made the boring bar yesterday and today after we got back from town started making a pair of alignment cones. these will be used to center the boring bar to the bores in the plates then I will tack weld the stabilizer bearings to the plates. This will be a little tricky as I need to set this up in the mill get everything square then tack the bearing stabilizers in place to insure the boring bar is perfectly perpendicular to the plates. I will probably do a mock set up on top of a sheet of steel on the mill table to protect it

    Alignment cones 2x2.75 x30°-20170823_181810.jpg
    viewed for demonstration only
    Alignment cones 2x2.75 x30°-20170823_182033.jpg

    186 More Best Homemade Tools eBook
    Never try to tell me it can't be done
    When I have to paint I use KBS products

  2. The Following 3 Users Say Thank You to Frank S For This Useful Post:

    NortonDommi (Aug 24, 2017), Okapi (Aug 25, 2017), Seedtick (Aug 25, 2017)

  3. #2
    Content Editor
    Supporting Member
    DIYer's Avatar
    Join Date
    Aug 2013
    Posts
    3,056
    Thanks
    773
    Thanked 1,852 Times in 1,653 Posts


    Thanks Frank S! We've added your Boring Alignment Cones to our Milling category,
    as well as to your builder page: Frank S's Homemade Tools. Your receipt:


    2000 Tool Plans

  4. #3
    Supporting Member ncollar's Avatar
    Join Date
    Oct 2012
    Posts
    354
    Thanks
    23
    Thanked 180 Times in 126 Posts
    Frank
    I would like to see more. Terribly interesting

  5. #4
    Supporting Member Frank S's Avatar
    Join Date
    Aug 2015
    Location
    Peacock TX
    Posts
    11,224
    Thanks
    1,985
    Thanked 8,788 Times in 4,207 Posts

    Frank S's Tools
    That's simple just follow my threads as I post them the next thread http://www.homemadetools.net/forum/set-up-block-63032 shows them in use. They are only needed for setting up and locating the center of a bore to be bored out Since I am only having to bore the 2 plates stacked together set up is fairly straight forward care must be taken to make sure the bar is perpendicular to the plates which would be much easier when dealing with a fabricated part where the plates are say a foot or more apart like those of a backhoe bucket or the bearing locations in the boom but the concept never changes a pair of well fitting tapered cones on a cylinder pased through a bore or pair of bores will locate the center or said bore
    Last edited by Frank S; Aug 24, 2017 at 09:29 PM.
    Never try to tell me it can't be done
    When I have to paint I use KBS products

  6. The Following User Says Thank You to Frank S For This Useful Post:

    Paul Jones (Aug 24, 2017)

  7. #5
    Supporting Member NortonDommi's Avatar
    Join Date
    Jul 2014
    Location
    North Island, New Zealand.
    Posts
    990
    Thanks
    1,800
    Thanked 525 Times in 315 Posts

    NortonDommi's Tools
    Speaking of protecting things a few days ago while driving mum around shopping I spotted some 'Fire Blankets' in a neat pouch at the local clearance shed. I pulled one out to have a look and seemed to be a very tightly woven glass/kevlar blend, quite flexible and about 3/32" thick. Made to be placed over a stovetop fire but would be handy anywhere to stop weld spatter. On my shopping list for next week.
    How big is this folder? Are you making tanks?

  8. #6
    Supporting Member
    Join Date
    Feb 2017
    Posts
    56
    Thanks
    0
    Thanked 3 Times in 3 Posts
    alignment cones.i will keep reading.

  9. #7
    Supporting Member Okapi's Avatar
    Join Date
    Mar 2013
    Location
    Switzerland
    Posts
    222
    Thanks
    346
    Thanked 132 Times in 76 Posts

    Okapi's Tools
    Quote Originally Posted by NortonDommi View Post
    Speaking of protecting things a few days ago while driving mum around shopping I spotted some 'Fire Blankets' in a neat pouch at the local clearance shed. I pulled one out to have a look and seemed to be a very tightly woven glass/kevlar blend, quite flexible and about 3/32" thick. Made to be placed over a stovetop fire but would be handy anywhere to stop weld spatter. On my shopping list for next week.
    How big is this folder? Are you making tanks?
    Hi Norton, it's a little bit out of subject in the very good post about special centering but be careful with that material to stay always the sime side over when it's not the smooth version which I prefer, the parts of carborandum etc… are difficult to take away and can fell on machines benches when you move it.
    Old good quality plastic table sheets are very usable(the can be cut and glued or solded freely), resist not too bad to the heat of metal chips, for fixing the use of photo tape in 50mm. wide make no marks and is acid-free, I hold them all especially fot that purpose, they restit to UV too very well.
    Last edited by Okapi; Aug 25, 2017 at 01:37 AM.

  10. The Following User Says Thank You to Okapi For This Useful Post:

    NortonDommi (Aug 25, 2017)

  11. #8
    Supporting Member Frank S's Avatar
    Join Date
    Aug 2015
    Location
    Peacock TX
    Posts
    11,224
    Thanks
    1,985
    Thanked 8,788 Times in 4,207 Posts

    Frank S's Tools
    In the past when I needed to do any welding on a work piece that I had set up on a lathe or mill I would cover the ways or table with anti rust shipping paper the brown waxed kind used to wrap parts in then wet an old wool Army blanket over that Wool is a natural fire retardant and wetting it cooled the sparks Or I would lay a couple of leather welding aprons over the machines both methods were fully effective. When I used my exothermic metalizing spray torch on a part chucked in the lathe I had a splatter shield made of thin sheet metal that covered the chuck right down to the part being turned. 5000° particles of molten powder being sprayed on a part that was heated to 1200° and spinning can go to places you never dreamed they could go and will destroy a lathe in seconds That led me to build a rotator for building up shafts.
    I would turn them to undersize then chuck them in my rotator for build up then anneal and return to the lathe for turning back to original
    If someday I build another rotator this time I plan on adding a lead screw and carriage with a tool holder for holding either a powder torch or a mig gun for building up shafts.
    Norton you asked what size folder I am making. it is 7 ft I will revise that thread as soon as I get a few more parts made for it. I built the basic frame for the machine 3 years ago and mounted a temporary swing beam and top clamp in order to fabricate some parts for a TYE grain drill I even posted it here. Only now I am completely remaking it into a almost completely different machine only retaining the main frame, when I'm done with the right attachments, I think it will be capable of doing things than no other folder is capable of doing
    stay tuned and follow my threads for up dates, as there may be several more tools which will have to be made before the folder makes its comeback
    Never try to tell me it can't be done
    When I have to paint I use KBS products

  12. The Following 4 Users Say Thank You to Frank S For This Useful Post:

    NortonDommi (Aug 25, 2017), Okapi (Aug 25, 2017), Paul Jones (Aug 25, 2017), Toolmaker51 (Aug 26, 2017)

  13. #9
    Supporting Member Frank S's Avatar
    Join Date
    Aug 2015
    Location
    Peacock TX
    Posts
    11,224
    Thanks
    1,985
    Thanked 8,788 Times in 4,207 Posts

    Frank S's Tools
    I probably should place this under the http://www.homemadetools.net/forum/1...ring-bar-62986 thread but this thread has showed some interest
    there are 5 short videos pertaining to this boring bar
    THe alignment cones worked perfectly in assisting setting up the boring bar and stabilizing guide bearing as when I did the set up on the mill there were no adjustments required the quill freely went up and down a good sign that things are aligned up well after the work piece is clamped down I even allowed the quill to raise high enough to lift the boring bar out of the bottom bearing then returned it with no issues


    Last edited by Frank S; Aug 26, 2017 at 12:29 AM.
    Never try to tell me it can't be done
    When I have to paint I use KBS products

  14. The Following 3 Users Say Thank You to Frank S For This Useful Post:

    NickP (Aug 27, 2017), Paul Jones (Aug 26, 2017), Seedtick (Aug 26, 2017)

  15. #10
    Supporting Member ncollar's Avatar
    Join Date
    Oct 2012
    Posts
    354
    Thanks
    23
    Thanked 180 Times in 126 Posts
    Frank
    Thank you so much for your ingenuous set up. that is what it is all about. Get out of the box and make something. We can't because we have never tried. Machinery working and capabilities are up to the operator. You have the skill and know how to use what you have. Thank you, and you are a inspiration.

  16. The Following User Says Thank You to ncollar For This Useful Post:

    Frank S (Aug 26, 2017)

Thread Information

Users Browsing this Thread

There are currently 1 users browsing this thread. (0 members and 1 guests)

Bookmarks

Posting Permissions

  • You may not post new threads
  • You may not post replies
  • You may not post attachments
  • You may not edit your posts
  •