Free 186 More Best Homemade Tools eBook:  
Get 2,000+ tool plans, full site access, and more.

User Tag List

Results 1 to 7 of 7

Thread: Brass chasing hammer - burin handle

  1. #1
    Supporting Member rendoman's Avatar
    Join Date
    Nov 2015
    Location
    Italy
    Posts
    435
    Thanks
    451
    Thanked 496 Times in 241 Posts

    rendoman's Tools

    Brass chasing hammer - burin handle

    Hi!
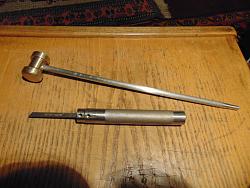
    I built this couple of tools to try engraving.
    Burin handle is in stainless steel, 18mm diameter, 14cm long, knurled for a better grip. 4x M5 socket set screw blade lock.


    The head of hammer is brass, 25mm diameter, one face rounded , one semi-round. I decided to try an aluminum rod as handle, I will modify if it necessary. I decided to use brass and not steel because I needed also a light and soft hammer in my garage

    Brass chasing hammer - burin handle-dsc05117_1600x1200.jpg

    186 More Best Homemade Tools eBook
    Last edited by rendoman; Jan 28, 2019 at 12:39 PM.

  2. The Following 2 Users Say Thank You to rendoman For This Useful Post:

    PJs (Jan 29, 2019), Toolmaker51 (Jan 28, 2019)

  3. #2
    Supporting Member Toolmaker51's Avatar
    Join Date
    Feb 2016
    Location
    Midwest USA
    Posts
    5,331
    Thanks
    7,042
    Thanked 2,980 Times in 1,893 Posts

    Toolmaker51's Tools
    Only tip I can offer is barely helpful; you'll spend a lot of time finding the right angle that shears without digging in or skidding. Finish in a recess depends heavily on perfection of cutting edge; carefully honed.

    2000 Tool Plans
    Sincerely,
    Toolmaker51
    ...we'll learn more by wandering than searching...

  4. The Following 2 Users Say Thank You to Toolmaker51 For This Useful Post:

    PJs (Jan 29, 2019), rendoman (Jan 28, 2019)

  5. #3
    Supporting Member rendoman's Avatar
    Join Date
    Nov 2015
    Location
    Italy
    Posts
    435
    Thanks
    451
    Thanked 496 Times in 241 Posts

    rendoman's Tools
    Thank you!
    I bought 8x gravers with different shape, I'm waiting diamond discs. I read about sharpening templates, many different grit, plus hone and leather to keep the edge sharp. I'm looking for info about the right position and angle, I suppose it will be not an easy work!
    The first thing I would like to engrave is my adjustable horn stand, I would like to add a vernier style reference, it would be hard to keep signs straight and with correct distance.

  6. #4
    Supporting Member Toolmaker51's Avatar
    Join Date
    Feb 2016
    Location
    Midwest USA
    Posts
    5,331
    Thanks
    7,042
    Thanked 2,980 Times in 1,893 Posts

    Toolmaker51's Tools
    How about dividing vernier by your mill for spacing, positioning a rail to guide the manual cutter? Verniers, as you know, break down a distance into 1 more increment in the same linear space. One challenge will be maintaining lines of discreet lengths for sake of readability.
    https://en.wikipedia.org/wiki/Vernier_scale
    Sincerely,
    Toolmaker51
    ...we'll learn more by wandering than searching...

  7. The Following 2 Users Say Thank You to Toolmaker51 For This Useful Post:

    PJs (Jan 29, 2019), rendoman (Jan 29, 2019)

  8. #5
    Supporting Member rendoman's Avatar
    Join Date
    Nov 2015
    Location
    Italy
    Posts
    435
    Thanks
    451
    Thanked 496 Times in 241 Posts

    rendoman's Tools
    Hello! I think your idea is really good! Mill for sure is accurate!
    I tried today the first funny step with graver… it's hard to go straight and keep the same angle.

    Funny picture on the left

    Brass chasing hammer - burin handle-dsc05138_1600x1200.jpg

  9. #6
    Supporting Member Toolmaker51's Avatar
    Join Date
    Feb 2016
    Location
    Midwest USA
    Posts
    5,331
    Thanks
    7,042
    Thanked 2,980 Times in 1,893 Posts

    Toolmaker51's Tools
    [QUOTE=rendoman;126739]Hello! I think your idea is really good! Mill for sure is accurate!
    I tried today the first funny step with graver… it's hard to go straight and keep the same angle.

    Funny picture on the left
    Well, so far none of the engravers at Beretta are worried about their jobs...Yeah I'm teasing you.
    I know you'll pursue this and do well, just like the plasma speakers, electronics, leatherwork, metal forming, handmade bike frames...
    As far as work in the picture, looked at enlarged; the cutting edge isn't sharp, too flat and far too wide. Look at something engraved. The vee's are smooth and distinct in the bottom and especially the edges. Then you'll know it is sharp. I believe Christophe Mineau here on HMT has video of what the process looks like, and probably a lifetime worth of youtube by others.
    Sincerely,
    Toolmaker51
    ...we'll learn more by wandering than searching...

  10. The Following User Says Thank You to Toolmaker51 For This Useful Post:

    rendoman (Jan 29, 2019)

  11. #7
    Supporting Member rendoman's Avatar
    Join Date
    Nov 2015
    Location
    Italy
    Posts
    435
    Thanks
    451
    Thanked 496 Times in 241 Posts

    rendoman's Tools
    I think you're right, I should check the edge. I tried pushing only with hand, the line is straight and good, but very thin. Pushing a deep Groove by hand is hard.
    I need to learn more for sure!


    186 More Best Homemade Tools eBook

Thread Information

Users Browsing this Thread

There are currently 1 users browsing this thread. (0 members and 1 guests)

Bookmarks

Posting Permissions

  • You may not post new threads
  • You may not post replies
  • You may not post attachments
  • You may not edit your posts
  •