
 LinkBack URL
 About LinkBacks


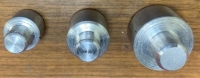
I often need to drill on the center line of standard sized stock, both flat and round. Here is a set of tools that make the job easy and accurate.
If you are interested, please see
https://rick.sparber.org/CenteringPartsDrillpress.pdf
Your comments are welcome. All of us are smarter than any one of us.
Thanks,
Rick


 Reply With Quote


Bookmarks