Free 186 More Best Homemade Tools eBook:  
Get 2,000+ tool plans, full site access, and more.

User Tag List

Page 1 of 2 1 2 LastLast
Results 1 to 10 of 11

Thread: Chuck Mandrel for 80 mm Chuck

  1. #1
    Supporting Member Paul Jones's Avatar
    Join Date
    May 2014
    Location
    Del Mar, California
    Posts
    1,231
    Thanks
    5,810
    Thanked 1,441 Times in 655 Posts

    Paul Jones's Tools

    Chuck Mandrel for 80 mm Chuck

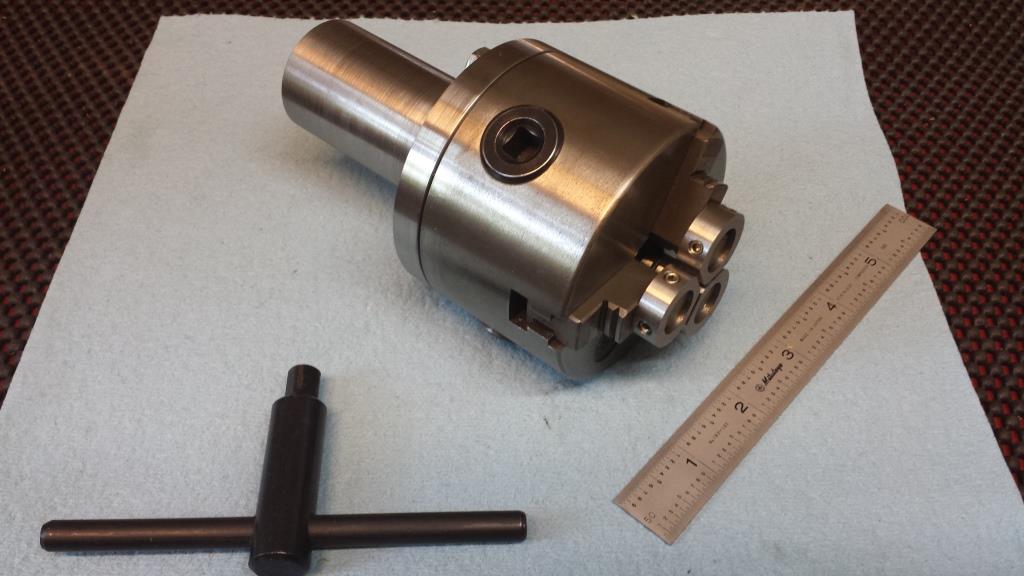
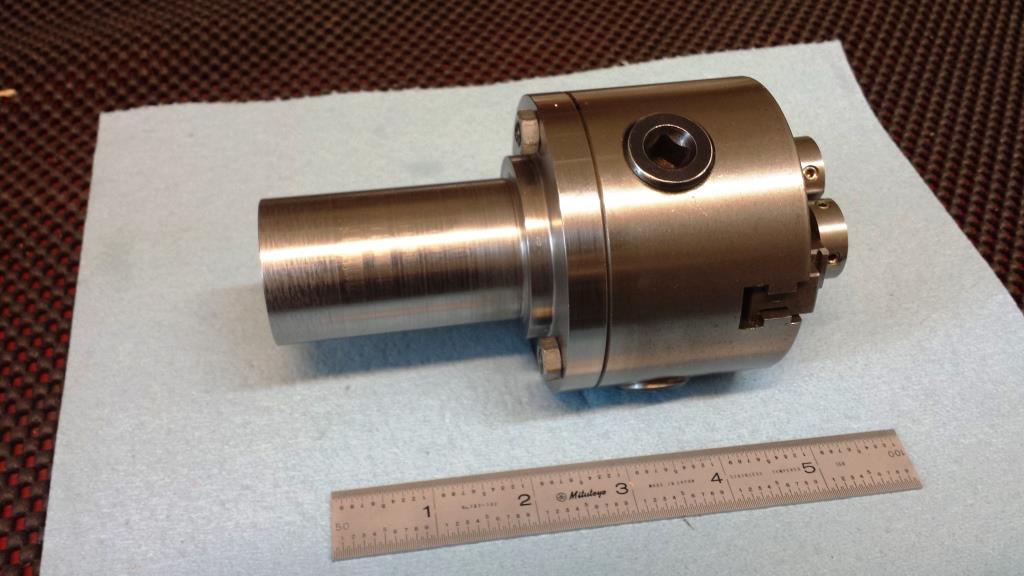
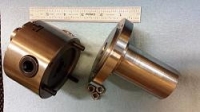
    I previously made a set of toolmakers mini jaws for a Yamakawa 80mm 3-jaw chuck. This is my original chuck for my 7” swing mini lathe and I added the mini jaws (see making the toolmaker mini jaws at Homemade Mini Toolmaker's Jaws - HomemadeTools.net ). However, the mini lathe is now equipped with an ER32 collet chuck and used primarily for small collet work.The 80mm chuck with the toolmaker mini jaws would be a great addition for my larger 12” swing geared-head lathe provided I could hold it with a precision mandrel.

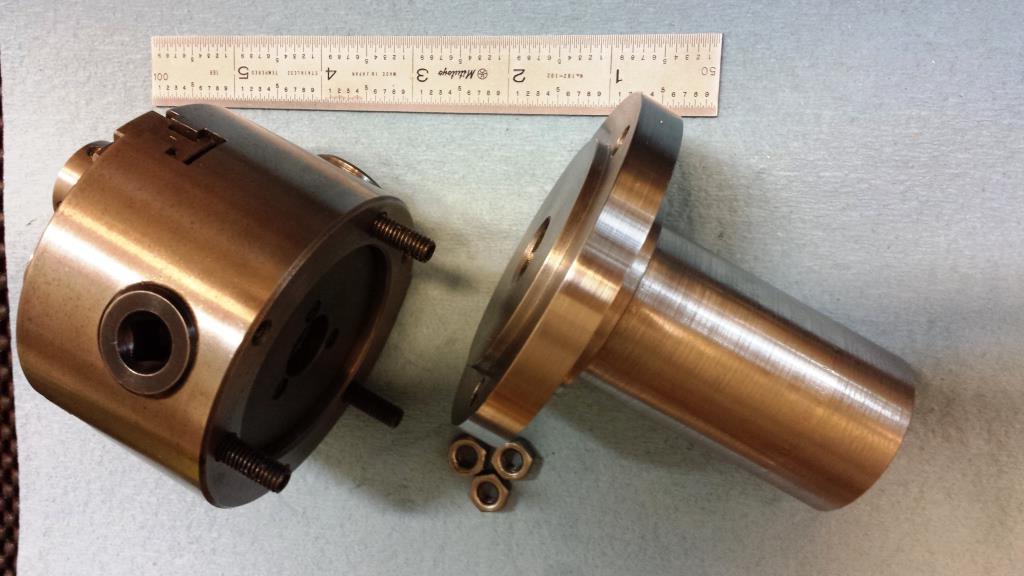
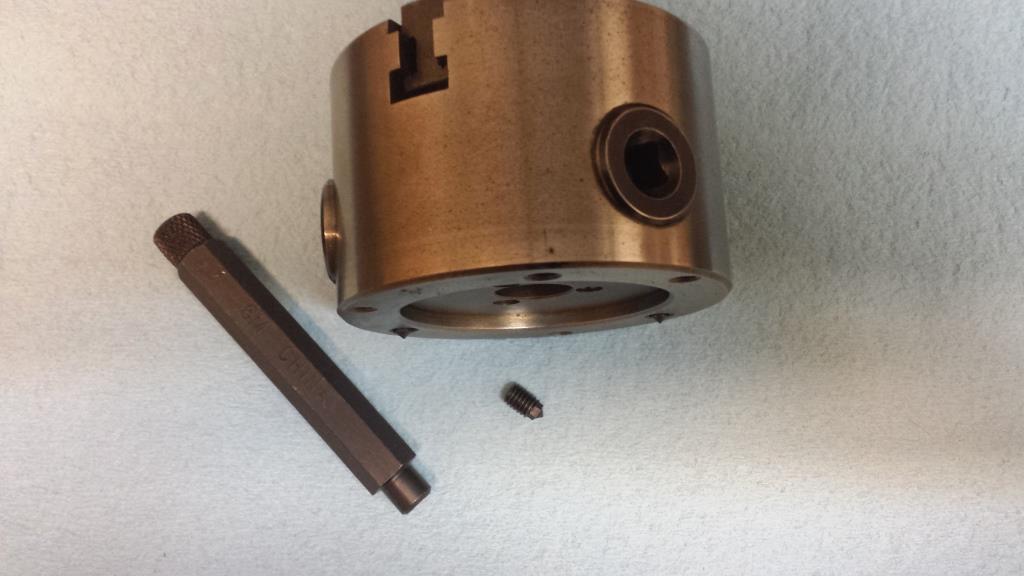
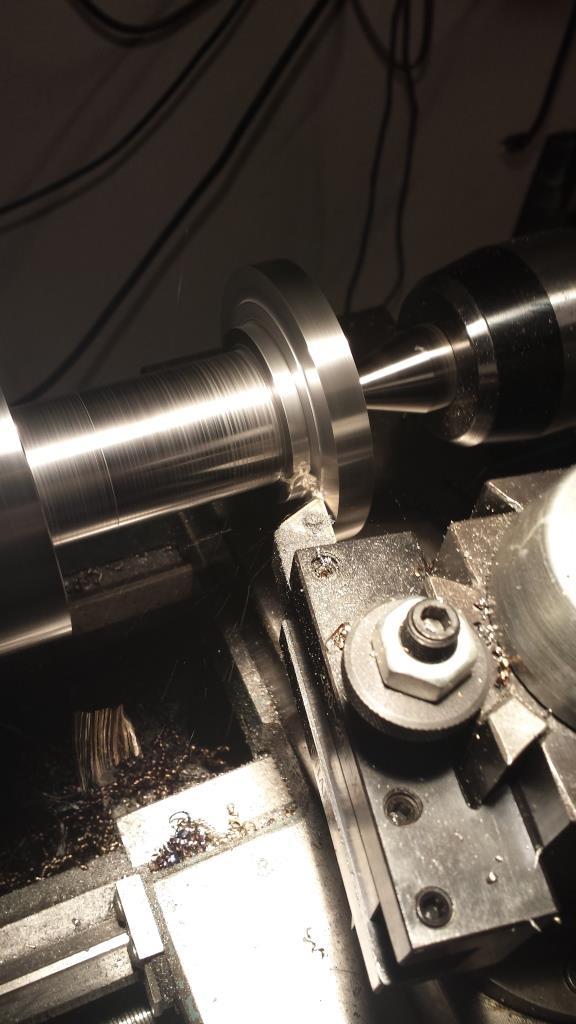
    The 80mm 3-jaw chuck now has a mandrel machined from 1045 alloy carbon steel 3.25" round bar stock. The mandrel has an overall length of 3.3” and the shaft dimensions are 1.5” dia. x 2.5” long. The chuck is attached with three M6x1 studs and nuts on the larger end that is 3.150” dia.x 0.375” thick. In addition the larger end has a 0.110” deep step that inserts snuggly into a recess in the back of 80mm chuck. The three holes for the studs were located with M6x1 transfer screws and the holes are 0.257” dia. (Letter F drill). A 0.625” thru hole runs down the center of the mandrel and matches the maximum thru hole diameter in the 80mm chuck.

    Chuck Mandrel for 80 mm Chuck-mandrel-made-80mm-chuck-toolmaker-mini-jaws.jpg

    Chuck Mandrel for 80 mm Chuck-chuck-mandrel-stamped-1-locating-larger-chuck-jaw-no.-1.jpg

    Chuck Mandrel for 80 mm Chuck-chuck-mandrel-attached-m6x1-studs-nuts.jpg

    Chuck Mandrel for 80 mm Chuck-chuck-hole-locations-determined-m6x1-transfer-screws.jpg

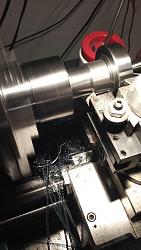
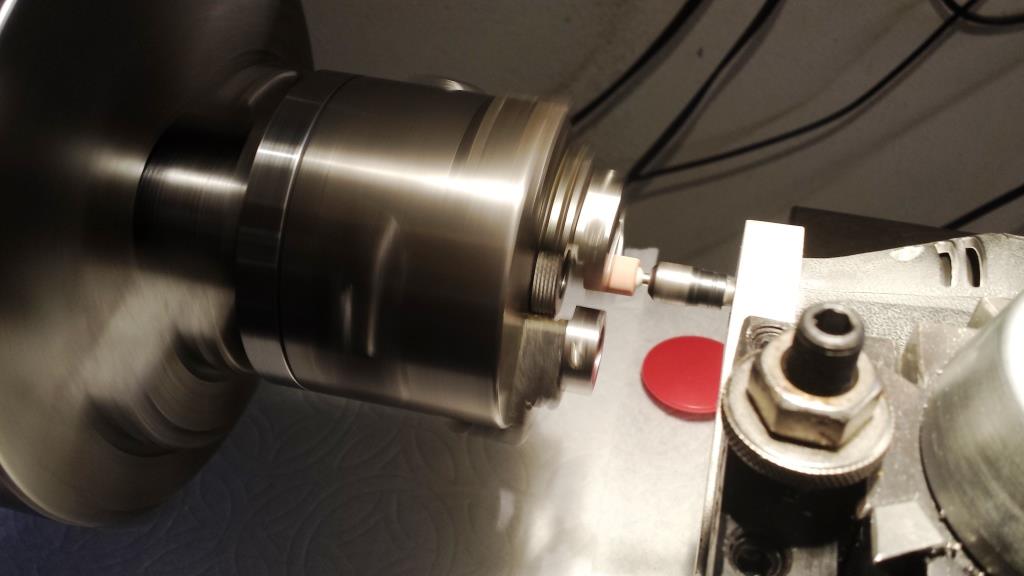
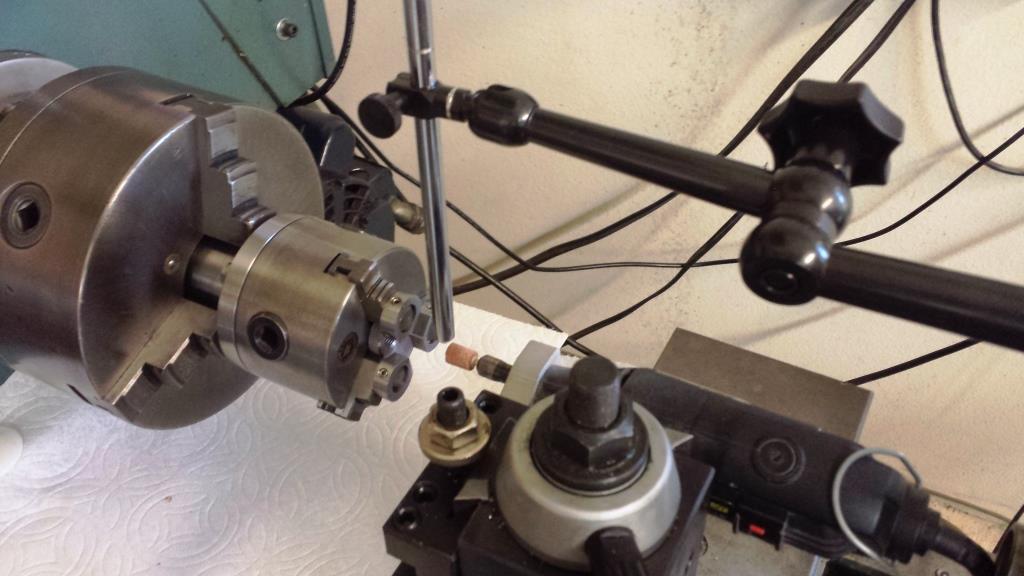
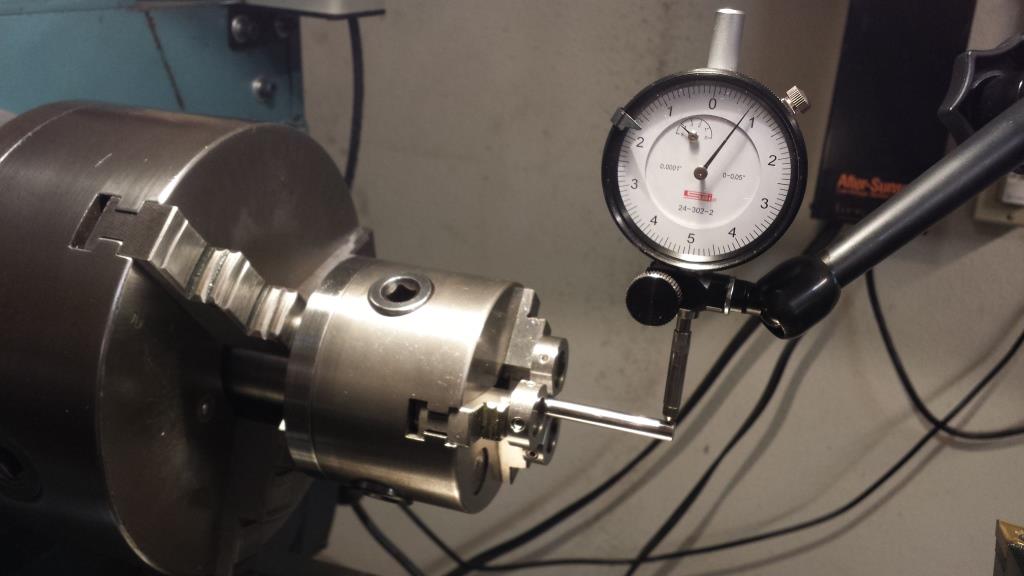
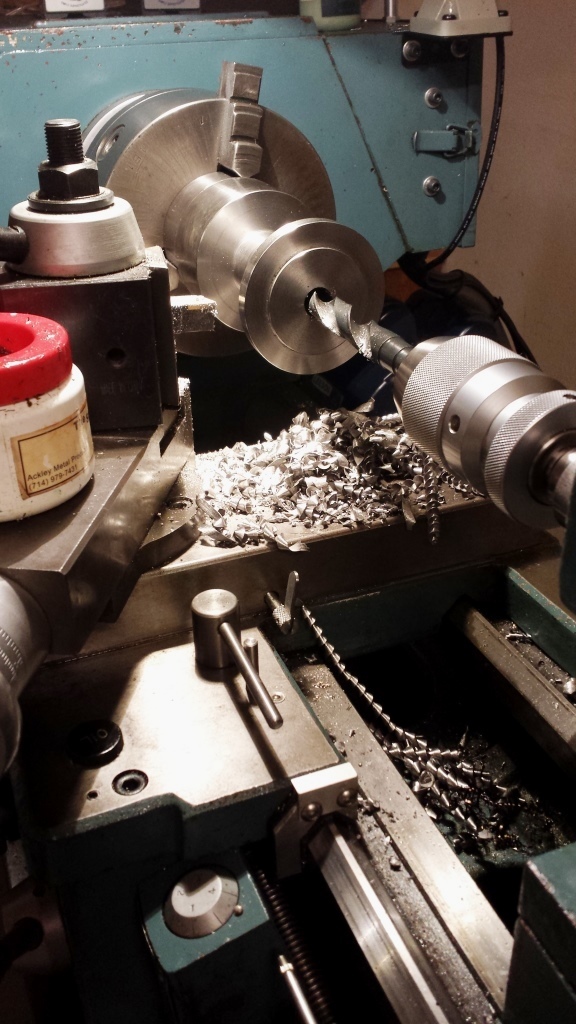
    The Toolmaker mini jaws were re-ground after assembling the 80mm chuck with the mandrel and held in the 6” chuck. Before stating the jaw grinding, a small steel ring was used to pre-load the original (inner) chuck jaws and can be seen in the photos. A Dremel tool with 0.375” dia. grinding stone was dressed in-place on the 12” swing lathe and used to grind the mini jaws true.

    A diamond dresser was held firmly with a Noga adjustable arm attached to the locked tailstock, and using the lathe carriage for movement, the Dremel tool and grinding stone were moved under the stationary dressing diamond. This trued-up the entire length of the grinding stone. Before grinding, the smaller chuck and mandrel were assembled and disassembled several times looking for the most accurate hole combination and location in the larger chuck. Witness marks indicate the most accurate mandrel position with the 80 mm chuck and the rear spacer step on the mandrel was marked with a number “1” for locating with the No. 1 chuck jaw of the larger chuck.

    Chuck Mandrel for 80 mm Chuck-grinding-toolmaker-mini-jaws-80mm-chuck-larger-chuck-mandrel.jpg

    Chuck Mandrel for 80 mm Chuck-noga-adjustable-arm-holds-diamond-dresser-dremel-grinding-stone-setup.jpg

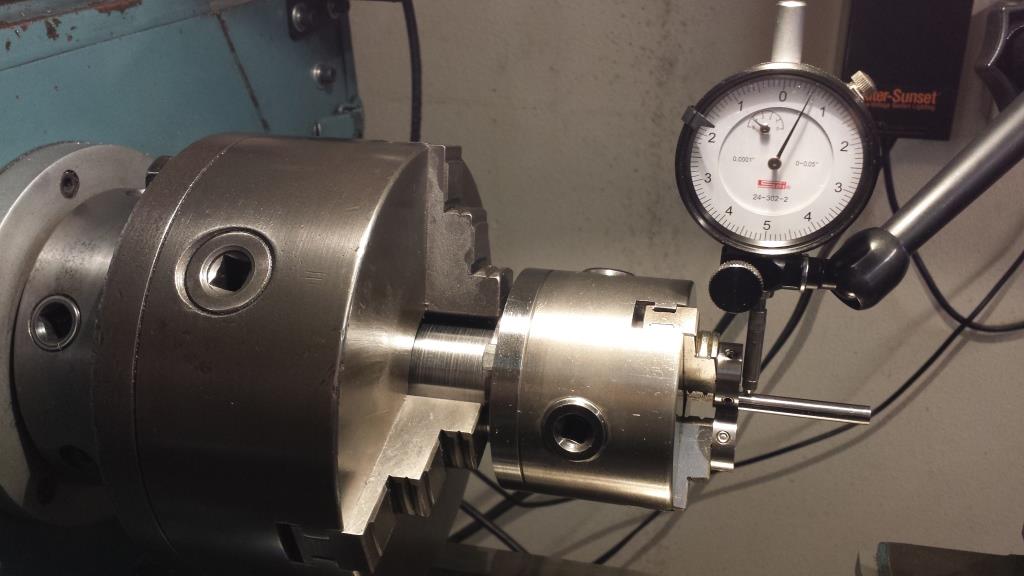
    Using a 0.250” gage pin, the measured repeatable TIR of the smaller chuck while held in the larger chuck is 0.0006” at the front of the toolmaker mini jaws and 0.0008” at a distance of 1.5” from the mini jaws. This TIR exceeded my expectations considering the larger chuck has the same TIR depending upon the diameter being held and while always tightened with the chuck key in the master pinon. Even more remarkable is the repeatable 0.0004” TIR measured with a 0.125” gage pin.

    Chuck Mandrel for 80 mm Chuck-toolmaker-mini-jaw-chuck-mandrel-tir-0.0006-inch.jpg

    Chuck Mandrel for 80 mm Chuck-toolmaker-mini-jaw-chuck-tir-0.0008-inch-1.5-inch.jpg

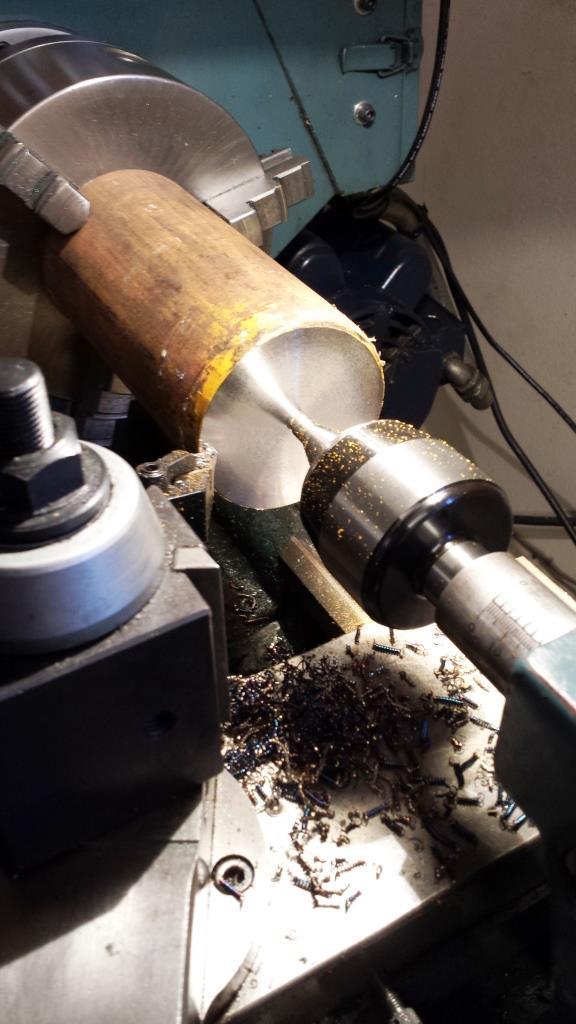
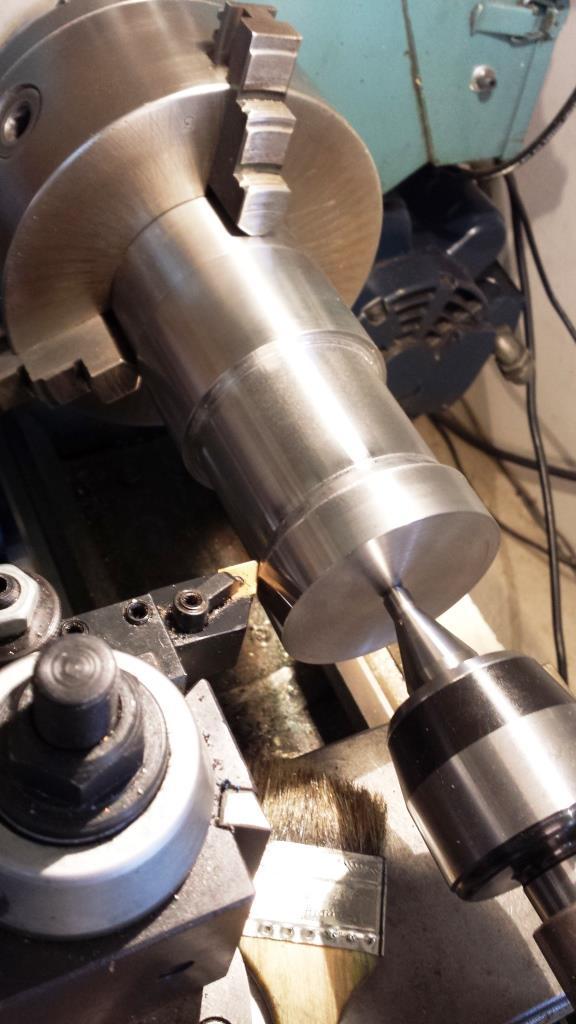
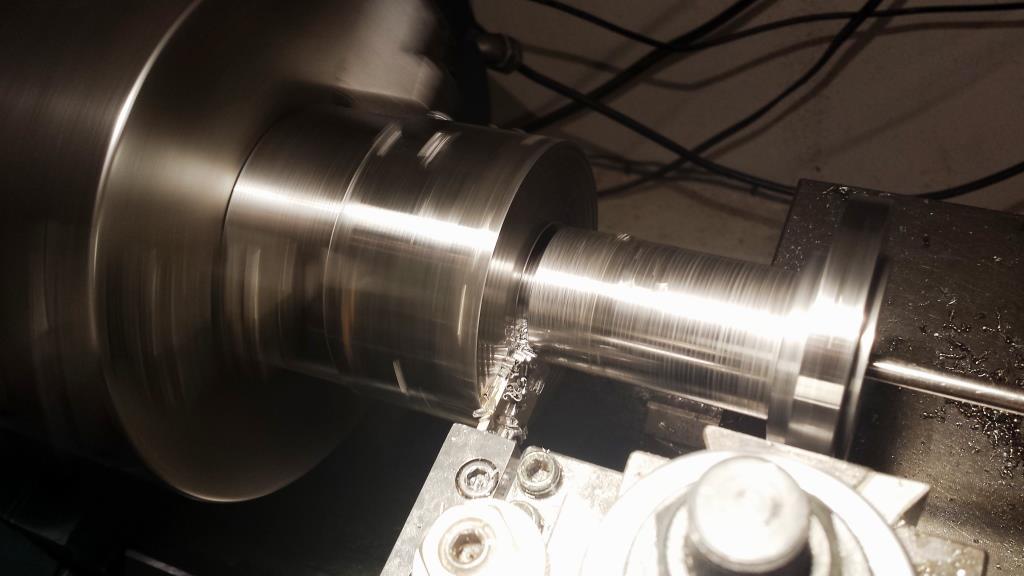
    The following photos show some of the steps in machining of the chuck mandrel from 1045 alloy carbon steel round bar stock. All the machining as completed without re-chucking the mandrel in ordered to achieve the best concentricity. DNMP and TNMP carbide inserts were used for most of the machining and an ISCAR GF insert GFR-3J used for parting-off. The final finishing passes for the 1.5” dia. shank section were completed using an A R Warner T15 HSS TCMW-322 insert but in this case, I think I should have continued using the DNMP Kennametal KT315 grade insert (a multilayer PVDTiN/TiCN/TiNcoated cermet turning grade) which produces a mirror-like finish seen on the larger diameter sections and my most favorite insert for finishing work. I plan to make another chuck mandrel to fit a 5C collet dimension for when I finally finish making a 5C collet chuck for the 12" geared-head lathe.

    Chuck Mandrel for 80 mm Chuck-preparing-3.25-inch-dia.-1025-crs-maching-chuck-mandrel-.jpg Chuck Mandrel for 80 mm Chuck-turning-down-1.5-inch-diameter-shank-using-dnmp-insert-.jpg

    Chuck Mandrel for 80 mm Chuck-turning-down-1.5-inch-diameter-shank-using-tnmg-insert-.jpg Chuck Mandrel for 80 mm Chuck-machining-back-step-chuck-mounting-bolts-nuts-.jpg

    Chuck Mandrel for 80 mm Chuck-drilling-0.625-inch-thru-hole-chuck-mandrel-.jpg Chuck Mandrel for 80 mm Chuck-chuck-mandrel-final-parting-off-iscar-gfr-3j-insert-power-cross-feed.jpg


    Thank you for looking,

    Paul Jones

    186 More Best Homemade Tools eBook
    Last edited by Paul Jones; Aug 24, 2016 at 10:02 PM.

  2. The Following 8 Users Say Thank You to Paul Jones For This Useful Post:

    C-Bag (Aug 23, 2016), high-side (Oct 3, 2019), jjr2001 (Sep 1, 2016), Jon (Aug 23, 2016), LMMasterMariner (Jun 1, 2017), PJs (Aug 23, 2016), rendoman (Aug 25, 2016), Vyacheslav.Nevolya (Aug 22, 2016)

  3. #2
    PJs
    PJs is offline
    Supporting Member PJs's Avatar
    Join Date
    Sep 2014
    Location
    Northern CA
    Posts
    1,841
    Thanks
    8,337
    Thanked 1,118 Times in 718 Posts

    PJs's Tools
    Thank you Paul for your always wonderful write ups and Pics. I Truly appreciate your detailed, precision approach to projects! Blown away by the TIR you got on a chuck in a chuck. 8 tenth's on a 12" swing, that far out is an achievement beyond my meager words...maybe Nasa stuff! Curious if you did that Tape fix on the bearings for the Dremel or just tiny, tiny passes to not load them, after dressing?

    The stuff they are doing now with sputtering (PVD) also makes it great to be alive to see it come so far. Again it looks like all that work on balancing/shock mounting you did along with these great cutting tools puts a magnificent finish on things!

    Thanks again for sharing your great work with us! ~PJ

    2000 Tool Plans
    ‘‘Always do right. This will gratify some people and astonish the rest.’’
    Mark Twain

  4. The Following User Says Thank You to PJs For This Useful Post:

    Paul Jones (Aug 24, 2016)

  5. #3
    Supporting Member Paul Jones's Avatar
    Join Date
    May 2014
    Location
    Del Mar, California
    Posts
    1,231
    Thanks
    5,810
    Thanked 1,441 Times in 655 Posts

    Paul Jones's Tools
    Thank you PJs. The TIR surprise me too and that is why I kept all the machining to the tightest tolerances possible on the lathe. The TIR measurement on the 0.1250" gage pin really surprise me and that is the diameter where this chuck will be most useful for me (I just used the chuck to modify several 4-40 socket button head screws). All the errors are accumulative and that is why I tried so many different combinations until I found one that also mitigated the errors. The cool thing is the TIR is repeatable after dissembling and reassembling the chuck and mandrel to the same combination and located with the "1" center on the No. 1 chuck jaw on the 6" chuck. Now I can concentrate on my machining knowing what to expect from the tolerance limits of the chuck.

    The Dremel is not the best tool for this type of grinding. I have planned to do the tape fix shown on HMT with my Dremel but have not gotten around to it. When grinding with the Dremel, I usually dial in 0.0005" (slight tap of the handle to get one half of the distance between the dial indicator lines) per grinding pass and do each pass in and out twice before doing the next 0.0005". I have the lathe chuck rotating at 140 RPM (the direction doesn't seem to matter but less vibration at lower speeds) and the Dremel at full throttle and use a 0.0014" lathe carriage feed rate (quick change gear setting E and 5). I use a blue Sharpie pen to blue the jaws when starting out to make sure everything is ground clean and a bright finish.

    I don't know anything about sputtering (PVD) and will have to learn more.

    Thanks for the comments,

    Paul
    Last edited by Paul Jones; Aug 31, 2017 at 06:16 PM.

  6. The Following User Says Thank You to Paul Jones For This Useful Post:

    PJs (Aug 24, 2016)

  7. #4
    PJs
    PJs is offline
    Supporting Member PJs's Avatar
    Join Date
    Sep 2014
    Location
    Northern CA
    Posts
    1,841
    Thanks
    8,337
    Thanked 1,118 Times in 718 Posts

    PJs's Tools
    Think its amazing that you can tear it down and put it back on and get the same numbers with your marking system! I get it with the best location finding on the chucks, Bolt Circles are never dead on, even CNC'd. Thanks for the info on the grinding speed/feeds and such, just can't imagine bumping it 5 tenths at a time without messing it up. Think it would be a head thumper for me...Doh! So Cool to mount up and go like that. Hats off to you Paul!

    4-40's tiny stuff...Can't wait to see what your doing with them! Been working with tweezers and some 2-56's on the music box motor/gear box stuff...won't say how many I've shot across the room.

    I saw the PVD in your Kennametal tool bit description for the Cermet coating and had just seen one of my favorite knife makers on YT doing some testing on the various new coatings for his blades. Used to work in cryogenics for sputtering systems and so Off I went drilling into whats out there now. (I love the drill down and learning) They are even doing diamond deposition now with amazing resilience and durability. The testing he did was good real world with a fairly subjective comparison. He is going back to them now for a sample of electroless nickle substrate with the DLC (diamond like Carbon) over, no rust, tough as nails. I think Kennametal probably has some of the best tool bits out there and are quite adept at their deposition work.

    Pictures look great now. I do 2 spaces between each insert and 2 wide, then a carriage return...looks like you did too!

    Thanks again for the inspiring post. ~PJ
    ‘‘Always do right. This will gratify some people and astonish the rest.’’
    Mark Twain

  8. #5
    Supporting Member mklotz's Avatar
    Join Date
    Aug 2015
    Location
    LA, CA, USA
    Posts
    3,437
    Thanks
    357
    Thanked 6,391 Times in 2,118 Posts

    mklotz's Tools
    Quote Originally Posted by PJs View Post
    Been working with tweezers and some 2-56's on the music box motor/gear box stuff...won't say how many I've shot across the room.
    If you dip the tips of your tweezers in liquid electrical insulation they'll have a grabby finish and will be a lot less likely to "spit" out small parts.

    Either that or buy some stamp tweezers (tips that look like miniature flat garden spades) or the pearl tweezers the jewelers use (cup-like tips with plastic coating). The latter are perfect for handling small spherical stuff like ball bearings.
    ---
    Regards, Marv

    Home Shop Freeware
    https://www.myvirtualnetwork.com/mklotz

  9. The Following 2 Users Say Thank You to mklotz For This Useful Post:

    Paul Jones (Aug 24, 2016), PJs (Aug 24, 2016)

  10. #6
    PJs
    PJs is offline
    Supporting Member PJs's Avatar
    Join Date
    Sep 2014
    Location
    Northern CA
    Posts
    1,841
    Thanks
    8,337
    Thanked 1,118 Times in 718 Posts

    PJs's Tools
    Quote Originally Posted by mklotz View Post
    If you dip the tips of your tweezers in liquid electrical insulation they'll have a grabby finish and will be a lot less likely to "spit" out small parts.

    Either that or buy some stamp tweezers (tips that look like miniature flat garden spades) or the pearl tweezers the jewelers use (cup-like tips with plastic coating). The latter are perfect for handling small spherical stuff like ball bearings.
    Thanks Marv, I think I remember you posting something on that. Have a bunch of different tweezers. The best I've found for the little beggars are the offset spring loaded ones with teeth. Did try some silicon fuel line but it was too gummy. I'll pick up some of that next time I'm in town.

    The cupped ones sound great and will look for those too!

    Appreciate the tip... ~PJ
    ‘‘Always do right. This will gratify some people and astonish the rest.’’
    Mark Twain

  11. #7
    Content Editor
    Supporting Member
    DIYer's Avatar
    Join Date
    Aug 2013
    Posts
    3,056
    Thanks
    772
    Thanked 1,852 Times in 1,653 Posts


    Thanks Paul Jones! We've added your Chuck Mandrel to our Lathe Accessories category,
    as well as to your builder page: Paul Jones's Homemade Tools. Your receipt:


  12. The Following User Says Thank You to DIYer For This Useful Post:

    Paul Jones (Aug 25, 2016)

  13. #8
    Supporting Member Paul Jones's Avatar
    Join Date
    May 2014
    Location
    Del Mar, California
    Posts
    1,231
    Thanks
    5,810
    Thanked 1,441 Times in 655 Posts

    Paul Jones's Tools
    Marv and PJs,

    My favorite tool for working with small screws (00-80 to 6-32) is the 5-prong diamond pick up tool. It has enough grip to start the screws into the threaded holes and to remove screws after being loosened. I use it in clock repairing. I also still have my very first "nice" tool I bought in 1960 when I was a kid and it is the "Austin Screw Sticker" made in Costa Mesa, CA (and came in a small blue box which I still have). It works just like the diamond pick up tool but has just two prongs with small v-slots and fits 4-40 and smaller screws.

    Paul
    Last edited by Paul Jones; Sep 25, 2016 at 09:01 PM.

  14. #9
    Supporting Member mklotz's Avatar
    Join Date
    Aug 2015
    Location
    LA, CA, USA
    Posts
    3,437
    Thanks
    357
    Thanked 6,391 Times in 2,118 Posts

    mklotz's Tools
    Wow, you've got a five prong diamond holder? Both of mine are only four prong. Regardless, as you say, they're great tools for starting small screws.

    There are similar three prong devices sold for extracting olives from jars. Future readers should be warned that they don't work any where near as well as the devices described above which can be bought here...

    Paul's five prong...

    https://www.amazon.com/Prong-Diamond...nd+pickup+tool

    My four prong...

    https://www.amazon.com/HTS-191D4-Pro...nd+pickup+tool


    and, for completeness,

    the stamp tweezers previously mentioned by me...

    https://www.amazon.com/Stamp-Tweezer...stamp+tweezers

    and the pearl tweezers...

    https://www.amazon.com/Bead-Tweezers...pearl+tweezers
    ---
    Regards, Marv

    Home Shop Freeware
    https://www.myvirtualnetwork.com/mklotz

  15. The Following 2 Users Say Thank You to mklotz For This Useful Post:

    Paul Jones (Aug 25, 2016), PJs (Aug 25, 2016)

  16. #10
    PJs
    PJs is offline
    Supporting Member PJs's Avatar
    Join Date
    Sep 2014
    Location
    Northern CA
    Posts
    1,841
    Thanks
    8,337
    Thanked 1,118 Times in 718 Posts

    PJs's Tools
    Paul and Marv...

    Wow thanks for the info and links. Like that 4/5 prong setup and Oh My the pearl/bead tweezers with rubber all ready on them! Must have's now and good price too! Never worked with any of that tiny tiny stuff like 00-80. 2-56's will be much easier with these goodies...now if I could just see them with out a 10x Optivisor and my trifocals.

    Thanks guys! ~PJ
    ‘‘Always do right. This will gratify some people and astonish the rest.’’
    Mark Twain

  17. The Following User Says Thank You to PJs For This Useful Post:

    Paul Jones (Aug 26, 2016)

Thread Information

Users Browsing this Thread

There are currently 1 users browsing this thread. (0 members and 1 guests)

Tags for this Thread

Bookmarks

Posting Permissions

  • You may not post new threads
  • You may not post replies
  • You may not post attachments
  • You may not edit your posts
  •