Free 186 More Best Homemade Tools eBook:  
Get 2,000+ tool plans, full site access, and more.

User Tag List

Results 1 to 5 of 5

Thread: CNC or Mill Tool Height Setter..Z-axis tool height setter

  1. #1
    Supporting Member jjr2001's Avatar
    Join Date
    Jun 2016
    Posts
    915
    Thanks
    1,182
    Thanked 2,045 Times in 553 Posts

    jjr2001's Tools

    CNC or Mill Tool Height Setter..Z-axis tool height setter

    Making one fixture creates the need for another tool for the shop.
    In the past I would just use a feeler gage to set my tool bit height on the CNC or Mill.
    Well for engraving with the tiny carbide cutters I needed a safer way to plunge the tool to the surface of the work.
    Many are available and are priced from $330.00 to $14.00 (14 bucks was a rough plastic with cheap dial indicator (import of course).
    I had a nice GEM dial test indicator and that seemed like a good fit for this project.

    No indicators were harmed in the creation of this tool!
    The indicator may be removed and used as originally intended.

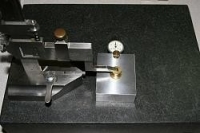
    This is a real easy build. I started by cleaning up the block of aluminum for the base.
    The base is 1" thick and was to be 2" by 2" square. However I really hate to throw away aluminum or any other material.
    Since my blank was 2.75" by 2.2" I just cleaned it up and squared it up on the mill.
    It ended up 2.146" by 2.631" and .975 thick.
    A piece of 5/8" brass was drilled and threaded 1/2-20". A brass plug was threaded 1/2-20. This is the zero adjustment.
    The base has a 5/8 hole reamed which is used to house the zeroing/measuring plunger.
    The plunger has a 5/8" (just under) spring to hold the plunger up.
    The indicator is mounted with a .332 (letter Q) drill bit. That hole intersects the 5/8" hole for the plunger.
    Only tricky part was getting the indicator in the hole!. While the diameter of the shank of the indicator is .328 there is
    a wider part at the lever end where the rivet protrudes. So I had to mill a slot from the bottom side so the indicator could be installed.
    Trickey part #2 is orienting the lever between the spring coils so the coils do not get deflected by the spring. No problem,
    just compress the spring one coil space and it is 100% out of the way.

    Set it up using the height gage and put a small amount of blue loctite to keep the plunger set.

    Works like a champ at a cost of a small piece of brass, small chunk of aluminum,one spring, and one thumb screw.

    Cheers, JR
    Attached Thumbnails Attached Thumbnails CNC or Mill Tool Height Setter..Z-axis tool height setter-img_2264.jpg   CNC or Mill Tool Height Setter..Z-axis tool height setter-img_2265.jpg   CNC or Mill Tool Height Setter..Z-axis tool height setter-img_2260.jpg  

    186 More Best Homemade Tools eBook

  2. The Following 10 Users Say Thank You to jjr2001 For This Useful Post:

    Home-PC (Jan 1, 2021), Jon (Jan 7, 2019), Paul Jones (Jan 13, 2019), PJs (Jan 9, 2019), Seedtick (Jan 7, 2019), Shanty (Jan 14, 2019), threesixesinarow (Jan 8, 2019), tonyfoale (Jan 7, 2019), Toolmaker51 (Jan 13, 2019), zarembak (Jan 7, 2019)

  3. #2
    Supporting Member tonyfoale's Avatar
    Join Date
    Nov 2016
    Location
    Spain
    Posts
    1,566
    Thanks
    689
    Thanked 2,646 Times in 709 Posts

    tonyfoale's Tools
    i have been thinking of building a touch off tool and I'll certainly add this to my list of two possible designs. The other is electronic.
    I have an unused indicator almost identical to yours.

    2000 Tool Plans

  4. The Following User Says Thank You to tonyfoale For This Useful Post:

    jjr2001 (Jan 7, 2019)

  5. #3
    Supporting Member jjr2001's Avatar
    Join Date
    Jun 2016
    Posts
    915
    Thanks
    1,182
    Thanked 2,045 Times in 553 Posts

    jjr2001's Tools
    Hi Tony, I also considered electrical. Mechanical won out since I can run the height over or under as read by the indicator.
    I guess an electrical could also be settable using a calibrated screw/micrometer arrangement.

    Cheers, JR

  6. The Following User Says Thank You to jjr2001 For This Useful Post:

    PJs (Jan 9, 2019)

  7. #4
    Content Editor
    Supporting Member
    DIYer's Avatar
    Join Date
    Aug 2013
    Posts
    3,056
    Thanks
    773
    Thanked 1,852 Times in 1,653 Posts


    Thanks jjr2001! We've added your Z Axis Tool Height Setter to our Measuring and Marking category,
    as well as to your builder page: jjr2001's Homemade Tools. Your receipt:


  8. The Following User Says Thank You to DIYer For This Useful Post:

    jjr2001 (Jan 11, 2019)

  9. #5
    Supporting Member Toolmaker51's Avatar
    Join Date
    Feb 2016
    Location
    Midwest USA
    Posts
    5,331
    Thanks
    7,042
    Thanked 2,981 Times in 1,893 Posts

    Toolmaker51's Tools
    jjr2001's Z height check is still a winning design. I finally supplied my self with a proper 6" height gauge that gets under milling heads, but a constant Z is far easier to use. A conventional height gauge, if compact enough, gets into play on castings, where a starting place is not so clear, and then establish other features.
    And we're not quite CNC'ing yet.


    186 More Best Homemade Tools eBook
    Sincerely,
    Toolmaker51
    ...we'll learn more by wandering than searching...

  10. The Following 2 Users Say Thank You to Toolmaker51 For This Useful Post:

    jjr2001 (Jan 2, 2021), lasten (Jan 2, 2021)

Thread Information

Users Browsing this Thread

There are currently 1 users browsing this thread. (0 members and 1 guests)

Tags for this Thread

Bookmarks

Posting Permissions

  • You may not post new threads
  • You may not post replies
  • You may not post attachments
  • You may not edit your posts
  •