Free 186 More Best Homemade Tools eBook:  
Get 2,000+ tool plans, full site access, and more.

User Tag List

Page 7 of 10 FirstFirst 1 2 3 4 5 6 7 8 9 10 LastLast
Results 61 to 70 of 91

Thread: CNC router build from Adept robotic cartesian slides.

  1. #61
    Supporting Member machiningfool's Avatar
    Join Date
    Jul 2015
    Location
    Seffner Florida
    Posts
    265
    Thanks
    0
    Thanked 271 Times in 146 Posts

    machiningfool's Tools
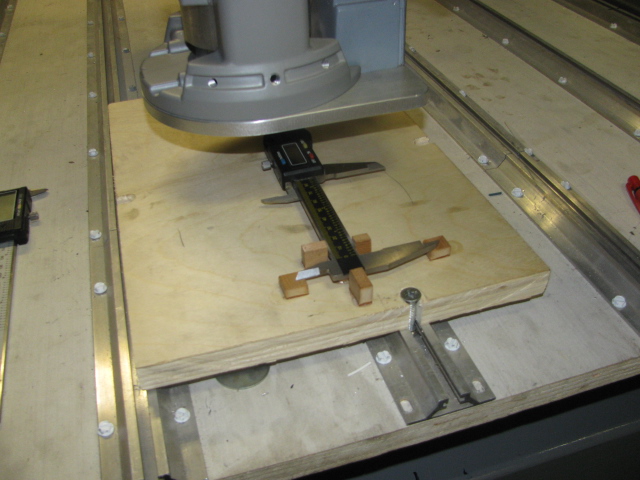
    Thank you again, Paul Jones and PJs for sticking with me in this endeavor. Here is my rendition of how I will scale my servo movement. Here it is as I understand it. I have mounted an 8 inch caliper able to be rotated 90 degrees for the the measurement of X and Y axis'. The Z axis is yet to be configured. Mach3 allows you to make a measured movement with a simple X or Y gcode. Then that movement is measured with my mounted caliper. Then Mach3 asks me how far that I asked it to move and I record that measurement. Then it asks me how far it actually moves, and I record that measurement. Mach3 then records those numbers and scales each axis with the proper movement. Say I tell the x axis to move 1.0 inches, and the machine moves .5.. inches, then the ratio is 2 to one when recorded. That scaling number is stored in memory, so when the axis is told to move the one inch, scaling is enacted and it moves one inch. Much quicker than I could do it with a calculator. Here are some pictures of my setup. I will be using just 5 inches for the gcode movement, because of the setup, that is all the room that I have. I will probably be using mm for the recording, might have better resolution for the moves. Two thousand units with using thousands, because it will also show ,0005, or not, and 2540 units in an inch with mm., since it measures in hundredths of a mm. Is that correct?, or am I dreaming? Either way, that is close enough for the girls I go with. Bob.CNC router build from Adept robotic cartesian slides.-img_2375.jpgCNC router build from Adept robotic cartesian slides.-img_2380.jpgCNC router build from Adept robotic cartesian slides.-img_2382.jpg

    186 More Best Homemade Tools eBook
    Last edited by machiningfool; Nov 9, 2015 at 06:21 PM.

  2. The Following 2 Users Say Thank You to machiningfool For This Useful Post:

    Paul Jones (Nov 9, 2015), PJs (Nov 9, 2015)

  3. #62
    Supporting Member machiningfool's Avatar
    Join Date
    Jul 2015
    Location
    Seffner Florida
    Posts
    265
    Thanks
    0
    Thanked 271 Times in 146 Posts

    machiningfool's Tools
    Sorry this a duplicate post, and cannot find the delete button. Bob.

    2000 Tool Plans
    Last edited by machiningfool; Nov 9, 2015 at 08:59 AM. Reason: Duplicated my post and cannot delete, sorry.

  4. #63
    Supporting Member Paul Jones's Avatar
    Join Date
    May 2014
    Location
    Del Mar, California
    Posts
    1,231
    Thanks
    5,810
    Thanked 1,441 Times in 655 Posts

    Paul Jones's Tools
    Nice calibration setup and yes, 25.5mm/inch is in terms of hundredths of mm equal to 2540 units in an inch.

  5. #64
    Supporting Member machiningfool's Avatar
    Join Date
    Jul 2015
    Location
    Seffner Florida
    Posts
    265
    Thanks
    0
    Thanked 271 Times in 146 Posts

    machiningfool's Tools
    Yes, hooray, I can still do math. Yes, by using the mm. calibration choice in Mach3, will give a slight edge in resolution for the calibration. Thank you. Bob.

  6. #65
    PJs
    PJs is offline
    Supporting Member PJs's Avatar
    Join Date
    Sep 2014
    Location
    Northern CA
    Posts
    1,841
    Thanks
    8,337
    Thanked 1,118 Times in 718 Posts

    PJs's Tools
    Good to hear you have movement. Looks like you got your controllers back? Last I saw they were still out for a checkup & firmware tweak. As for your resolution being better in mm...maybe in longer runs, but would depend on the accuracy of the caliper over its range and what value is used in its internal conversion. The 5tenths some calipers show would represent .0127mm or 12.7 of your units I believe, but I rarely rely on those values to be anything but close enough to a skosh.

    I'm a bit confused.

    First by the setup and what I see in Pic2; it appears you are putting the left edge of the spindle on one end of the caliper then moving some distance and measuring on the right edge of the spindle. Technically you would be measuring the move + the diameter of the spindle. To be accurate I would think you would need to mic the spindle, divide by 2 and subtract that from the measured distance. Unless you are moving the caliper with the spindle and you "zero" the caliper first then move the caliper with the spindle.

    Second, if you haven't tuned your servo's yet then there will be a certain amount of over/undershoot and maybe even some hunting, then a settling time (albeit likely short duration) comparatively. This will also lead to errors in your "Multiplier".

    Third, if you only use one move of 5" (12700units) to determine your "multiplier"and don't verify on smaller or larger increments up to say 7.5" (caliper limitations) and down to say .125" you may be looking at some considerable errors over your full X/Y runs, and definitely repeatability issues. Also have you put some mic standards in your calipers over the range to check its accuracy? Looks to be a Mitutoyo?

    ~PJ
    ‘‘Always do right. This will gratify some people and astonish the rest.’’
    Mark Twain

  7. #66
    Supporting Member machiningfool's Avatar
    Join Date
    Jul 2015
    Location
    Seffner Florida
    Posts
    265
    Thanks
    0
    Thanked 271 Times in 146 Posts

    machiningfool's Tools
    You were correct on your second assumption. I will be just moving the axis, and recording the move, so I won't have to worry about diameter. This procedure is just to get it close, after this procedure, then I will set up a run of thirty five inches with an indicator at the end of the run, and re-scale it. .001 inch off in a run of 35 inches will definitely be close enough for me. As for the hunting, when I tested the servo on the bench, there was absolutely no movement that I could detect, rock solid. It sounds like you have worked in tenths, but If I can get my molds within .001, I will be happy, after all I am working with Bondo and wood. I haven't received my electronic stuff back yet, Sergey has to do some testing, so it will be a couple of weeks before I can do the scaling. Thanks for your suggestions, I appreciate the input.

  8. The Following 2 Users Say Thank You to machiningfool For This Useful Post:

    Paul Jones (Nov 23, 2015), PJs (Nov 10, 2015)

  9. #67
    Supporting Member machiningfool's Avatar
    Join Date
    Jul 2015
    Location
    Seffner Florida
    Posts
    265
    Thanks
    0
    Thanked 271 Times in 146 Posts

    machiningfool's Tools
    Here is an update. Sergey is sending back all of the electronics and everything works as should be. He found that there could have been a bad brk board and the pci board was OK. He hooked everything up with a new PCI board and that board was bad, so when he installed a new board, everything worked as it should. I will get everything back in a couple of days. He is sending a new XML file, what the hell do I do with that? Oh well, I will find out I guess. I have learned how to transfer the XML files between drives, but he will have to tell me how to insert them into the PCI, if that is what he means. I figured out how to place a brake on the Z axis manual adjustment for the router. I installed a 3/8ths inch rod, 8 inches long, and will construct a block with a twist lock handle, so when I tighten it, the load will not be transferred to the gear set in the microscope adjustable base, so that will solve that problem. I will loosen the screw handle, manually adjust the height, and then tighten the screw. Next time I should have the machine up and running. Bob.

  10. The Following 2 Users Say Thank You to machiningfool For This Useful Post:

    Paul Jones (Nov 23, 2015), PJs (Nov 23, 2015)

  11. #68
    Supporting Member machiningfool's Avatar
    Join Date
    Jul 2015
    Location
    Seffner Florida
    Posts
    265
    Thanks
    0
    Thanked 271 Times in 146 Posts

    machiningfool's Tools
    OK, I received the electronics today along with a new xml file. Sergey tested the configuration at his end and everything worked as it should. Servo turned in both dir., limits worked, so I will install everything tomorrow and hopefully will work as it should on my configuration. I also learned how to insert the new xml file and it is now installed. I also finished the z axis brake, and it works good. So, tomorrow night, I should have some good news. Bob.

  12. The Following User Says Thank You to machiningfool For This Useful Post:

    PJs (Nov 26, 2015)

  13. #69
    Supporting Member machiningfool's Avatar
    Join Date
    Jul 2015
    Location
    Seffner Florida
    Posts
    265
    Thanks
    0
    Thanked 271 Times in 146 Posts

    machiningfool's Tools
    Good news, everything works, all servos go plus and minus, all limits work, so I am on my way to some serious tuning of the servos. Thanks for everyones' interest. When I get the servos on the machine working the way they should, I will put one final video on and show the final product, Bob.

  14. The Following 3 Users Say Thank You to machiningfool For This Useful Post:

    Jon (Nov 27, 2015), Paul Jones (Nov 27, 2015), PJs (Nov 27, 2015)

  15. #70
    Supporting Member machiningfool's Avatar
    Join Date
    Jul 2015
    Location
    Seffner Florida
    Posts
    265
    Thanks
    0
    Thanked 271 Times in 146 Posts

    machiningfool's Tools

    CNC router, Adept slides, video of movement.

    To sum up, this cnc router has, Adept slides, Mach3 controller, 3 axis servos, Granite Devices drives, KSilabs Centipede pci card and brk. board. Here is a short video of the quiet movement. I have the jog rate set at 6 percent for calibration purposes, with a 20mm/rpm pitch, you can see that it will go quite fast, but not yet. I still have quite a bit of calibrating and tuning to do, but for the purposes of this post, I think this project is done and I want to thank everyone for their support and interest. Machiningfool, Robert Brown.

  16. The Following 2 Users Say Thank You to machiningfool For This Useful Post:

    Paul Jones (Nov 27, 2015), PJs (Nov 27, 2015)

Thread Information

Users Browsing this Thread

There are currently 1 users browsing this thread. (0 members and 1 guests)

Bookmarks

Posting Permissions

  • You may not post new threads
  • You may not post replies
  • You may not post attachments
  • You may not edit your posts
  •