Free 186 More Best Homemade Tools eBook:  
Get 2,000+ tool plans, full site access, and more.

User Tag List

Page 1 of 2 1 2 LastLast
Results 1 to 10 of 15

Thread: Deburring Tool

  1. #1
    Supporting Member rossbotics's Avatar
    Join Date
    Dec 2013
    Location
    Florida
    Posts
    730
    Thanks
    1,019
    Thanked 1,645 Times in 402 Posts

    rossbotics's Tools

    Deburring Tool

    DeBurring tools are very handy and useful to have, they come in a multitude of shapes and sizes, I have been using for years these disposable units with a B-10 blade, B-10 blades will work in holes, inside radiuses and straight edges which covers about 95% of my deburring, any other deburring gets the old file treatment or a scraper.

    I bought this new deburring tool about three months ago which included a handle (of course) and a B-10 blade, it had a spring loaded quick release mechanism for changing the blade which was great, it worked fine for a while then I noticed a last week the blade was starting to get loose in the handle and working its way out, well come to find out the whole dang thing was made from PLASTIC, I paid over $25.00 for it thinking I was getting a fairly descent tool, this is what intrigued me to make this tool, they just don’t make things like they use to, even name brand tools are made in china anymore.


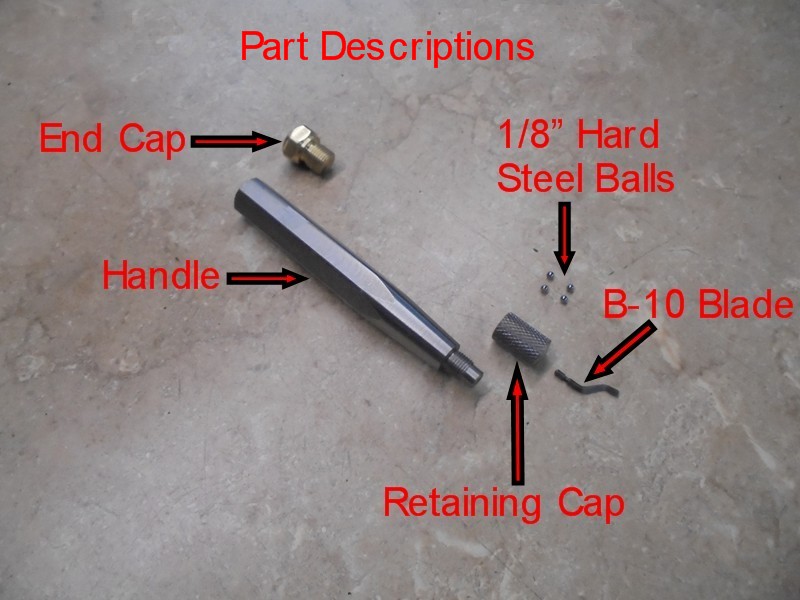
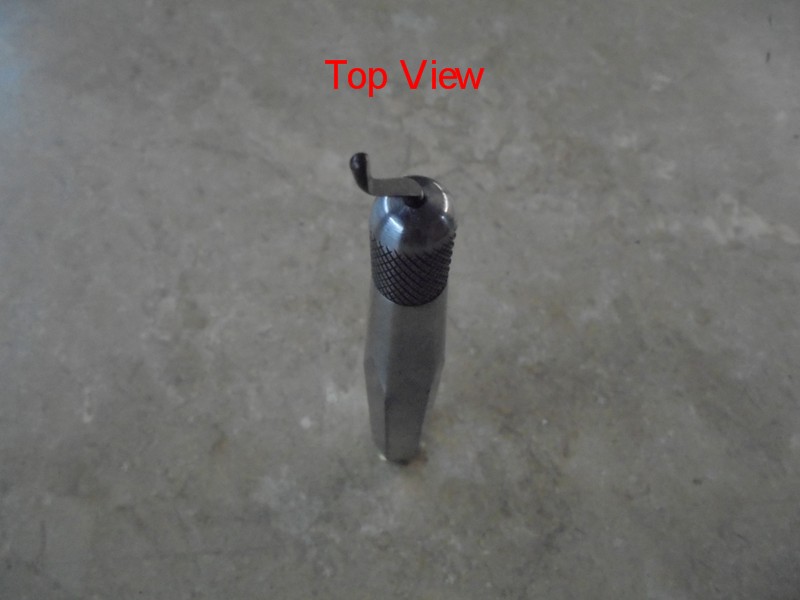
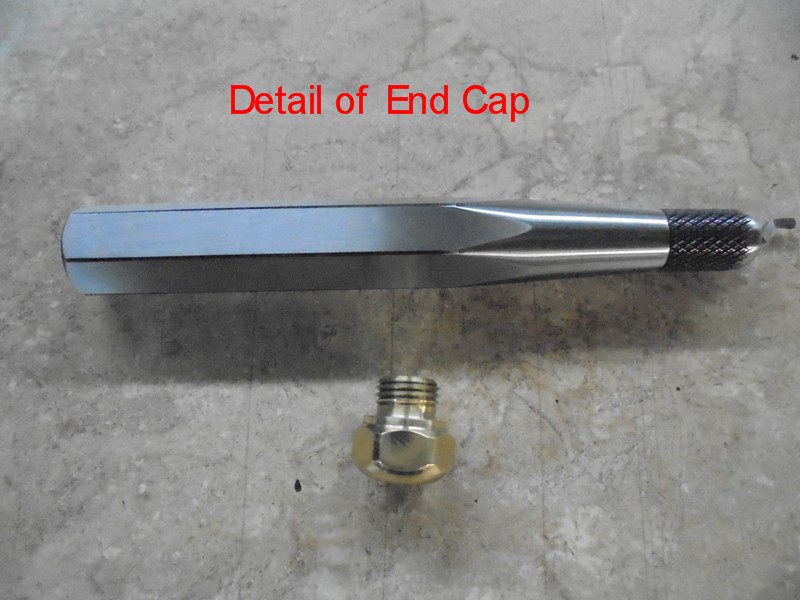
    I wanted to make this tool with some what of a quick release end on it, so I came up with this threaded retaining cap idea which contains four 1/8” hard steel balls, those balls fit into a radius that’s machined onto the B-10 blade, this is what holds the blade from coming out of the handle and allows the blade to rotate freely, all you do is insert the B-10 blade in from the bottom of the retaining cap and drop four 1/8” hard steel balls in from the top of the retainer, (just don’t drop your balls on the floor
    J) the balls locate themselves automatically around the radius of the B-10 blade, inside the retaining cap looks like a ball bearing when assembled, simply screw the retaining cap onto the threaded end of the handle and your done, it swivels nice and smooth and you can’t push it in or pull it out, to change the blade you just reverse the process stated above.


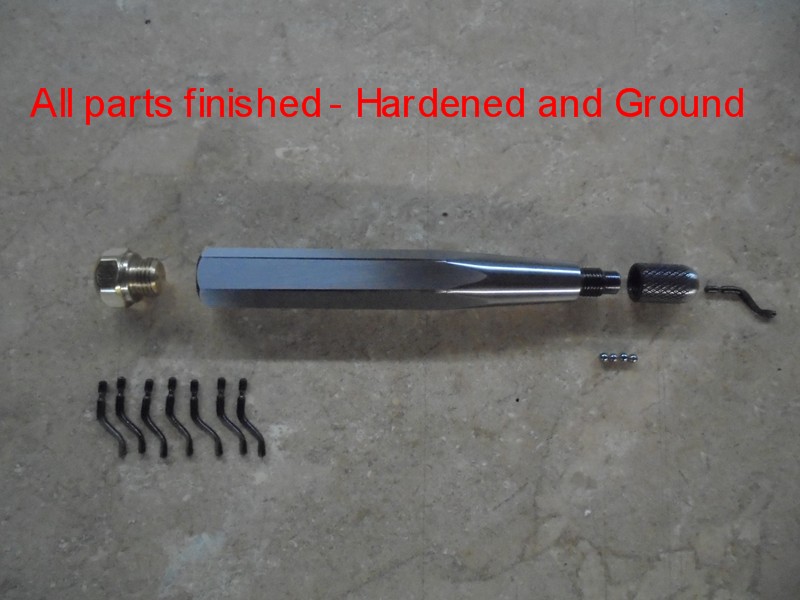
    The tool was constructed from 4140 steel, hardened and tempered, NO PLASTIC, the handle has a hex milled on it for a nice grip, the handle also has been drilled out to 29/64”Dia. X 3 ½” Dp. and taped ½”-20 for a cap, this also relieves weight in the handle and acts as a storage department for holding extra B-10 blades, this tool works as intended and hopefully my problems with a deburring tool is over.


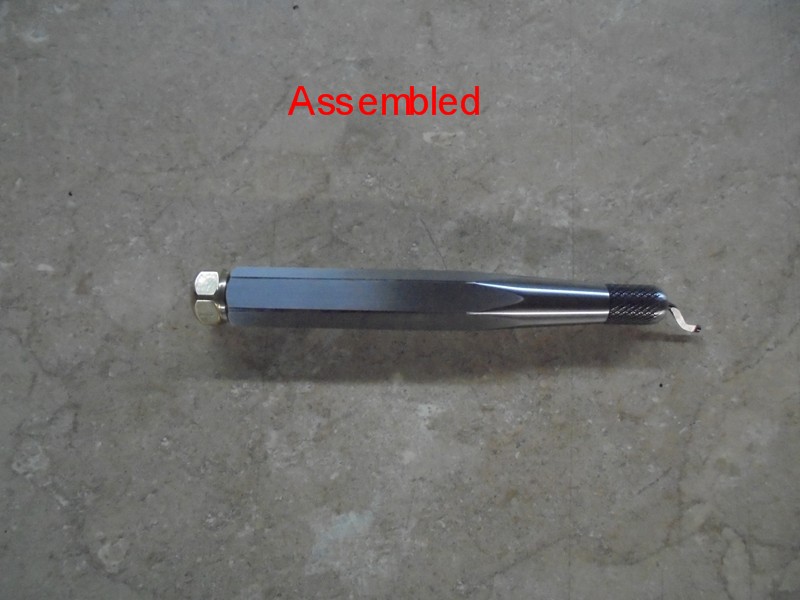
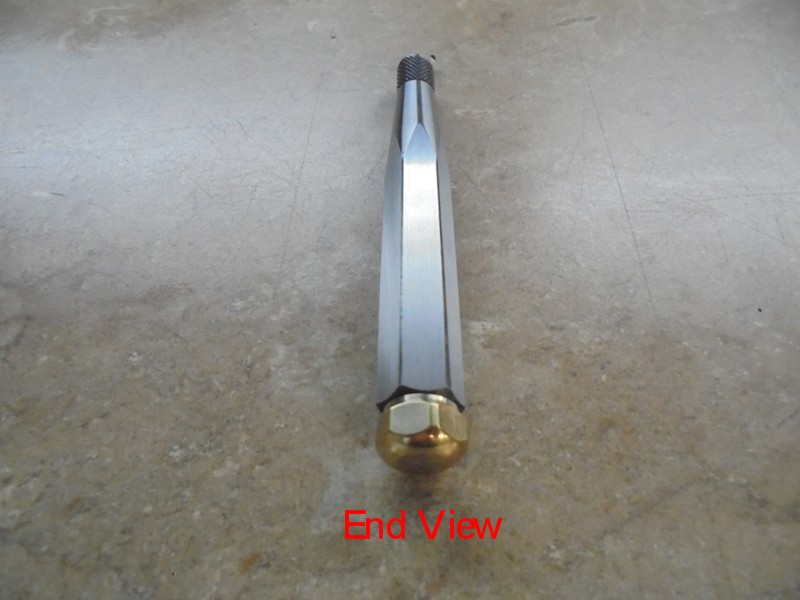
    Below you find some photos of the machined parts and the finished tool


    As always thanks for looking


    And happy machining


    Doug

    Deburring Tool-1.jpg

    Deburring Tool-2.jpg

    Deburring Tool-3.jpg

    Deburring Tool-4.jpg

    Deburring Tool-5.jpg

    Deburring Tool-6.jpg


    186 More Best Homemade Tools eBook
    Last edited by rossbotics; Aug 1, 2017 at 01:08 AM.
    Comments are always welcome
    Doug

    Subscribe to my you tube channel

    https://www.youtube.com/channel/UCDD..._as=subscriber


    Tool Plans for Sale by rossbotics


  2. The Following 8 Users Say Thank You to rossbotics For This Useful Post:

    Jon (Jul 31, 2017), LMMasterMariner (Aug 1, 2017), NickP (Jul 31, 2017), NortonDommi (Jul 31, 2017), olderdan (Aug 1, 2017), Paul Jones (Jul 31, 2017), PJs (Jan 9, 2018), Seedtick (Jul 31, 2017)

  3. #2
    Supporting Member Paul Jones's Avatar
    Join Date
    May 2014
    Location
    Del Mar, California
    Posts
    1,231
    Thanks
    5,810
    Thanked 1,441 Times in 655 Posts

    Paul Jones's Tools
    Doug,

    Very nice design, fits well in the hand and has an easy, quick release blade collet.

    Thanks for posting this and providing the details.

    Paul Jones

    2000 Tool Plans

  4. The Following User Says Thank You to Paul Jones For This Useful Post:

    rossbotics (Aug 1, 2017)

  5. #3
    Supporting Member Frank S's Avatar
    Join Date
    Aug 2015
    Location
    Peacock TX
    Posts
    11,210
    Thanks
    1,982
    Thanked 8,785 Times in 4,206 Posts

    Frank S's Tools
    Now I need to go have a look at mine. haven't used in in a while for some reason I only use it on aluminum or brass and haven't machined any of either in quite a while
    But if I remember correctly mine has an aluminum handle don't remember how the blade is changed but I really like your design.
    Never try to tell me it can't be done
    When I have to paint I use KBS products

  6. The Following User Says Thank You to Frank S For This Useful Post:

    rossbotics (Aug 1, 2017)

  7. #4
    Supporting Member Paul Jones's Avatar
    Join Date
    May 2014
    Location
    Del Mar, California
    Posts
    1,231
    Thanks
    5,810
    Thanked 1,441 Times in 655 Posts

    Paul Jones's Tools
    Frank S,

    I think Doug's design is very sturdy and the quick release head makes it so easy to swap deburring cutters of many different styles. I made a deburring tool from an old Gillette Sensor Excel razor handle ( http://www.homemadetools.net/forum/m...r-handle-18962 ) but I didn't know how to make the quick change head. Doug's design solves this problem and is a significant improvement over the plastic versions. I think Doug has a great design with the four ball bearing quick release head and all metal handle.

    Paul Jones

  8. The Following User Says Thank You to Paul Jones For This Useful Post:

    rossbotics (Aug 1, 2017)

  9. #5
    Supporting Member Frank S's Avatar
    Join Date
    Aug 2015
    Location
    Peacock TX
    Posts
    11,210
    Thanks
    1,982
    Thanked 8,785 Times in 4,206 Posts

    Frank S's Tools
    I like the quick release as well. just never paid much attention to mine since I hardly ever use it
    Never try to tell me it can't be done
    When I have to paint I use KBS products

  10. The Following User Says Thank You to Frank S For This Useful Post:

    Paul Jones (Aug 1, 2017)

  11. #6
    Supporting Member Paul Jones's Avatar
    Join Date
    May 2014
    Location
    Del Mar, California
    Posts
    1,231
    Thanks
    5,810
    Thanked 1,441 Times in 655 Posts

    Paul Jones's Tools
    A couple of years ago my grandson gave me this Noga deburring set as a Christmas gift ( https://www.mscdirect.com/product/details/67294520 ). It came with a decent quick release aluminum handle but I wanted to make a dedicated handle for the Roto-Drive Countersink. The Roto-Drive Countersink is very useful and quickly deburrs the hole edges of drilled holes without having to swap the drill for a countersink. I use this more than the dog-leg deburring cutters.

  12. #7
    Supporting Member olderdan's Avatar
    Join Date
    Jun 2016
    Posts
    782
    Thanks
    1,457
    Thanked 1,538 Times in 466 Posts

    olderdan's Tools
    Nice work Doug, I have a German made VARGUS one that I have used for many years and would not be without it but when it retires I will copy your design.
    I have found that the blades can be sharpened a few times with a diamond file (I know,how mean can you get).

  13. The Following User Says Thank You to olderdan For This Useful Post:

    rossbotics (Aug 1, 2017)

  14. #8
    Supporting Member mklotz's Avatar
    Join Date
    Aug 2015
    Location
    LA, CA, USA
    Posts
    3,437
    Thanks
    357
    Thanked 6,391 Times in 2,118 Posts

    mklotz's Tools
    Very nicely done, Doug. You certainly won't break that one easily.

    I have a number of the Noga style deburring tools and use them frequently on my larger scale projects.

    However, when one gets into the world of miniature engine models and such, that style of tool simply isn't usable; it's just too big for the tiny holes encountered in model work.

    What I use are a different style entirely. Although I purchased mine, I thought it useful to show them here. Many folks will never have encountered the style; moreover, having seen them, making one's own version is certainly a possibility so there's a vague homemade tool connection.

    Each tool consists of a fluted handle with a small disk of carbide attached at either end. In use, a disk of the appropriate size is seated on the hole periphery and the handle is twirled between the fingers while applying slight downward pressure. The sharp edges of the disk quickly and neatly remove burrs around the edge of the hole.


    The tools are Swiss-made and available from Gesswein...

    Precision Deburring Tools
    ---
    Regards, Marv

    Home Shop Freeware
    https://www.myvirtualnetwork.com/mklotz

  15. The Following 4 Users Say Thank You to mklotz For This Useful Post:

    C-Bag (Aug 1, 2017), LMMasterMariner (Aug 1, 2017), Paul Jones (Aug 1, 2017), Seedtick (Aug 2, 2017)

  16. #9
    Supporting Member C-Bag's Avatar
    Join Date
    Aug 2015
    Location
    California, central coast
    Posts
    720
    Thanks
    689
    Thanked 876 Times in 471 Posts

    C-Bag's Tools
    Very interesting, and thanks for the link. We have several antique stores that have different booths inside and one person's focus is tools. Especially machinist tools. Last time I was there I saw one of the special cross drill deburring tools that was in your link and of course had no idea what it was. There might have been one of the small tools like the ones in your pic and I wasn't familiar with it either. Nobody in the store knew what they were so I passed.

    Just out of curiosity, can you do edges with the round deburring tool by wedging it against the handle and the round cutter against the edge to be deburred? Or are they strictly for holes?

  17. #10
    Supporting Member Frank S's Avatar
    Join Date
    Aug 2015
    Location
    Peacock TX
    Posts
    11,210
    Thanks
    1,982
    Thanked 8,785 Times in 4,206 Posts

    Frank S's Tools
    I just has a look at mine. Like I said I've had for for years and it still has the original cutter in it I never noticed until just now how the quick chuck works. It is spring loaded so just push it up and it opens the Brand is General the body is hex aluminum. most of my deburing is done with a 2" diameter cone grinder or a 60° tapered champer bit but a lot of the stuff I do any more doesn't require much precision attention
    Never try to tell me it can't be done
    When I have to paint I use KBS products

Thread Information

Users Browsing this Thread

There are currently 1 users browsing this thread. (0 members and 1 guests)

Bookmarks

Posting Permissions

  • You may not post new threads
  • You may not post replies
  • You may not post attachments
  • You may not edit your posts
  •