Free 186 More Best Homemade Tools eBook:  
Get 2,000+ tool plans, full site access, and more.

User Tag List

Page 1 of 2 1 2 LastLast
Results 1 to 10 of 17

Thread: A Family of Hand Planes

  1. #1
    Supporting Member
    Join Date
    Jul 2015
    Location
    Ireland
    Posts
    125
    Thanks
    1
    Thanked 220 Times in 53 Posts

    Brendon's Tools

    A Family of Hand Planes

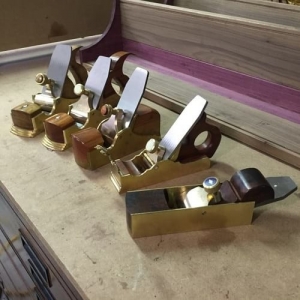
    Here is my family of Shop-built Hand Planes. Each one was hand-crafted by me from brass and exotic hardwoods. That is, scratch-built; no kit was involved.
    Attachment 9173
    From left to right we have a roughing smoother (designed to remove wood quickly), then a fine smoothing plane that gives a quality finish. Next a high-angled polishing smoother, 60 degree pitch (This plane can produce the finest of shavings. A painter/decorator friend of mine observed that he would not be able to get the same finish as this plane can get, with sandpaper). It works a bit like a scraper plane; it's really cool! Next comes an old-style smoothing plane with oak-leaf front, designed for small works (This little plane is a delight to use) and finally a low-angled mitre plane.
    Here is a rear/side view of the set.
    Attachment 9174
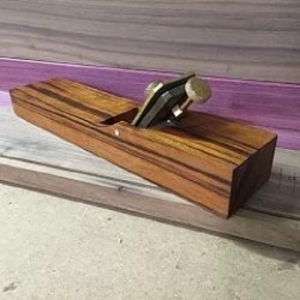
    Most of my planing needs are catered for with this set of planes, except perhaps chamfering. But Look!
    Here is an adjustable Japanese style champhering plane I made a few years ago which covers that problem:
    Attachment 9175 Attachment 9176
    Oddly, this is the only plane in the entire set that has an adjuster; the rest are hammer-adjusted. I moved away from Norris style adjusters a few years ago after reading Ron Brese's theories on adjusters. Now, any plane I make is hammer adjusted. There is a certain skill in hammer adjusting but it is learned quickly, and once mastered the finest adjustments can be made by the deftest touch of the hammer. It's fun to do as well.
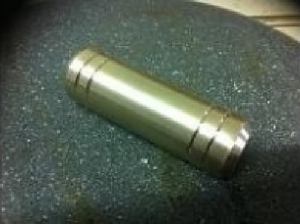
    I use either a small conventional type hammer or my preferred, palm-hammer, which slips easily into my shop-apron pocket and is therefore, always at hand. I find the palm hammer gives me greater control over the hammer tap than a handled hammer. This is the palm hammer:
    Attachment 9177
    It's a ridiculously simple little tool but as we often discover, the simplest solution to a problem is sometimes the best. I hold the palm hammer between by first finger and thumb and either tap the top of the blade to advance the blade, or tap the heel of the plane to retract the blade. Occasionally I might tap the side of the blade to straighten it up. You can set the blade for as fine a cut as you can and then tap the heel repeatedly, to get finer and finer shavings. Its amazing how fine you can actually go. You wouldn't have thought it was possible to do this with a hammer.

    There is real satisfaction and an exquisite pleasure in constructing projects using tools that you have made yourself by your own hand. Words cannot describe that feeling. You have to immerse yourself in it to appreciate it.

    A SHORT VIDEO ON HOW TO ADJUST HAND PLANES SUCH AS MINE
    CAN NOW BE VIEWED ON MY BLOG.
    Click on the link below.

    186 More Best Homemade Tools eBook
    Last edited by Brendon; Mar 21, 2016 at 04:13 PM.
    Visit my blog at www.waneyedgeworkshop.com

  2. The Following 7 Users Say Thank You to Brendon For This Useful Post:

    aphilipmarcou (Feb 26, 2017), CedarSlayer (Mar 22, 2016), jjr2001 (Nov 4, 2016), Jon (Mar 15, 2016), kbalch (Mar 16, 2016), Paul Jones (Mar 16, 2016), PJs (Mar 16, 2016)

  3. #2
    Content Editor
    Supporting Member
    DIYer's Avatar
    Join Date
    Aug 2013
    Posts
    3,056
    Thanks
    772
    Thanked 1,852 Times in 1,653 Posts
    Thanks Pat! We've added your Hand Planes, Chamfering Plane, and Palm Hammer to our Planes and Hammers categories, as well as to your builder page: Brendon's Homemade Tools. Your receipt:


    2000 Tool Plans
    Last edited by Jon; Oct 22, 2021 at 10:06 PM.

  4. #3
    Supporting Member Paul Jones's Avatar
    Join Date
    May 2014
    Location
    Del Mar, California
    Posts
    1,231
    Thanks
    5,810
    Thanked 1,441 Times in 655 Posts

    Paul Jones's Tools
    Brendon,

    You always make all your homemade tools look very beautiful and work precisely. Thank you for your information about hammer-adjusted planes. I could use the chamfering plane because this finishing touch on cabinet work is more difficult than it looks.

    Regards, Paul

  5. The Following User Says Thank You to Paul Jones For This Useful Post:

    jjr2001 (Nov 4, 2016)

  6. #4
    Supporting Member
    Join Date
    Jul 2015
    Location
    Ireland
    Posts
    125
    Thanks
    1
    Thanked 220 Times in 53 Posts

    Brendon's Tools
    Thanks Paul for your comment.
    One thing I have discovered (which drives me on making my own tools) is that the tools I make
    myself are so far ahead and so much better than store-bought tools. It is really worth the time and effort it takes
    to make our own tools.The quality of finish and the ease of use of my tools leaves anything bought in the store
    in the shade.
    In addition, I like to do detail work like chamfers by hand rather than running the work across a router table
    and of course, it is a million times more pleasurable to do it with a tool you've made yourself.
    Thanks again for your comment and good luck with your own projects.
    Brendan
    Visit my blog at www.waneyedgeworkshop.com

  7. The Following 3 Users Say Thank You to Brendon For This Useful Post:

    jjr2001 (Nov 4, 2016), Paul Jones (Mar 16, 2016), PJs (Mar 16, 2016)

  8. #5
    PJs
    PJs is offline
    Supporting Member PJs's Avatar
    Join Date
    Sep 2014
    Location
    Northern CA
    Posts
    1,841
    Thanks
    8,337
    Thanked 1,118 Times in 718 Posts

    PJs's Tools
    Thank you Brendon for sharing your beautiful and functional builds. Love the one with the Maple Leaf!! I totally agree about using something we build ourselves, but do appreciate using old tools some one else has built. You kind of pick up the juice from that and imbue it into the work at hand, IMHO.

    I have a question about planes and you are obviously the one to ask. I have been researching about planes and ALLLLL the different types. Is there a reference you might recommend that explains the types and uses with some detail about angles and grinds/hone? Have you written a book like that? Food for thought...

    I am a complete novice but working on a music box for my G-son. I have a little Shop Fox D3831 1-3/8" which got good reviews. It works pretty good for softer wood but tried some birds eye maple and it was tough going and not so pretty. I did hone the blade after a few test runs and thinking the angle is important for harder wood?

    As Always your work is superb!! Thanks for sharing it! ~PJ
    ‘‘Always do right. This will gratify some people and astonish the rest.’’
    Mark Twain

  9. The Following User Says Thank You to PJs For This Useful Post:

    jjr2001 (Nov 4, 2016)

  10. #6
    Supporting Member
    Join Date
    Jul 2015
    Location
    Ireland
    Posts
    125
    Thanks
    1
    Thanked 220 Times in 53 Posts

    Brendon's Tools
    Hi PJ,
    Yes, I know what you mean about using old tools. It was using antique planes that got me interested in the subject in the first place. I have a fairly extensive collection of antique hand planes and often use one or the other of them.

    Your experience with Birds eye Maple proves my argument in a way and is interesting. It's pretty touch stuff and the average light-weight, store bought plane will struggle with it. There are two main differences between my planes and store-bought ones I think. One is the weight of the tool itself; mine are pretty heavy and bed themselves into the wood. All I have to do is push. The plane does the business itself. The second thing is the quality of the blade; you need a good-quality heavy blade that is dead sharp. Most store bought planes have blades that are fairly light.
    Another point worth mentioning I think, is to go for the lightest shaving you can. It will give you a better finish and be easier work. That's down to setting the depth of cut of course.

    A couple of years ago I had to plane off the ends of a series of maple dowels in a project I was working on. I picked up a store-bought block plane and it didn't touch them. I tried a couple of other planes and they all just hopped off the dowels. Finally, I picked up one of my own and it shaved the dowel heads smooth as if they were hairs. That made me feel good!

    It took me a few years, making and discarding planes before I got them to the point where I wanted them. I started making wooden planes and then progressed to wooden planes with brass soles. Finally I started making brass bodies. It was then that I fully appreciated the difference that the extra weight made. As I said in my post, I also fiddled about with adjusters for a few years. I'm happy with where I have them now.

    In regard to books and references, I would say get onto Amazon. They have quite a few books for sale on the subject of hand planes. You could try The Handplane Book by Gareth Hack, or Hand Planes in the Modern Shop by Kerry Pierce, or The Woodworker's Guide to Handplanes by Scott Wynn, or The Wooden Plane, its History From and Function by John Whelan.

    If you fancy having a go at making one yourself you could start with wooden planes and read Making & Mastering Wood Planes by David Finck.

    When you start delving into the subject of handplanes you will find it intriguing; the history, the hundreds of different planes there were for different purposes and the differences between handplanes from different cultures (especially the Japanese handplanes)>.
    You could be at the beginning of a journey my friend; prepare to become addicted.
    Thanks for your interest and good luck.
    Brendon
    Last edited by Brendon; Mar 16, 2016 at 12:59 PM.
    Visit my blog at www.waneyedgeworkshop.com

  11. The Following 5 Users Say Thank You to Brendon For This Useful Post:

    jjr2001 (Nov 4, 2016), kbalch (Mar 16, 2016), Paul Jones (Mar 16, 2016), PJs (Mar 16, 2016), Toolmaker51 (Nov 6, 2016)

  12. #7
    PJs
    PJs is offline
    Supporting Member PJs's Avatar
    Join Date
    Sep 2014
    Location
    Northern CA
    Posts
    1,841
    Thanks
    8,337
    Thanked 1,118 Times in 718 Posts

    PJs's Tools
    Thank you for all the great info Brendon. You are a wealth of knowledge and skill and much appreciate the encouragement! I get what you say about the weight of them as this little one is pretty light and a bit hard to hold with my big mits, but for small light stuff it will do for now.

    I will follow up on your recommendations as I do love the history of tools and the iterations to the present. Not all improvements are that but present certain conveniences at some level. Simple & Elegant is my rule for design and forgot to mention your palm hammer as a perfect example. Maybe it's why I am drawn to the Japanese style of tools in all forms. Someone posted a video a while back from a plane contest in Japan with draw planes...blew me a way with the paper thin (translucent) curls. Must be similar in some ways to your Hi-Angle planer except a push type. The angle stuff is the other mystery to me as it seems there should be a correct angle for every type of cut. Not just the angle of the blade but the angle of grind as well...like lathe tools.

    Thanks again...On my journey now...thanks to you! ~PJ
    ‘‘Always do right. This will gratify some people and astonish the rest.’’
    Mark Twain

  13. The Following User Says Thank You to PJs For This Useful Post:

    jjr2001 (Nov 4, 2016)

  14. #8
    Supporting Member
    Join Date
    Jul 2015
    Location
    Ireland
    Posts
    125
    Thanks
    1
    Thanked 220 Times in 53 Posts

    Brendon's Tools
    Yes, PJ,
    I have seen the Japanese competitions; they are amazing.
    You will become familiar with the various angles, bed angles, clearance angles, angles of attack etc.
    I hope you enjoy your journey.
    Best Wishes
    Brendon
    Visit my blog at www.waneyedgeworkshop.com

  15. The Following 3 Users Say Thank You to Brendon For This Useful Post:

    jjr2001 (Nov 4, 2016), Paul Jones (Mar 16, 2016), PJs (Mar 16, 2016)

  16. #9
    Supporting Member Christophe Mineau's Avatar
    Join Date
    Jul 2014
    Location
    France, Brittany !
    Posts
    913
    Thanks
    826
    Thanked 1,691 Times in 481 Posts

    Christophe Mineau's Tools
    Hi Brendon, PJs, Paul, and others,
    What a great post !
    I completely share what says Paul and PJs above and your conversation is so instructive !
    I think I will try to find one of that books also.
    Brendon, by the way, to come back to your palm hammer, could you explain a little bit more how you proceed, how you handle the plane, the palm hammer, where you tap ? A little video with that would be great !
    Thanks a lot, your work is always a delight to watch .
    Christophe
    Cheers !
    Christophe
    ________________________________________________________________
    Visit my Website : http://www.labellenote.fr/
    Facebook : La Belle Note
    All my personal works, unless explicitly specified, are released under
    Creative Commons BY-NC-SA license.

  17. The Following 3 Users Say Thank You to Christophe Mineau For This Useful Post:

    jjr2001 (Nov 4, 2016), Paul Jones (Mar 17, 2016), PJs (Mar 19, 2016)

  18. #10
    Supporting Member
    Join Date
    Jul 2015
    Location
    Ireland
    Posts
    125
    Thanks
    1
    Thanked 220 Times in 53 Posts

    Brendon's Tools
    Hi Christophe,
    Good to hear from you. Thanks for feedback.
    OK, how to adjust a hand plane. Let's say you are putting the blade back in after sharpening.
    I usually proceed as follows:
    Place the plane down on a dead flat surface (I like to use a sheet of glass but a clean melamine surface will work too).
    Slide the blade down along the bed gently until the tip of the blade makes contact with the glass surface.
    (With many planes you will be doing this with the blade bevel down; with low angle mitre planes it is usually bevel up).
    Be gentle, you do not want to damage the newly sharpened point of the blade. Keep the blade as straight as possible in the plane. In other words, don't let it lean over to the left or right. Once you feel the blade touching the glass, tighten the lever cap knob to snug, do not overtighten but tighten it enough that the blade isn't going to slip when you begin to use the plane. With practice you will get to know how tight this should be.
    Because you have set it up on a dead flat surface the blade should be sitting straight in the plane.
    Gently try to take a test cut on a piece of wood held in a vice.
    You may be lucky and plane may cut nicely first time. If that has happened, Well Done!
    If the plane does not cut at all, gently tap the top end of the blade (very gently does it, you are not driving a nail!).
    This will push the blade a little further down the bed.
    Try another test cut. You may have to do this a couple of times to get the plane to cut.
    If, on the other hand, the plane is cutting too deeply, tap the rear end of the sole of the plane. The little shock wave that this sends through the body of the plane will retract the blade ever so slightly. Make sure the lever cap knob is tight and take another test cut.
    This cut should be lighter than the last one. Keep repeating this exercise until the shaving is a light as you want it to be.
    If the plane is cutting deeper on one side than the other, you can gently tap the upper side of the blade to coax it over a bit until the plane cuts evenly across its width.
    All this sounds like a lot of work but after just a little practice you will set your plane in a matter of moments.

    As regards the hammer, you can use any small hammer. I just like my palm hammer because it gets me closer to the blade, if you know what I mean. I usually hold it a bit like holding a pen, between the first finger and the thumb and tap with the forward end of the hammer. I find the palm hammer is more accurate (for me anyway) at gauging the force of the tap. In my mind I don't have to compensate for the extra force created by the leverage of the long handle on most hammers.

    I hope this was helpful Christophe.
    If I get a chance I'll try and do a short video.
    Last edited by Brendon; Mar 17, 2016 at 04:50 PM.
    Visit my blog at www.waneyedgeworkshop.com

  19. The Following 5 Users Say Thank You to Brendon For This Useful Post:

    Christophe Mineau (Mar 19, 2016), jjr2001 (Nov 4, 2016), Paul Jones (Mar 17, 2016), PJs (Mar 19, 2016), Toolmaker51 (Nov 6, 2016)

Thread Information

Users Browsing this Thread

There are currently 1 users browsing this thread. (0 members and 1 guests)

Bookmarks

Posting Permissions

  • You may not post new threads
  • You may not post replies
  • You may not post attachments
  • You may not edit your posts
  •