Free 186 More Best Homemade Tools eBook:  
Get 2,000+ tool plans, full site access, and more.

User Tag List

Page 1 of 2 1 2 LastLast
Results 1 to 10 of 12

Thread: HFT Belt Sander Handle fix

  1. #1
    PJs
    PJs is offline
    Supporting Member PJs's Avatar
    Join Date
    Sep 2014
    Location
    Northern CA
    Posts
    1,841
    Thanks
    8,337
    Thanked 1,118 Times in 718 Posts

    PJs's Tools

    HFT Belt Sander Handle fix

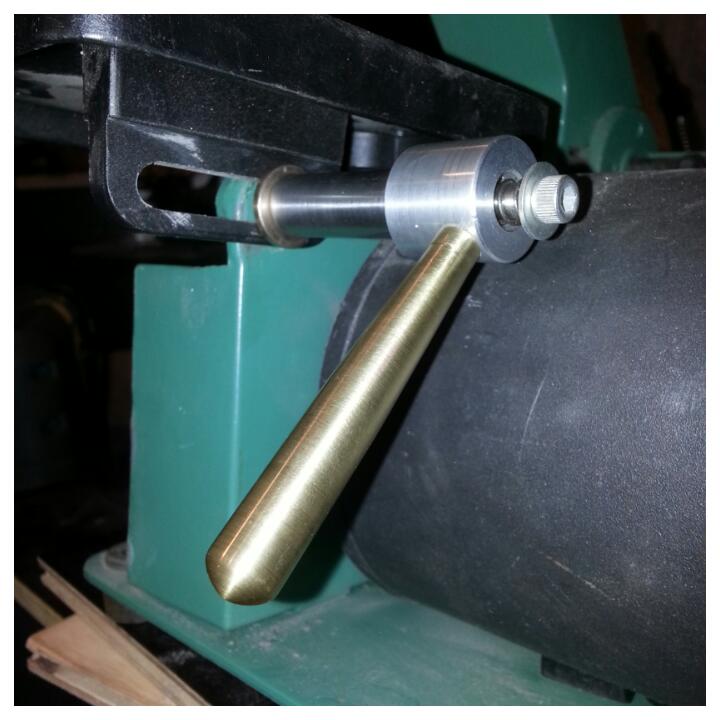
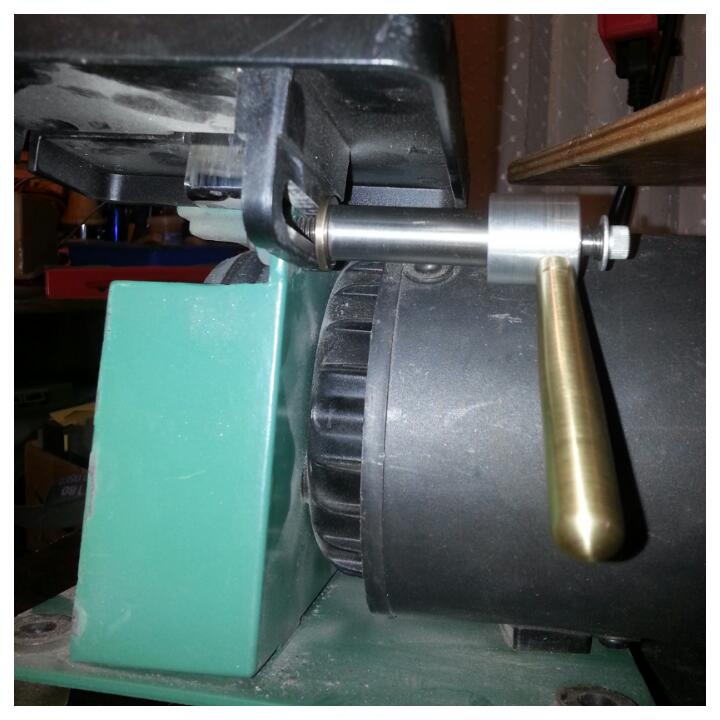
    I picked up one of the Harbor Freight belt sanders (60543) a couple of years ago for $29 with a coupon. It's been ok and have done some other mods to the wheels by crowning them a bit better and truing them up on the mini. I use it quite a bit and have a good selection and various types of belts for it now from 60G to a leather strop. But the handle for the table tilt has been a pain since the beginning. The screw for the quick release spring tension adjust was bungied from the beginning and it never locked the table very well. I must have broken the (1-800-bad plastic) handle 4 or 5 times. Kept gluing it with Loctite gel ca glue but finally it exploded beyond repair.

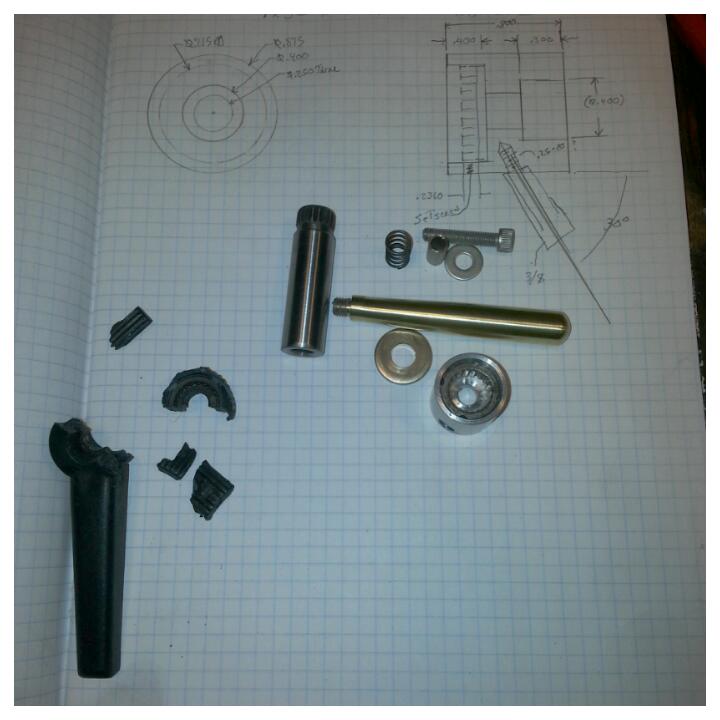
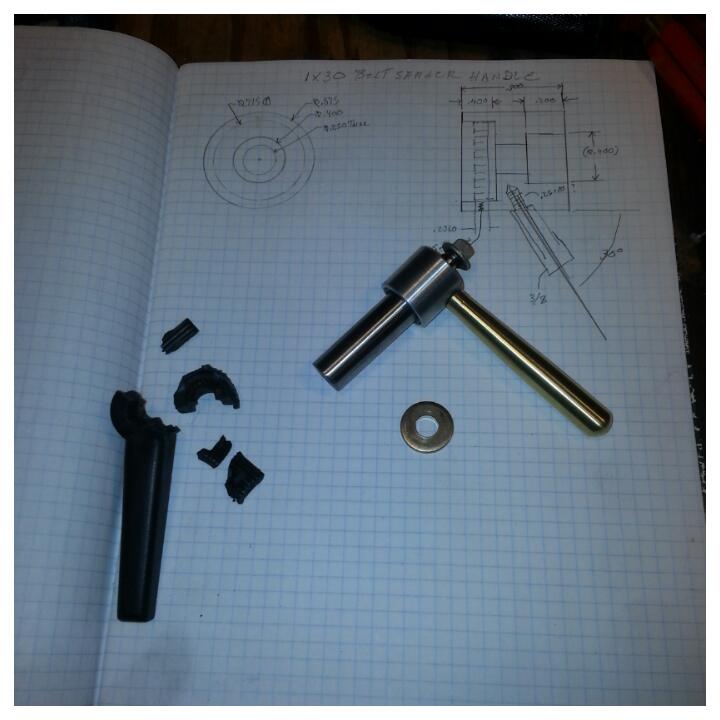
    I mic'd what was left from the exploded handle and sketch out the number. The housing is a piece of 1" AL RB turned down to .875 then bore through .25 and counter bored on both ends to the numbers on my sketch book (zoom in). The critical one was the .715 for the splined collet I salvaged from the broken handle. Because it wasn't very round I bored it until I could just slip in the collet and never did mic the final dim...but it was a nice fit. Turned out it had 4 dimples in it so I could use as 4-40 set screw to lock it in place (can't see it in the pics but its opposite the handle and just eyeballed the location).

    I really wanted the handle to come off at 30º but alas with a HFT Drill press it was not possible even with a center drill, so I punted and put it at a much shallower angle (?) that I could drill at. Tapped it 1/4-28 mainly because I only had about 3-4 threads of engagement at 28TPI. (The handle can't penetrate into the spring area because it will interfere with the spring release action.)

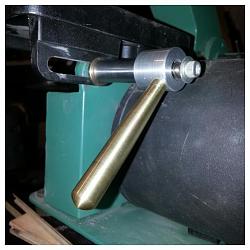
    Next I started the handle with a small piece of that old ground rod I got years ago (Got a Lot of Mileage from that so far). Turned down for the threaded end and used a die to thread it. Then put the taper (~3º included) on it and used a graver to create the round end. I ended up having to trim some of the threads off so it wouldn't interfere with the spring....better long than short!

    The final operations were re-taping the end of the main splined shaft 10-32. Think it was 4mm before (too bungied to tell) but got some nice clean threads. Then used a piece of ~.50L X 1/4" stainless tubing from the bin for a sleeve instead of making an whole new shoulder screw. The ID of the tubing needed a bit of a hair cut to slip fit the SS 10-32 SHCS I had in the bin. I ended up chucking up the splined shaft in the mini and removed all the blacking (Hides Beer can material) and refacing the end that contacts the table slot. The brass washer was a left over in my washer bin from my Green Machine fix for my Brother. Also put a bit of 242 Loctite on the handle threads to hold it from coming out.

    It came out well in the end, only took a few hours. Now with just a 10-15º movement of the handle it locks the table strong with a smooth and quick action. Boom Done...one more project off the list and another silk purse on a sow's ear.

    HFT Belt Sander Handle fix-2016-11-20_19.18.03.jpg HFT Belt Sander Handle fix-2016-11-20_19.18.37.jpg
    HFT Belt Sander Handle fix-2016-11-20_19.19.12.jpg HFT Belt Sander Handle fix-2016-11-21_09.02.49.jpg

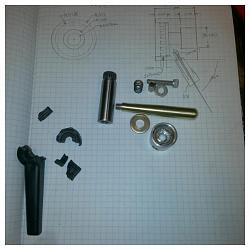
    This was all done on the fly and you can zoom in to see some of the numbers in my sketch (chicken scratches). Hope this helps others with these kinds of problems with cheap and cheerful priced tools that we can make better with scraps and some fun tinkering. ~PJ

    186 More Best Homemade Tools eBook
    Last edited by PJs; Nov 21, 2016 at 01:42 PM.
    ‘‘Always do right. This will gratify some people and astonish the rest.’’
    Mark Twain

  2. The Following 9 Users Say Thank You to PJs For This Useful Post:

    C-Bag (Dec 1, 2016), j.bickley (Jan 7, 2018), jjr2001 (Dec 2, 2016), mattthemuppet (Dec 1, 2016), Paul Jones (Dec 1, 2016), Sleykin (Dec 23, 2023), Tonyg (Sep 11, 2019), Toolmaker51 (Dec 1, 2016), Tuomas (Dec 8, 2016)

  3. #2
    Content Editor
    Supporting Member
    DIYer's Avatar
    Join Date
    Aug 2013
    Posts
    3,056
    Thanks
    772
    Thanked 1,852 Times in 1,653 Posts

    Thanks PJs! We've added your Belt Sander Handle to our Metalworking category,
    as well as to your builder page: PJs's Homemade Tools. Your receipt:


    2000 Tool Plans
    Last edited by Jon; Oct 27, 2021 at 09:29 PM.

  4. The Following User Says Thank You to DIYer For This Useful Post:

    jjr2001 (Dec 2, 2016)

  5. #3
    Supporting Member Paul Jones's Avatar
    Join Date
    May 2014
    Location
    Del Mar, California
    Posts
    1,231
    Thanks
    5,810
    Thanked 1,441 Times in 655 Posts

    Paul Jones's Tools
    PJs,

    Looks good and will last forever.

    By the way, I always date, initial and location on the pages in my plan sketch notebook. Over the years, I have found it fun and useful to go back and see what I was working on, and sometimes finding something that was not yet built, or finally needed. It also makes it easier to find an old drawing when you can remember the year and perhaps at least the season for your search criteria. I only do my sketches or plan drawing on the page to the right, and use the left hand side for my notes and calculations.

    Regards,
    Paul

    Paul

  6. The Following 4 Users Say Thank You to Paul Jones For This Useful Post:

    jjr2001 (Dec 2, 2016), PJs (Dec 1, 2016), Tonyg (Sep 11, 2019), Toolmaker51 (Dec 1, 2016)

  7. #4
    PJs
    PJs is offline
    Supporting Member PJs's Avatar
    Join Date
    Sep 2014
    Location
    Northern CA
    Posts
    1,841
    Thanks
    8,337
    Thanked 1,118 Times in 718 Posts

    PJs's Tools
    Thanks Paul. Probably will out last the sander but can use it on the new one after another 100k miles.

    I usually date my stuff too but sometimes when I'm on the fly I forget. This was only a couple of hours git to go and didn't really look back until I decided to post it. I glance back at mine sometimes when I'm trying to remember how I did something and not reinvent the wheel. I generally draw and write on the right also and like you the left for notes/calcs or other small parts that go with the assembly design. Another thing I do is update it with whatever changes I make on the fly or even final numbers so I can create a Cad drawing later for some stuff if I want one...much better than my chicken scratchin's.

    ~PJ
    ‘‘Always do right. This will gratify some people and astonish the rest.’’
    Mark Twain

  8. The Following 2 Users Say Thank You to PJs For This Useful Post:

    jjr2001 (Dec 2, 2016), Paul Jones (Dec 2, 2016)

  9. #5
    Supporting Member Toolmaker51's Avatar
    Join Date
    Feb 2016
    Location
    Midwest USA
    Posts
    5,331
    Thanks
    7,042
    Thanked 2,981 Times in 1,893 Posts

    Toolmaker51's Tools
    Paul Jones and PJs alone may have more HFT documentation on mods and such than HFT generates themselves!
    And to PJs, a center drill is ill-suited to starting at angles past 10 or so.
    Get a couple 2 or 4 flute small diameter ball end-mills of the center cutting single end variety. They cut on the entire periphery of the ball from 0 to 90 degrees, where any drill deflects if web fails to engage while the lands create a circular cut. Use the feed stop to control depth a .010-.020 at a time. The hemisphere will then accept center drill correctly.
    Sincerely,
    Toolmaker51
    ...we'll learn more by wandering than searching...

  10. The Following 6 Users Say Thank You to Toolmaker51 For This Useful Post:

    C-Bag (Dec 2, 2016), jjr2001 (Dec 2, 2016), Paul Jones (Dec 2, 2016), PJs (Dec 2, 2016), Sleykin (Dec 23, 2023), Tonyg (Sep 11, 2019)

  11. #6
    Supporting Member jjr2001's Avatar
    Join Date
    Jun 2016
    Posts
    915
    Thanks
    1,182
    Thanked 2,045 Times in 553 Posts

    jjr2001's Tools
    Nice replacement handle for that plastic one that came with the sander. I like the note book idea too. I usually just use a piece of paper and then just toss it in the can when the project is complete. Note book would be so much better..
    TM51...Thanks for the tip on the CC Ball EM for large angle drilling. I am writing it down in my portable memory bank!

    Cheers, JR

  12. The Following 3 Users Say Thank You to jjr2001 For This Useful Post:

    Paul Jones (Dec 2, 2016), PJs (Dec 2, 2016), Toolmaker51 (Dec 2, 2016)

  13. #7
    PJs
    PJs is offline
    Supporting Member PJs's Avatar
    Join Date
    Sep 2014
    Location
    Northern CA
    Posts
    1,841
    Thanks
    8,337
    Thanked 1,118 Times in 718 Posts

    PJs's Tools
    And to PJs, a center drill is ill-suited to starting at angles past 10 or so.
    Get a couple 2 or 4 flute small diameter ball end-mills of the center cutting single end variety. They cut on the entire periphery of the ball from 0 to 90 degrees, where any drill deflects if web fails to engage while the lands create a circular cut. Use the feed stop to control depth a .010-.020 at a time. The hemisphere will then accept center drill correctly.
    Great tip TM, on the ball end mill for starting an angled hole! Thank you very much, logged in! Don't have a set at this point but been on my want list. LMS has a 4 flute small set for a good price for what I do. The other issue is the HFT DP. Mine has a place where the spindle jumps at certain positions but haven't bothered to tear the spindle down. When I get my restoration finished on the 49'-50' King Seeley it will be Much better and more robust.

    Nice replacement handle for that plastic one that came with the sander. I like the note book idea too. I usually just use a piece of paper and then just toss it in the can when the project is complete. Note book would be so much better..
    Thanks JR! I don't use mine as much as I used to for the "on the fly" stuff, but they are real handy for flushing out an idea and something to work from. I've got a good sized box of them like Paul, back to the dark ages and keep several types from science to wood working. I prefer the grid type but the .1 grids are getting harder to find. Another good one I've used a lot and maybe more to your liking is Grid Pads like these. Usually the big box like Staples or Office Max has them. They are "A" size (8.5x11) and punched 3-ring if you decide to keep it you can put them in binders.

    Thanks Very Much to All! ~PJ
    ‘‘Always do right. This will gratify some people and astonish the rest.’’
    Mark Twain

  14. The Following 2 Users Say Thank You to PJs For This Useful Post:

    Paul Jones (Dec 2, 2016), Toolmaker51 (Dec 2, 2016)

  15. #8
    Supporting Member jjr2001's Avatar
    Join Date
    Jun 2016
    Posts
    915
    Thanks
    1,182
    Thanked 2,045 Times in 553 Posts

    jjr2001's Tools
    I remember using .1 grid in school and still have some of that left from the way back time. I did find this:
    https://www.amazon.com/gp/huc/view.h...VFCMC96WHO%2C1 and it is .1 inch but only on the back side. Might be useful.

    Cheers,JR

  16. The Following 2 Users Say Thank You to jjr2001 For This Useful Post:

    PJs (Dec 3, 2016), Toolmaker51 (Dec 2, 2016)

  17. #9
    Supporting Member Paul Jones's Avatar
    Join Date
    May 2014
    Location
    Del Mar, California
    Posts
    1,231
    Thanks
    5,810
    Thanked 1,441 Times in 655 Posts

    Paul Jones's Tools
    Thanks TM51 on the ball-end mills and sorry PJs about hijacking your posting but shop notebooks are important. Thanks for reminding us about updating changes made on the fly (I try to avoid these becasue they don't always work out as expected) and noting the as built dimensions. Also converting the all the decimal drill hole sizes to the equivalent numbered, letter or fractional drill to be used.

    I use a spiral notebook with a light green 0.2" grid. The spiral binding allows the notebook to lay flat and especially useful for making copies of the pages for use in the shop. The notebook is also in the shop for notes but handling the copies keeps the oily fingers from staining the pages - pencils don't work on oily pages. I found a Pentel 0.7 mm drafting pencil and stainless steel erasing shields for correcting work best for me. I like the medium 0.7 mm thickness pencil leads over the super thin 0.5 mm and 0.3 mm leads.

    I used to work with field geologists and field geophysicists who used bound notebooks for note taking and they always used pencils and not ball point pens. They said the notebooks sometimes get wet in heavy rains and the ink would run but not if they used pencils. The same would be true in shops with coolants.

    Regards, Paul
    Last edited by Paul Jones; Dec 6, 2016 at 12:14 PM.

  18. The Following 2 Users Say Thank You to Paul Jones For This Useful Post:

    PJs (Dec 3, 2016), Toolmaker51 (Dec 2, 2016)

  19. #10
    PJs
    PJs is offline
    Supporting Member PJs's Avatar
    Join Date
    Sep 2014
    Location
    Northern CA
    Posts
    1,841
    Thanks
    8,337
    Thanked 1,118 Times in 718 Posts

    PJs's Tools
    Thanks JR for the link but it appeared to take it to a checkout.

    No Hijack here Paul. Good discussion and techniques following a build a build or mod, most always brings things forward we could all use. Personally I find the spirals nice for the reasons stated but storing is not as convenient to me. When I was in corporate I used to go through one every month or two as I'm sure you did. I generally do add drill numbers/sizes and such to the sketch because I keep a pocket Starrett chart in my shop coat pocket, always handy.

    Agreed about Pencil mainly for the old drafting rule: "Never draw more in the morning than you can erase in the afternoon." I still have a ton of drafting templates and supplies but never thought to keep a eraser shield in the book...might make a good book mark too. I've been stuck on .5mm for ever and then some but find using HB lead works for solid lines and don't break it to often. The old mechanical pencils are still my favorite and keep one in my cup on the bench, but no one ever invented an eraser for the top because of the push button.

    Thanks for all the good discussion and tips guys! ~PJ
    ‘‘Always do right. This will gratify some people and astonish the rest.’’
    Mark Twain

  20. The Following 2 Users Say Thank You to PJs For This Useful Post:

    Paul Jones (Dec 3, 2016), Tonyg (Sep 11, 2019)

Thread Information

Users Browsing this Thread

There are currently 1 users browsing this thread. (0 members and 1 guests)

Tags for this Thread

Bookmarks

Posting Permissions

  • You may not post new threads
  • You may not post replies
  • You may not post attachments
  • You may not edit your posts
  •