Free 186 More Best Homemade Tools eBook:  
Get 2,000+ tool plans, full site access, and more.

User Tag List

Page 2 of 3 FirstFirst 1 2 3 LastLast
Results 11 to 20 of 27

Thread: Homemade scissor style hood hinges

  1. #11
    Supporting Member astroracer's Avatar
    Join Date
    May 2012
    Location
    Byron, Michigan
    Posts
    311
    Thanks
    20
    Thanked 569 Times in 174 Posts

    astroracer's Tools
    Quote Originally Posted by Frank S View Post
    Astroracer did you experience any wind flutter getting under the hood trying to lift the leading edge I have seen some factory hinges that would do this without some catch lock under the hood to keep it down
    Hey Frank,
    I have not used these yet. The van is still a long way off from road trials. I will be using a set of Aero latches at the back of the hood though so I will expect zero flutter. During installation I will probably be working in a set of gas cylinders to hold the hood open. I am thinking those MAY help to stabilize the hood when it is shut also but, with the hard latches at the rear, I doubt they will do much.
    I didn't get to the sketches this weekend (obviously) utilizing the good weather to get a mower deck sand blasted and primed. I will get to them this week though, promise!
    Mark

    186 More Best Homemade Tools eBook

  2. #12
    Supporting Member Frank S's Avatar
    Join Date
    Aug 2015
    Location
    Peacock TX
    Posts
    11,212
    Thanks
    1,983
    Thanked 8,786 Times in 4,206 Posts

    Frank S's Tools
    The reason I asked was because I've been there albeit a long time ago, which is probably the reason why most manufactures of front hinged hood vehicles add in a safety system that holds the hood down taking any strain off of the hinge system. even the tightest hinge points have some movement from hysteresis (slack or flex in the joints) It is a fairly straight forward fix if needed just a loop or possibly 2 mounted to the hood that slides under a hook as the hood closes can possibly even be incorporated into the hinge itself at the mounting plate on the hood.
    The last thing you want is to allow high pressure wind to lift the front of the hood @ 100 MPH because even the strongest hinges rely on their mounting points
    A side note though I do like the system design you have come up with not sure about using bolts as pivots though I might have used rivets. at the very least they should be shouldered bolts so no threads are involved in part of the pivoting.

    2000 Tool Plans
    Never try to tell me it can't be done
    When I have to paint I use KBS products

  3. #13
    Supporting Member astroracer's Avatar
    Join Date
    May 2012
    Location
    Byron, Michigan
    Posts
    311
    Thanks
    20
    Thanked 569 Times in 174 Posts

    astroracer's Tools
    Quote Originally Posted by Frank S View Post
    The reason I asked was because I've been there albeit a long time ago, which is probably the reason why most manufactures of front hinged hood vehicles add in a safety system that holds the hood down taking any strain off of the hinge system. even the tightest hinge points have some movement from hysteresis (slack or flex in the joints) It is a fairly straight forward fix if needed just a loop or possibly 2 mounted to the hood that slides under a hook as the hood closes can possibly even be incorporated into the hinge itself at the mounting plate on the hood.
    The last thing you want is to allow high pressure wind to lift the front of the hood @ 100 MPH because even the strongest hinges rely on their mounting points
    A side note though I do like the system design you have come up with not sure about using bolts as pivots though I might have used rivets. at the very least they should be shouldered bolts so no threads are involved in part of the pivoting.
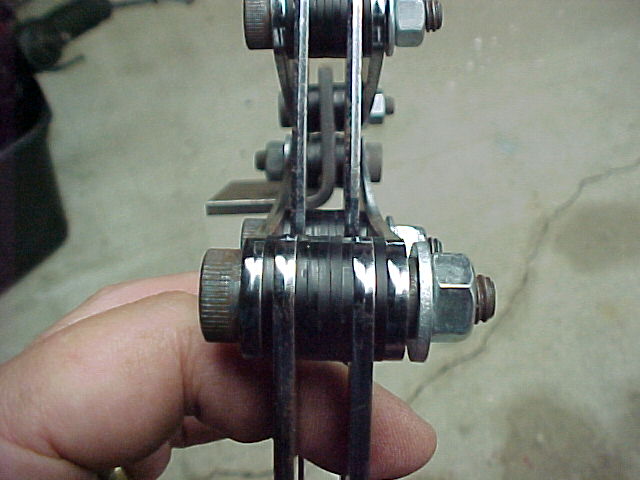
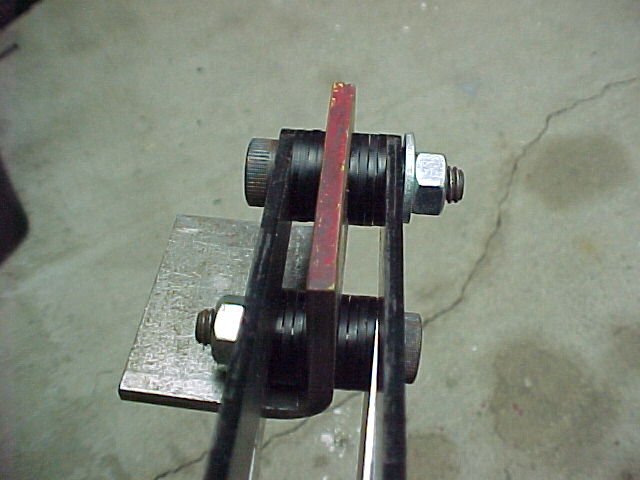
    The way the hinges close, if you look at the pics, they lock together when in the down position. The hood would have to pivot backwards to open the hinges from the front. It cannot do that with the double pivot design and it will not do that with gas cylinders and the latches on the back edge.
    The plan is to use shoulder bolts when the hinges get assembled for the final time. The bolts you see in the pics are simply for mock-up and proof of concept. They were never intended to be the final product. I designed the hinges around 3/8th's dia. shoulder bolts. There will also be nylon washers between each "arm" to eliminate rubbing. The stack height of the arms over the washers and the shoulder bolts leaves enough space to let the arms move freely in their assembly.
    I will get some better pics so you can see how I was thinking when I designed these.
    Mark
    Last edited by astroracer; Dec 5, 2017 at 10:23 AM.

  4. #14
    Supporting Member Frank S's Avatar
    Join Date
    Aug 2015
    Location
    Peacock TX
    Posts
    11,212
    Thanks
    1,983
    Thanked 8,786 Times in 4,206 Posts

    Frank S's Tools
    I wasn't trying to be critical just pointing out some personal observations. Glad to here that shoulder bolts and nylon washers were the main consideration in design, others who see these designs then try to make them on their own may not understand their importance. A lot of things that I make I press in hardened bushings or sometimes use bronze flange bushings to isolate and reduce pivotal slack
    Never try to tell me it can't be done
    When I have to paint I use KBS products

  5. #15
    Supporting Member astroracer's Avatar
    Join Date
    May 2012
    Location
    Byron, Michigan
    Posts
    311
    Thanks
    20
    Thanked 569 Times in 174 Posts

    astroracer's Tools
    Nope, no "criticalness" taken. I know it really helps when you understand the full design and that wasn't documented here. I don't think these hinges will need bushings, they aren't going to be used that extensively. I do know I want them to be a bit loose so they don't bind or fight one another while opening.
    Mark

  6. #16
    Supporting Member Frank S's Avatar
    Join Date
    Aug 2015
    Location
    Peacock TX
    Posts
    11,212
    Thanks
    1,983
    Thanked 8,786 Times in 4,206 Posts

    Frank S's Tools
    Quote Originally Posted by astroracer View Post
    Nope, no "criticalness" taken. I know it really helps when you understand the full design and that wasn't documented here. I don't think these hinges will need bushings, they aren't going to be used that extensively. I do know I want them to be a bit loose so they don't bind or fight one another while opening.
    Mark
    Yep you don't want them causing the hood to wind up looking like a 76 chevy truck hood
    Never try to tell me it can't be done
    When I have to paint I use KBS products

  7. #17
    Supporting Member astroracer's Avatar
    Join Date
    May 2012
    Location
    Byron, Michigan
    Posts
    311
    Thanks
    20
    Thanked 569 Times in 174 Posts

    astroracer's Tools
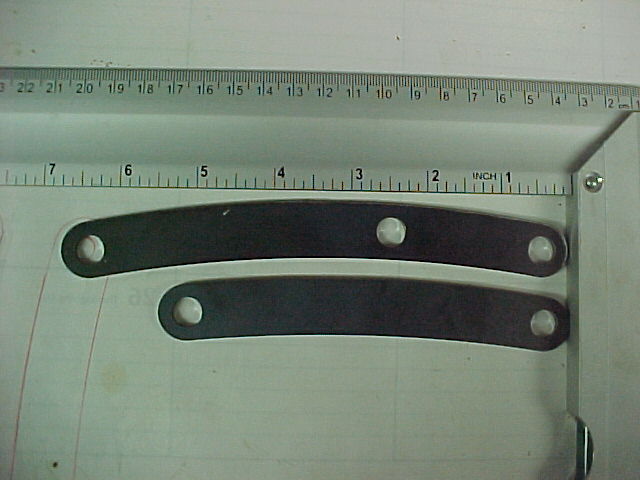
    Okay, I got some pics and made a quick sketch of both arms. When you make these make patterns out of thin cardstock first and try them out before committing to the hard stuff. If you guys have any questions just holler.


    The stacks of washers will be replaced with aluminum spacers when these are assembled to the vehicle.


    Mark

  8. The Following 2 Users Say Thank You to astroracer For This Useful Post:

    blkadder (Dec 9, 2017), KustomsbyKent (May 21, 2018)

  9. #18

    Join Date
    Nov 2017
    Posts
    3
    Thanks
    0
    Thanked 0 Times in 0 Posts
    I really appreciate it! This is perfect.
    Thanks again, Mark

  10. #19

    Join Date
    Aug 2015
    Posts
    3
    Thanks
    0
    Thanked 0 Times in 0 Posts
    Nice work!

    Studebaker used that style hinge on both their hoods, and trunk lids from the 1920's through the 1960's.
    They put springs on theirs. Strong springs on the trunk lids to hold the trunk lid up.
    Lighter springs on the hood, not to hold the hood up, but to hold the cowl end under tension so the hood would move foward as it went up.
    The springs also take out any pin slop. Bad part is the springs also hide pin wear.
    DEEPNHOCK

  11. #20
    Supporting Member blkadder's Avatar
    Join Date
    May 2012
    Location
    Florida, USA
    Posts
    170
    Thanks
    532
    Thanked 69 Times in 36 Posts
    Thanks to Astroracer for posting these pics. I think this may be something I can use on an upcoming project.
    Ron

    ...Semper Fidelis...

Thread Information

Users Browsing this Thread

There are currently 1 users browsing this thread. (0 members and 1 guests)

Bookmarks

Posting Permissions

  • You may not post new threads
  • You may not post replies
  • You may not post attachments
  • You may not edit your posts
  •