Free 186 More Best Homemade Tools eBook:  
Get 2,000+ tool plans, full site access, and more.

User Tag List

Page 1 of 2 1 2 LastLast
Results 1 to 10 of 13

Thread: The Importance of Wheel-dressing when Surface Grinding is Revealed

  1. #1
    Supporting Member
    Join Date
    Jul 2015
    Location
    Ireland
    Posts
    125
    Thanks
    1
    Thanked 220 Times in 53 Posts

    Brendon's Tools

    The Importance of Wheel-dressing when Surface Grinding is Revealed

    I carried out the following "visual" experiment recently out of curiosity and to answer the question of a friend who happened to drop into my shop. “What are you doing” he asked. “I’m dressing the wheel of my surface grinder” I answered. There followed a number of questions on why I needed to do this, how often I did it etc. My friend seemed to think I was being over-fussy in doing this every time I went to grind. Anyway the results of the experiment were interesting and went some way at least, into allaying my friend’s skepticism. But he still thinks I am being fussy. I did not go into the niceties of truing the wheel with him other than to mention that it is also important to true the wheel beforehand. The question I set out to answer was “Is it so important to dress the wheel every time we use the surface grinder?”

    As my friend is unfamiliar with machine shop work and techniques I tried using the analogy of driving a car. The tires are the only point of contact we have with the road when driving. To a great extent, the quality and safety of the drive depends on a good set of tires and balanced wheels. Similarly, when grinding, the interface between the wheel and the work-piece, to a great extent, determines grinding quality. A properly balanced and dressed wheel is vital in order to achieve a good finish. So, to make my point, I grabbed the nearest scrap of metal I had to hand, a block of brass, and endeavored to show why wheel-dressing is so important.

    Using a Teslong Digital Microscope (200X magnification), I photographed a piece of brass

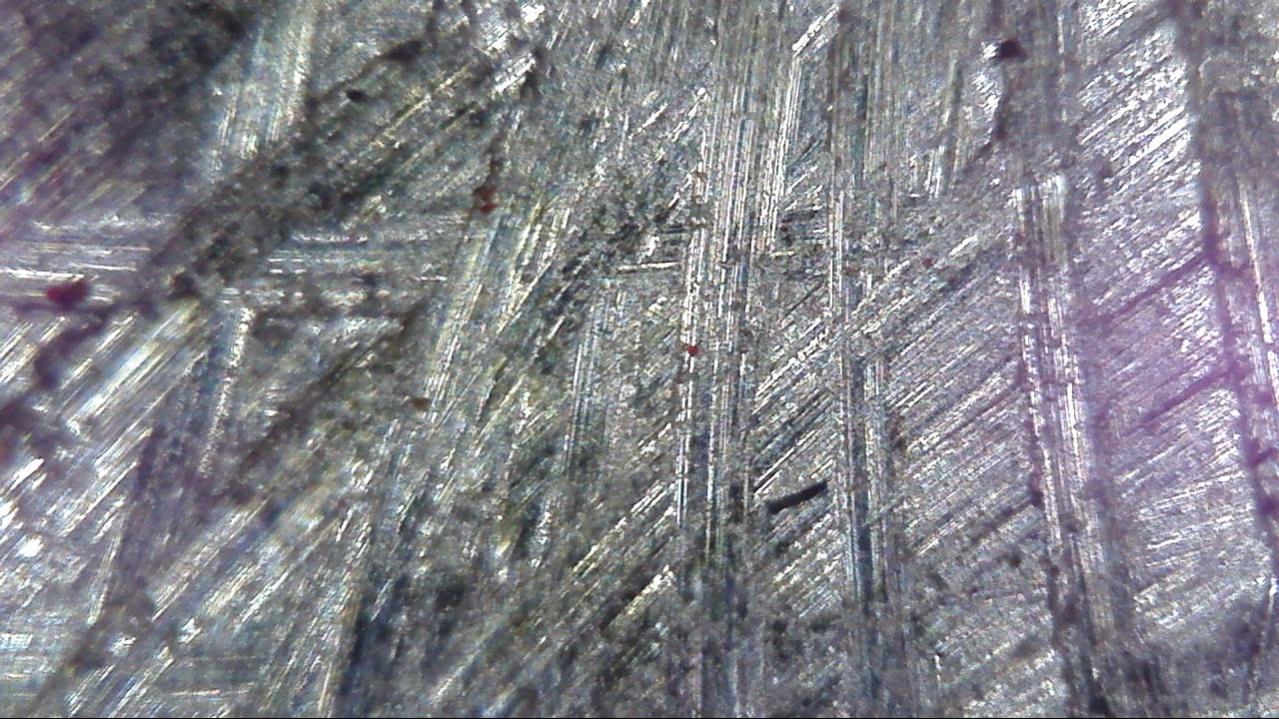
    1. After machining on the mill
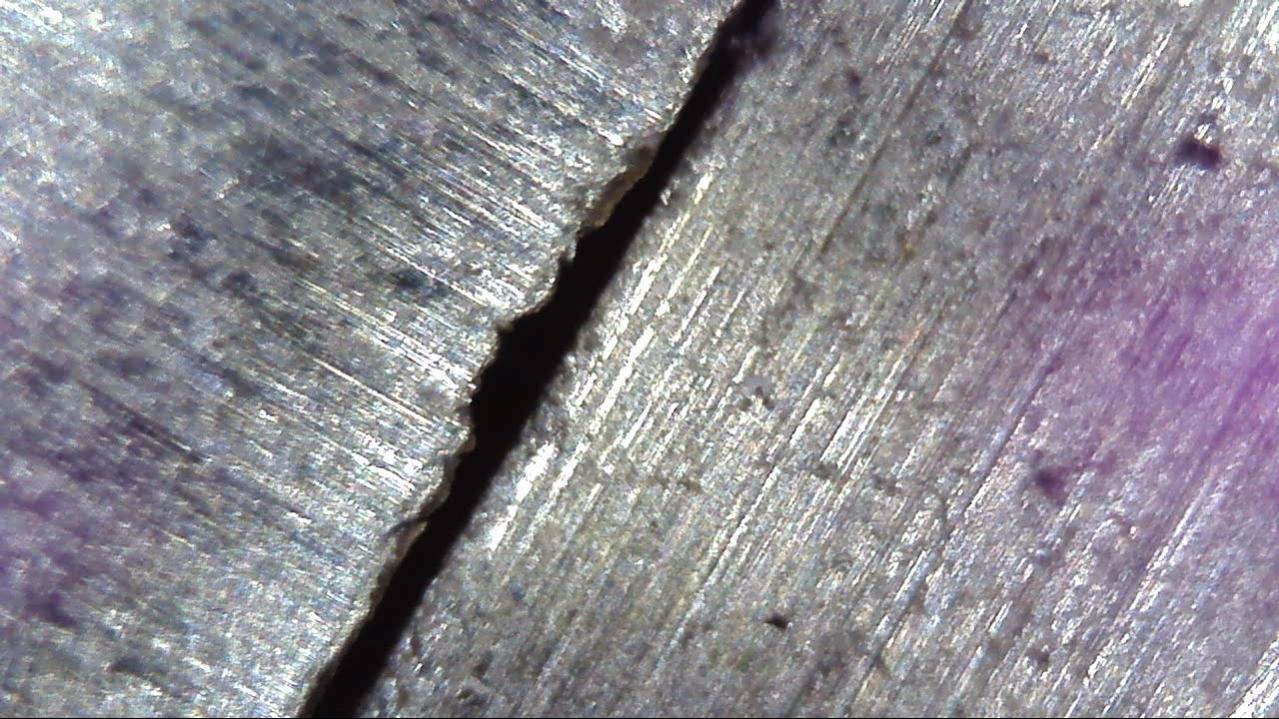
    2. After grinding without dressing the wheel
    3. After grinding following wheel dressing
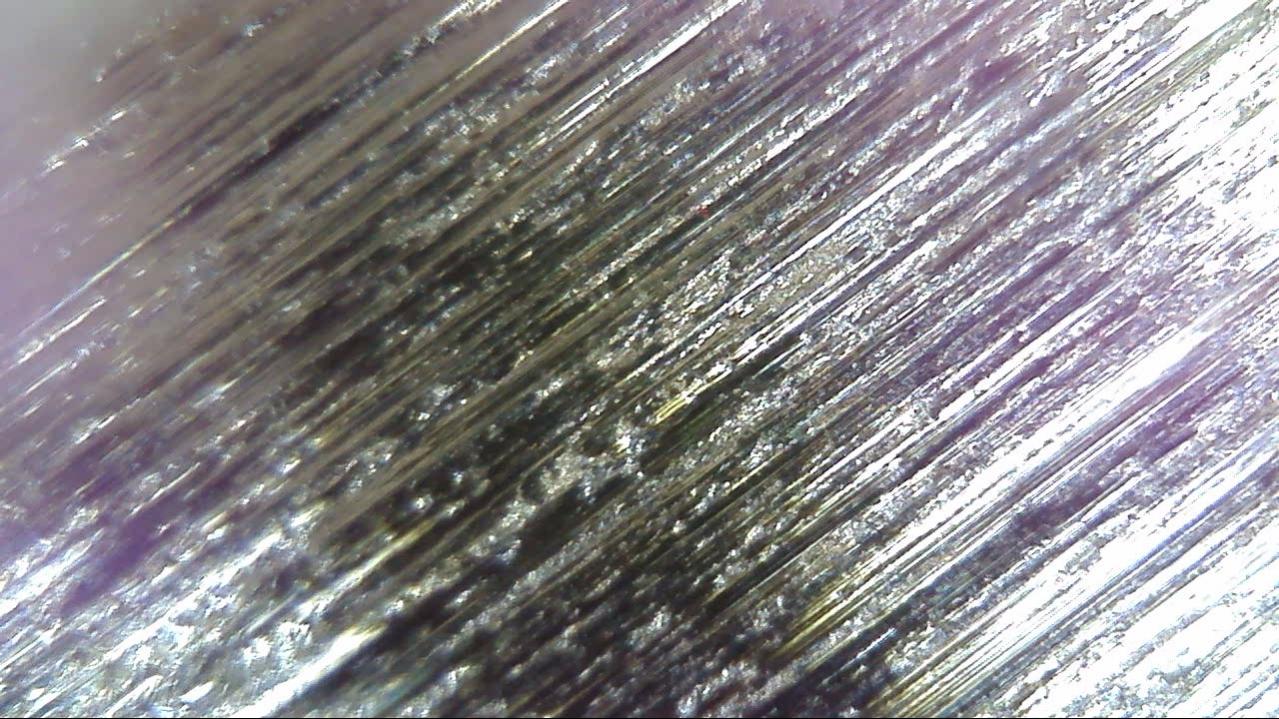
    4. After grinding having turned the machine off and on again (without dressing the wheel a second time).

    While the following cannot be perceived to be as controlled or exact as a scientific experiment, the results are still interesting.
    1.
    The Importance of Wheel-dressing when Surface Grinding is Revealed-snap_012.jpg

    This first photo shows the surface of the material after machining only (magnified 200 times). The machining pattern can clearly be seen as can a couple of pit marks that were not visible to the naked eye. Other than that, nothing unusual.

    2. 3.
    The Importance of Wheel-dressing when Surface Grinding is Revealed-snap_011.jpg

    This combined picture shows the material after grinding without dressing the wheel (on the left) and after grinding following dressing the wheel (on the right). Note the edges of the material were not chamfered before these photographs were taken (the roughness of the edges evident in the photos was not obvious to the naked eye). The difference in the surface finish was clearly visible to the naked eye; the right hand sample appearing much smoother and feeling smoother to the touch. The tiny pitting that appears in the right hand photo was not visible to the naked eye.
    The black coloring in the left hand photo represents shadows caused by coarser grinding marks indicating that this sample is not as smooth as the one in the right hand sample. This lesser degree of smoothness was very obvious to the naked eye and to touch by the fingertip. The purple hue in both photos appears to have been something to do with the lighting and did not correlate with anything that was obvious to the naked eye.

    4.
    The Importance of Wheel-dressing when Surface Grinding is Revealed-snap_003.jpg

    The final photo shows the brass after grinding following switching the machine off and switching it on again (no repeat wheel-dressing was done before grinding in this case). The surface finish is poor; somewhere between samples 2. and 3. both visually to the naked eye and to the touch of the fingertip. The black coloring indicates this. Again, the purple hue can be ignored.

    Conclusion.
    The conclusion to this basic experiment would appear to be two-fold:

    Firstly, always dress the wheel before a grinding session. Not only will it sharpen the abrasive elements of the wheel but will also remove any build-up of crud on the wheel that would result in a poorer than optimum finish.

    Secondly, do not switch off the machine after dressing but go straight into the grinding work as switching off and on throws the wheel ever so slightly out of balance, resulting in a less than optimum finish. It also follows that the machine should not be switched off and on again during the grinding session lest the wheel be thrown off balance.

    Any comments or contributions to this conversation would be welcome.
    My friend, by the way, is still perplexed as to why anyone could be so fastidious about their work. He is a hammer-and-nail man, I think.
    Happy machining folks!

    186 More Best Homemade Tools eBook
    Visit my blog at www.waneyedgeworkshop.com

  2. The Following 28 Users Say Thank You to Brendon For This Useful Post:

    Andyt (Aug 12, 2021), aphilipmarcou (Aug 20, 2017), baja (Aug 12, 2021), blkadder (Aug 20, 2017), CookieCrunch (Oct 27, 2018), Corm (Mar 8, 2018), DIYSwede (Jun 30, 2019), gunsgt1863 (Jul 4, 2018), homey_g (Feb 22, 2021), HUMARIA (Mar 28, 2019), jackman (Aug 20, 2017), Jon (Aug 20, 2017), JRock (Oct 27, 2018), KustomsbyKent (Aug 20, 2017), mklotz (Aug 20, 2017), mwmkravchenko (Oct 27, 2018), NortonDommi (Aug 21, 2017), Okapi (Jul 7, 2018), oldcaptainrusty (Mar 7, 2018), olderdan (Aug 21, 2017), Ralphxyz (Feb 11, 2021), Seedtick (Aug 21, 2017), TCL (Aug 20, 2017), tooly (Feb 13, 2021), UncleBob (Jan 24, 2019), volodar (Oct 27, 2018), will52100 (Oct 26, 2018), Zaakoc (Sep 30, 2017)

  3. #2
    Supporting Member
    Join Date
    Jul 2017
    Posts
    91
    Thanks
    14
    Thanked 25 Times in 19 Posts
    Fascinating. So what actually happens when you stop and restart the wheel, that would push it out of balance? Does it have to do with tiny chips being embedded in the wheel moving, due to the changes in inertia? Or something else?

    2000 Tool Plans

  4. #3
    Supporting Member
    Join Date
    Jul 2015
    Location
    Ireland
    Posts
    125
    Thanks
    1
    Thanked 220 Times in 53 Posts

    Brendon's Tools
    Nothing extra-terrestrial happens to the grinding surface of the wheel when we switch off and on, that necessarily requires the wheel to be re-dressed. The problem is that on small grinding machines, which is what most home machinists will likely have, the wheel flange is secured to the grinding wheel by a central nut. This arrangement can allow the grinding wheel to slightly shift around on its wheel flange. We are only talking about tiny movements here but I suppose the problem stems from the fact that we cannot really tighten the wheel nut down too hard or we will crack the wheel. This movement, if it is going to happen, usually happens upon start-up especially if the wheel has not recently been balanced.
    My experience is that dressing the wheel before each grinding session gives me best results; the magnified photographs seem to confirm this. The dressing only takes a few moments anyway, so it’s no big deal. It will also clean off any build-up on the wheel; build-up can happen quite quickly, especially when you are grinding soft metals; it’s as well to be rid of it.
    It is, of course, important that the diamond used for dressing is still sharp; a dull diamond will true the cutting edge of the wheel but will not sharpen the cutting surface. Moreover, the diamond should be turned in the holder fairly often to expose a new face.
    There are other potential problems as well that can arise when grinding: the wheel will go out of balance over time, coolant can pool in the bottom of the wheel overnight, the paper washers (blotters) can cause the wheel to loosen slightly when they get wet, the wheel may not be fully tight on the arbor, etc. etc. I am sure there are many guys out there who will want to give us the benefit of their experience. Come on guys, post a comment!
    Visit my blog at www.waneyedgeworkshop.com

  5. The Following User Says Thank You to Brendon For This Useful Post:

    olderdan (Aug 21, 2017)

  6. #4
    Supporting Member olderdan's Avatar
    Join Date
    Jun 2016
    Posts
    782
    Thanks
    1,457
    Thanked 1,538 Times in 466 Posts

    olderdan's Tools
    Hi Brendon
    Well you asked for comments so here is mine.
    That was an in depth analysis of wheel dressing, I have a few thoughts on this as I have spent over 30 years in the grinding shop, universal / cyl and form grinding gears and all sorts of forms needed in punch and die sets for the sintered metal industry.
    Firstly brass is to me an odd choice for a test as soft metals do not lend themselves well to the grinding process unless you have a specific wheel grade usually silicone carbide green or black.
    Surprisingly to some these wheels are also chosen for grinding carbide because they break down quickly to prevent clogging, this can also be dangerous as the embedded particles heat up and can cause wheel fractures, this can be reduced by a coolant flood.
    As for wheels going out of balance on start up this is not something I have ever encountered and would suggest that it is not securely mounted to begin with, what you describe is more likely moving on start up torque and becoming eccentric on is mounting. Our form grinders had only optical dividing heads to work with requiring D/M/S setting at every index (a minefield for errors on a part worth thousands).
    The safe way was to stop the wheel, index and see if you were in the right place before starting up again, we did this hundreds of times a day and never had a wheel go out of balance.
    Same thing with universal grinding where changing from external to internal and back again requires the machine to be stopped, obviously this required a wheel dress but no out of balance was ever experienced and we are talking twelve inch wheels.

    NB I wrote all the above before I read your latest post, you obviously know a fair bit about machine grinding so it seems you have narrowed down the problem already to wheel mounting issues.
    All our machines were Jones & Shipman and the wheel flanges were taper mounted to the spindle, this allowed wheel changes without loss of truness as long as we left them on the hubs. As for coolant retention just let the wheels run dry before stopping and if you have soggy card washers it means something is not tight enough.

  7. The Following 4 Users Say Thank You to olderdan For This Useful Post:

    brianr47 (Feb 12, 2021), PJs (Jul 5, 2018), tonyfoale (Jan 25, 2019), volodar (Oct 27, 2018)

  8. #5
    Supporting Member
    Join Date
    Jul 2015
    Location
    Ireland
    Posts
    125
    Thanks
    1
    Thanked 220 Times in 53 Posts

    Brendon's Tools
    Hey! Dan,
    Many thanks for your comments and generous contribution of information. This is exactly what I hoped for: to get a discussion going in the hope of increasing learning for all.
    I agree that brass was an odd choice. The test wasn't planned; it just happened when I attempted to show my curious friend
    what I was up to. I just grabbed the nearest bit of material, which happened to be a brass off-cut. It was afterwards I decided to
    post the results as I thought they were interesting. As I said, it wasn't a scientific test.
    Hopefully, more comments will ensue.
    Thanks again,
    Brendon
    Visit my blog at www.waneyedgeworkshop.com

  9. The Following User Says Thank You to Brendon For This Useful Post:

    Beoir (Aug 24, 2017)

  10. #6
    Supporting Member
    Join Date
    Jan 2017
    Location
    NOLA
    Posts
    25
    Thanks
    13
    Thanked 21 Times in 10 Posts
    As we know in most things in life, there is rarely an always. I spent my final years before my wreck as a grinder, primarily making my Jung CNC profile grinder dance for me. Through the years, I had used anything from small manual Harig's to large Okamoto NC grinders, then onto small to large CNC Okamoto, Blohm, & Jung grinders. For someone that swore I'd never end up as a grinder as my trade, I spent many years as a grinder as my trade. But I loved the tight .0002" tolerance on a daily basis, and the repeatability the techniques and machines offered.
    As was offered in previous posts, careful handling of the grinding wheels and hubs are required, and mounted wheels are commonly pre-shaped with particular profiles, especially perfect half-rounds, since they're the most difficult to get correct, but others also. But starting that wheel was always a moment of great apprehension, because despite ones best efforts, the wheels could slip inside the hub. I, and many of the more experienced of my colleagues would soft-hit the start button a few times to get the wheel up the some speed before committing it to full on. On the larger, or more current (smarter) machines, they would soft-start themselves to prevent wheel shift.
    If I can remember, I have written diamond dressing speeds/feeds program, used either manually or for CNC input, that I can share. I have a few related programs about dressing & grinding, but I forget what they are. I will need to locate where I stored them. They were a big hit with the guys at work and others in the industry.

  11. #7
    Supporting Member aphilipmarcou's Avatar
    Join Date
    Dec 2016
    Location
    new zealand
    Posts
    58
    Thanks
    134
    Thanked 49 Times in 26 Posts

    aphilipmarcou's Tools
    I can confirm that if the wheel slips on the shaft even by a few degrees on start up the surface will usually be adversely affected. For me the question is how to stop this slipping which does happen because the nut somehow loosens itself- no matter how tight (within reason) I make it. I have tried making paper washers to replace the ones supplied with the wheel. So now when fitting a new wheel I mark the nut when tight against a point marked on the wheel and keep retightening /checking regularly with regular dressing. I have a stone age Brown & Sharpe-must have been a beauty when new and respected.

  12. #8
    Supporting Member
    Join Date
    Jan 2017
    Location
    NOLA
    Posts
    25
    Thanks
    13
    Thanked 21 Times in 10 Posts
    aphilipmarcou, just like any other threaded joint, you can use blue, or non-permanent, locking compound on the threads. It can still be snugged up later, if needed. A hub/flange ass'y in good condition will spin tighter to a grinding wheel than many people would think. If the spindle on the surface grinder isn't in perfect shape, the rotation of the hub to shaft is critical.
    Also, for dry operations, paper flange gaskets work fine. They only shrink after an extended period, where further tightening will solve the issue. For wet grinding, I found the plastic or impregnated paper gaskets are better suited.
    Again, I've had 6" to 14" formed wheels for ages that I saved for repeated touch up work, or venting on a mold cavity. Soft-starting kept the wheel in check. Any heavy grinding will still require a redress.

  13. The Following User Says Thank You to KickStart For This Useful Post:

    aphilipmarcou (Jul 4, 2018)

  14. #9
    Supporting Member Okapi's Avatar
    Join Date
    Mar 2013
    Location
    Switzerland
    Posts
    222
    Thanks
    346
    Thanked 132 Times in 76 Posts

    Okapi's Tools
    As an idea for the choice of paper washer, I use 350gr. aquarell paper by canson which has a surface with most relief.

  15. #10

    Join Date
    Jan 2016
    Posts
    43
    Thanks
    3
    Thanked 10 Times in 8 Posts
    It looks like photos 2 & 3 are turned opposite of each other. If this is the case then the edge of the piece in photo 3 is not shown. I might be wrong but I’m looking at the lines on both pieces. Ronj

Thread Information

Users Browsing this Thread

There are currently 1 users browsing this thread. (0 members and 1 guests)

Bookmarks

Posting Permissions

  • You may not post new threads
  • You may not post replies
  • You may not post attachments
  • You may not edit your posts
  •