Free 186 More Best Homemade Tools eBook:  
Get 2,000+ tool plans, full site access, and more.

User Tag List

Page 1 of 2 1 2 LastLast
Results 1 to 10 of 14

Thread: Lathe Cross Feed Screw and Nut

  1. #1
    Supporting Member rossbotics's Avatar
    Join Date
    Dec 2013
    Location
    Florida
    Posts
    731
    Thanks
    1,019
    Thanked 1,649 Times in 403 Posts

    rossbotics's Tools

    Lathe Cross Feed Screw and Nut

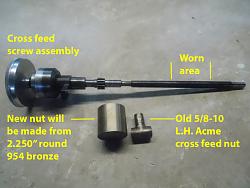
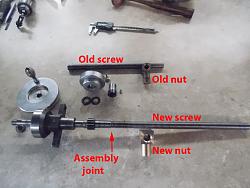
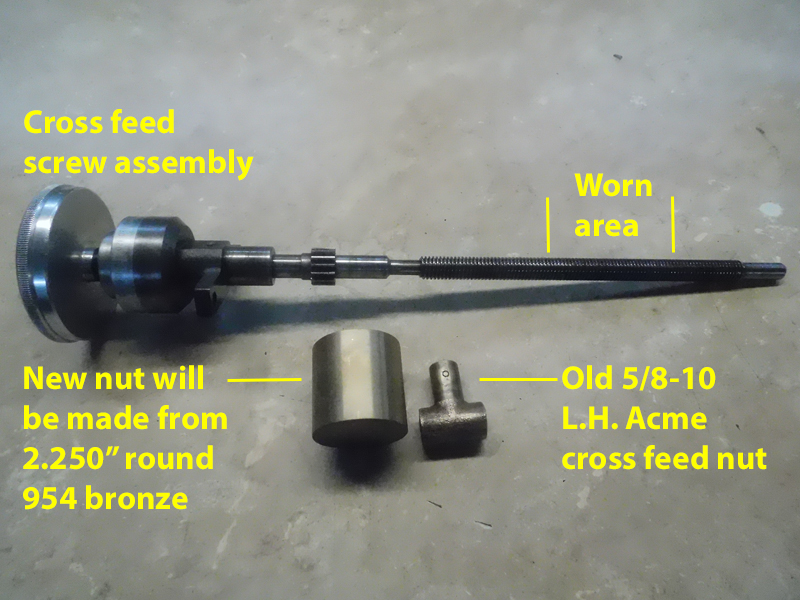
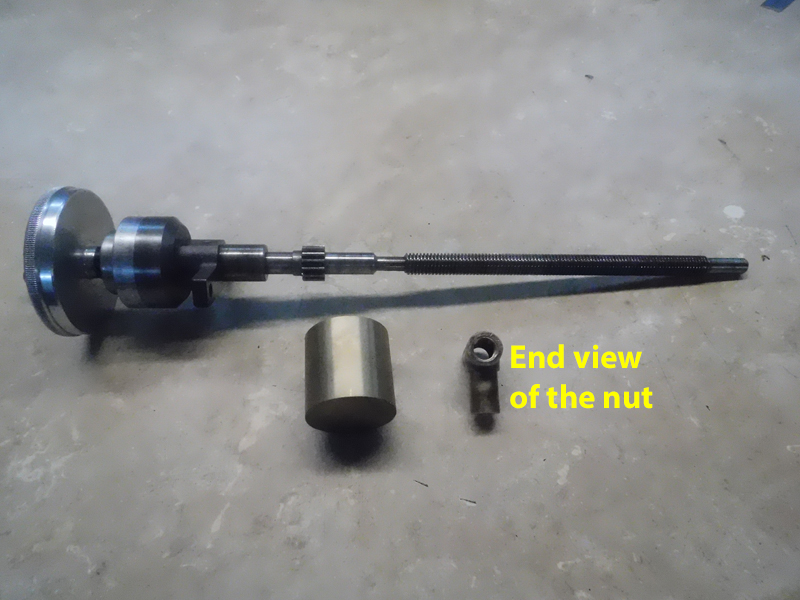
    I noticed here a while back that the cross feed screw and bronze nut on my 6913 Clausing Lathe was developing quite a bit of backlash so I decided it was time to address the issue, I sent an e-mail to Clausing Mfg. asking for the availability and cost of a new bronze cross feed nut, not by surprise but they still make parts for these older machines and are readily available, the nut was $110.00 and shipping was $22.00 WOW!!! I would hate to know what a lead screw would cost.

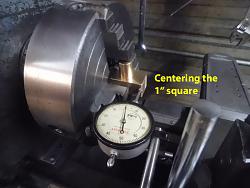
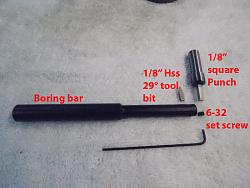
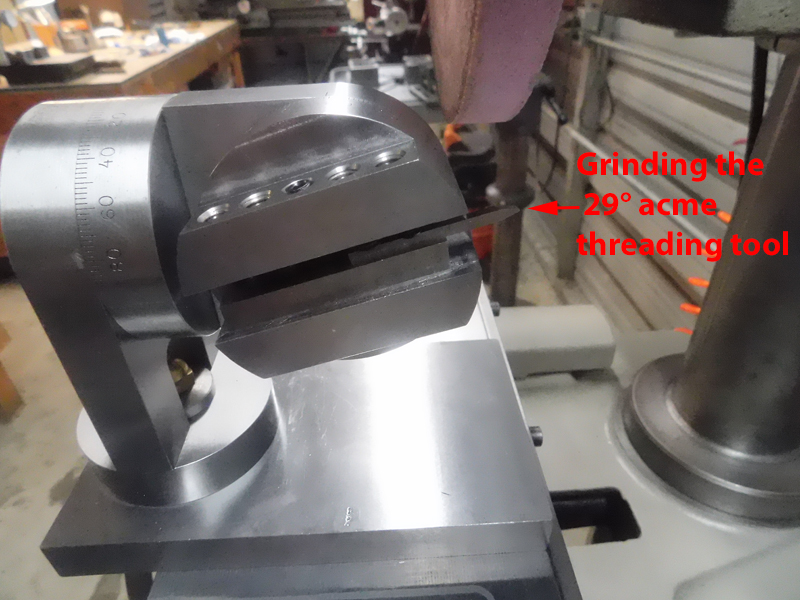
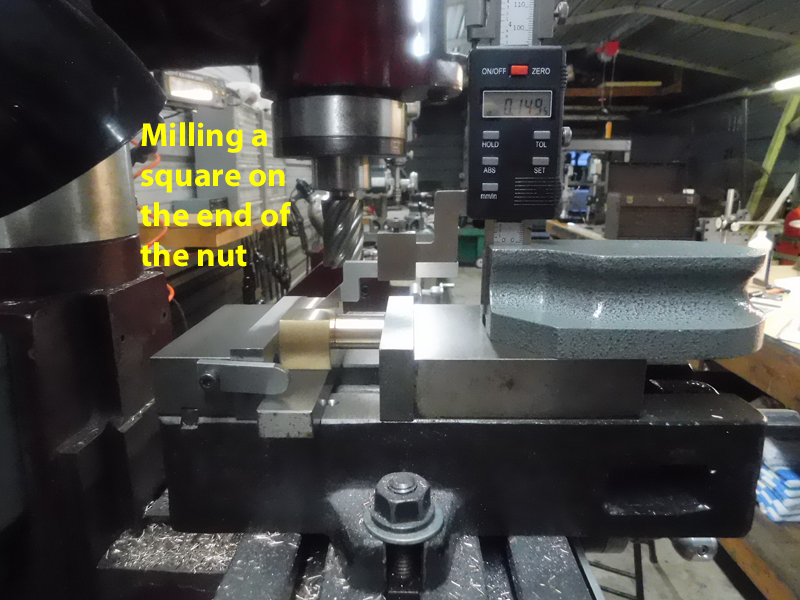
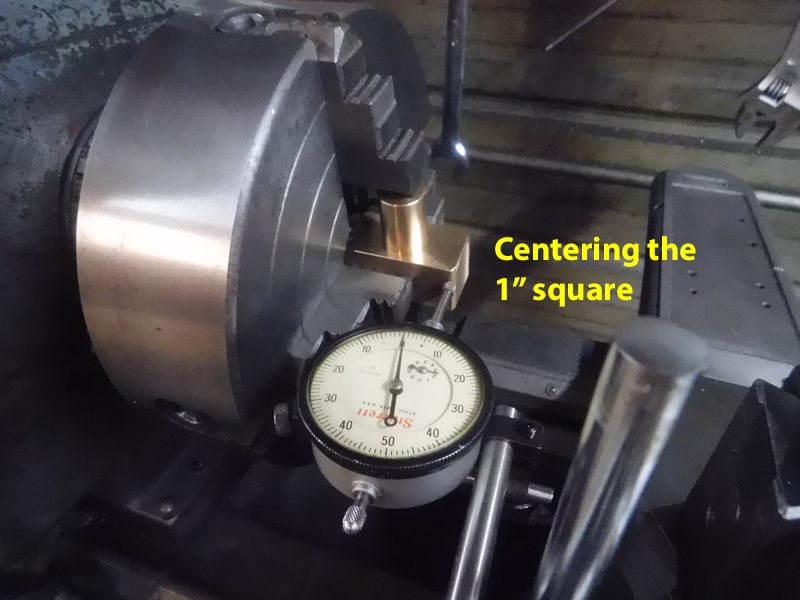
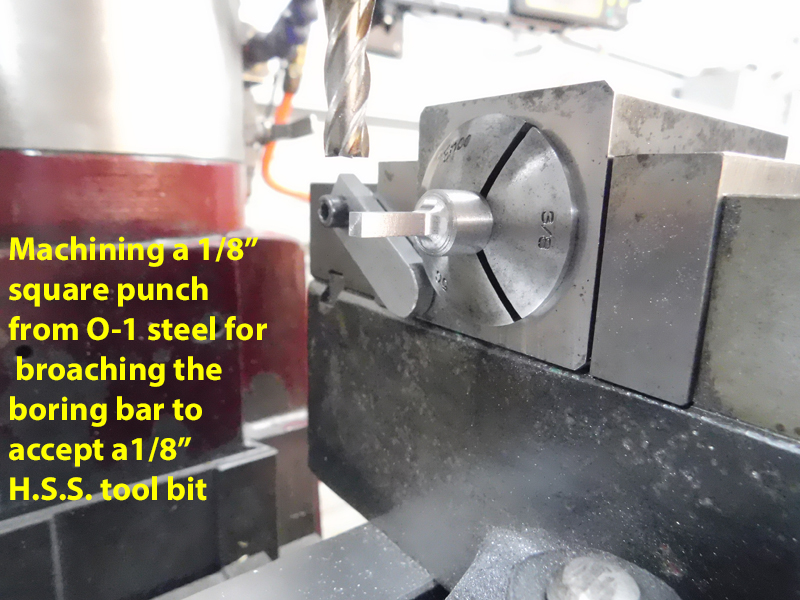
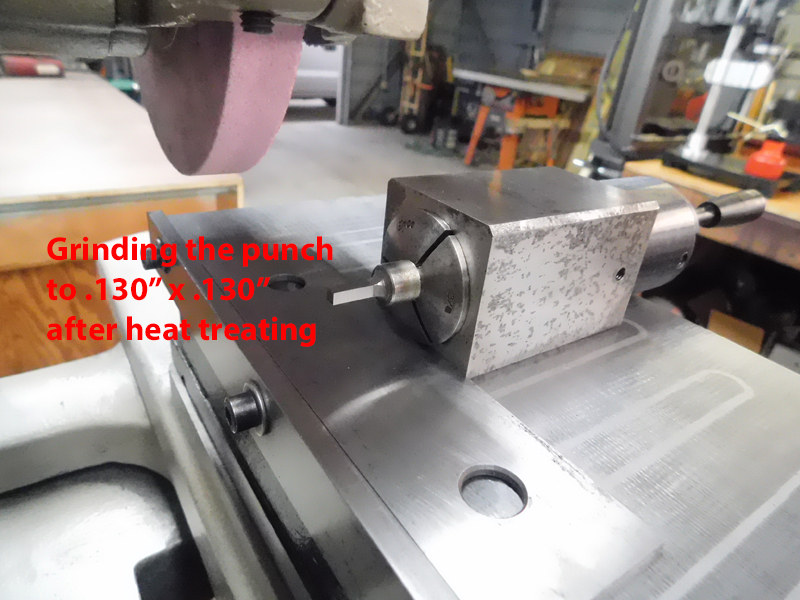
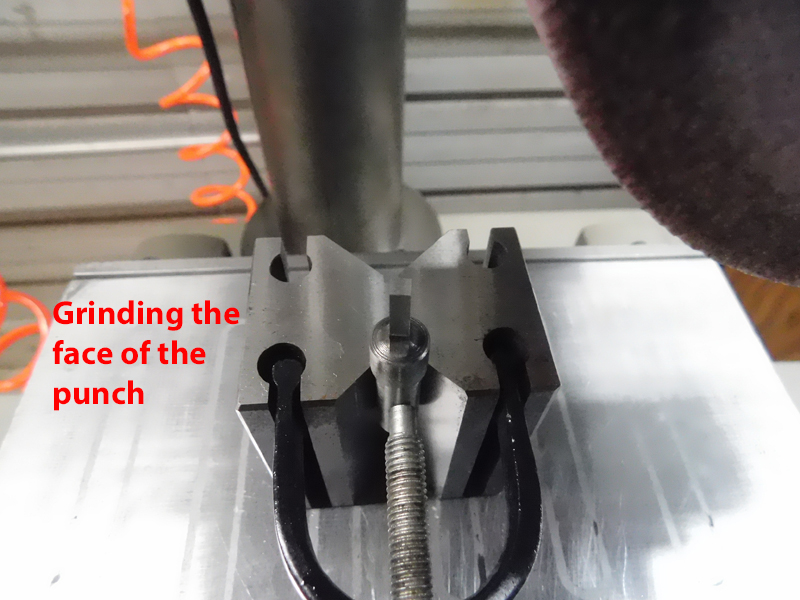
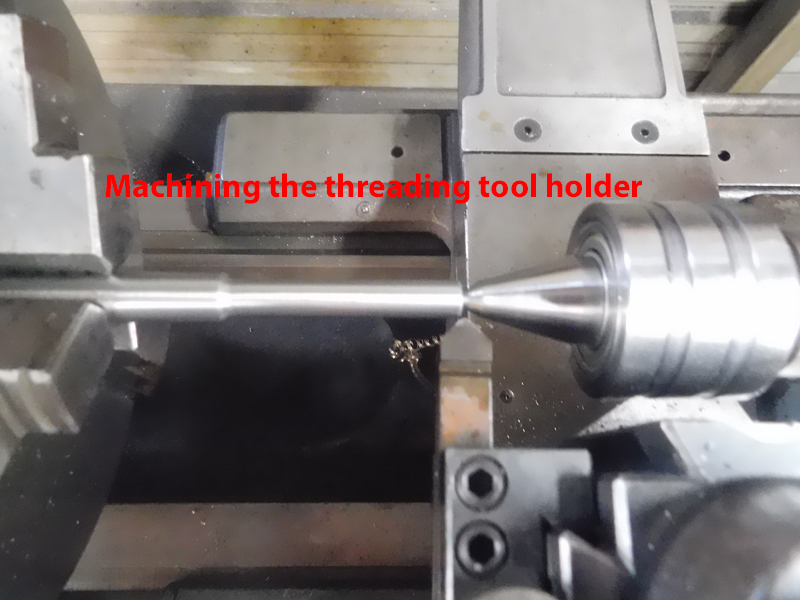
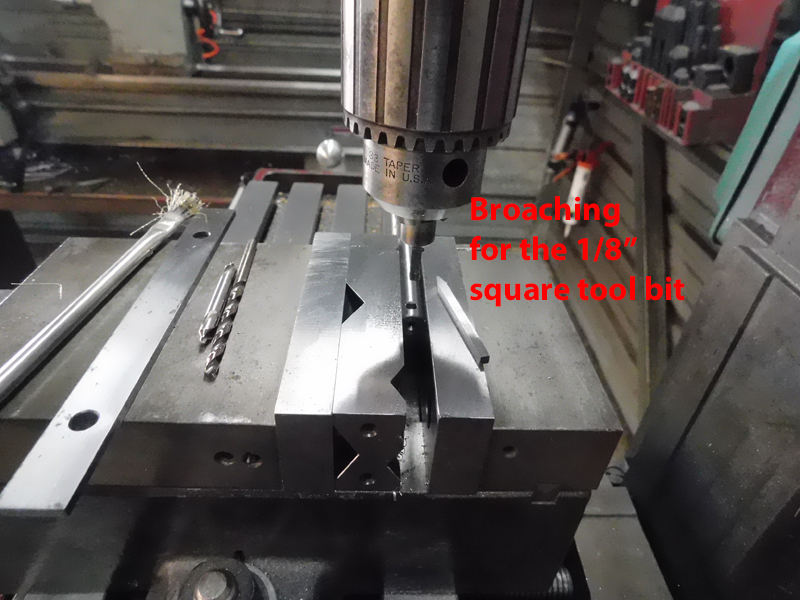
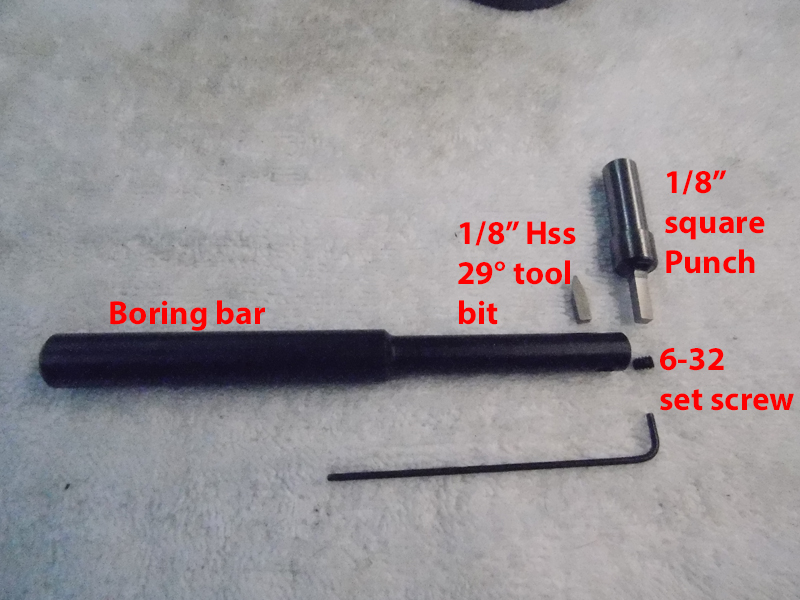
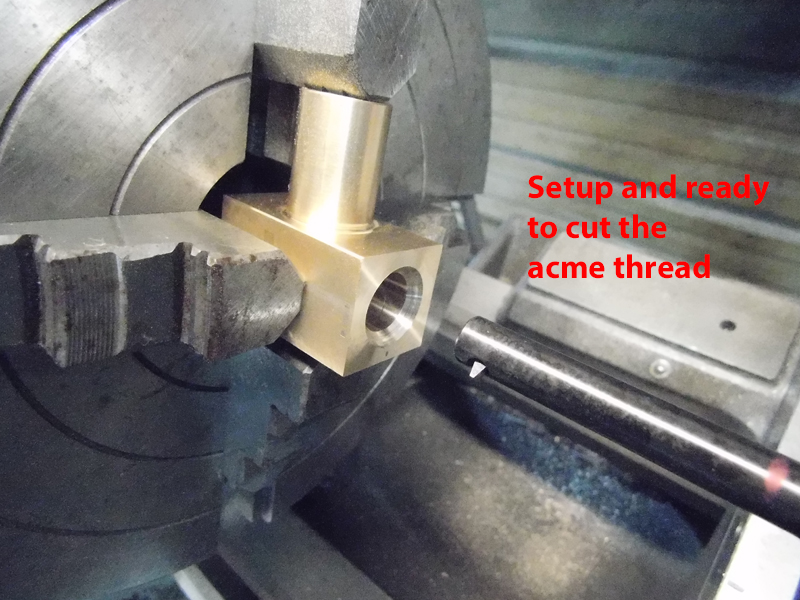
    I ordered a piece of 5/8-10 left hand acme lead screw 12”long from roton.com they specialize in lead screws and nuts, the 12”piece was only $26.00 including shipping, I couldn’t find a suitable bronze nut to modify from Roton so I had to decide on what road to take with this bronze nut because Clausing wasn’t getting any of my money, I looked into buying a solid carbide ½” shank #10 preformed acme threading bar but it was astronomical as well $97.00 without shipping, so I decided to make a small boring bar to hold a 1/8” square Cobalt Hss tool bit, the threading bar is made from a piece of 1/2" round by 5” long O-1 steel turned down to 3/8” for 2” long on the end where the tool bit will be, I machined a .140” X .140” square punch from O-1 steel hardened and ground to .130” X .130” square, I drilled a .147” cross hole in the threading bar then broached the .130” square while it was still in the milling machine, the entire boring bar was then hardened and tempered, the 1/8”Hss tool bit was setup in my universal grinding fixture to grind the correct form of 29° and 8° side clearances for cutting the #10 acme thread, the bronze acme nut was made from a piece of 2.250” round by 2.000” long 954 bronze (which I had) I machined it similar to the factory design then chucked it in a 4 jaw chuck and threaded the inside to fit the new Roton lead screw.
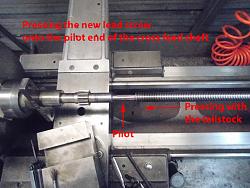
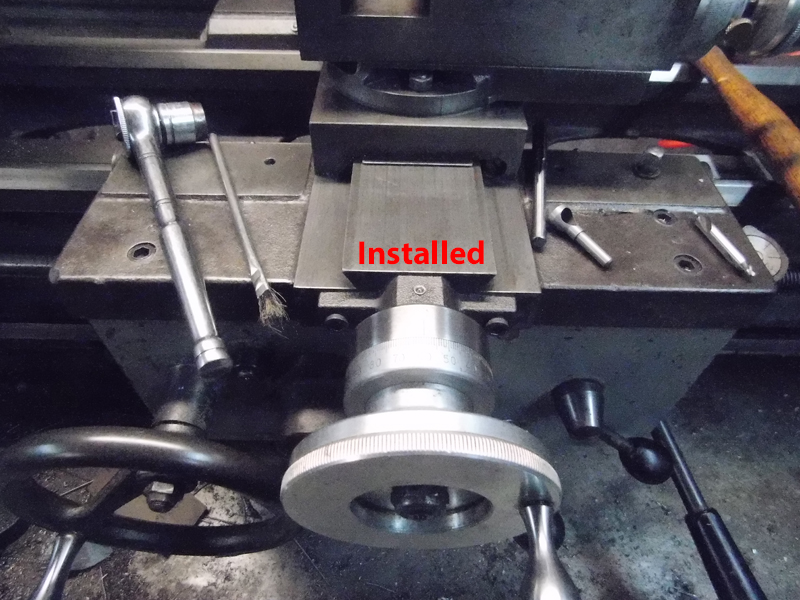

    I’m only replacing 12” of the lead screw itself, I’m not making a complete shaft, I done this by cutting off the threaded area on the old lead screw and machined a .4385” dia. pilot on one end 2” back, I then drilled and reamed one end of the new lead screw to .4375” by 2.125” DP, the assembly was setup in the lathe between centers and pressed together, I then drilled and installed a 1/8” roll pin to further secure the joint along with the .001”press fit, I put a dial indicator on the lathe and checked it for straightness finding it was out .006” but that was an easy enough challenge to tackle with a plastic hammer, the unit was then installed into the machine, while watching the machine dial on the cross feed screw I turned the handle left and right finding I had .005” backlash in the screw instead of previously having .055”.


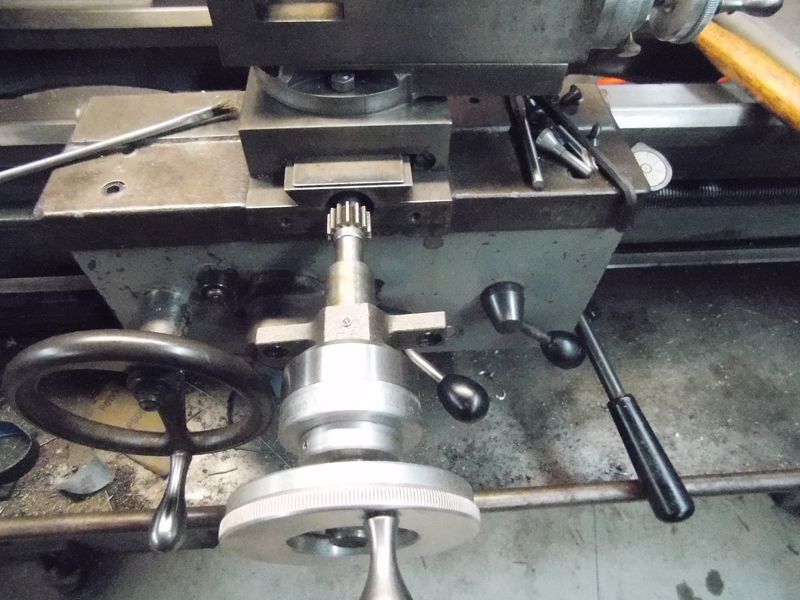
    I have included multiple photos making the tools it took to do this job with along with photos and a video of making the new nut and repairing the cross feed screw.


    As always thanks for looking and happy machining.

    Comments are always welcome.
    Doug

    Lathe Cross Feed Screw and Nut-1.jpg Lathe Cross Feed Screw and Nut-2.jpg Lathe Cross Feed Screw and Nut-3.jpg

    Lathe Cross Feed Screw and Nut-4.jpg Lathe Cross Feed Screw and Nut-5.jpg Lathe Cross Feed Screw and Nut-6.jpg

    Lathe Cross Feed Screw and Nut-7.jpg Lathe Cross Feed Screw and Nut-8.jpg Lathe Cross Feed Screw and Nut-9.jpg

    Lathe Cross Feed Screw and Nut-10.jpg Lathe Cross Feed Screw and Nut-11.jpg Lathe Cross Feed Screw and Nut-12.jpg

    Lathe Cross Feed Screw and Nut-13.jpg Lathe Cross Feed Screw and Nut-14.jpg Lathe Cross Feed Screw and Nut-15.jpg

    Lathe Cross Feed Screw and Nut-16.jpg


    <span style="font-family: Calibri"><font size="3"><font color="#000000">


    186 More Best Homemade Tools eBook
    Last edited by rossbotics; Nov 21, 2018 at 03:35 AM.
    Comments are always welcome
    Doug

    Subscribe to my you tube channel

    https://www.youtube.com/channel/UCDD..._as=subscriber


    Tool Plans for Sale by rossbotics


  2. The Following 15 Users Say Thank You to rossbotics For This Useful Post:

    aphilipmarcou (Nov 1, 2018), bigtrev8xl (Nov 1, 2018), bruce.desertrat (Oct 31, 2018), elk-a-holic (Feb 5, 2019), Home-PC (Nov 3, 2020), HUMARIA (Nov 4, 2018), JRock (Oct 31, 2018), LMMasterMariner (Oct 31, 2018), marksbug (Nov 3, 2020), olderdan (Nov 2, 2018), Papa Bill (Nov 4, 2018), PJs (Nov 1, 2018), Scotty1 (Nov 4, 2018), Seedtick (Oct 31, 2018), volodar (Nov 2, 2018)

  3. #2
    Supporting Member bruce.desertrat's Avatar
    Join Date
    Nov 2017
    Posts
    787
    Thanks
    559
    Thanked 668 Times in 357 Posts

    bruce.desertrat's Tools
    Love the 'Well, I made a tool to make a tool to repair my tool' sequence of events. :-) Masterful work, as usual! That's for the link to roton.com...that will come in handy.

    2000 Tool Plans

  4. #3

    Join Date
    Sep 2016
    Posts
    7
    Thanks
    0
    Thanked 11 Times in 7 Posts

    Topos's Tools
    Rossbotics, thank you for a most brilliantly presented step by step tutorial. Having an Atlas 618 which is a 'door-stop' version of your lathe I too had to order a NOS bronze nut. Not as expensive yet I know that a next project will be to emulate your skill and make a tighter version. Thank you for your generosity and
    inspiration. Best.

  5. The Following User Says Thank You to Topos For This Useful Post:

    PJs (Nov 1, 2018)

  6. #4
    Supporting Member Frank S's Avatar
    Join Date
    Aug 2015
    Location
    Peacock TX
    Posts
    11,224
    Thanks
    1,985
    Thanked 8,788 Times in 4,207 Posts

    Frank S's Tools
    Love your repair, excellent workmanship as you always do. making a tool to make a tool using other homemade tools to hold that tool while making it then making the part to repair the lathe is classic.
    years ago I had an old lathe with a worn cross feed nut not time to make new at the time so sawed a slot in the nut most of the way through drilled the body from the end then taped the bore and counter drilled out the threads of one half used a 10-24 socket head screw to slightly deform the nut. A dirty but quick fix that tightened the nut for years
    Never try to tell me it can't be done
    When I have to paint I use KBS products

  7. #5
    bigtrev8xl's Avatar
    Join Date
    Jul 2016
    Posts
    35
    Thanks
    310
    Thanked 6 Times in 5 Posts
    Superb workmanship.

  8. #6
    Supporting Member rossbotics's Avatar
    Join Date
    Dec 2013
    Location
    Florida
    Posts
    731
    Thanks
    1,019
    Thanked 1,649 Times in 403 Posts

    rossbotics's Tools
    Quote Originally Posted by bruce.desertrat View Post
    Love the 'Well, I made a tool to make a tool to repair my tool' sequence of events. :-) Masterful work, as usual! That's for the link to roton.com...that will come in handy.
    Thanks bruce.desertrat
    A tool for a tool and another tool

    Doug
    Comments are always welcome
    Doug

    Subscribe to my you tube channel

    https://www.youtube.com/channel/UCDD..._as=subscriber


    Tool Plans for Sale by rossbotics


  9. #7
    PJs
    PJs is offline
    Supporting Member PJs's Avatar
    Join Date
    Sep 2014
    Location
    Northern CA
    Posts
    1,841
    Thanks
    8,337
    Thanked 1,118 Times in 718 Posts

    PJs's Tools
    Impeccable write up and pics Doug. Seen a lot of this being done on YT and various places and this is by far the best of them. Workin that tiny .125 bit and the broach is off the charts, on top of all the ops! Thanks Always for sharing your great work and thinking processes.

    PJ
    ‘‘Always do right. This will gratify some people and astonish the rest.’’
    Mark Twain

  10. #8
    Supporting Member rossbotics's Avatar
    Join Date
    Dec 2013
    Location
    Florida
    Posts
    731
    Thanks
    1,019
    Thanked 1,649 Times in 403 Posts

    rossbotics's Tools
    Quote Originally Posted by Topos View Post
    Rossbotics, thank you for a most brilliantly presented step by step tutorial. Having an Atlas 618 which is a 'door-stop' version of your lathe I too had to order a NOS bronze nut. Not as expensive yet I know that a next project will be to emulate your skill and make a tighter version. Thank you for your generosity and
    inspiration. Best.
    Thank you very much for your comments Topos

    Doug
    Comments are always welcome
    Doug

    Subscribe to my you tube channel

    https://www.youtube.com/channel/UCDD..._as=subscriber


    Tool Plans for Sale by rossbotics


  11. #9
    Supporting Member rossbotics's Avatar
    Join Date
    Dec 2013
    Location
    Florida
    Posts
    731
    Thanks
    1,019
    Thanked 1,649 Times in 403 Posts

    rossbotics's Tools
    Quote Originally Posted by Frank S View Post
    Love your repair, excellent workmanship as you always do. making a tool to make a tool using other homemade tools to hold that tool while making it then making the part to repair the lathe is classic.
    years ago I had an old lathe with a worn cross feed nut not time to make new at the time so sawed a slot in the nut most of the way through drilled the body from the end then taped the bore and counter drilled out the threads of one half used a 10-24 socket head screw to slightly deform the nut. A dirty but quick fix that tightened the nut for years
    Thanks for your compliments Frank
    a lot of bronze nuts are easily repaired like you say and have done, but if you noticed how thin of a wall was on the old nut I had it would have been nearly impossible to split it and deform it, I really wasn't looking forward to all the extremities I went through to make the nut but it did come out well, hopefully I want have to ever make another one.
    Thanks Again Frank
    Doug
    Comments are always welcome
    Doug

    Subscribe to my you tube channel

    https://www.youtube.com/channel/UCDD..._as=subscriber


    Tool Plans for Sale by rossbotics


  12. #10
    Supporting Member rossbotics's Avatar
    Join Date
    Dec 2013
    Location
    Florida
    Posts
    731
    Thanks
    1,019
    Thanked 1,649 Times in 403 Posts

    rossbotics's Tools
    Quote Originally Posted by bigtrev8xl View Post
    Superb workmanship.
    Thank You Very Much bigtrev8x1

    Doug
    Comments are always welcome
    Doug

    Subscribe to my you tube channel

    https://www.youtube.com/channel/UCDD..._as=subscriber


    Tool Plans for Sale by rossbotics


Thread Information

Users Browsing this Thread

There are currently 1 users browsing this thread. (0 members and 1 guests)

Bookmarks

Posting Permissions

  • You may not post new threads
  • You may not post replies
  • You may not post attachments
  • You may not edit your posts
  •