Free 186 More Best Homemade Tools eBook:  
Get 2,000+ tool plans, full site access, and more.

User Tag List

Page 1 of 3 1 2 3 LastLast
Results 1 to 10 of 21

Thread: Lightweight Surface Plate Cover

  1. #1
    Supporting Member Paul Jones's Avatar
    Join Date
    May 2014
    Location
    Del Mar, California
    Posts
    1,231
    Thanks
    5,810
    Thanked 1,441 Times in 655 Posts

    Paul Jones's Tools

    Lightweight Surface Plate Cover

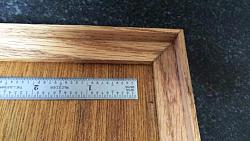
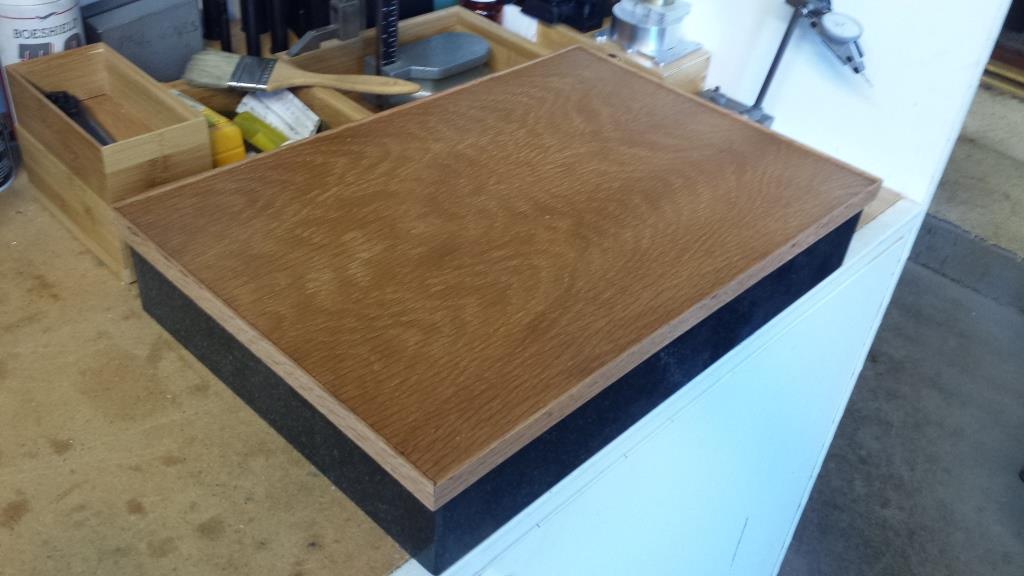
    This easy to build surface plate cover is for a small 12” x 18” x3” granite surface plate. The cover adds protection to the top surface of the plate and can be used as a tray for small layout tools needed at the workbench. The custom milled red oak T-shaped edging is approximately 3/4” x 5/8” in cross section and the cover is 3/16” thick red oak plywood. DAP contact cement was used to glue the 1/2” wide center section of the edging to the plywood. This produces a very strong bond and does not require any fasteners. I applied several coats of clear polyurethane from a spray can to seal the wood and protect it from oil.

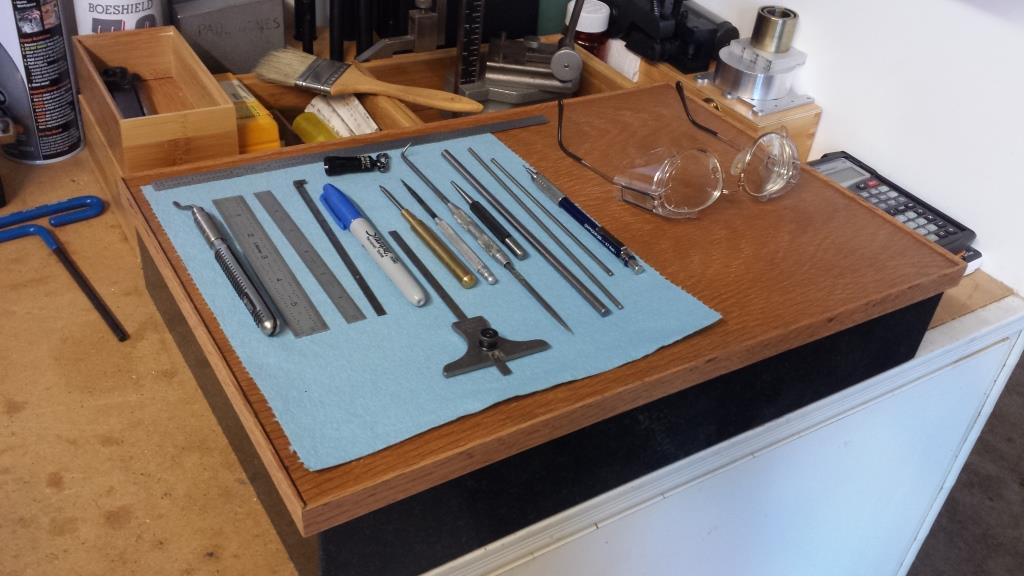
    The completed surface plate cover and tool tray.

    Lightweight Surface Plate Cover-12-x-18-surface-plate-cover-made-red-oak.jpg

    Lightweight Surface Plate Cover-12-x-18-surface-plate-cover-tray-adds-protection.jpg

    A view of the bottom section of the red oak edging after gluing with DAP contact cement to the 3/16”oak plywood. The lower skirt of the oak edging fits around the surface plate and holds it in place. Note the pencil line on the 45 degree cut. When fitting the fourth and final framing part cut with 45 degree corners, I always cut longer than marked and test fit which in this case allowed the part not to be cut too short.

    Lightweight Surface Plate Cover-12-x-18-surface-plate-cover-lower-side-corner-detail.jpg

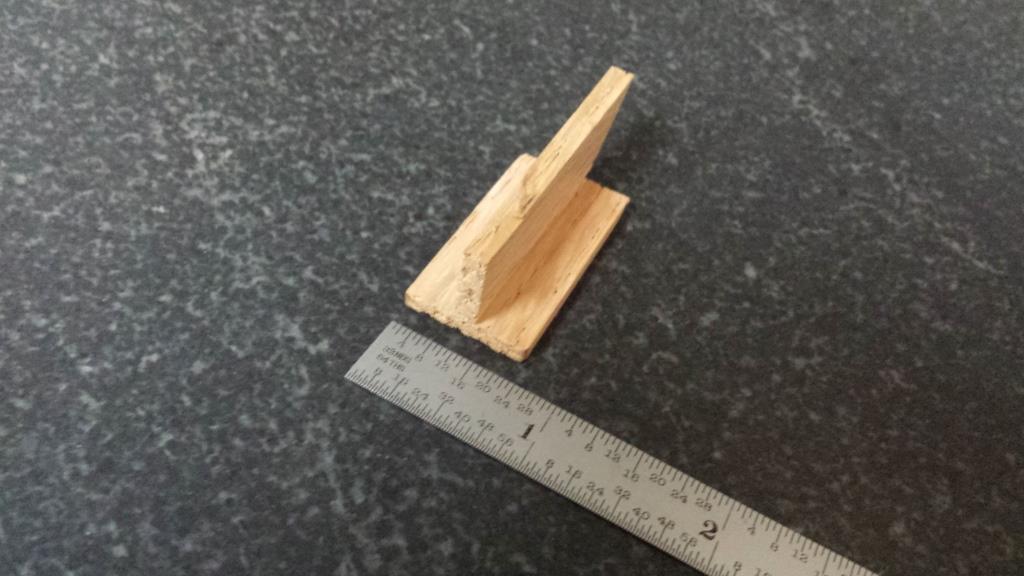
    A cross section view of the oak edging.

    Lightweight Surface Plate Cover-custom-milled-red-oak-t-shaped-edging.jpg


    Thank you for looking,
    Paul

    186 More Best Homemade Tools eBook
    Last edited by Paul Jones; Dec 30, 2016 at 12:08 PM.

  2. The Following 13 Users Say Thank You to Paul Jones For This Useful Post:

    Andyt (Feb 21, 2020), C-Bag (Dec 30, 2016), Charron63 (Nov 30, 2017), Floradawg (Feb 27, 2024), Frank S (Dec 29, 2016), Komo (May 23, 2018), LMMasterMariner (Jan 20, 2018), mklotz (Dec 30, 2016), olderdan (Jan 27, 2017), PJs (Dec 30, 2016), Ralphxyz (Feb 27, 2024), ranald (May 23, 2018), zarembak (May 23, 2018)

  3. #2
    PJs
    PJs is offline
    Supporting Member PJs's Avatar
    Join Date
    Sep 2014
    Location
    Northern CA
    Posts
    1,841
    Thanks
    8,337
    Thanked 1,118 Times in 718 Posts

    PJs's Tools
    Classy Top and handy tray Paul. I really liked the way you have all your tools laid out on it and can set it to the side to work from it. I have a bath towel draped over mine and try not to set anything on it but mine is 18x24x3 and in my small shop its really difficult Not to set stuff on it. I like that your tray is a hard protective surface so if I do set something on it, it's better than just a towel. Thanks for the idea and tip! ~PJ

    2000 Tool Plans
    ‘‘Always do right. This will gratify some people and astonish the rest.’’
    Mark Twain

  4. The Following User Says Thank You to PJs For This Useful Post:

    Paul Jones (Dec 30, 2016)

  5. #3
    Supporting Member Paul Jones's Avatar
    Join Date
    May 2014
    Location
    Del Mar, California
    Posts
    1,231
    Thanks
    5,810
    Thanked 1,441 Times in 655 Posts

    Paul Jones's Tools
    Thanks PJs,
    I would have preferred a 18x24x3 or larger granite plate. The cool thing about this cover design is the custom milled T-section rails can be scaled-up in size to provided more strength for much larger covers or the rails could be made from an aluminum T-section rails and attached to the plywood cover with either DAP contact cement or pop rivets.
    Paul

  6. The Following User Says Thank You to Paul Jones For This Useful Post:

    PJs (Jan 2, 2017)

  7. #4
    Supporting Member rossbotics's Avatar
    Join Date
    Dec 2013
    Location
    Florida
    Posts
    730
    Thanks
    1,019
    Thanked 1,645 Times in 402 Posts

    rossbotics's Tools
    Looks great Paul, You have just inspired me to do that to mine.

    Thanks
    Doug

  8. The Following User Says Thank You to rossbotics For This Useful Post:

    Paul Jones (Dec 30, 2016)

  9. #5
    Supporting Member C-Bag's Avatar
    Join Date
    Aug 2015
    Location
    California, central coast
    Posts
    720
    Thanks
    689
    Thanked 876 Times in 471 Posts

    C-Bag's Tools
    +1 Paul, add me to the list of "I'm gonna do that too".

    Good tip on the aluminum T edging, that I could pull off. I've been thinking about needing to put something besides the rubber mat I've got on my plate but didn't want to bodge the edges.

  10. The Following 2 Users Say Thank You to C-Bag For This Useful Post:

    Paul Jones (Dec 31, 2016), PJs (Jan 2, 2017)

  11. #6
    Content Editor
    Supporting Member
    DIYer's Avatar
    Join Date
    Aug 2013
    Posts
    3,056
    Thanks
    772
    Thanked 1,852 Times in 1,653 Posts


    Thanks Paul Jones! We've added your Surface Plate Cover to our Storage and Organization category,
    as well as to your builder page: Paul Jones's Homemade Tools. Your receipt:


  12. The Following User Says Thank You to DIYer For This Useful Post:

    Paul Jones (Dec 31, 2016)

  13. #7
    Supporting Member frugalolegeezer's Avatar
    Join Date
    Nov 2015
    Location
    Mound City
    Posts
    51
    Thanks
    0
    Thanked 110 Times in 33 Posts

    frugalolegeezer's Tools
    Hey Paul, How much does that piece of granite weight and where in the world did you come up with a 3 inch slab? Good job, I also will be making one of those.

  14. The Following User Says Thank You to frugalolegeezer For This Useful Post:

    Paul Jones (Jan 2, 2017)

  15. #8
    Supporting Member Paul Jones's Avatar
    Join Date
    May 2014
    Location
    Del Mar, California
    Posts
    1,231
    Thanks
    5,810
    Thanked 1,441 Times in 655 Posts

    Paul Jones's Tools
    Hi frugalolegeezer,

    Thanks. The black granite slabs are surface plates available from MSC ( https://www.mscdirect.com/product/details/00150011 ) and other tool distributors such as Grizzly. I have a Grade B surface plate of 12" x 18" x 3" and has an overall unilateral flatness tolerance of 0.0001". It weights around 80 lbs and I would prefer the next larger size of 18" x 24" x 3" but it weighs around 150 lbs. In the case of the smaller import surface plates, the shipping costs can sometimes cost more than the surface plates. I bought mine years ago from ENCO (now part of MSC) for less than $50 and when they had a special offered for free shipping.

    I have a project planned in 2017 to make adjustable three point leveling pads epoxied to the surface plate bottom.

    Paul

  16. #9
    Supporting Member mklotz's Avatar
    Join Date
    Aug 2015
    Location
    LA, CA, USA
    Posts
    3,437
    Thanks
    357
    Thanked 6,391 Times in 2,118 Posts

    mklotz's Tools
    Paul,

    You probably know this already but let me throw it out here for the benefit of future readers.

    If you mount your surface plate on three points it's possible for it to tip if a heavy object is placed outboard of the single point of support..

    Three point supports should have two near-to-touching supports outboard of the single point. These structures do not actually touch or support the surface plate but rather serve to "catch" it if it begins to tilt. Normally, they are only a few thousandths shy of touching so, if the plate tilts, it can only do so very slightly and anything on the plate will not slide off.
    ---
    Regards, Marv

    Home Shop Freeware
    https://www.myvirtualnetwork.com/mklotz

  17. The Following 4 Users Say Thank You to mklotz For This Useful Post:

    C-Bag (Jan 4, 2017), Paul Jones (Jan 4, 2017), PJs (Jan 4, 2017), Toolmaker51 (Jan 4, 2017)

  18. #10
    Supporting Member Paul Jones's Avatar
    Join Date
    May 2014
    Location
    Del Mar, California
    Posts
    1,231
    Thanks
    5,810
    Thanked 1,441 Times in 655 Posts

    Paul Jones's Tools
    Marv,

    Thanks for pointing out the tipping issues. There are exact ways to calculate the ideal position of the three support locations on the bottom of the surface plate. Most surface plate manufactures use a Fed spec to locate the support positions or companies such as Starrett recommend using the rule of thumb: "A surface plate should be supported at 3 points, ideally located 20% of the length in from the ends of the plate. Two supports should be located 20% of the width in from the long sides, and the remaining support should be centered".

    Other surface plate manufactures such as Standridge Granite mark the bottom of their surface plates to shown where it was supported during the surface lapping and inspection process and expect the owners to support the plate in the same locations.

    Paul

  19. The Following 3 Users Say Thank You to Paul Jones For This Useful Post:

    C-Bag (Jan 4, 2017), PJs (Jan 4, 2017), Toolmaker51 (Jan 4, 2017)

Thread Information

Users Browsing this Thread

There are currently 1 users browsing this thread. (0 members and 1 guests)

Tags for this Thread

Bookmarks

Posting Permissions

  • You may not post new threads
  • You may not post replies
  • You may not post attachments
  • You may not edit your posts
  •