Free 186 More Best Homemade Tools eBook:  
Get 2,000+ tool plans, full site access, and more.

User Tag List

Page 1 of 3 1 2 3 LastLast
Results 1 to 10 of 21

Thread: Pantogragh style tracing torch project

  1. #1
    Supporting Member Frank S's Avatar
    Join Date
    Aug 2015
    Location
    Peacock TX
    Posts
    11,212
    Thanks
    1,983
    Thanked 8,786 Times in 4,206 Posts

    Frank S's Tools

    Pantogragh style tracing torch project

    This project is a pretty much forgotten way to duplicating parts with a cutting torch or a plasma now that CNC has become the in word of the day.
    Never the less I miss my old Victor DC2400 with its magnetic knurled stylus that would cut out any shape I could possibly conceive as long as I made my templets correctly.

    My whole reason for building the tubing/pipe holder for my Craftsman lathe was to make this project.
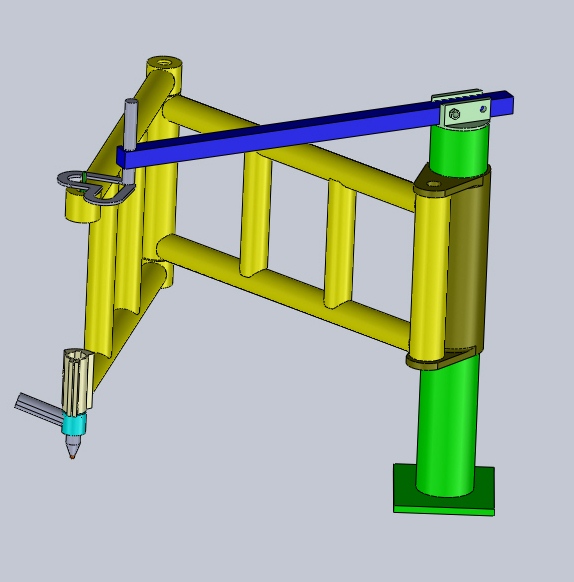
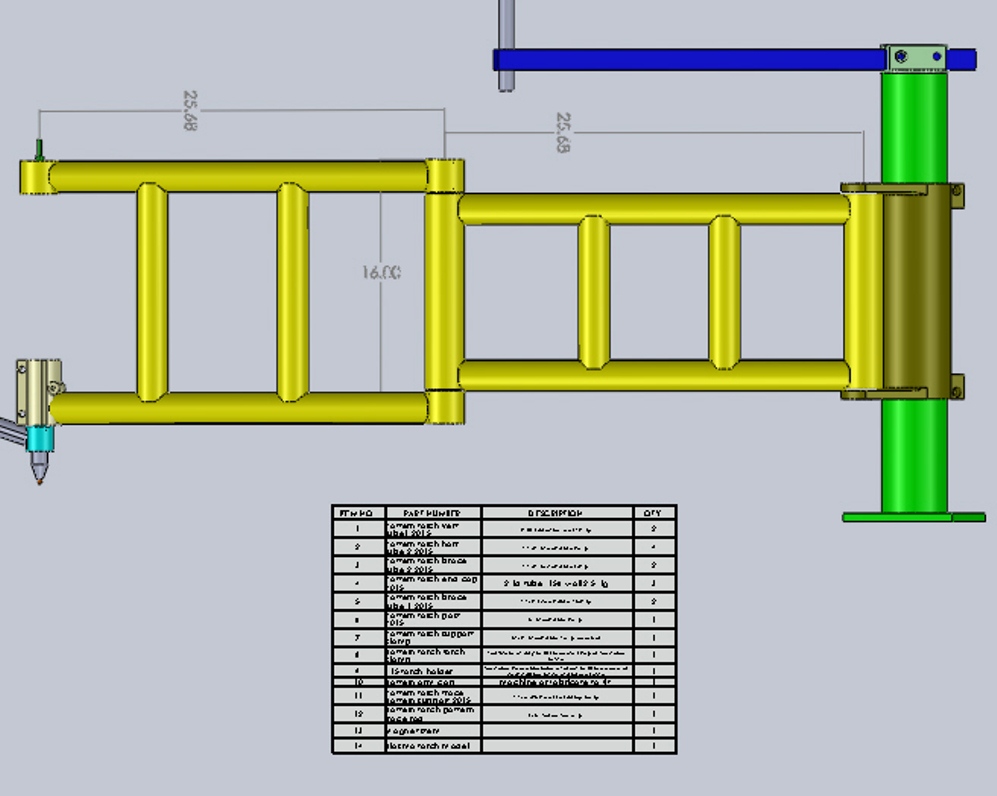
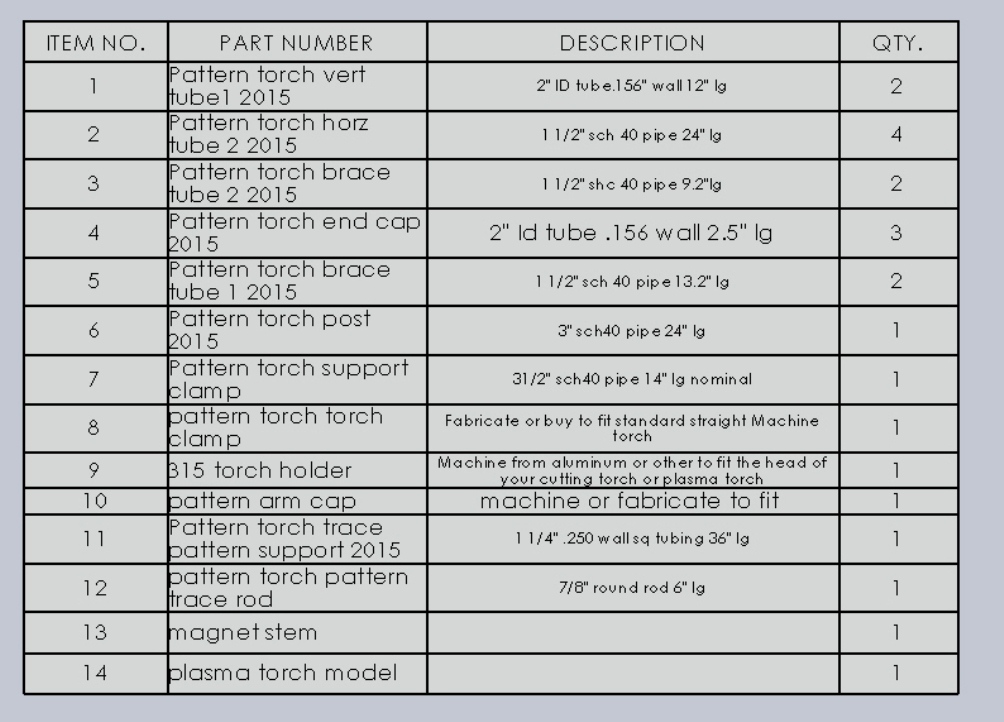
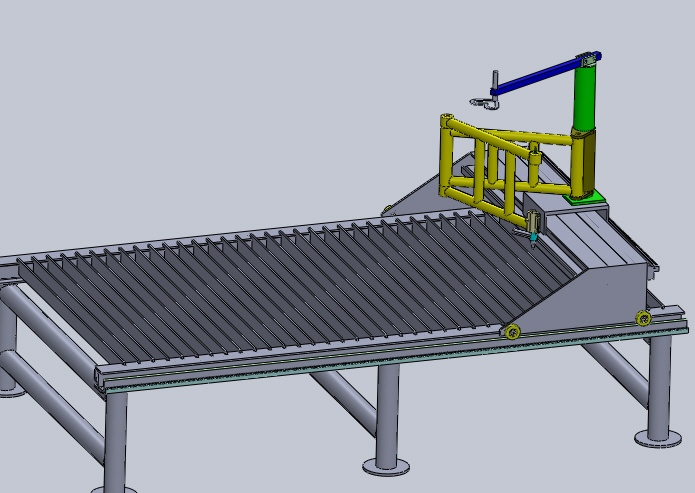
    This is the cad rendering of what I am building.
    Pantogragh style tracing torch project-tracing-torch-1.jpg
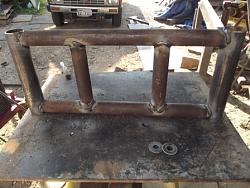
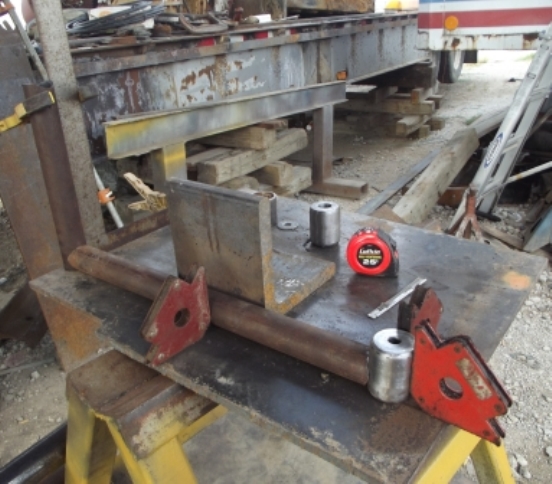
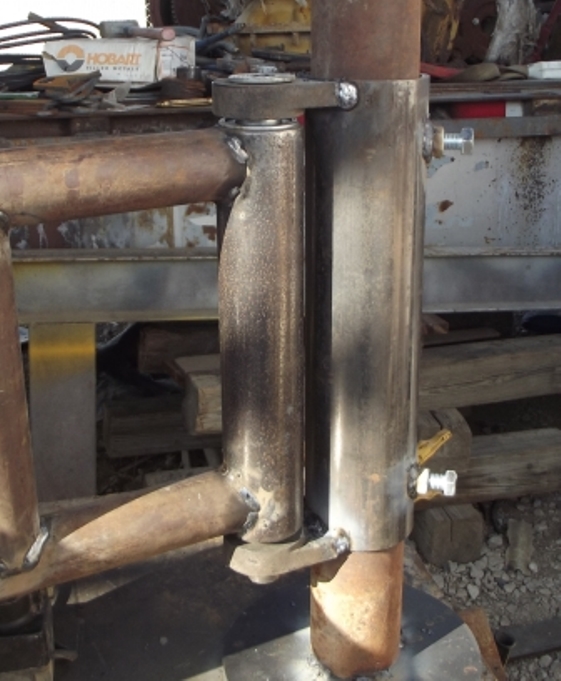
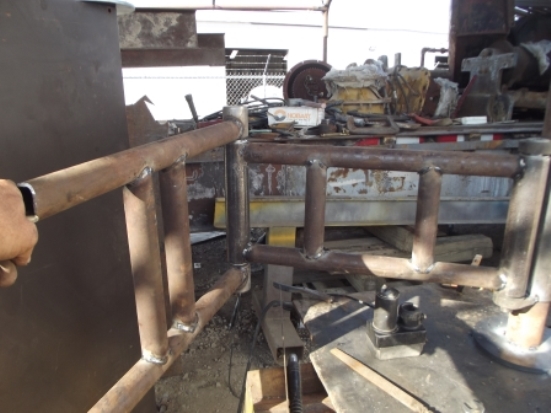
    Starting off with a plate laid on top of 1 of my handy work stands I began placing the pipes into position
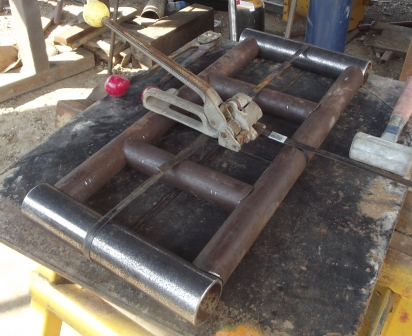
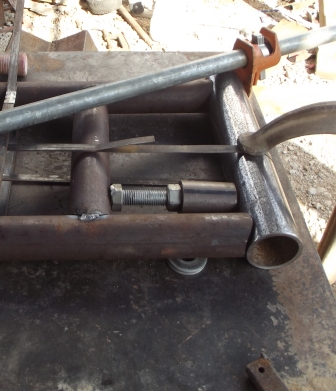
    One of the tools I frequently use for projects like this is my bander. I find that using a steel band to hold things together is 10 times faster than tacking a lot of scraps to a plate to make a jig if I am only making a one-off When fabricating multiples then a fit up fixture if the only way to go.
    Pantogragh style tracing torch project-dscf6473c.jpg
    The steel banding also makes it easier to pull something square when you have half a dozen or so loose parts to contend with.
    Pantogragh style tracing torch project-dscf6474c.jpg
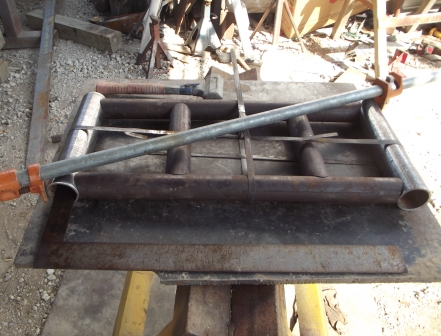
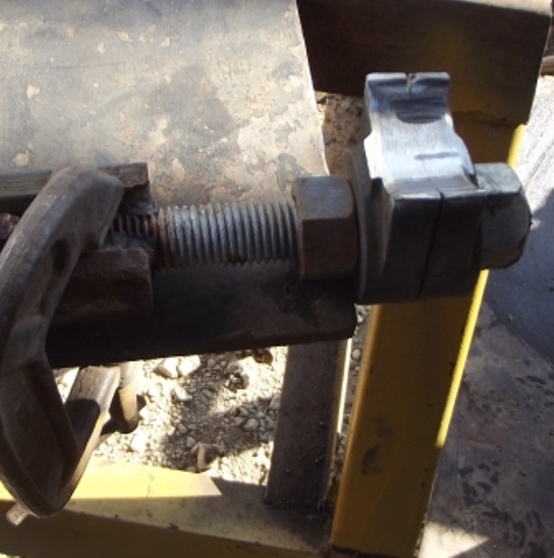
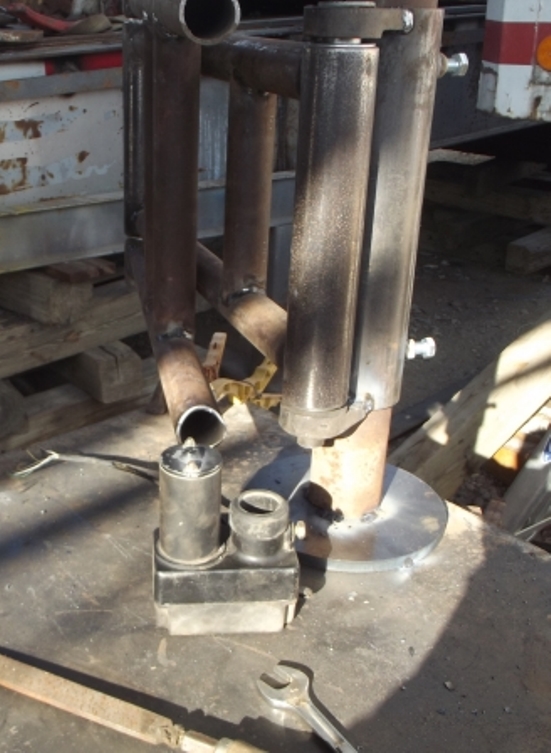
    And we hardly ever think of the simple innocuous jack screw as a real homemade tool since we mostly just grab a nut and a bolt with a short length of pipe to force the final piece to where we need it
    No matter how close parts are cut it always seams to me at least that one corner needs a bit of prodding to get it just right. in my 150 odd years of doing this kind of stuff (well 50 odd at least) I bet I have used a million of these simple little tools. I actually saw some for sale at a machinist supply once and my question was WHY?
    Pantogragh style tracing torch project-dscf6475c.jpg
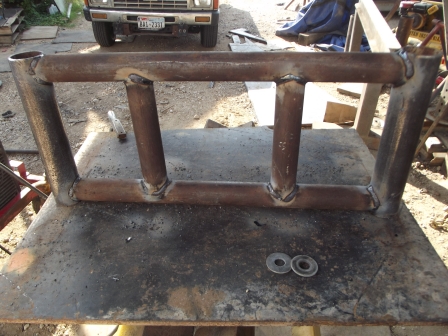
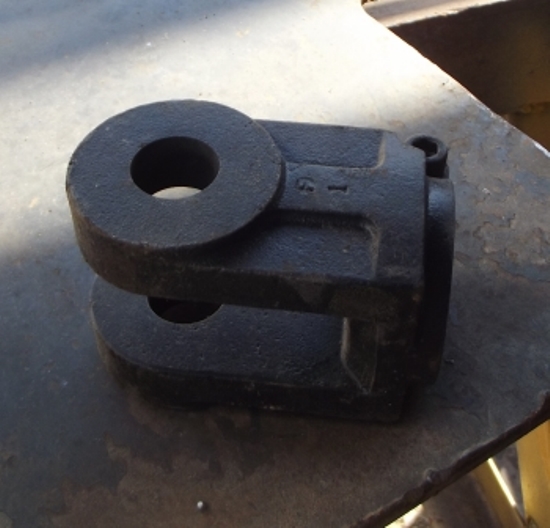
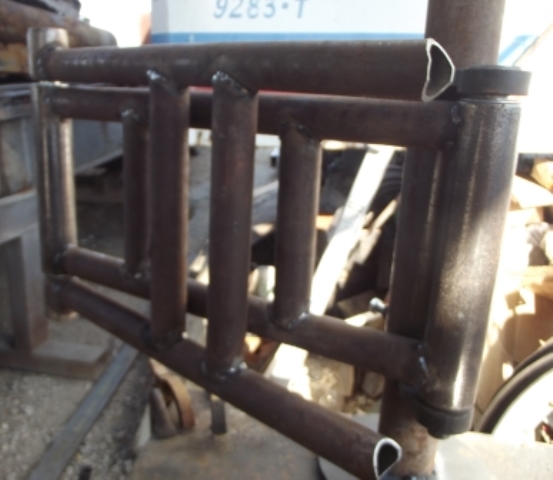
    First arm fabricated ready for clean up
    Pantogragh style tracing torch project-dscf6476c.jpg

    186 More Best Homemade Tools eBook
    Never try to tell me it can't be done
    When I have to paint I use KBS products

  2. The Following 11 Users Say Thank You to Frank S For This Useful Post:

    12L14 (Jul 31, 2019), baja (Aug 26, 2021), ciscokid8 (Sep 23, 2015), clydeman (Aug 25, 2021), jere (Sep 22, 2015), Jon (Sep 21, 2015), kbalch (Sep 23, 2015), mwmkravchenko (Jul 13, 2019), PJs (Sep 22, 2015), Sleykin (Jun 8, 2022), Toolmaker51 (Nov 13, 2016)

  3. #2
    Content Editor
    Supporting Member
    DIYer's Avatar
    Join Date
    Aug 2013
    Posts
    3,056
    Thanks
    772
    Thanked 1,852 Times in 1,653 Posts
    Thanks for posting this. Not everyone has the resources to acquire, or build, a CNC machine.

    2000 Tool Plans

  4. The Following User Says Thank You to DIYer For This Useful Post:

    Sleykin (Jun 8, 2022)

  5. #3
    Supporting Member d.king's Avatar
    Join Date
    Apr 2015
    Location
    Quebec City, Canada
    Posts
    1
    Thanks
    0
    Thanked 0 Times in 0 Posts
    Hello Frank S,
    It would be nice to have some dimensions posted.
    I am thinking of all the things I need/want to use this for!

    D.King
    Nice and simple often makes the most useful tools.
    Don't believe me? Just look at a hammer sometime.........

  6. #4
    Supporting Member Frank S's Avatar
    Join Date
    Aug 2015
    Location
    Peacock TX
    Posts
    11,212
    Thanks
    1,983
    Thanked 8,786 Times in 4,206 Posts

    Frank S's Tools
    d.king ordinarily I just think up a probable size that I want then start hacking out what I want. In this case though I want to be able to burn 36" diameter circles and or parts up to 60" long since my old Victor DC2400 was very limited in the size department I am making this unit quite a bit larger. the arms will be about 25+" long at the bearing centers their separation distance is not at all critical but I decided on the primary arm to be 12" tall the torch arm or secondary arm will have to be sized to pivot around the primary
    I am making my main post out of 3" oilfield pipe because that is what I had on hand also it will be much more stable than the factory torch was with its little 1 1/2" OD stem
    these may help you out
    Pantogragh style tracing torch project-pattern-torch-main-swing-arm-2015-text.jpg

    Pantogragh style tracing torch project-pattern-torch-main-swing-arm-2015-text2.jpg
    just click on the pictures for a full size view

    Eventually after I get it built I will be making a burn table for it and most probably do like I did on the one I took to Kuwait and left there. I will mount the torch on a gantry that travels the length of the burn table. Doing that even allows for converting to a CNC burn table later on if I desired
    this is what I have in mind with the burn table I will be able to place a 4x8 sheet on it and move the torch anywhere over the sheet I found on my old one that it really made things easy to make multiples of the same parts or change out the templets andcut up a whole sheet without moving it
    Pantogragh style tracing torch project-gantry-table-pattern-torch.jpg
    Never try to tell me it can't be done
    When I have to paint I use KBS products

  7. The Following 3 Users Say Thank You to Frank S For This Useful Post:

    KustomsbyKent (Nov 6, 2017), Sleykin (Jun 8, 2022), Toolmaker51 (Nov 13, 2016)

  8. #5
    Supporting Member Frank S's Avatar
    Join Date
    Aug 2015
    Location
    Peacock TX
    Posts
    11,212
    Thanks
    1,983
    Thanked 8,786 Times in 4,206 Posts

    Frank S's Tools
    For the bearings temporarily I will be using 2" OD 1" ID stamped flanged ball bearings the same ones I used in my rough terrain welding cart and my torch cart mod. these are not the best quality for the job but I have an abundant supply of them, they are also less than $2.00 each on Ebay. Later I will change them out for true angular contact bearings.
    Never try to tell me it can't be done
    When I have to paint I use KBS products

  9. #6
    Supporting Member
    Join Date
    Feb 2015
    Posts
    142
    Thanks
    27
    Thanked 94 Times in 43 Posts

    Manitoba Man's Tools
    Frank S.
    I see your not afraid to build your pantagraph on the sturdy side. I look forward to more photos as you progress. I have a pantagraph table "partly" underway. I have an old dentist's light arm I want to use after I add new bearings. After seeing yours I am eyeing my 2 1/2" pipe out back though. You have a good writing style too. Not bad for a 150 year old!

    Thanks for the good ideas.

    Bob from Canada

  10. #7
    Supporting Member Frank S's Avatar
    Join Date
    Aug 2015
    Location
    Peacock TX
    Posts
    11,212
    Thanks
    1,983
    Thanked 8,786 Times in 4,206 Posts

    Frank S's Tools
    Bob; one of the main failings of my factory built Victor DC2400 was the post and the adjustable legs it came with. of cours it was also a much smaller rig than I am, constructing. I may wind up with a duel pattern support system due to the expected large patterns I could conceivably use on it.
    Vertical movement while cutting due to vibrations or whatever is a huge enemy to the finished product. That is why I opted for 2 braces in each arm and the way over-sized post
    Good luck on your pantagraph project. If you are talking about the arm assembly used to hold the big reflector-ized light over the dentists chair then it should be fine as long as the vertical movement parallelogram arms are locked.
    As to the 150 year old part some days I really feel like I have been doing this type of stuff for that long LOL
    Never try to tell me it can't be done
    When I have to paint I use KBS products

  11. #8
    Supporting Member Frank S's Avatar
    Join Date
    Aug 2015
    Location
    Peacock TX
    Posts
    11,212
    Thanks
    1,983
    Thanked 8,786 Times in 4,206 Posts

    Frank S's Tools
    A little time today to make some progress on my pattern torch
    I had welded 1/2" thick ends to teh short pipe pieces then chucked them in the lathe and did a minimum clean up on them then with a 5/8 bit in the tail stock I drilled all the way through
    Pantogragh style tracing torch project-dscf6484c.jpg
    then I used a " drill I drilled all the way through 1 part then on the second part I stopped about 1/8" short of going all the way through the reason for this will be explained latter
    Pantogragh style tracing torch project-dscf6485c.jpg
    A few items for helping hands to hold the parts square to each other
    Pantogragh style tracing torch project-dscf6486c.jpg
    the completed arm except for the ends that will eventually hold a drive motor and what ever torch I use
    Pantogragh style tracing torch project-dscf6487c.jpg
    Never try to tell me it can't be done
    When I have to paint I use KBS products

  12. The Following User Says Thank You to Frank S For This Useful Post:

    Sleykin (Jun 8, 2022)

  13. #9
    Supporting Member Frank S's Avatar
    Join Date
    Aug 2015
    Location
    Peacock TX
    Posts
    11,212
    Thanks
    1,983
    Thanked 8,786 Times in 4,206 Posts

    Frank S's Tools
    Life always finds a way of getting in my way when I want to build a special tool that will involve more than a few minutes time to construct.
    then there is the Frankinizing factor which has plagued me since before I was hardly old enough to walk when I used to sit on an old blanket in my dad's garage playing with worn out engine parts as my toys to keep me occupied.
    I started out just going to build this to have a simple round stylus on the top and to hold which ever torch I wanted to use IE ox-act or plasma. InitiallyI was not going to go to the trouble of making a proper drive motor for it. That was going to come later but I started thinking about a DC gear motor that I knew I had off an old satellite tracking system Sure enough it turned out to still function I counted 40 RPM on 12v Since the power requirements will be low I figure I can get away with up to 40vdc
    which would probably yield upwards of 150RPM nearing the max voltage. So time to start looking around for a suitable power supply. all of te ones I could dig up out of my stock of recyclables proved to be way too large I for sure do not need a DC supply that is capable of a 50 AMP output
    OK bite the bullet and buy a small 120vac to 40 VDC 5 amp power supply from Ebay and a DC motor speed controller both for under $25.00 I think. Anyway enough about that stuff for now.
    Today I finally had a few minutes to do a little more work on the unit.
    I found this cylinder rod clevis lurking in one of my parts bins that looked like it was begging to be used. Ok I kne wit was made of malleable iron but the stuff takes to a cutting torch well enough and welds just fine besides it meant I didn't have to cut out and drill a couple of parts just cut it up and grind the ends to fit my mounting post collar.
    Pantogragh style tracing torch project-dscf6528c.jpg
    Pantogragh style tracing torch project-dscf6529c.jpg
    these are the bearings I am using they will be more than adequate for this machine and they only cost about a buck each
    Pantogragh style tracing torch project-dscf6491c.jpg
    2 7/8" OD oilfield tubing and 3" ID pipe for the post and collar the set bolts are 1/2" gr 5 with flanged nuts welded to the collar the picture doesn't show but there are 4 of these welded to the collar
    Pantogragh style tracing torch project-dscf6530c.jpg

    Pantogragh style tracing torch project-dscf6531c.jpg
    this is the motor I plan on using
    Pantogragh style tracing torch project-dscf6532c.jpg
    All is left now is to mount the motor make the magnetic drive and the stylus plus the torch mount
    Pantogragh style tracing torch project-dscf6533c.jpg
    Never try to tell me it can't be done
    When I have to paint I use KBS products

  14. The Following User Says Thank You to Frank S For This Useful Post:

    Sleykin (Jun 8, 2022)

  15. #10
    Supporting Member Frank S's Avatar
    Join Date
    Aug 2015
    Location
    Peacock TX
    Posts
    11,212
    Thanks
    1,983
    Thanked 8,786 Times in 4,206 Posts

    Frank S's Tools
    Jon I'm glad you drug this one out of the vault. I tabled the project while we were making our move and just the other day managed to dig it out of the storage trailer.
    Basically it is ready to use with the exception of a suitable means to make way to magnetize the stylus. I have tried cylindrical hollow centered magnets but they don't magnetize a stylus well enough to hold it against a pattern
    Any suggestions would be helpful at this stage
    Never try to tell me it can't be done
    When I have to paint I use KBS products

  16. The Following 2 Users Say Thank You to Frank S For This Useful Post:

    clydeman (Aug 25, 2021), mwmkravchenko (Jul 13, 2019)

Thread Information

Users Browsing this Thread

There are currently 1 users browsing this thread. (0 members and 1 guests)

Bookmarks

Posting Permissions

  • You may not post new threads
  • You may not post replies
  • You may not post attachments
  • You may not edit your posts
  •