Free 186 More Best Homemade Tools eBook:  
Get 2,000+ tool plans, full site access, and more.

User Tag List

Page 1 of 2 1 2 LastLast
Results 1 to 10 of 20

Thread: Rising to a new Level

  1. #1
    Supporting Member hemmjo's Avatar
    Join Date
    Feb 2017
    Posts
    2,551
    Thanks
    226
    Thanked 1,449 Times in 822 Posts

    hemmjo's Tools

    Rising to a new Level

    OH ... the things we learn then we start to pay close attention to the details…

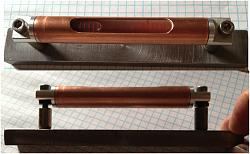
    The back story…I have been working with machine tools for a long time. Up until this point, ± 0.001” has been the closest I have had to be. Typically not even that close was necessary. Now I am wanting to try some more challenging projects. While trying to work more closely, I have discovered my lathe needs a tune up. Reading about this tune up process, leveling is one of the places I have neglected. After moving a lathe to my basement several years go, not having a precision level, I used my best carpenters level, this was not good enough. Not having a precision level also makes it near impossible to correct this. This is the reason for this project.

    I do not want to spend lots of money on a precision level. Since I enjoy the challenge of building something special like this…I thought I would try my hand at making one. My wife has already asked me, “Why don’t you just buy one?” I seem to hear that a lot. Searching online for vials, I discovered there are so many, some with INCREDIBLE precision specifications. I settled on a replacement vial for a Starrett 98-8. I purchased that for $15.00 with shipping I have $23.00 in it. The rest of the components I made from materials I had in my, “I will make something with this someday”, collection.

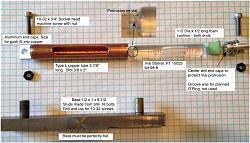
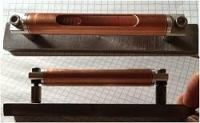
    The base was a chunk of hot rolled steel, 1/2 x 1 I cut off a piece about 6 1/2” long, the longest I can fit in my 4 jaw chuck. I “faced” the 4 sides, to clean up piece and flatten the base.

    The vial holder is a piece of type L copper plumbing pipe. If you choose to make one I recommend type K or L copper, type M has a very thin wall. I wish I had a piece of K to use. I cut a slot in that with my lathe using the compound rest mounted vertical on an adapter I made a while ago after seeing one on HomemadeTools.net - More Than 30,000 Homemade Tools - HomemadeTools.net Since I do not have milling cutters, I used a large center drill held in my collet chuck. It actually worked very well. The biggest problem was holding the tube securely enough without crushing it as the slot made the tube weaker. I ended up making aluminum “plugs” to slip inside the tube to prevent the vise from crushing it. I “honed” the inside with sand paper on a dowel, both before and after milling the slot.

    The end caps for the vial holder are aluminum. The small end is sized to be a snug push fit into the copper tube. The small ends are center drilled just a little, because the vial has a little glass tip on one end from the manufacturing process. I had intended to use O’RIngs to make a tight fit with the copper tube, but they work fine without them. The large end is sized to match the OD of the copper tube. Flats on the large end were milled using a 1/2” carbide router bit in the collet chuck along with my “milling adapter”.

    The posts to hold the vial assembly are made from 3/8-16 bolts. They are cut to length so the threaded end will not stick out the bottom and the unthreaded part is long enough to hold in the collet. The posts are drilled thru and tapped for 10-32.

    The vial is cushioned in the tube with 1/2” thick foam “plugs” that were cut using a “sharpened” piece of copper tube. This is not the best solution. The vial needs to be more secure than the foam makes it. I do not want to make the installation permanent by using something more secure until I am sure the design is good. On another forum, suggested using DAP 33 window glazing compound to seat a replacement vial in their Starrett level. I may try that later.

    The vial assembly went together well, the vial is held snug, but it can move, being held in place with only the friction from the foam cushions. Simply cleaning the glass with a tissue knocked the level out of adjustment.

    This is how you calibrate the level. Starrett 98-12 Level

    During testing I discovered that the bottom was not flat. It was tapered from the center toward the ends about .001” so, pressing down one end, made the other end, .002” high. (each time I try to get more and more precise, I learn my lathe needs a tune up) I corrected this by draw filing the base and checking with my best straight edge. Of course I never noticed this taper when facing small parts, but over the 6 “ length of this bar, it sure did show up.

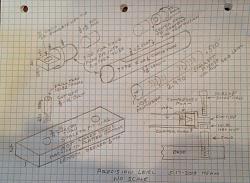
    Attached are photos and a sketch of the level if you want to try it. I can promise it will bring your understanding of level to a whole new level, unless of course, you are already….. on the level
    Rising to a new Level-precision-level-assembled.jpgRising to a new Level-precision-level-sketch.jpgRising to a new Level-precision-level-parts.jpgRising to a new Level-precision-level-base.jpgRising to a new Level-precision-level-test.jpg

    186 More Best Homemade Tools eBook

  2. The Following 18 Users Say Thank You to hemmjo For This Useful Post:

    baja (Oct 10, 2020), DIYer (May 19, 2018), high-side (Jan 11, 2019), Jon (Oct 9, 2020), KustomsbyKent (Sep 25, 2018), Mi Tasol (May 18, 2018), mwmkravchenko (May 18, 2018), Paul Jones (May 18, 2018), PJs (Sep 27, 2018), rendoman (Oct 4, 2018), rgsparber (Sep 25, 2018), rossbotics (May 18, 2018), Seedtick (May 18, 2018), sossol (Jan 10, 2019), Tonyg (Jan 11, 2019), Toolmaker51 (May 19, 2018), tooly (Oct 9, 2020), TSiArt (Sep 26, 2018)

  3. #2
    Supporting Member rossbotics's Avatar
    Join Date
    Dec 2013
    Location
    Florida
    Posts
    730
    Thanks
    1,019
    Thanked 1,645 Times in 402 Posts

    rossbotics's Tools
    Nice work there hemmjo
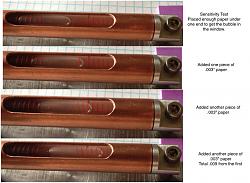
    Just a useful thought though, each graduation on the vial of the level represents .005", beings you made the base of your level 6" long and your using a vial that is made and graduated for a 8" level your error would nearly double, Example:when you put a piece of paper under the level that was .003" thick it would move your bubble about .005"- .006" meaning you couldn't use the level for precise work, just as reference, look at your last photo and it shows how much the bubble moved every time you added .003"
    You did a beautiful job though !

    Doug

    2000 Tool Plans
    Last edited by rossbotics; May 18, 2018 at 09:53 AM.
    Comments are always welcome
    Doug

    Subscribe to my you tube channel

    https://www.youtube.com/channel/UCDD..._as=subscriber


    Tool Plans for Sale by rossbotics


  4. The Following 3 Users Say Thank You to rossbotics For This Useful Post:

    Paul Jones (May 18, 2018), PJs (Sep 27, 2018), rlm98253 (May 18, 2018)

  5. #3
    Content Editor
    Supporting Member
    DIYer's Avatar
    Join Date
    Aug 2013
    Posts
    3,056
    Thanks
    772
    Thanked 1,852 Times in 1,653 Posts


    Thanks hemmjo! We've added your Precision Level to our Measuring and Marking category,
    as well as to your builder page: hemmjo's Homemade Tools. Your receipt:


  6. #4
    Supporting Member Ralphxyz's Avatar
    Join Date
    Dec 2016
    Posts
    1,575
    Thanks
    2,487
    Thanked 280 Times in 229 Posts

    Ralphxyz's Tools
    Now how do you calibrate it? What do you have that is certified level to begin with.

    It is interesting that machinist levels are "adjustable" so that you can set your lathe "level" to it's stand not that it is certified level.

    Ralph

  7. #5
    Supporting Member mklotz's Avatar
    Join Date
    Aug 2015
    Location
    LA, CA, USA
    Posts
    3,437
    Thanks
    357
    Thanked 6,391 Times in 2,118 Posts

    mklotz's Tools
    Quote Originally Posted by Ralphxyz View Post
    Now how do you calibrate it? What do you have that is certified level to begin with.

    It is interesting that machinist levels are "adjustable" so that you can set your lathe "level" to it's stand not that it is certified level.
    Levels are self-calibrating.

    Set the level on any flat (not necessarily level) surface. Mark around its base. Note the position of the bubble.

    Now turn the level 180 degrees and place it on the marks made previously. If the bubble returns to the same position as in the first orientation, the level is calibrated. If not, make adjustment and iterate procedure until it is.

    Rather than marking around the base, I prefer to make a corner pocket into which to fit the level. Clamping a machinist's square or similar to a mill table works well.
    Last edited by mklotz; Oct 5, 2018 at 09:31 AM.
    ---
    Regards, Marv

    Home Shop Freeware
    https://www.myvirtualnetwork.com/mklotz

  8. The Following 5 Users Say Thank You to mklotz For This Useful Post:

    high-side (Jan 11, 2019), Paul Jones (May 22, 2018), PJs (Sep 27, 2018), Toolmaker51 (May 19, 2018), TSiArt (Sep 26, 2018)

  9. #6
    Supporting Member rossbotics's Avatar
    Join Date
    Dec 2013
    Location
    Florida
    Posts
    730
    Thanks
    1,019
    Thanked 1,645 Times in 402 Posts

    rossbotics's Tools
    It's very easy to set or check the level Raplhxyz
    Set the level on a semi level surface, it doesn't even have to be perfect, just make sure your surface you set the level on is level enough that the bubble is close as possible in the middle, use a surface plate, milling machine table ETC. look where your bubble is, now turn the level around 180° the bubble should be in the same place it was before you turned it around , if it's not then unloosen the two locking nuts and raise or lower the vial until the level reads the same every time you rotate it 180°
    Doug
    Comments are always welcome
    Doug

    Subscribe to my you tube channel

    https://www.youtube.com/channel/UCDD..._as=subscriber


    Tool Plans for Sale by rossbotics


  10. The Following 2 Users Say Thank You to rossbotics For This Useful Post:

    Paul Jones (May 22, 2018), PJs (Sep 27, 2018)

  11. #7
    Supporting Member mklotz's Avatar
    Join Date
    Aug 2015
    Location
    LA, CA, USA
    Posts
    3,437
    Thanks
    357
    Thanked 6,391 Times in 2,118 Posts

    mklotz's Tools
    Another thing to remember, Ralph...

    The lathe does not need to be level*. What is needed is to remove any twist from the bed. A level is just a convenient tool with which to measure twist.

    --
    * Lathes are regularly mounted in ship machine shops where level is something that only happens when docked.
    ---
    Regards, Marv

    Home Shop Freeware
    https://www.myvirtualnetwork.com/mklotz

  12. The Following 2 Users Say Thank You to mklotz For This Useful Post:

    PJs (Sep 27, 2018), TSiArt (Sep 26, 2018)

  13. #8
    Supporting Member Toolmaker51's Avatar
    Join Date
    Feb 2016
    Location
    Midwest USA
    Posts
    5,331
    Thanks
    7,042
    Thanked 2,980 Times in 1,893 Posts

    Toolmaker51's Tools

    Yeppers, good thing to be on the level...

    Marv is 100% correct. If a level repeats after 180° reorientation it is correct; even with some apparent displacement of bubble. If not, either base or surface have an interference, some imperfection out of plane to their respective surface.
    Process he describes is the procedure, by textbook and in practice. There are conditions that increase accuracy; a master level will displace its bubble just breathing on the vial [temperature change].

    A good quality carpenters level can be very reliable too. In their normal use, the check combines level [or perpendicular] along with straightness of a surface; over an extended area of contact. That combination may not always be the best indication of information sought.

    Try this experiment. A kitchen table, counter top, etc...demonstrates this as well if not better than a precision surface.
    Place a level on a clean 'flat' surface, obviously longer than the level. Observe reading.
    Now, level still in same location, place thinnest feeler gauge, shim stock, tissue, number size drill etc, at one very end. Observe new reading.
    Next, place level on two identical items at very end; gauge blocks, drill blanks, shim stock. Don't be surprised when a third different reading occurs.
    You could with little effort determine practical accuracy by a little math here, working the overall length by the known thickness of spacer.

    On many levels, the intermediate pair of marks indicate a slope of 1/4" per foot, critical in generation of dependable drainage.

    While base of a precision level can support itself decently in full contact or at its ends, I use that second tendency in leveling machine tools. I suspend the level on good 1-2-3 blocks or reamer blanks. With the spacers separated by a known distance, it is quite simple to better estimate what amount [and direction] of movement is needed to get a machine on two [X & Y] truly horizontal planes.

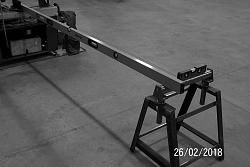
    I used 2 levels, an 8' carpenter for X and 12'' magnetic torpedo for Y on the bandsaw support. To get accurate cuts for long material used in machine frames, this and improved leveling of the saw itself had to occur.
    Rising to a new Level-outboard-support_3.jpg
    As no table connects machine and support there likely is a sag in the level, regarded negligible by reversing level for the same reading. I found imperfections in the concrete floor experimenting with the distance and approximating the Airy Points https://en.wikipedia.org/wiki/Airy_points
    Sincerely,
    Toolmaker51
    ...we'll learn more by wandering than searching...

  14. The Following User Says Thank You to Toolmaker51 For This Useful Post:

    Paul Jones (May 22, 2018)

  15. #9
    Supporting Member Ralphxyz's Avatar
    Join Date
    Dec 2016
    Posts
    1,575
    Thanks
    2,487
    Thanked 280 Times in 229 Posts

    Ralphxyz's Tools
    Thanks, I knew that, duh well I knew that 55 years ago.

    I need a "level" surface to calibrate my cell phone.

    Ralph

  16. #10
    Supporting Member mklotz's Avatar
    Join Date
    Aug 2015
    Location
    LA, CA, USA
    Posts
    3,437
    Thanks
    357
    Thanked 6,391 Times in 2,118 Posts

    mklotz's Tools
    Quote Originally Posted by Ralphxyz View Post
    I need a "level" surface to calibrate my cell phone.
    Float it in a pan of mercury.

    The surface of the mercury is not precisely flat. It will have a radius equal to the radius of the earth but since that is 6371 km, it'll be close enough for government work. If you define "level" to be perpendicular to the local gravity vector, then it's just as level as any surface "leveled" using a bubble level.
    ---
    Regards, Marv

    Home Shop Freeware
    https://www.myvirtualnetwork.com/mklotz

  17. The Following 4 Users Say Thank You to mklotz For This Useful Post:

    Paul Jones (May 22, 2018), PJs (Sep 27, 2018), Toolmaker51 (May 19, 2018), TSiArt (Sep 26, 2018)

Thread Information

Users Browsing this Thread

There are currently 1 users browsing this thread. (0 members and 1 guests)

Bookmarks

Posting Permissions

  • You may not post new threads
  • You may not post replies
  • You may not post attachments
  • You may not edit your posts
  •