Free 186 More Best Homemade Tools eBook:  
Get 2,000+ tool plans, full site access, and more.

User Tag List

Results 1 to 8 of 8

Thread: Round Column Mill Quick Depth Stop

  1. #1
    Supporting Member pfredX1's Avatar
    Join Date
    Sep 2016
    Location
    Delaware
    Posts
    162
    Thanks
    6
    Thanked 121 Times in 62 Posts

    pfredX1's Tools

    Round Column Mill Quick Depth Stop

    I have one of those mainland clones of a RF-32 round column mill. You know a "Heavy Duty" Mill/Drill? Anyhow, I never really liked the depth stop mechanism on it. Consequently I rarely bothered to use it either. Which well, let's face it, there's plenty of times when using a drill depth stop is useful.

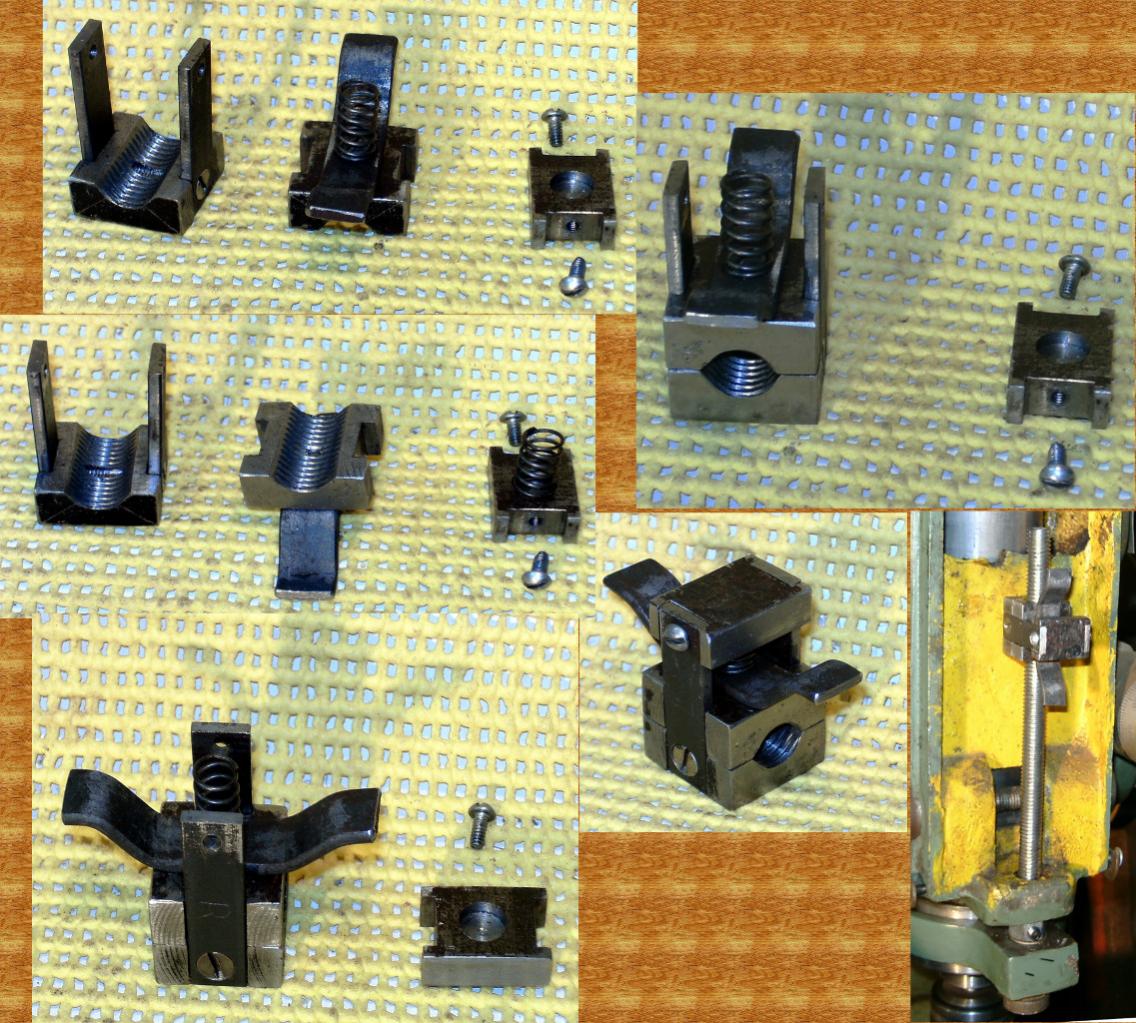
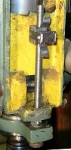
    So one day I decided to modify my machine to improve things somewhat. This is what I made.


    The one tricky aspect of this was I had to knock down the corners inside the expanding block with a file. Otherwise the nut just wouldn't speed slide. If you make it, you'll see what I mean. Filing that bit of thread out doesn't hurt the nut holding on the threaded rod at all. You really have to put quite a chamfer in it for this to work right. So don't be bashful.

    Other than that it is what it looks like. Prepare, and size your stock, then have at it. Making one of these should not take anyone very long. Then you'll actually use your depth stop every time you should. Which means no more drilling through your vises, and nice counterbored holes.

    File this one under, I should have done this years ago. The only real downside is you have to leave that crappy plastic cover off. At least I couldn't make this where I could leave that on. I had some ideas, but this seemed more practical to me. I never really used that crappy scale and pointer much anyways.
    Round Column Mill Quick Depth Stop-millstop1.jpg
    Round Column Mill Quick Depth Stop-pict0095.jpg

    186 More Best Homemade Tools eBook
    Last edited by pfredX1; Oct 1, 2016 at 05:26 PM. Reason: this site does not like PNG images

  2. The Following 2 Users Say Thank You to pfredX1 For This Useful Post:

    Paul Jones (Oct 6, 2016), sossol (Oct 5, 2016)

  3. #2
    Content Editor
    Supporting Member
    DIYer's Avatar
    Join Date
    Aug 2013
    Posts
    3,056
    Thanks
    773
    Thanked 1,852 Times in 1,653 Posts


    Thanks pfredX1! We've added your Mill Depth Stop to our Machining category,
    as well as to your builder page: pfredX1's Homemade Tools. Your receipt:


    2000 Tool Plans

  4. #3
    Supporting Member Paul Alciatore's Avatar
    Join Date
    Mar 2014
    Location
    Beaumont, TX
    Posts
    303
    Thanks
    9
    Thanked 155 Times in 82 Posts

    Paul Alciatore's Tools
    You are dead right when you say that the OEM depth stops are often too difficult to use. So they are most often just ignored.

    It looks like an interesting build. But it is a bit over complicated. This is my solution for mills and drill presses that have difficult to use depth stops.


    I have replaced the double nut stops that came on this drill press with a speed nut. The nut has a button on the side which is visible in the photo. You just press it and it instantly releases it's grip on the threaded rod. Up or down in an instant. And it can be rotated for fine adjustments. Fine adjustment is very desirable for things like countersinking. I have modified several drill presses and mill/drills like this and they work great. I plan to do so for my latest floor stand drill press and my present mill/drill.

    The speed nuts are available from many machine tool suppliers for the common thread sizes used on drill presses and mills. They cost around $10 to $20 each or they are easily fabricated if you have a mill: only two parts and a spring.

  5. The Following 2 Users Say Thank You to Paul Alciatore For This Useful Post:

    C-Bag (Oct 9, 2016), Paul Jones (Oct 7, 2016)

  6. #4
    Supporting Member pfredX1's Avatar
    Join Date
    Sep 2016
    Location
    Delaware
    Posts
    162
    Thanks
    6
    Thanked 121 Times in 62 Posts

    pfredX1's Tools
    space is an issue with my machine. There are protrusions in the casting that the nut has to pass through. Perhaps the nut you depict could be slimmed down? I cannot quite see how your depth stop works. All I see is a knob, and a block. Also, my designs are limited by the stock I have on hand when I make things. I do not have any round stock really. The thickest steel I have is some half inch thick flat bar.

  7. #5
    Supporting Member Paul Alciatore's Avatar
    Join Date
    Mar 2014
    Location
    Beaumont, TX
    Posts
    303
    Thanks
    9
    Thanked 155 Times in 82 Posts

    Paul Alciatore's Tools
    OK, you have all the same elements as I do. Only the "nut" differs.

    My threaded rod is attached to the moveable portion of the quill. That's the aluminum bracket at the bottom of my photo. Yours is also attached to the moveable portion of your quill. No essential difference there except I had to make my bracket.

    I also had to add a Stop that the threaded rod passes through. You also have that feature, but it was built in to the mill. Again, no essential difference.

    That leaves the moveable "nut". I bought mine but you made yours. Mine is the round, black object on the threaded rod. It is made like this:


    The spring goes in the 1/2" hole and then the button on top of it. Press the button in and put it on the threaded rod. Release the button and it locks in place. Rotate for fine control. It works great and can be re-scaled for different sizes of threaded rod.

  8. The Following 4 Users Say Thank You to Paul Alciatore For This Useful Post:

    C-Bag (Oct 9, 2016), Paul Jones (Oct 7, 2016), pfredX1 (Oct 7, 2016), PJs (Oct 11, 2016)

  9. #6
    Supporting Member pfredX1's Avatar
    Join Date
    Sep 2016
    Location
    Delaware
    Posts
    162
    Thanks
    6
    Thanked 121 Times in 62 Posts

    pfredX1's Tools
    Thanks for the drawing. Though honestly I still do not see how it works. There looks like there are lathe operations involved making this too. I do not have a metal lathe. Sometimes I think it'd be nice to have a lathe. But for the most part for what I do a lathe would not be too useful to me. So far I've gotten by without one.

  10. #7
    Supporting Member Paul Alciatore's Avatar
    Join Date
    Mar 2014
    Location
    Beaumont, TX
    Posts
    303
    Thanks
    9
    Thanked 155 Times in 82 Posts

    Paul Alciatore's Tools
    I believe that with round stock it could be made without a lathe and even that is not strictly necessary. You say you have limited metal stock. The nut could be made from the head of a large bolt, perhaps a 1" one. Those would be available at a well stocked hardware store. It would be best to use a lathe to form it, but it could be done with a file and some elbow grease. It does not have to be round. It could be left as a hex shape or you could file down the six corners for a 12 sided shape or whatever you like. You could even file a knurl pattern on the outside of it after filing it to shape. The rest is just drilling.

    Likewise, round stock could be used for the button. It does not have to be precise and again, a large bolt could supply the needed stock. The rest of the work could be done on your mill and with some filing for the step for the spring. Or even that could be done on the mill with a bunch of rotations to form a bunch of straight cuts into a roughly circular notch. An inexpensive spring assortment would probably provide a suitable spring or just buy one at the hardware.

    And yes, it could easily be scaled up or down. But you are working with the the basic thread size of the threaded rod you are using so that must be kept in mind. I find that the somewhat large diameter facilitates fine adjustments.

    As for how it works, when the button is completed (step 2 in my drawing), the slot in the button has threads on the rear end of that slot but the rest of the slot has been enlarged to clear the threads on the threaded rod. Normally the spring holds that threaded part of the slot against the threaded rod and it acts like a normal nut. When you press the button in, the threads disengage and it is free to easily move up and down on the threaded rod. It is a very simple device and, as I said, it is available from tool supply houses in at least two sizes.

    You might think that having a spring holding the threads in contact would not be reliable, but I have used this type of nut for years and have never had one skip a thread. It acts like a very positive stop.

  11. The Following 2 Users Say Thank You to Paul Alciatore For This Useful Post:

    C-Bag (Oct 9, 2016), PJs (Oct 11, 2016)

  12. #8
    Supporting Member pfredX1's Avatar
    Join Date
    Sep 2016
    Location
    Delaware
    Posts
    162
    Thanks
    6
    Thanked 121 Times in 62 Posts

    pfredX1's Tools
    This is all academic to me today as I have already made my complicated depth stop. But perhaps it will help someone else out? Thanks.


    186 More Best Homemade Tools eBook

Thread Information

Users Browsing this Thread

There are currently 1 users browsing this thread. (0 members and 1 guests)

Tags for this Thread

Bookmarks

Posting Permissions

  • You may not post new threads
  • You may not post replies
  • You may not post attachments
  • You may not edit your posts
  •