Free 186 More Best Homemade Tools eBook:  
Get 2,000+ tool plans, full site access, and more.

User Tag List

Page 1 of 3 1 2 3 LastLast
Results 1 to 10 of 24

Thread: RR Anvil

  1. #1
    Supporting Member Carlos B's Avatar
    Join Date
    Mar 2017
    Location
    Canada
    Posts
    103
    Thanks
    81
    Thanked 165 Times in 38 Posts

    Carlos B's Tools

    RR Anvil

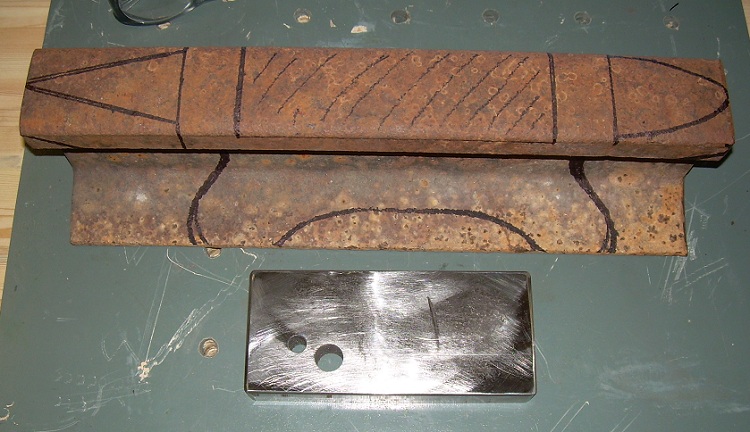
    As mentioned in another RR anvil thread, a few years ago while filling in a old homestead basement dugout I found a 7 1/2' piece of rail, I had thought of making an RR anvil so this was perfect. After collecting more rust for a couple years I finally utilized a 1.5' to build a double horn anvil for light work. The first picture is were I started.

    RR Anvil-7-anvil-rail-section.jpg

    In this picture I have done a rough mark-up for a guide and I made up a face of 1" thick tool steel to add weight and size to the working face.

    RR Anvil-13-markup-face.jpg

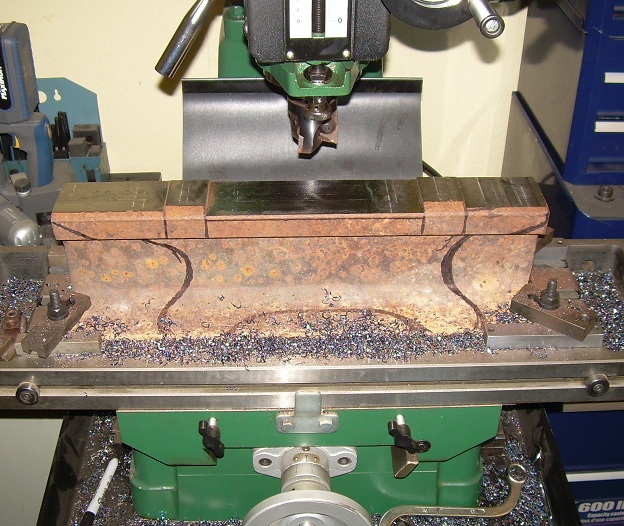
    Here I faced off the top surfaces on my mill/drill.

    RR Anvil-15-milled-top.jpg

    The anvil roughed out.

    RR Anvil-18-rough-2.jpg

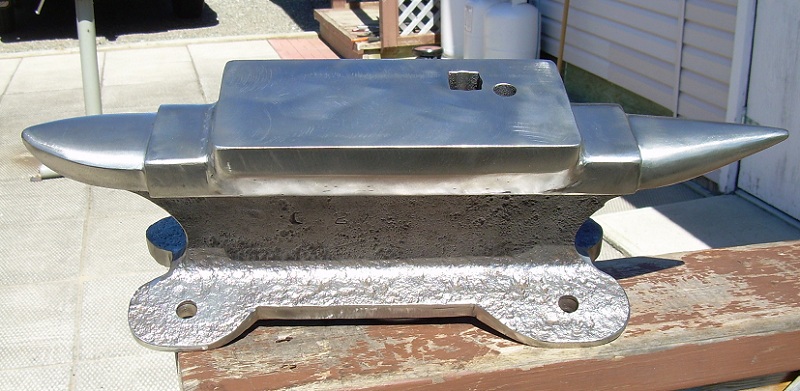
    Here the horns have been refined, ready to heat treat the face and weld it up.

    RR Anvil-27-almost-there.jpg

    All welded up, the welds cleaned up, finished refining the shape and wire brushed the rust, ready for paint

    RR Anvil-36-ready-paint-2.jpg

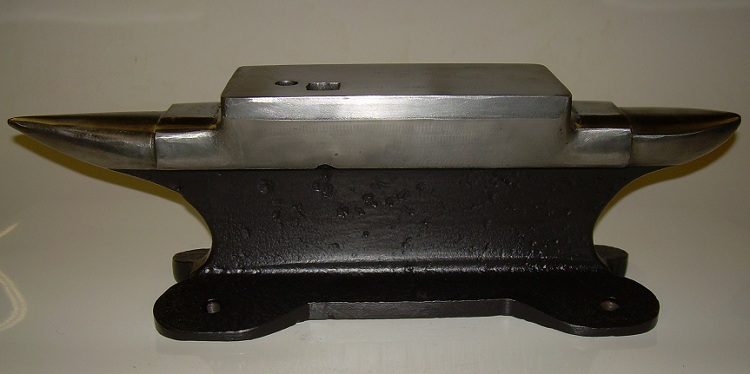
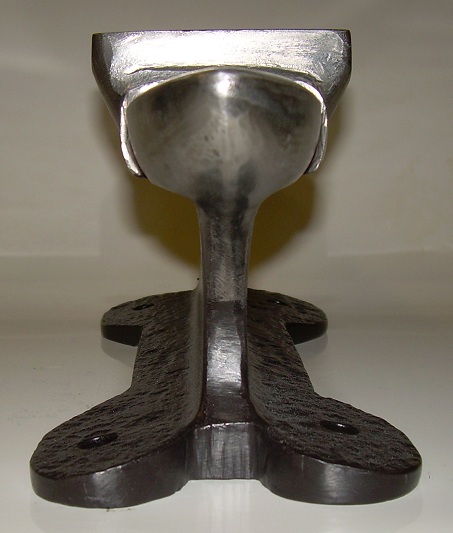
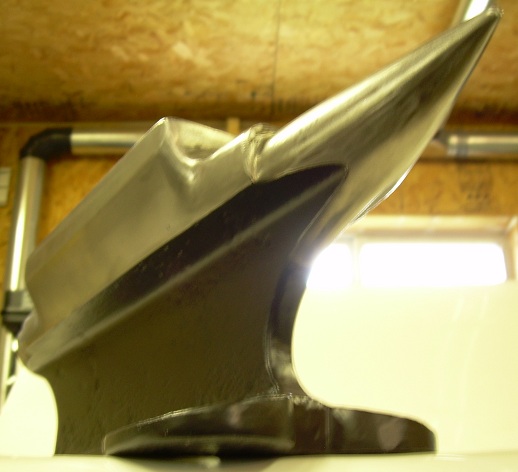
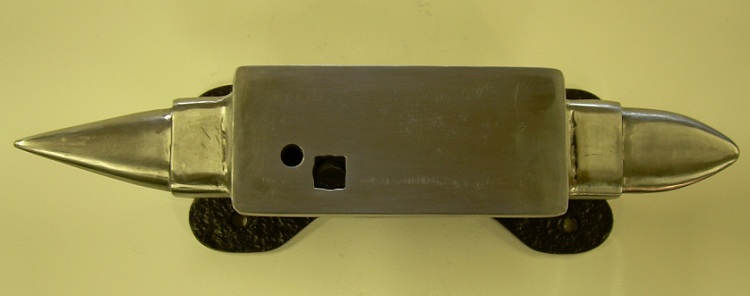
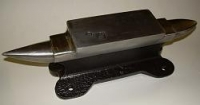
    All finished, the paint is two coats of high heat Tremclad flat enamel. Here are the finished pictures.

    RR Anvil-anvil-2.jpg

    RR Anvil-anvil-4.jpg

    RR Anvil-anvil-6.jpg

    RR Anvil-anvil-7.jpg

    RR Anvil-anvil-8.jpg

    The anvil has a nice clear ring to it. Should do me well for the light work I intend to do on it. There are more pictures and full build documentation on my site at the address in my signature.

    186 More Best Homemade Tools eBook
    Last edited by Carlos B; Jun 15, 2017 at 02:53 PM.
    From a popular rap: "If time is money then I need a loan."
    Carlos B,http://hobbyworkshopprojects.blogspot.com

  2. The Following 16 Users Say Thank You to Carlos B For This Useful Post:

    Bobinwa (Jun 16, 2017), bobs409 (Jun 15, 2017), Frank S (Jun 16, 2017), gunsgt1863 (Jun 20, 2018), JD62 (Jun 16, 2017), Marc Broussard (Jun 16, 2017), milomilo (Jun 20, 2017), NortonDommi (Jun 17, 2017), Paul Jones (Jun 18, 2017), PJs (Jun 21, 2018), rlm98253 (Jun 16, 2017), rossbotics (Jun 16, 2017), Seedtick (Jun 16, 2017), sossol (Jun 16, 2017), Toolmaker51 (Jun 16, 2017), Tuomas (Jun 19, 2017)

  3. #2

    Join Date
    Jul 2016
    Location
    Alvin, TX
    Posts
    3
    Thanks
    0
    Thanked 0 Times in 0 Posts
    I was at my local metal supplier the other day and they had several 2' sections of railroad rail for $.30 per pound

    2000 Tool Plans

  4. #3
    Content Editor
    Supporting Member
    DIYer's Avatar
    Join Date
    Aug 2013
    Posts
    3,056
    Thanks
    772
    Thanked 1,852 Times in 1,653 Posts


    Thanks Carlos B! We've added your Anvil to our Anvils category,
    as well as to your builder page: Carlos B's Homemade Tools. Your receipt:


  5. The Following User Says Thank You to DIYer For This Useful Post:

    Marc Broussard (Jun 16, 2017)

  6. #4
    Supporting Member Frank S's Avatar
    Join Date
    Aug 2015
    Location
    Peacock TX
    Posts
    11,212
    Thanks
    1,983
    Thanked 8,787 Times in 4,206 Posts

    Frank S's Tools
    Throughout the history of anvil making there have been numerous makes with double horns this may be the first one Ihave seen with dissimilar horn and bick shapes. Really a nice feature when I think about it however not many smiths actually ever take full advantage of the bick or damage them due to their not knowing the somewhat delicate nature with respect of the rest of the anvil.
    Having a short reasonably fat horn on one end with a blunt bick gives you a slight advantage over other 2 horned anvils since you can rough form on the shortened one and finish forming if need be on the more elongated slender horn with the sharper bick.
    Having a hardened steel face welded to the anvil body is a practice that got started in the US by several anvil makers the face was heated to white hot and placed in the bottom of the mold then molten iron was poured in causing the face to be bonded with the body by some manufactures others dir this in the inverse by first casting the body then re heating it and the face then causing the bond by the use of a very large steam hammer Both practices had given way to cast steel by the early 1900's
    Having the wider face on your anvil will give you more flat area to work with however the thin body or in the case of RR track the web with the wide face can not transfer energy from hammer blows as well as the narrower faces of RR track anvils when striking near the edge This only poses a problem for the smith if he has to use his anvil for long periods or time resulting in fatigue to his arm But most smiths will never experience this since they do not normally swing their hammers for hours at a time as a blacksmith would when beating out plow shears and the like.
    The wider face does give you the ability to use it as a replacement for not having a heal since you have 2 horns and many was the time when I was working as a blacksmith apprentice I had wished for a deeper step but my mentor always told me, son you just can not have everything unless you make it yourself.
    All in all in my opinion you have created a next gen RR track anvil which you should be very satisfied with for years to come
    Never try to tell me it can't be done
    When I have to paint I use KBS products

  7. The Following 4 Users Say Thank You to Frank S For This Useful Post:

    Carlos B (Jun 16, 2017), Marc Broussard (Jun 16, 2017), PJs (Jun 21, 2018), Toolmaker51 (Jun 16, 2017)

  8. #5
    Supporting Member Carlos B's Avatar
    Join Date
    Mar 2017
    Location
    Canada
    Posts
    103
    Thanks
    81
    Thanked 165 Times in 38 Posts

    Carlos B's Tools
    Thank you for the likes Frank S. That was my thinking too with the double horns the shorter horn will handle a little heavier, small curve work while the cone horn will handle more delicate tighter curve work. The small face of the rail bothered me, the 1" thick tool steel plate adds a nice work surface and almost 15 lbs. of weight to the anvil. I poured almost half a box of welding rod into building up the sides, its a solid attachment and has a nice clear ring to it. I had a light sheet metal working anvil that I built out of heavy wall steel shapes on a I beam, I beefed it up in a similar manner so it will handle heavier work but unlike the rail anvil it's ring is more muffled because of the hollow body.
    From a popular rap: "If time is money then I need a loan."
    Carlos B,http://hobbyworkshopprojects.blogspot.com

  9. #6
    Supporting Member Frank S's Avatar
    Join Date
    Aug 2015
    Location
    Peacock TX
    Posts
    11,212
    Thanks
    1,983
    Thanked 8,787 Times in 4,206 Posts

    Frank S's Tools
    A second observation which may be useful to others the RR track used in the making of this anvil appears to have been the cut off section of un-used track which would not have received the years of work hardening from trains rolling on it, adding the hard steel face is a good way to compensate for that
    Never try to tell me it can't be done
    When I have to paint I use KBS products

  10. #7
    Supporting Member Carlos B's Avatar
    Join Date
    Mar 2017
    Location
    Canada
    Posts
    103
    Thanks
    81
    Thanked 165 Times in 38 Posts

    Carlos B's Tools
    Actually this was a very well used piece of rail before it succumbed to these northern temps. The picture below shows where it broke off and probably resulted in a derailment. There was a good wear lip on the inside edge, and the work hardening went deep. I faced it off with a carbide insert face mill, I don't think HSS tooling could have done it. Its was tough.

    RR Anvil-4-broken-rail.jpg
    From a popular rap: "If time is money then I need a loan."
    Carlos B,http://hobbyworkshopprojects.blogspot.com

  11. The Following User Says Thank You to Carlos B For This Useful Post:

    Toolmaker51 (Feb 22, 2018)

  12. #8
    Supporting Member Frank S's Avatar
    Join Date
    Aug 2015
    Location
    Peacock TX
    Posts
    11,212
    Thanks
    1,983
    Thanked 8,787 Times in 4,206 Posts

    Frank S's Tools
    OK from the pics it looked like just a cut off that had been out in the weather for a long time thanks for the update
    Never try to tell me it can't be done
    When I have to paint I use KBS products

  13. #9
    Supporting Member Carlos B's Avatar
    Join Date
    Mar 2017
    Location
    Canada
    Posts
    103
    Thanks
    81
    Thanked 165 Times in 38 Posts

    Carlos B's Tools
    Not a problem, the wear lip was facing away from the camera ,totally understandable.
    From a popular rap: "If time is money then I need a loan."
    Carlos B,http://hobbyworkshopprojects.blogspot.com

  14. #10
    Supporting Member NortonDommi's Avatar
    Join Date
    Jul 2014
    Location
    North Island, New Zealand.
    Posts
    990
    Thanks
    1,800
    Thanked 525 Times in 315 Posts

    NortonDommi's Tools
    Seeing this has reminded me that I have a nearly finished one somewhere. Loverly work you have done.

Thread Information

Users Browsing this Thread

There are currently 1 users browsing this thread. (0 members and 1 guests)

Tags for this Thread

Bookmarks

Posting Permissions

  • You may not post new threads
  • You may not post replies
  • You may not post attachments
  • You may not edit your posts
  •