Free 186 More Best Homemade Tools eBook:  
Get 2,000+ tool plans, full site access, and more.

User Tag List

Results 1 to 8 of 8

Thread: Shop Bead Breaker

  1. #1
    wadeamca's Avatar
    Join Date
    Mar 2012
    Location
    Belen, NM
    Posts
    5
    Thanks
    0
    Thanked 7 Times in 3 Posts

    wadeamca's Tools

    Shop Bead Breaker

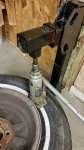
    Here are photos of the bead breaker I McGyver’d over the last couple of days from parts/scrap laying around the shop. I took Phil Gaukroger’s idea of using a part of a trailer hitch and jack, but instead of a screw jack, I used one of my old hydraulic jacks.

    Since I wanted to use this in my small shop and not take up much (if any) room, I needed a way of semi-attaching it to my wall. Looking around (and remembering Phil’s idea of using his receiver hitch), I remembered I an old receiver from my truck that was laying against the wall back in the corner. (This receiver was on my truck, but one day a lady in a Jeep tagged the ball and bent the receiver-to- frame mounts. The 2” square hole and the rest of the receiver was still in perfect condition so I cut off the frame mountings and saved the rest).

    I stood the receiver on the left end (where the frame mounting brackets had been) and did some measuring. I cut off the right end so I basically had the 2” square hitch hole and the left end. I then slid some 2” round pipe into the hitch hole and welded that into place and then welded two pieces of 3/8 (or so) angle iron onto each side of the pipe. I had some 1” square tubing so I cut about an inch-long piece, capped one end and welded this piece to the underside of the pipe to accept the screw end of my hydraulic jack. I also needed some way of keeping this bead breaker from rising when I tried to break down a tire so I took about a 4” section of the piece I had previously removed from the receiver and welded it to the bottom of the left end. I lag-bolted a 2’ piece of 4x4 fence post into the wall frame about 3 ½ inches above the floor. And then brush-painted everything with gloss black Rustoleum.

    Now I slid the breaker into position, put the tire in place, put screw from the hydraulic jack into its receptacle and started pumping. As you can see, it worked on a 15” Lincoln Continental rim that’s from my 1936 Hudson Terraplane. And when finished, I can lay it in a corner or hang it from the shop wall. I like it and it's so much faster and easier than a crow-bar and 4-lb sledge hammer.

    The photos give a much better visual description than my words.
    Attached Thumbnails Attached Thumbnails Shop Bead Breaker-090723.jpg   Shop Bead Breaker-090737.jpg   Shop Bead Breaker-090753.jpg   Shop Bead Breaker-090828.jpg   Shop Bead Breaker-090917.jpg  

    Shop Bead Breaker-090931.jpg   Shop Bead Breaker-091508.jpg   Shop Bead Breaker-091630.jpg  

    186 More Best Homemade Tools eBook

  2. The Following 3 Users Say Thank You to wadeamca For This Useful Post:

    augercreek (Oct 16, 2014), kbalch (Aug 28, 2014), Tule (Nov 12, 2018)

  3. #2
    Content Editor
    Supporting Member
    Altair's Avatar
    Join Date
    Aug 2013
    Posts
    11,890
    Thanks
    1,361
    Thanked 29,699 Times in 9,869 Posts
    Great job wadeamca. I like the non-obtrusive design.

    2000 Tool Plans

  4. #3
    kbalch's Avatar
    Join Date
    Jun 2012
    Location
    Clermont, FL
    Posts
    5,034
    Thanks
    2,275
    Thanked 531 Times in 383 Posts
    Thanks wadeamca! I've added your Wall-Mounted Bead Breaker to our Metalworking category, as well as to your builder page: wadeamca's Homemade Tools. Your receipt:


  5. #4
    Content Editor
    Supporting Member
    DIYer's Avatar
    Join Date
    Aug 2013
    Posts
    3,056
    Thanks
    772
    Thanked 1,852 Times in 1,653 Posts
    An unusual design, using the jack itself to press down on the bead. I like it!

  6. #5
    nonhog's Avatar
    Join Date
    Mar 2012
    Location
    house
    Posts
    11
    Thanks
    1
    Thanked 5 Times in 4 Posts

    nonhog's Tools
    Just scrapped a couple old hitches. Now to find another.
    Well done!

  7. #6
    wadeamca's Avatar
    Join Date
    Mar 2012
    Location
    Belen, NM
    Posts
    5
    Thanks
    0
    Thanked 7 Times in 3 Posts

    wadeamca's Tools
    Thanks for the words of encouragement. But I can't take all the credit for this idea - I took the jack and trailer hitch idea from Phil Gaukroger at Tech: Cheap bead breaker easy to use.. Since I needed to use it in my shop, I just used an old trailer hitch rather than the back of my truck the way Phil did.

  8. #7
    wadeamca's Avatar
    Join Date
    Mar 2012
    Location
    Belen, NM
    Posts
    5
    Thanks
    0
    Thanked 7 Times in 3 Posts

    wadeamca's Tools
    Had to make a minor modification --- when I was trying to break down a tire, this kept pulling away from the wall. I drilled a 3/8 hole in the 4x4 support, inserted a carriage bolt through a short chain wrapped around the bead breaker and reattached it to the other end of the carriage bolt. No more problems.
    Last edited by wadeamca; Sep 3, 2014 at 10:50 AM.

  9. #8
    Content Editor
    Supporting Member
    DIYer's Avatar
    Join Date
    Aug 2013
    Posts
    3,056
    Thanks
    772
    Thanked 1,852 Times in 1,653 Posts
    That'd make a pretty strong reinforcement, wadeamca. Much better than a plate at the back which is what I would have probably considered.


    186 More Best Homemade Tools eBook

Thread Information

Users Browsing this Thread

There are currently 1 users browsing this thread. (0 members and 1 guests)

Tags for this Thread

Bookmarks

Posting Permissions

  • You may not post new threads
  • You may not post replies
  • You may not post attachments
  • You may not edit your posts
  •