Free 186 More Best Homemade Tools eBook:  
Get 2,000+ tool plans, full site access, and more.

User Tag List

Page 1 of 3 1 2 3 LastLast
Results 1 to 10 of 21

Thread: Simplifying the measurement of bores

  1. #1
    Supporting Member mklotz's Avatar
    Join Date
    Aug 2015
    Location
    LA, CA, USA
    Posts
    3,437
    Thanks
    357
    Thanked 6,391 Times in 2,118 Posts

    mklotz's Tools

    Simplifying the measurement of bores

    In a previous post...

    http://www.homemadetools.net/forum/m...g-tapers-55135

    I discussed using shop tools (123 blocks) as an aid to making difficult measurements (of tapers). I'd like to expand on that theme and describe using another shop tool (adjustable parallels) to make another tricky measurement - in this case bores.

    If you want to accurately measure small bores (say <= 0.25"), the best tool is a set of plug gauges. For somewhat larger (say up to 0.5") bores, split ball gauges can be used as can the smallest size of telescoping gauge*. Telescoping gauges consist of a T-shaped device that contains two spring-loaded arms that spring out to the inner diameter of the bore and are then locked in place by a knurled knob on the end of the handle. The gauge is then withdrawn from the bore and measured with a standard micrometer.

    There are a number of problems with the telescoping gauge. Ensuring that it is really on a diameter when locked is the biggest; canting is easy and leads to erroneous measurements. The quality of the locking mechanism is an important concern. If weak, the arms can "grow outward" after removal from the bore or the pressure of the micrometer jaws can press the arms together, again corrupting the measurement. It takes a long time for the amateur to develop the proper "feel" to use these tools properly and this is further complicated by the fact that the type of measurement involved is typically not one done frequently.

    This photo shows a typical telescoping gauge. Next to it is the 1" calibration ring used to calibrate an inside micrometer. I'll use that as our test "bore" since its size is known very accurately. In the background is the Mitutoyo electronic micrometer, held in a stand, which will be used for measurements.


    I measured the calibration ring with the telescoping gauge and, after about four botched tries, got a value of 0.9990" for an (assumed) error of one thousandth. Not too bad but, despite the fact that I've used such gauges for many years, it still took me a lot of fiddling about. It's easy to appreciate why this is one of the measurements most feared by neophyte machinists.

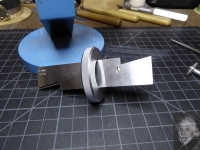
    One of the more useful tools you can buy is a set of adjustable parallels. They have obvious uses supporting stock during machining and can be used to measure slots and similar but are often overlooked as a tool to measure bores. In the picture below, I've expanded one of the parallels into the bore and locked it into place using the locking screws on the parallel...


    Now, measuring diagonally across the edges of the parallel, the micrometer shows 1.0000" on the first try ! Reassuringly accurate and a whole lot easier to do. Give it a try the next time you need to measure a bore accurately.

    Measuring across the diagonal requires a bit of care. The mathematicians in the crowd might ask why I don't measure across the flats and combine that measurement with a measure of the parallel's thickness to calculate the length of the diagonal. The answer is that the edges are ever so slightly relieved and that would introduce an unacceptable amount of error into the process.

    --
    * There are other tools for the job which I won't spend time on here. Inside micrometers, while accurate, require some operator finesse to use properly and can't reach deep into a bore. Bore gauges are super accurate and can reach deeply but are super expensive and usually well beyond the home shop budget.

    186 More Best Homemade Tools eBook
    ---
    Regards, Marv

    Home Shop Freeware
    https://www.myvirtualnetwork.com/mklotz

  2. The Following 18 Users Say Thank You to mklotz For This Useful Post:

    12L14 (Jul 3, 2022), baja (Jun 25, 2022), benkeller3 (May 1, 2018), Eaglewood (Jan 4, 2019), emu roo (Jun 24, 2022), Home-PC (Oct 11, 2020), jdurand (May 13, 2022), jjr2001 (May 1, 2018), Jon (May 1, 2018), mudnducs (May 2, 2018), mwmkravchenko (May 1, 2018), rayh__ (Jun 23, 2022), rgsparber (May 1, 2018), Seedtick (May 1, 2018), Toolmaker51 (May 6, 2018), tooly (Jun 24, 2022), watsonrick (May 1, 2018), yves78 (May 2, 2018)

  3. #2

    Join Date
    Apr 2015
    Posts
    18
    Thanks
    0
    Thanked 0 Times in 0 Posts
    Great job, I love this idea......

    2000 Tool Plans

  4. #3
    Supporting Member rgsparber's Avatar
    Join Date
    Nov 2012
    Location
    Phoenix, AZ
    Posts
    1,278
    Thanks
    735
    Thanked 2,764 Times in 650 Posts

    rgsparber's Tools
    Elegant approach and good explanation of why measuring flats isn’t as good.
    Rick

  5. #4
    Supporting Member metric_taper's Avatar
    Join Date
    Mar 2017
    Location
    Marion, Iowa
    Posts
    585
    Thanks
    228
    Thanked 257 Times in 153 Posts

    metric_taper's Tools
    I never used the telescoping (snap) gauge correctly until I watched Keith Fenner (youtube machinist) on a video about 4 years ago. I always would hold them so I had the gauge long part parallel with the hole, and tighten the lock screw. This is the wrong way to do this. You insert it at an angle to your hole tighten the lock, and rotate the snap gauge and remove from the hole. This action pushes the Tee section telescoping parts in, they 'walk' to the major diameter, and you get the correct hole diameter. The calibration ring, may not be thick (deep) enough for this motion.
    I do like your solution of the adjustable parallels, and measuring the diagonal. But this may not work in a hole unless it's deep enough for the adjustable parallel to capture.
    Last edited by metric_taper; May 1, 2018 at 09:47 PM.

  6. The Following 3 Users Say Thank You to metric_taper For This Useful Post:

    evilwrench (Sep 5, 2018), PJs (May 2, 2018), yves78 (May 2, 2018)

  7. #5
    Supporting Member thehomeengineer's Avatar
    Join Date
    Nov 2017
    Location
    Berkshire UK
    Posts
    706
    Thanks
    722
    Thanked 2,069 Times in 407 Posts

    thehomeengineer's Tools
    This is OK as long as the bore/hole is deep enough or a through hole to allow the adjustable parallel to be located in place to take the reading. I like the use of the plug gauges as this can have an upper and lower tolerance turned/machined on any old piece of bar big enough to suit the application.
    I do have some Moore & Wright bore parallels, which have a crown on the top of them, to measure across, but find the same issue with them. Great when they fit but very limited in their use.
    For me, first choice (if you have one) internal bore mic as the bore can be checked in several positions and along its length so any taper that can occur can also be identified.
    The Home Engineer

  8. #6
    Content Editor
    Supporting Member
    DIYer's Avatar
    Join Date
    Aug 2013
    Posts
    3,056
    Thanks
    772
    Thanked 1,852 Times in 1,653 Posts


    Thanks mklotz! We've added your Simplified Bore Measurement Method to our Measuring and Marking category,
    as well as to your builder page: mklotz's Homemade Tools. Your receipt:


  9. #7
    Supporting Member Paul Jones's Avatar
    Join Date
    May 2014
    Location
    Del Mar, California
    Posts
    1,231
    Thanks
    5,810
    Thanked 1,441 Times in 655 Posts

    Paul Jones's Tools
    Marv,

    I like your tip and will try it.

    By the way, Adam Booth (Abom79 on YouTube) demonstrated a technique for consistently measuring bores with telescoping gages and works for me. Adam uses Starrett gages and I have Mitutoyo telescoping gages bought in 1970 and both are of high quality and work consistently making accurate measurements. I use these all the time.

    However, I dislike my Mitutoyo small split ball gages because it is very difficult to get the exact right feel of the gage slippage in the bore hole. I think if I used these every day I would eventually be better at the technique. I finally bought several sets of high quality plug gages. The plug gages are simple to use but have never mastered the technique for consistently measuring accurate small diameter holes with the small split ball gages. I am satisfied with using the plug gages.

    Thank you,
    Paul
    Last edited by Paul Jones; May 3, 2018 at 07:53 AM. Reason: Add details on the gages

  10. #8
    Supporting Member mklotz's Avatar
    Join Date
    Aug 2015
    Location
    LA, CA, USA
    Posts
    3,437
    Thanks
    357
    Thanked 6,391 Times in 2,118 Posts

    mklotz's Tools
    Quote Originally Posted by Paul Jones View Post
    Marv,

    I like your tip and will try it.

    By the way, Adam Booth (Abom79 on YouTube) demonstrated a technique for consistently measuring bores with telescoping gages and works for me.

    I also dislike the small split ball gages because it is very difficult to get the right fell of the gage slippage in the hole. I finally bought several sets of good quality plug gages.

    Thank you,
    Paul
    If the method to which you refer involves partially locking the telescoping arms extended, inserting angled and then pivoting to perpendicular to compress the arms after which they are locked with the thumbscrew, have a care. It may work with quality tools but more economic models may leak the arms open after removal due to a less than perfect lock.

    As with so much of what we do, one needs to become familiar and adept with his own tools so he knows how to get reliable measurements from them.

    And I agree, plug gauges are the way to go.
    ---
    Regards, Marv

    Home Shop Freeware
    https://www.myvirtualnetwork.com/mklotz

  11. The Following 2 Users Say Thank You to mklotz For This Useful Post:

    Paul Jones (May 3, 2018), thehomeengineer (May 3, 2018)

  12. #9
    Supporting Member Frank S's Avatar
    Join Date
    Aug 2015
    Location
    Peacock TX
    Posts
    11,210
    Thanks
    1,982
    Thanked 8,786 Times in 4,206 Posts

    Frank S's Tools
    Marv has given an excellent explanation about measuring bores. I like using adjustable parallels for doing what he describes the problem with them of using telescopic gauges is we humans were unfortunately only have 2 hands. holding 2 objects one in each hand then trying to position those just so. and get true reading of the measurements are sometimes more daunting than trying to take the measurement in the first place. It is next to impossible for me to hold a 4 " mic in 1 hand and and adjust it with the same hand Often I will hold the shaft of the telescope gauges in the alligator clips of a pair of 3rd hands or hold the body of a micrometer in the rubber jaws of a small vice. When ever possible though I measure bores with this.
    .0005" graduations plus most bores that I need to check are either tapered or out of round I can tell both by moving up or down or rotating it in the bore. the readings are close enough for anything that I do from 2 to 6 inches
    Simplifying the measurement of bores-20180502_164547.jpgf.jpg
    Never try to tell me it can't be done
    When I have to paint I use KBS products

  13. The Following User Says Thank You to Frank S For This Useful Post:

    Paul Jones (May 3, 2018)

  14. #10
    Supporting Member Toolmaker51's Avatar
    Join Date
    Feb 2016
    Location
    Midwest USA
    Posts
    5,331
    Thanks
    7,042
    Thanked 2,980 Times in 1,893 Posts

    Toolmaker51's Tools
    I can agree and identify with each practice and solution here.
    Telescopes need sufficient depth [and a decent finish in the bore] to feel accurately.
    Ball gauges center easily [bore is perpendicular handle] but are even worse about poor surface finish.
    Inside rod, or tubular mics work well, but only go so small, my littlest is 1.000.
    Like thehomeengineer, I have bore parallels but they're only good on true cylinders.
    The inside mics built on outside mic frames are usually .200 minimum diameter, also useless when taper is suspect.
    Pin gauges are hard to beat, but only get so big...being hardened they are great for all kinds of other tasks.
    Bore gauges come in a variety of styles and $$$.
    Point is, such measurements depend on resources first, then solutions. I haven't measured across corners of parallels but have used them to space a pair of 1/16 drill blanks against the inner surface of a short length yet larger bore. Getting everything aligned a true pain.
    So again, where resources are inadequate, solutions are the key.
    Sincerely,
    Toolmaker51
    ...we'll learn more by wandering than searching...

  15. The Following User Says Thank You to Toolmaker51 For This Useful Post:

    thehomeengineer (May 8, 2018)

Thread Information

Users Browsing this Thread

There are currently 1 users browsing this thread. (0 members and 1 guests)

Bookmarks

Posting Permissions

  • You may not post new threads
  • You may not post replies
  • You may not post attachments
  • You may not edit your posts
  •