Free 186 More Best Homemade Tools eBook:  
Get 2,000+ tool plans, full site access, and more.

User Tag List

Page 1 of 6 1 2 3 4 5 6 LastLast
Results 1 to 10 of 51

Thread: Single piece, simple ball turner.

  1. #1
    Supporting Member tonyfoale's Avatar
    Join Date
    Nov 2016
    Location
    Spain
    Posts
    1,557
    Thanks
    686
    Thanked 2,643 Times in 708 Posts

    tonyfoale's Tools

    Single piece, simple ball turner.

    I need to make some engine pushrod ends with a ball shape. In the past I have done this with carefully ground form tools. There can be two problems with this approach. Firstly, form tools can cause chatter and secondly there is a question of how accurately the shape is.
    I have been thinking of building a ball turning attachment for several decades but there has rarely been a real need. i only make tools when I have a current need.
    My initial ideas centred around "conventional" devices but as I was searching for suitable lumps of metal a much simpler and minimal work idea emerged. Most/all systems that I have seen pictures of don't seem to have a means of fine diameter adjustment. This is an important requirement for me. I guess making door knobs or lathe handles doesn't need it. Then I thought that I needed something like a compound rest slide to mount the tool on for diameter adjustment. That idea led me to ask why build something else when the cross slide can be rotated and is probably more securely held than the small pivots used by many designs of ball turners? So this meant that I only had to make a single piece, a tool holder that would put the cutting edge near the rotation axis of the compound rest. Job done.
    Before use I'll need to clock up the the hole that the compound rest pivots on to centralize that using the cross slide and then lock it in place. That will put the rotational axis on the same longtitudinal vertical plane as the centre of the work piece, ensuring a circular ball rather than a distorted circle with pointed ends as is often seen on winding handles. Perhaps I should make some form of stop to eliminate the clocking each time.
    There is one principal disadvantage with this design. The cutting edge of the tool is set a fair way back and the saddle can't get close enough to a chuck without a lot of workpiece overhang. There is also a compound rest rotational clearance problem ​with a normal chuck. Not so much of a problem with 25 mm and above material if the work piece is long enough to give enough overhang. For smaller diameters I have found that an ER25 collet chuck with a 5C shank held in a chuck on the parallel section works well. This ball turner is suitable for a wide range of ball diameters up to around 40 mm diameter, which is far larger than any anticipated work.
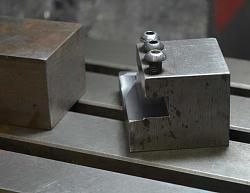
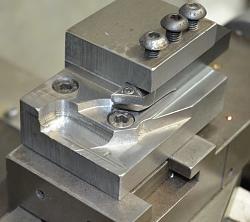
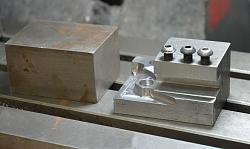
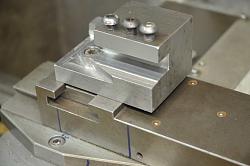
    So i dug out a suitable steel block from the scrap bin and did the minimum amount of milling to enable tool holding and to give work piece and collet chuck clearance. I like to leave the maximum amount of metal in place for rigidity and general mass. I decided to build it to take 1/2" square insert lathe tools because it will give me great flexibility in the choice of cutting tool shapes. I machined the height of the floor of the tool mounting to put the cutting edge at the centre height of the work piece.
    Single piece, simple ball turner.-balls-01.jpg Single piece, simple ball turner.-balls-02.jpg
    The machined tool holder block compared to the original lump of steel.
    Single piece, simple ball turner.-balls-03.jpg Single piece, simple ball turner.-balls-04.jpg
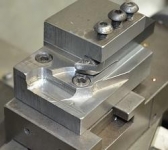
    The block bolted in place on the compound slide in place of the usual tool post. The odd shapes milled away are for clearance as the compound rest is rotated.
    Single piece, simple ball turner.-balls-05.jpg Single piece, simple ball turner.-balls-06.jpg
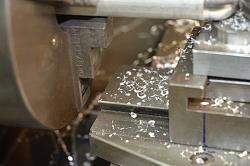
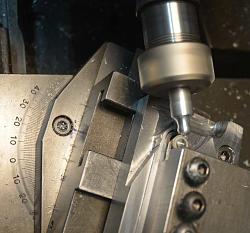
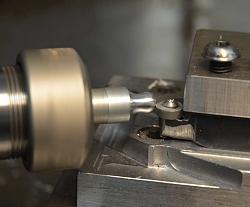
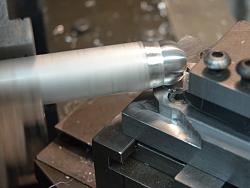
    Machining a 25 mm diameter ball end. Note the required overhang and the closeness of the fixed section of the slide to the chuck.
    Single piece, simple ball turner.-balls-07.jpg Single piece, simple ball turner.-balls-08.jpg
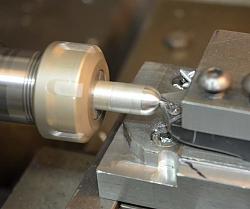
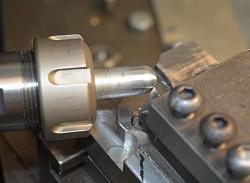
    Machining a 12 mm ball end held in the ER25 collet. Since this photo was taken, more clearance material has been machined away and the overhang from the collet has been greatly reduced.

    I don't claim that this is anywhere near the best ball turner out there but it does a great job and it must be one of the simplest to make and it is a solid and rigid implementation. I love simplicity and minimum work.

    186 More Best Homemade Tools eBook

  2. The Following 15 Users Say Thank You to tonyfoale For This Useful Post:

    Canobi (Sep 3, 2018), high-side (Jul 4, 2020), Inflight (Dec 17, 2023), LMMasterMariner (Aug 15, 2017), Mook (Dec 24, 2023), mwmkravchenko (Sep 3, 2018), olderdan (Aug 15, 2017), old_toolmaker (Jun 5, 2021), Paul Jones (Aug 18, 2017), Ralphxyz (Jun 12, 2021), rossbotics (Aug 16, 2017), Seedtick (Aug 16, 2017), sergulbka (Dec 25, 2023), Tonyg (Sep 4, 2018), Tuomas (Mar 7, 2018)

  3. #2
    Supporting Member tonyfoale's Avatar
    Join Date
    Nov 2016
    Location
    Spain
    Posts
    1,557
    Thanks
    686
    Thanked 2,643 Times in 708 Posts

    tonyfoale's Tools
    here are a couple more pix. making a pushrod end, the base reason for making this ball turner. I mentioned that one of the reasons for making it to accept insert type lathe tools was the choice of cutting edges that can be used. Here I am using a round insert which leaves a smooth finish and blends nicely into the rest eliminating stress concentration.

    Single piece, simple ball turner.-balls-09.jpg Single piece, simple ball turner.-balls-10.jpg
    Two views showing the turning of an 8 mm ball for a pushrod end cap. Click images for full size versions.

    2000 Tool Plans

  4. The Following 8 Users Say Thank You to tonyfoale For This Useful Post:

    LMMasterMariner (Aug 15, 2017), olderdan (Aug 15, 2017), Paul Jones (Aug 18, 2017), Ralphxyz (Jun 12, 2021), rossbotics (Aug 16, 2017), Seedtick (Aug 16, 2017), Tuomas (Mar 7, 2018), WmRMeyers (Dec 19, 2023)

  5. #3
    Supporting Member olderdan's Avatar
    Join Date
    Jun 2016
    Posts
    782
    Thanks
    1,457
    Thanked 1,538 Times in 466 Posts

    olderdan's Tools
    Nice simple sturdy solution, I use my boring head in the up and over mode but do not have the precision requirement that you need, mostly for acorn nuts.

  6. The Following User Says Thank You to olderdan For This Useful Post:

    Okapi (Sep 4, 2018)

  7. #4
    Supporting Member tonyfoale's Avatar
    Join Date
    Nov 2016
    Location
    Spain
    Posts
    1,557
    Thanks
    686
    Thanked 2,643 Times in 708 Posts

    tonyfoale's Tools
    Quote Originally Posted by olderdan View Post
    Nice simple sturdy solution, I use my boring head in the up and over mode but do not have the precision requirement that you need, mostly for acorn nuts.
    i did actually consider using a Criterion style boring head instead of making the tool holder but on balance i decided against it.

    A memory damaged by age is a terrible thing. i remembered as soon as I finished it that I had previously considered two other methods for making ball ends.
    1. i described a T & C grinder that I made in an earlier post to this forum. If I change the grinding wheel for an end mill then I could make balls on that.
    2. I could put the work piece in the mill spindle and a lathe tool in the vice, sprinkle in a bit of G-code and hey presto.

    Why wasn't it before I made this ball turner that I remembered these almost zero work options?

  8. The Following 2 Users Say Thank You to tonyfoale For This Useful Post:

    Seedtick (Aug 16, 2017), Tonyg (Jul 2, 2020)

  9. #5
    Content Editor
    Supporting Member
    DIYer's Avatar
    Join Date
    Aug 2013
    Posts
    3,056
    Thanks
    772
    Thanked 1,852 Times in 1,653 Posts


    Thanks tonyfoale! We've added your Ball Turning Fixture to our Machining category,
    as well as to your builder page: tonyfoale's Homemade Tools. Your receipt:


  10. #6
    Supporting Member Toolmaker51's Avatar
    Join Date
    Feb 2016
    Location
    Midwest USA
    Posts
    5,331
    Thanks
    7,042
    Thanked 2,980 Times in 1,893 Posts

    Toolmaker51's Tools
    Quote Originally Posted by tonyfoale View Post
    (abbreviated) A memory damaged by age is a terrible thing. i remembered as soon as I finished it that I had previously considered two other methods for making ball ends. Why wasn't it before I made this ball turner that I remembered these almost zero work options?
    Well you mentioned considering a ball turner for decades. Both other solutions are feasible, perhaps turning beats milling by eliminating 1 axis?
    Any how, it seems memory is subject to more than just age...Few of us can create items quicker than conceive them.
    Sincerely,
    Toolmaker51
    ...we'll learn more by wandering than searching...

  11. The Following User Says Thank You to Toolmaker51 For This Useful Post:

    tonyfoale (Aug 16, 2017)

  12. #7
    Supporting Member tonyfoale's Avatar
    Join Date
    Nov 2016
    Location
    Spain
    Posts
    1,557
    Thanks
    686
    Thanked 2,643 Times in 708 Posts

    tonyfoale's Tools
    Quote Originally Posted by Toolmaker51 View Post
    ...... Both other solutions are feasible, perhaps turning beats milling by eliminating 1 axis?
    You have lost me there, I see 3 axis involved either way.
    In the lathe you have the rotary workpiece Z axis, the rotary Y axis of the compound rest to describe the ball circle and a linear axis of the compound slide for diameter adjustment.
    On the mill you have the Z workpiece spin axis, the linear Z axis to traverse the work and either the linear X or Y axis (user or G-code programmer's choice) to trace out the shape and size.
    If you have a rotary 4th axis on the mill then you would still need 3. The spin of the 4th axis, the traverse of the X axis and the linear Z axis for the shape and size.
    I don't have a 4th axis yet but I have my eyes open for a small lathe head which I would drive either with an induction motor to use it as a high speed lathe or a stepper motor to use as a CNC 4th axis. A change of belt or a dog clutch would allow rapid swap between the two modes. Although my mill had only 3 axis control I took the precaution of setting up the control stuff for 4 axes to allow easy addition of a 4th.

  13. The Following User Says Thank You to tonyfoale For This Useful Post:

    Wmrra13 (Mar 6, 2018)

  14. #8
    Supporting Member Ralphxyz's Avatar
    Join Date
    Dec 2016
    Posts
    1,575
    Thanks
    2,487
    Thanked 280 Times in 229 Posts

    Ralphxyz's Tools
    I am just getting started with using a lathe and have a ball turner on my list of things to do.

    Where is the pivot on you tool? Sure wish I could could see things live, posible a video of it in action would help.

    But thanks!!

    Ralph

  15. #9
    Supporting Member Toolmaker51's Avatar
    Join Date
    Feb 2016
    Location
    Midwest USA
    Posts
    5,331
    Thanks
    7,042
    Thanked 2,980 Times in 1,893 Posts

    Toolmaker51's Tools
    Quote Originally Posted by tonyfoale View Post
    You have lost me there, I see 3 axis involved either way.
    I'm thinking along the set-up, manipulating knee and quill Z's [prior to locking] wherein lathe that's more 'built-in' addressing centerline. Maybe better size control too? Can think of last occasion to ball turn, no-one had the lathe version, used a boring head though. Difficult to get proper finish, heads aren't too great for decent corner radii on cutters. I wouldn't spend effort on form tool even with means to generate accurate cutter, on something like a push rod.
    Sincerely,
    Toolmaker51
    ...we'll learn more by wandering than searching...

  16. #10
    Supporting Member Y-geo's Avatar
    Join Date
    Aug 2017
    Location
    west london
    Posts
    32
    Thanks
    54
    Thanked 22 Times in 13 Posts

    Y-geo's Tools
    Ralph,
    from my "library " :-


    It is one of the variant "ball making Jigs " available commercially I have not seen (so far ) a how to make your own ball making jig/fixture.

    PS you are in luck this is ONLY 23 mins long lolz
    S & F
    Y-Geo

  17. The Following 3 Users Say Thank You to Y-geo For This Useful Post:

    Frank S (Mar 7, 2018), Paul Jones (Aug 18, 2017), Tonyg (Sep 4, 2018)

Thread Information

Users Browsing this Thread

There are currently 1 users browsing this thread. (0 members and 1 guests)

Tags for this Thread

Bookmarks

Posting Permissions

  • You may not post new threads
  • You may not post replies
  • You may not post attachments
  • You may not edit your posts
  •