Free 186 More Best Homemade Tools eBook:  
Get 2,000+ tool plans, full site access, and more.

User Tag List

Results 1 to 9 of 9

Thread: TAILSTOCK CAM LOCK

  1. #1
    Supporting Member LMMasterMariner's Avatar
    Join Date
    Jan 2016
    Location
    Dubrovnik - Croatia
    Posts
    233
    Thanks
    586
    Thanked 568 Times in 131 Posts

    LMMasterMariner's Tools

    TAILSTOCK CAM LOCK

    Captain’s Lathe 3rd Mod

    Hi everyone

    This is 3rd modification of my lathe (11 x 26, bigger brother of Grizzly G0602).

    As almost every lathe which I used on board ships had cam lock tailstock;
    either longitudinal or transversal cam lock, I decided to make cam lock for my lathe tailstock.
    Little bit more complicated than those already seen on web, but at the same time more heavy ‘dtuy’.
    I like it to be oversized. Piston diameter is 24 mm and frame bolt diameter is 40 mm and it’s 40 mm high.
    Shaft diameter is 16 mm and at cam spot it’s 10 mm in diameter. All parts are oversized.
    Also added support on handle side of the tailstock. No modification was done to sliding plate underneath of ways, nor spring was added to it, as it wasn’t necessary. There is absolutely no slipping of tailstock under heavy loads; when drilling and supporting work piece with live center. Must say that I am very happy with this mod and I still wonder why I didn’t make it earlier.

    Picture 01
    Milled hole in tailstock with 16 mm end mill. (drilled it first)

    Pictures 02 and 03
    Milled bottom and top of oval shaped cavity in order to install frame block.
    Had to remove coating and some cast iron in order to have flat bottom and enough room on top.

    Picture 04
    Milled piston hole with 16 mm end mill.

    Picture 05
    Also had to remove some material at frame block (piston housing) in order to fit inside cavity.

    Picture 06
    Parts. All made from stainless steel except snap ring and chrome plated handle
    which was ordered from Taobao. (one size bigger than one used as tool post handle)

    Picture 07
    Parts assembled on top of milling vise (locked position)

    Picture 08
    Front view of tailstock (locked position – piston up)

    Picture 09
    Front view of tailstock (unlocked position – piston down) Note that handle can not go more down as the bottom of the piston is already touching the tailstock.

    Picture 10
    Observe 4.5 mm gap and sloped part where shaft is passing through. I still think that whoever designed this tailstock did it intentionally just in order to turn away people from making this modification and to make it harder.
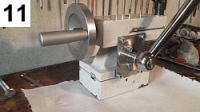
    Picture 11
    Back view. It is visible that piece of 3 mm flat bar is placed at the place of the gap. Also put 2 washers there. Didn’t have flat bar of 4.5 mm thickness and I was too lazy to fabricate it.

    Picture 12
    Drawing with exact dimensions

    Picture 13
    Cam Lock in use - locked position


    Hope that this info will help someone to make this mod.


    LMMasterMariner
    Attached Thumbnails Attached Thumbnails TAILSTOCK CAM LOCK-01.jpg   TAILSTOCK CAM LOCK-02.jpg   TAILSTOCK CAM LOCK-03.jpg   TAILSTOCK CAM LOCK-04.jpg   TAILSTOCK CAM LOCK-05.jpg  

    TAILSTOCK CAM LOCK-06.jpg   TAILSTOCK CAM LOCK-07.jpg   TAILSTOCK CAM LOCK-08.jpg   TAILSTOCK CAM LOCK-09.jpg   TAILSTOCK CAM LOCK-10.jpg  

    TAILSTOCK CAM LOCK-11.jpg   TAILSTOCK CAM LOCK-12.jpg   TAILSTOCK CAM LOCK-13.jpg  

    186 More Best Homemade Tools eBook

  2. The Following 11 Users Say Thank You to LMMasterMariner For This Useful Post:

    Al8236 (Apr 29, 2017), C-Bag (Apr 28, 2017), Doc (Mar 1, 2022), ilmaneger (Jul 13, 2020), Jon (Oct 2, 2019), mwmkravchenko (Feb 15, 2018), Paul Jones (Apr 29, 2017), rossbotics (Apr 28, 2017), Seedtick (Apr 29, 2017), Tule (Apr 29, 2017), VegeKev (Feb 12, 2018)

  3. #2
    Content Editor
    Supporting Member
    DIYer's Avatar
    Join Date
    Aug 2013
    Posts
    3,057
    Thanks
    771
    Thanked 1,850 Times in 1,652 Posts


    Thanks LMMasterMariner! We've added your Tailstock Cam Lock to our Lathe Accessories category,
    as well as to your builder page: LMMasterMariner's Homemade Tools. Your receipt:


    2000 Tool Plans

  4. #3
    Supporting Member Ralphxyz's Avatar
    Join Date
    Dec 2016
    Posts
    1,551
    Thanks
    2,330
    Thanked 277 Times in 226 Posts

    Ralphxyz's Tools
    Thanks, definitely on my must do list!!
    Ralph

  5. #4
    Supporting Member C-Bag's Avatar
    Join Date
    Aug 2015
    Location
    California, central coast
    Posts
    720
    Thanks
    689
    Thanked 876 Times in 471 Posts

    C-Bag's Tools
    Very nicely done LMMM. Very heavy duty and beautiful finish.

    I did the same to my 9x20, but I cheated and used the kit LittleMachineShop sells for the smaller lathe 7x's. I also didn't put the nice outboard bearing, just figured the cast iron would be good enough and was using the eccentric shaft that came with the kit and it wasn't that long. Also cheated on the handle and used one off my mill/drill that I don't use anyway. I had to mill more off the tailstock casting than you did but it works fine and is way better than having to use a wrench!

  6. The Following User Says Thank You to C-Bag For This Useful Post:

    Paul Jones (Apr 29, 2017)

  7. #5
    Supporting Member LMMasterMariner's Avatar
    Join Date
    Jan 2016
    Location
    Dubrovnik - Croatia
    Posts
    233
    Thanks
    586
    Thanked 568 Times in 131 Posts

    LMMasterMariner's Tools
    Hello C-Bag,
    Thanks for your comments, especially the last sentence; no more wrench using. I tried first without outboard bearing and it worked, but I already fabricated all parts on board my ship and brought it home. A lot of free time and lot of free of charge materials there. That's why I turned outboard bearing from stainless steel round bar of 70 mm diameter. When I was making it, I was sure that back of tailstock is flat like on some 9 x 20 lathes and that it would be very simple to install. Once arrived home there was big surprise and this is the reason for additional steel plate.
    Best regards
    LMMM

  8. The Following User Says Thank You to LMMasterMariner For This Useful Post:

    Paul Jones (Apr 29, 2017)

  9. #6
    Supporting Member Tule's Avatar
    Join Date
    Apr 2017
    Location
    Sweden
    Posts
    4
    Thanks
    1,754
    Thanked 1 Time in 1 Post
    Very nice done, I just put it on my to do list. Thanks!

  10. #7
    Supporting Member LMMasterMariner's Avatar
    Join Date
    Jan 2016
    Location
    Dubrovnik - Croatia
    Posts
    233
    Thanks
    586
    Thanked 568 Times in 131 Posts

    LMMasterMariner's Tools
    Hello DIYer,

    Thanks.

    I have just checked my builder page: LMMasterMariner's Homemade Tools and observed that
    my reverse tumbler [http://www.homemadetools.net/forum/c...tumbler-57855]
    is not mentioned there.

    Best regards
    LMMM

  11. #8
    Supporting Member C-Bag's Avatar
    Join Date
    Aug 2015
    Location
    California, central coast
    Posts
    720
    Thanks
    689
    Thanked 876 Times in 471 Posts

    C-Bag's Tools
    LMMM, " A lot of free time and lot of free of charge materials there."

    Very jealous of that. I see a lot of projects here on HMT with big chunks of steel, stainless and whatnot and remember to my last wage slave job where there was literally tons of what they would call scrap. Just perfect for projects. The thing I miss most was the buckets of fastener hardware laying around from cleaning the floor. Whenever I had spare time I built stuff to help do my job as a fabricator/millwright but left all that when I quit.

  12. The Following User Says Thank You to C-Bag For This Useful Post:

    Paul Jones (Apr 29, 2017)

  13. #9
    Jon
    Jon is online now Jon has agreed the Seller's Terms of Service
    Administrator
    Supporting Member
    Jon's Avatar
    Join Date
    Jan 2012
    Location
    Colorado, USA
    Posts
    25,409
    Thanks
    7,916
    Thanked 38,544 Times in 11,260 Posts
    Quote Originally Posted by LMMasterMariner View Post
    I have just checked my builder page: LMMasterMariner's Homemade Tools and observed that
    my reverse tumbler
    is not mentioned there.
    Fixed, thanks!


    186 More Best Homemade Tools eBook

Thread Information

Users Browsing this Thread

There are currently 1 users browsing this thread. (0 members and 1 guests)

Bookmarks

Posting Permissions

  • You may not post new threads
  • You may not post replies
  • You may not post attachments
  • You may not edit your posts
  •