
 LinkBack URL
 About LinkBacks


Several years ago I followed the mini lathe headstock alignment procedures published by MiniLathe Alignment. The method involves placing 0.001" or larger shims between the headstock and the lathe bed. The method works very well but takes several hours to achieve an alignment of approximately 0.001" over 10" from the headstock when measured in the vertical and horizontal directions. However, aligning the headstock now makes the tailstock too low and not in parallel alignment with the headstock. My solution was to buy a replacement tailstock that is manufactured slightly higher in the vertical direction and has an adjustment feature for horizontal adjustment (the old tailstock was one piece). I milled the lower section of the tailstock and added a 0.001" shim on the rear surface that mates with the upper part of the tailstock. This allowed the tailstock to become vertically aligned and horizontally parallel to the headstock. However, I had a really hard time trying to align the horizontal direction while locking the tailstock in place with the set screws provided by the manufacturer.
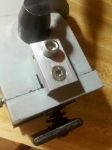
I decided to make another part that would allow a fine left to right horizontal adjustment of the tailstock while keeping it accurately in place as the set screws were tightened. The part consists of a 0.7" x 1.2" x 0.375" 6061 aluminum plate drilled in two places. One hole accommodates a 1/4-20 flathead screw that is used to attach the part to the lower section of the tailstock (the lower section that was milled for lowering the tailstock) and the second hole holds a 1/4-20 adjustment capscrew that is threaded into the upper section. The adjustment capscrew has a shallow square groove cut around the screw shaft just below the head. I added another setscrew from the side of the aluminum plate that captures the adjustment capscrew but still allows it to turn. The adjustment capscrew can now be turned during the alignment process yet keeps the upper section of the tailstock in place while the locking screws are tightened. This works well for me because I do not intend to offset the tailstock for turning tapers. I have another way to do this.


 Reply With Quote


Bookmarks