
 LinkBack URL
 About LinkBacks


Hi folks
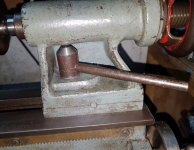
I've wanted to make a quick release lever for my tailstock for ages but always seemed to have something else on the go, until the other day.
There really wasn't much that went into the lever but its a sheer joy to have and use for such a simple thing.
I must confess I got caught up in the swing of things and forgot to take picks as I went along so I will try to explain the steps as best I can.
THE NUT
To make the nut I cut a short length of some 22mm diameter steel bar that was slightly longer than the recess under the quill, I then stuck the piece in the three jaw chuck, faced the end and then cut the bevel.
Once that was done, the piece was flipped over and faced to length, I then drilled and tapped it to fit the tailstock bolt and screwed in place for marking the handle position.
After I'd made my location mark, the nut was removed and tranfered to the bench vice to drill and tap the hole for the handle, this time being quite low on the nut as I plan on adding a tailstock DRO some point soon and I didn't want the handle getting in the way or obscuring things.
Note: With the handle being mounted into the wall of the nut rather than the nice solid part up top, there wasn't going be much material involved for resisting the required leverage forces. The wall thickness is only 12mm and I didn't feel that a 10mm deep blind hole would be enough, so I decided to try something and drilled the hole for the handle threads all the way through the wall of the nut.
The main threads were then tidied up with the tap to remove any burrs that might have been left from drilling the hole through them.
THE HANDLE
The handle was made from a short length of 9.5mm dia steel (same stuff as the 22mm, I'm not sure what type of steel it is but it's lovely to machine) which made it simple to just thread the end as M10.
I must be learning as an intersting idea formed to try something and I marked the handle thread depth so the tip would be level with the nominal internal diameter of the nut once it was screwed in place.
I then turned a relief behind the thread area with my parting tool and used an M10 die to thread it.
THE ESSEMBLY
I screwed the handle into the nut till it was good and tight and the essembly was then clamped in my bench vice. I then reinserted the tap used to cut the main threads of the nut in order to cut threads into the protruding handle tip to clear the bore and blend the protruding tip in with the surrounding thread form.
My thought being that doing so would served to buy the handle a couple extra mm of support and strength either side and should also prevent the handle from unscrewing at any point in the future.
Once that was done, I removed the tailstock from the bed and screwed the lever in place using the clamping foot to turn the bolt home. I then put the tailstock back on the bed and gave the lever a thorough workout along the length of the bed.
The distance the handle travels to get a good strong clamp varies depending on where the tailstock is situated along the bed, which suggests the lathe casting underneath the ways is a little rough but my old Grayson is proper old school and likely have been finished by hand at the factory back in the 40s.
With that said, the handle doesn't need to travel very far to achive high clamping forces along most of the bed, only one spot seems to need it to come close to full travel to match the forces I can get along the rest of the bed but luckily it still stops short.
When released, the tailstock slides to where I need it without much effort so I'm counting it as win on achieving a set goal with a critical parameter and job done
If you made it to this point, I thank you for reading and I hope you found something in there that either inspired or was of use to you in some small way.
The lack of pictures will be made up for in a follow-up thread where I will be making a more substantial locking lever of the same size to replace my tailstock quill's rather small offering:
Until then I wish you all ☆happy chips-mas☆ and I'll see you good folks round


 Reply With Quote


Bookmarks