
 LinkBack URL
 About LinkBacks

Being easily amused, I was having a rollicking good time in the shop making parts I could buy for 45 cents at the hardware store but what fun is that? Making them involved machining on lathe and mill, TIG welding, MIG welding, silver brazing, zinc plating and exercise of vocabulary Ive not used for a while. Living alone has its benefits
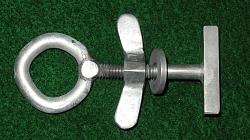
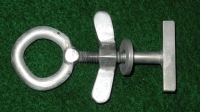
The gaps between the boards on the deck at the lake are ¼ most places, at least enough places to suffice. The idea is to shove the inverted T down thru the crack, rotate it 90 degrees and tighten the wing nut to secure it. Then a rope can be run thru the eye to limit the excursion of the extended part of the awning when the wind gets frisky as it does now and then at Minnewaska. Theres a lot of awning there, so a lot of lift when the wind is just right.
When not needed, these two devices can be easily removed from the deck and put in the deck storage box until next needed, leaving the deck free of hazards to trip on during happy hour. Think of it as a quick-release heavy-duty screw eye.
I wont say how much time I spent farting around making those stupid wing nuts. I didnt want just a little pissant wingnut like any pedestrian mope can buy, oh my no! I wanted man-sized wingnuts, ol Son! I learned a few things. They were things Ive learned before, but apparently not well enough to remember. Doncha hate when that happens? Hint: when drilling stock in lathe in preparation for tapping, do not use previous hole found in stock for starter because it will surely be off center and then every operation thereafter will be f****d up. I knew that! Geez! At least I didnt break a tap.
The nut was made of mild steel hex stock. The wings on the wing nut were cut from 1/8 mild steel flat stock and TIG-welded to the nut. The nut was pre-drilled one size under, but not tapped until welding operations were complete. Then it was drilled out #7 and tapped ¼-20.
The T part of the T-bolt is ¼ square stock. The eye is ¼ round mild steel rod wound around a ¾ mandrel in the vise. Being old, I cheat: its orange hot when I bend it. Bends like wet spaghetti.
The project involved two-step plating, and welding a previously-plated entity. I made the tee-bolt, washer and wingnut, plated them, assembled them, then made the eyes to be welded atop the tee-bolt. I jigged the job with drill press vises and clamps, then wrapped most of the plated part in a cloth soaked with water and hit it with the TIG just enough to get a spot weld and then quenched it quick with a squirt bottle. Result: plating intact up to 1/8 from the weld.
TIG is slow but precise so thats why I tacked with TIG. Just made a weld the size of a BB to stick things together. Once stuck, jigging no longer necessary so I adjourned to the back lab where Mr. MIG resides. MIG is very fast: Ive made welds on sheet metal that didnt blister paint ¼ away. I finished welding on the eyes with MIG, again using a wet sock and a squirt bottle to minimize damage to existing plating. Then I wirebrushed it and stuck them in the zinc bucket to plate the eye and weld, and re-plate the parts that got burned off.
\


 Reply With Quote


Bookmarks