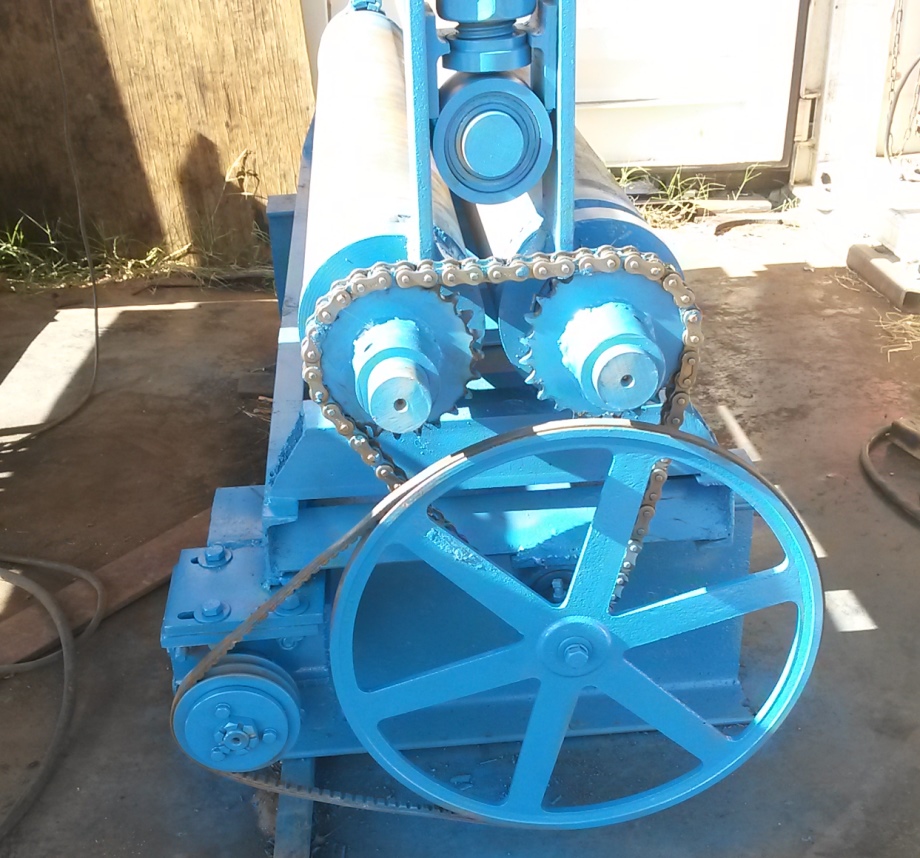
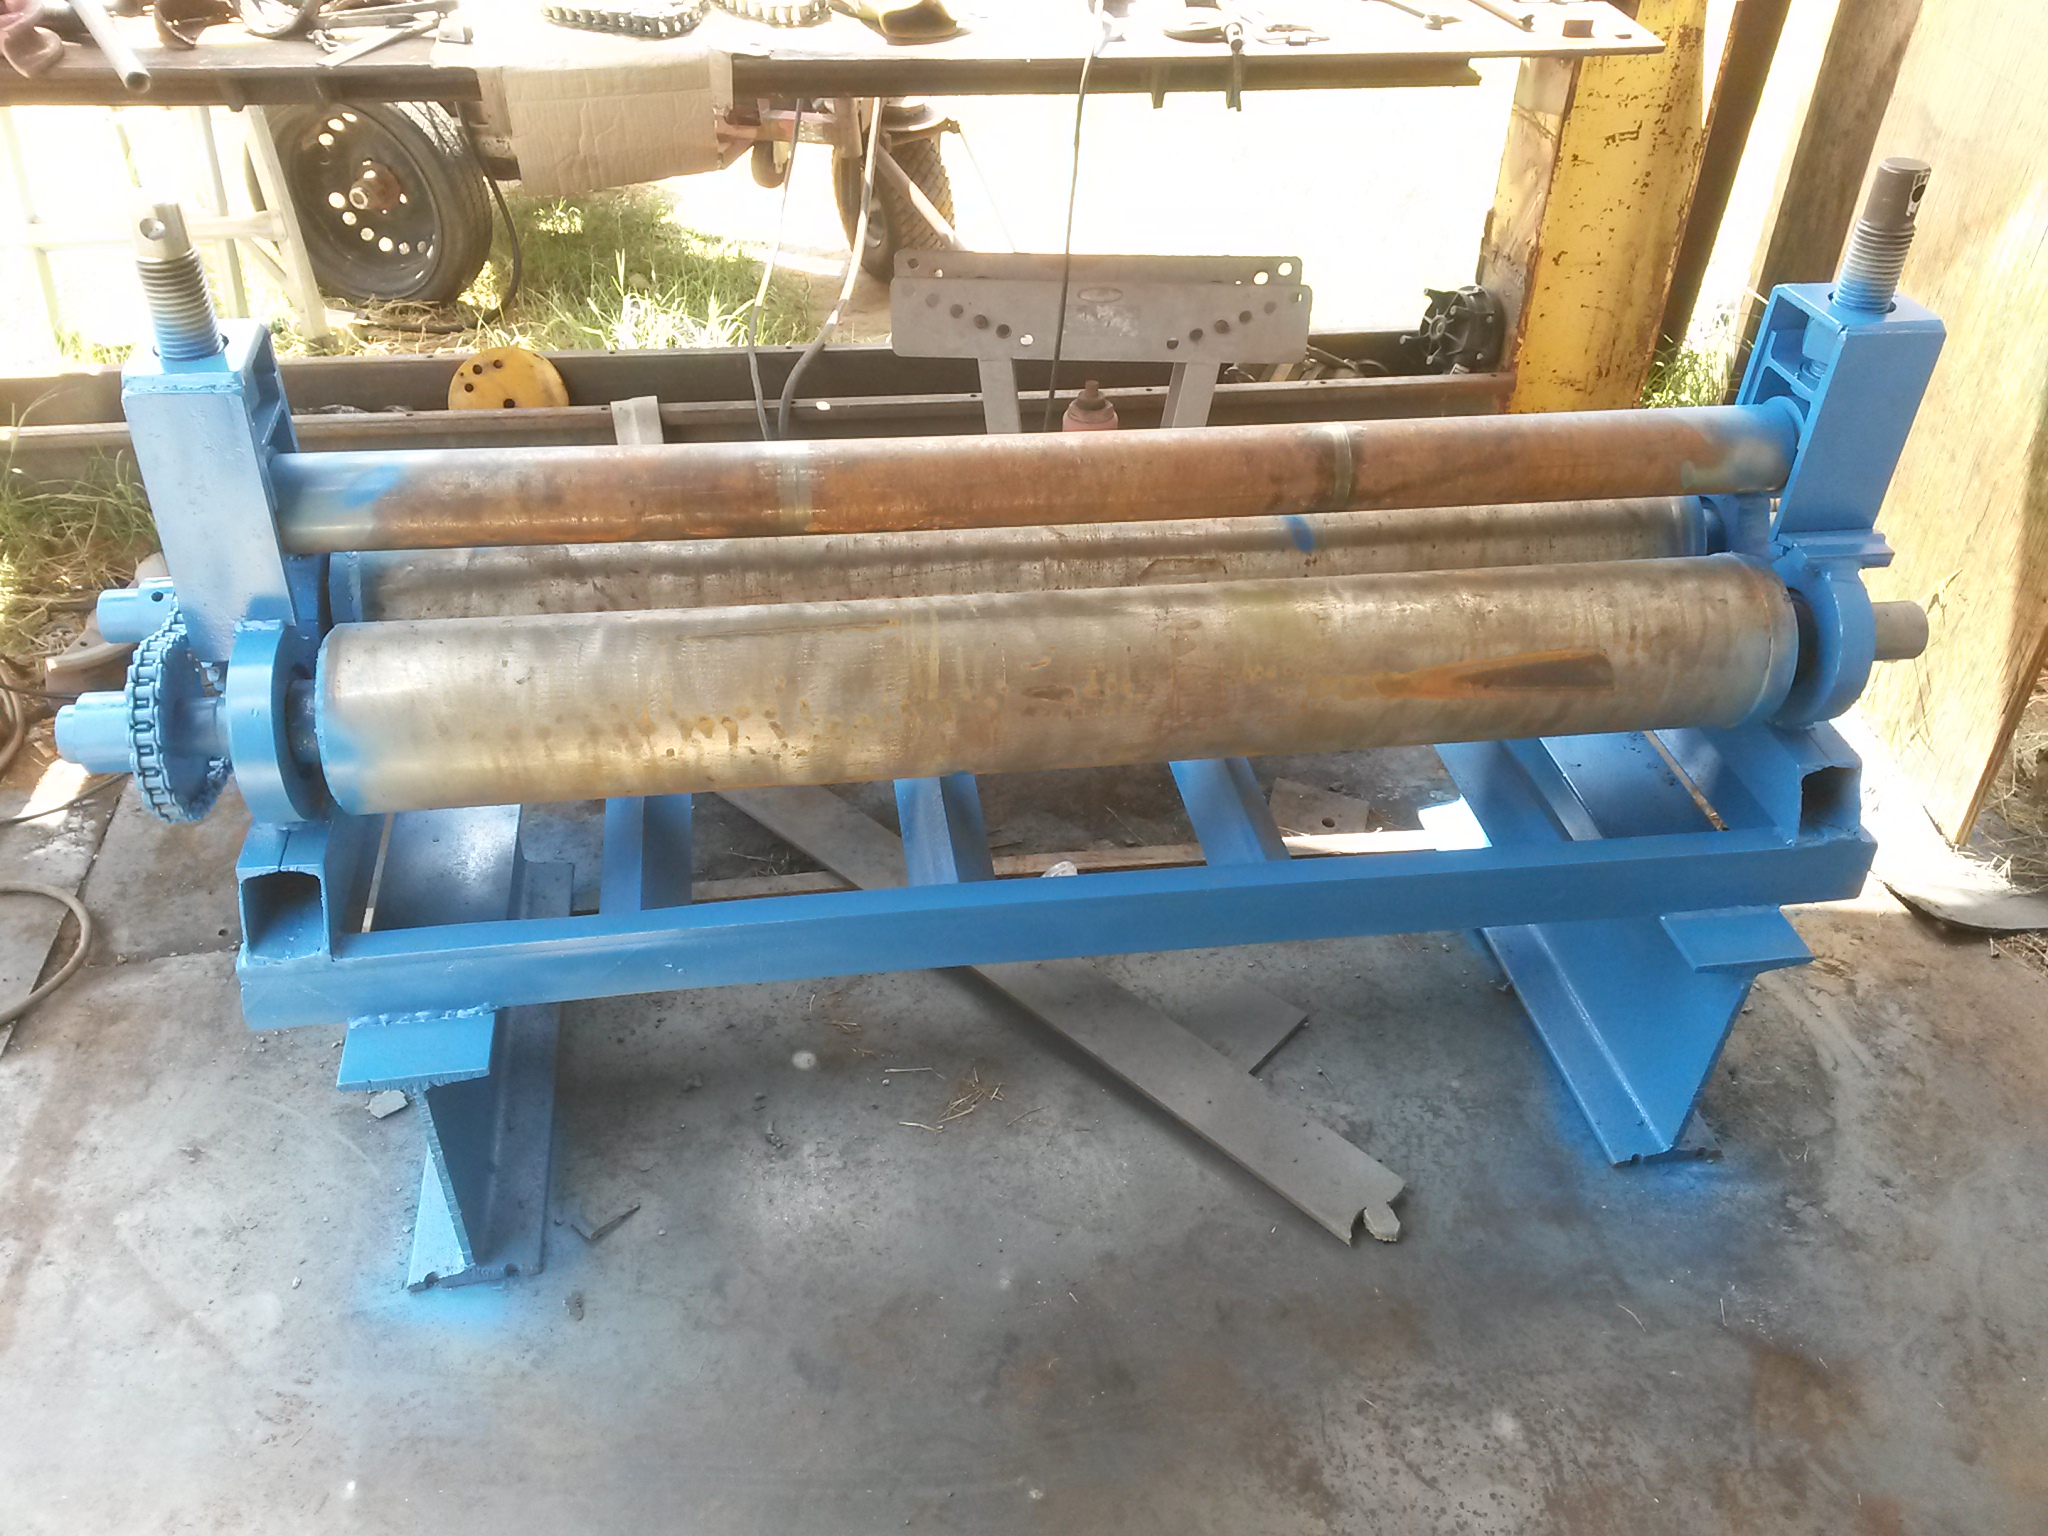
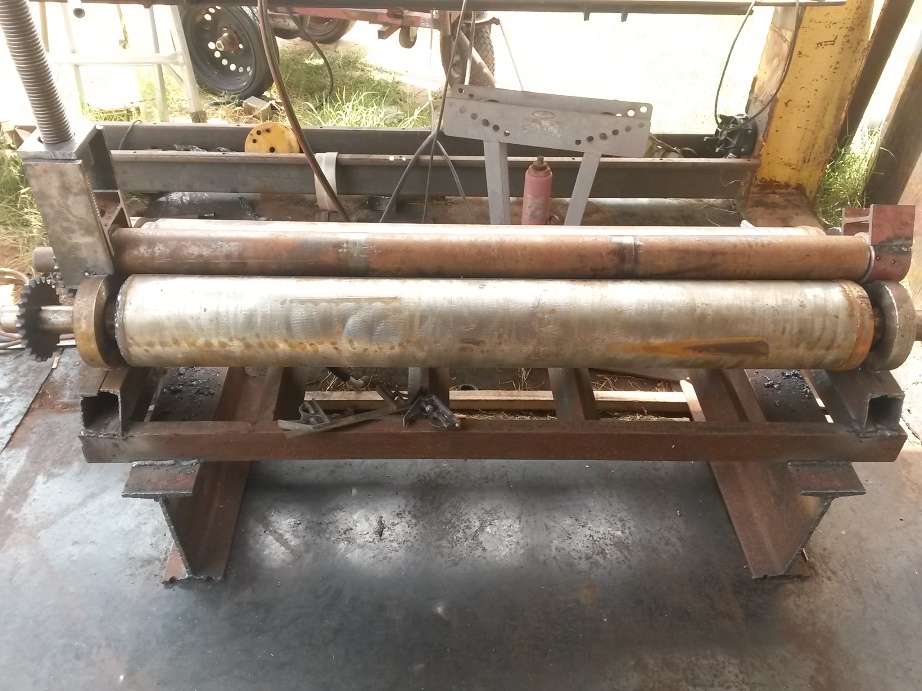
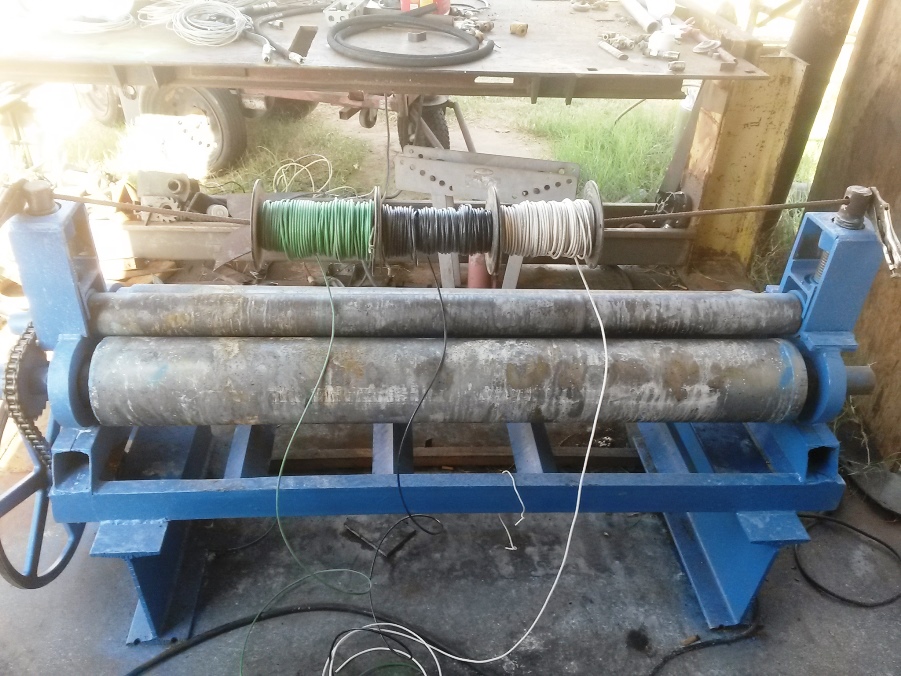
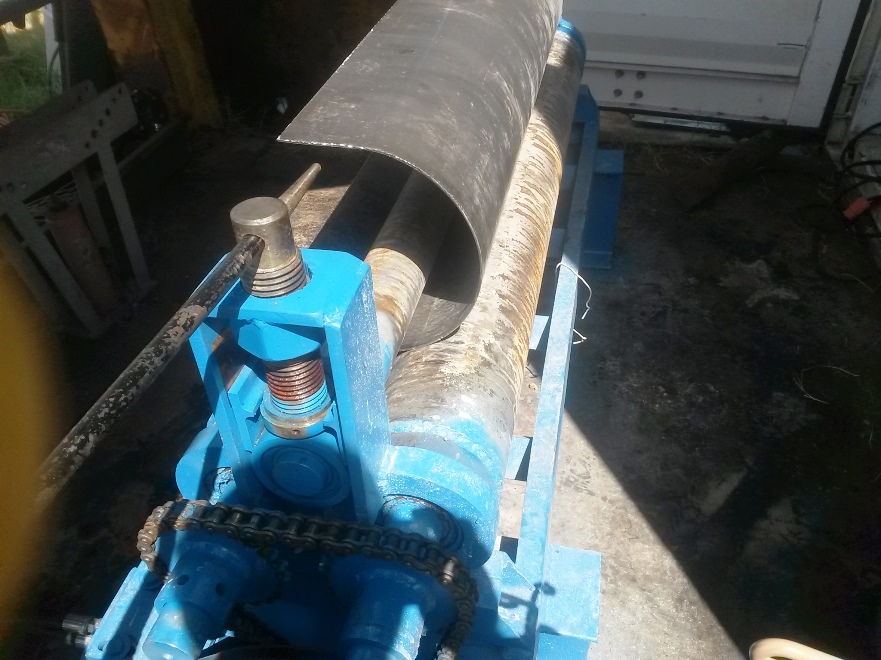
For quite a while now I have been working on my 54" 10ga plate roll
it has 6" pipe main rollers and 3 1/2" solid bar top roll
Attachment 30646
Attachment 30647
Computer keeps crashing so more pics and explanation in next post.
Printable View
For quite a while now I have been working on my 54" 10ga plate roll
it has 6" pipe main rollers and 3 1/2" solid bar top roll
Attachment 30646
Attachment 30647
Computer keeps crashing so more pics and explanation in next post.
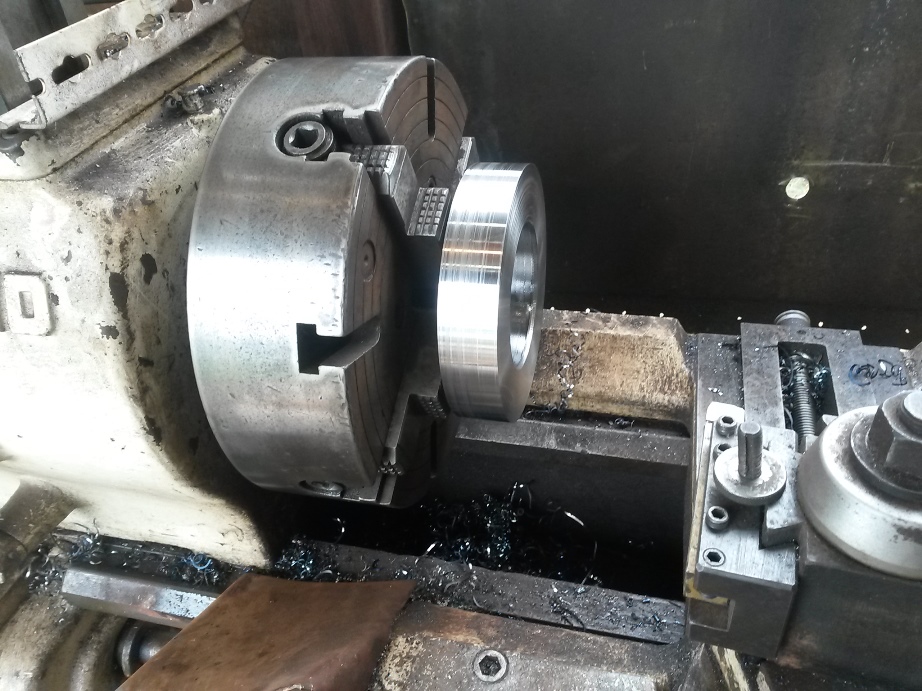
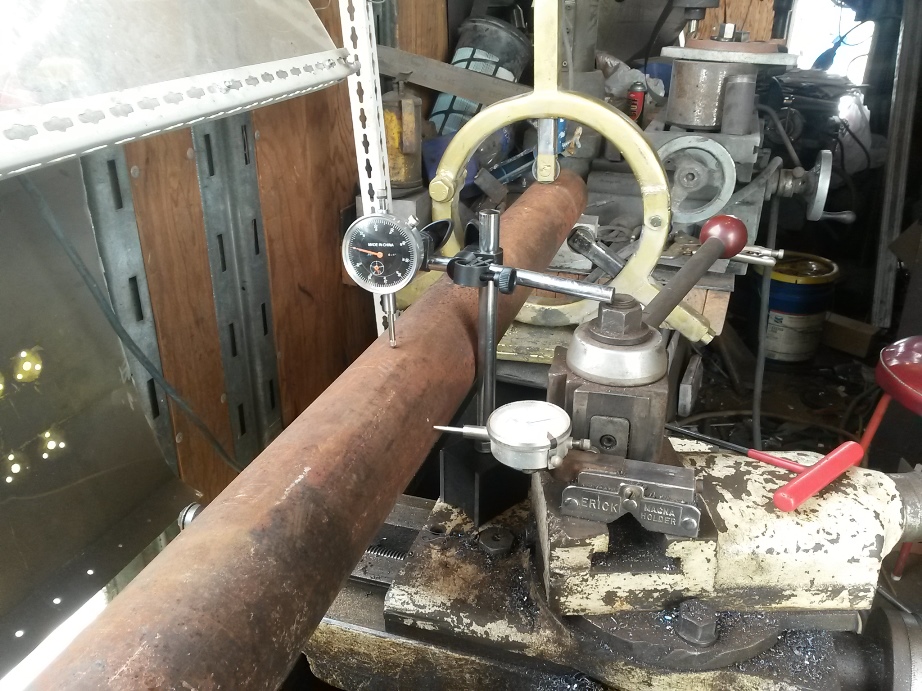
Started off with 6" seamless Sch 40 pipe that had 1 end already on it just had to trim off 50 lbs of steel then turn the pipes
Attachment 30648
Attachment 30649
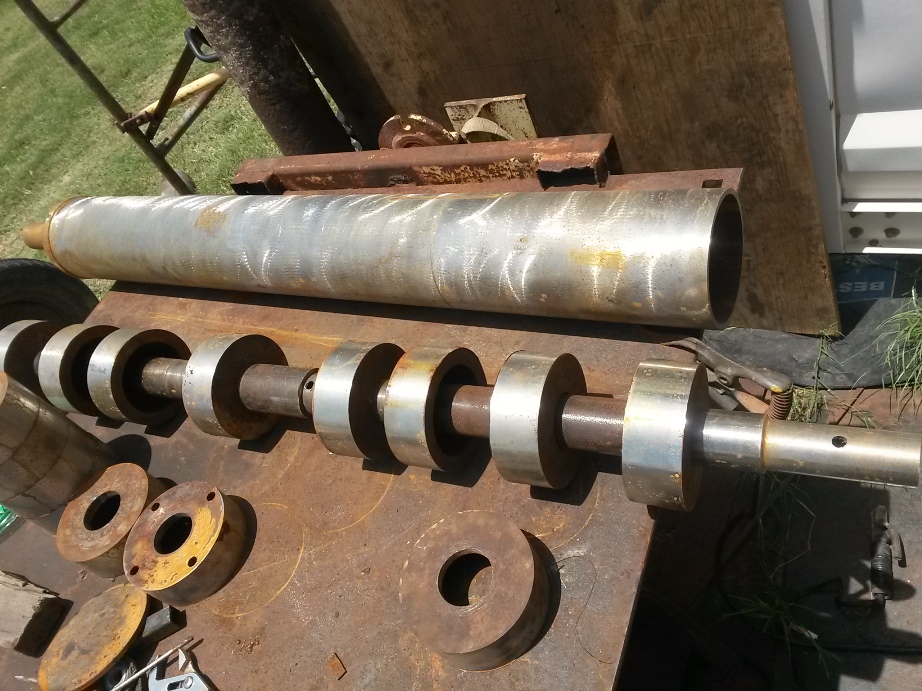
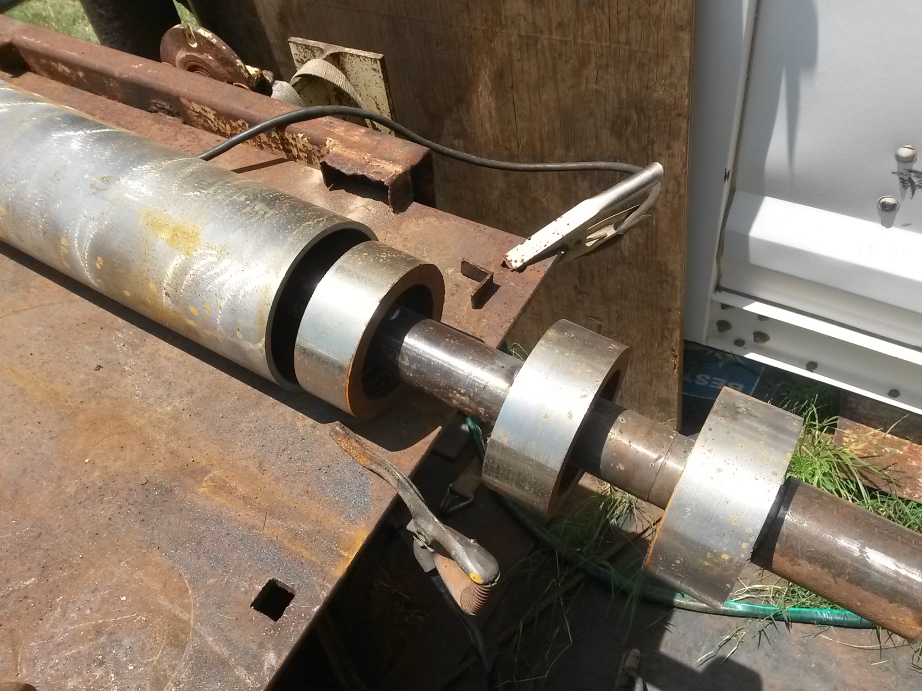
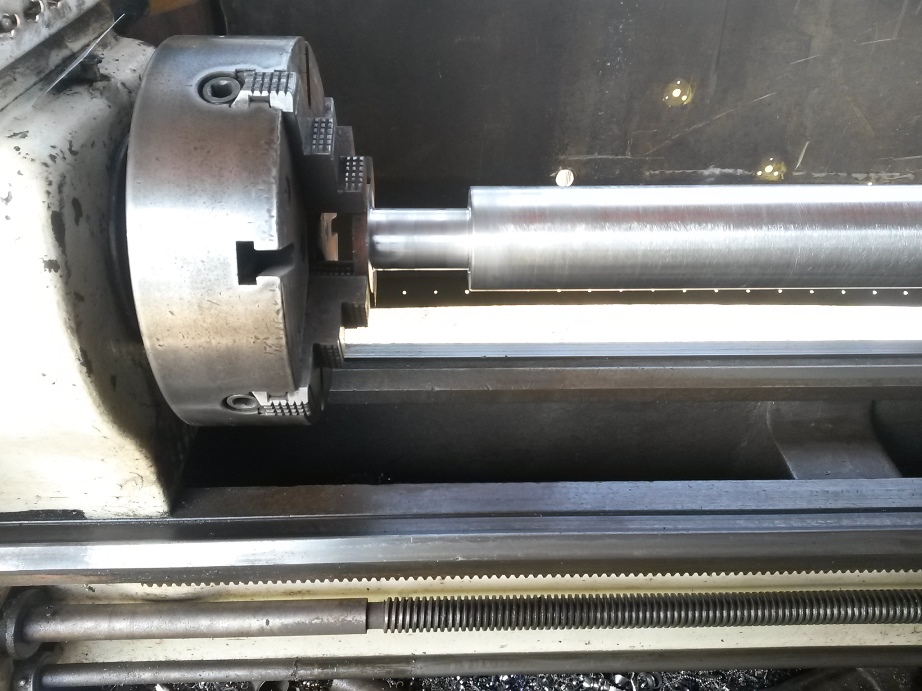
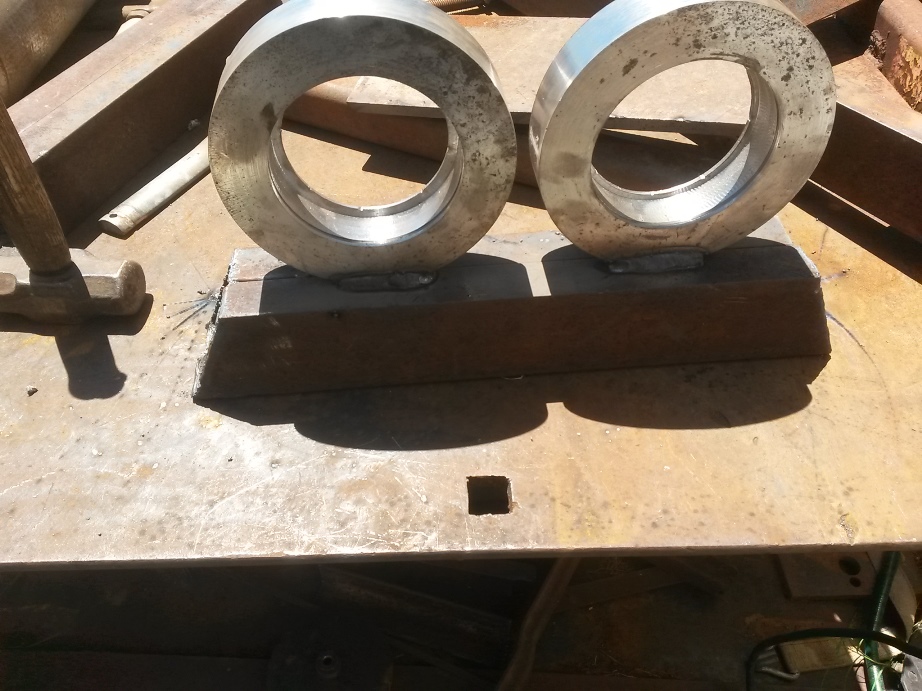
Then machined 16 2 1/4" thick disks to go inside and a center shaft to stiffen the main rollers
Attachment 30651
Attachment 30650
Attachment 30652
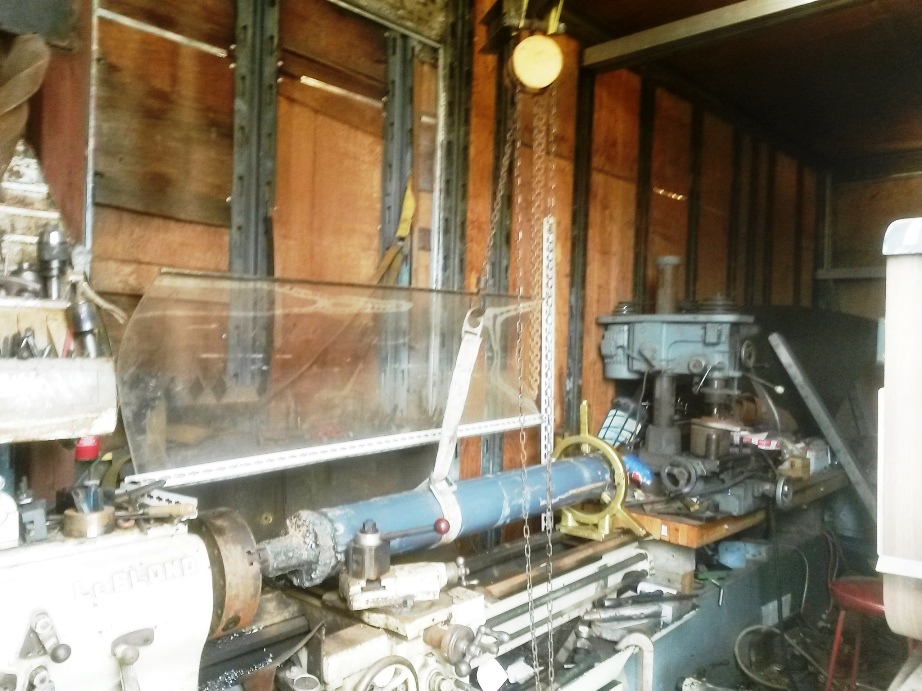
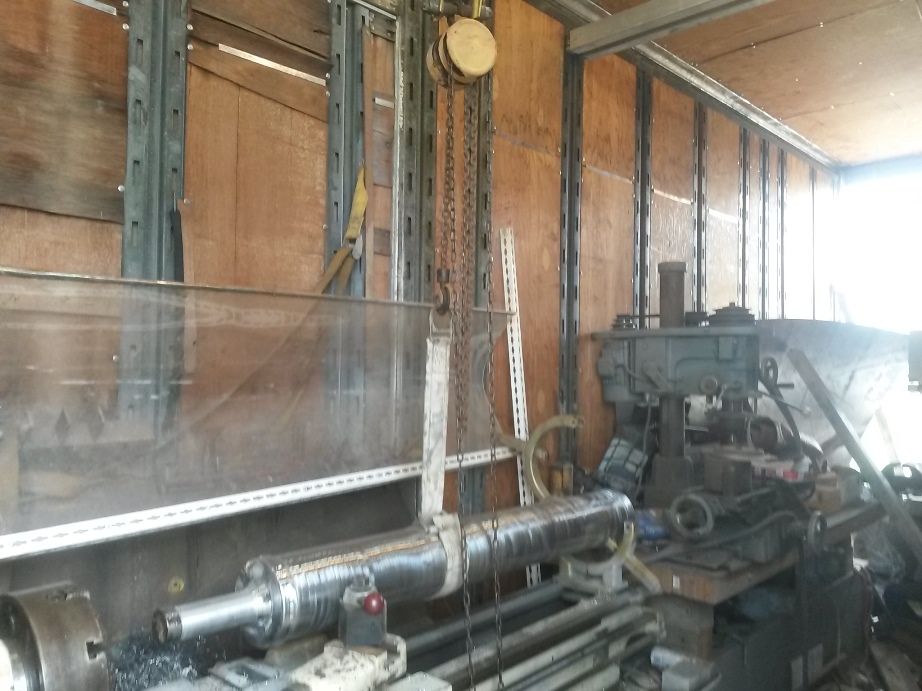
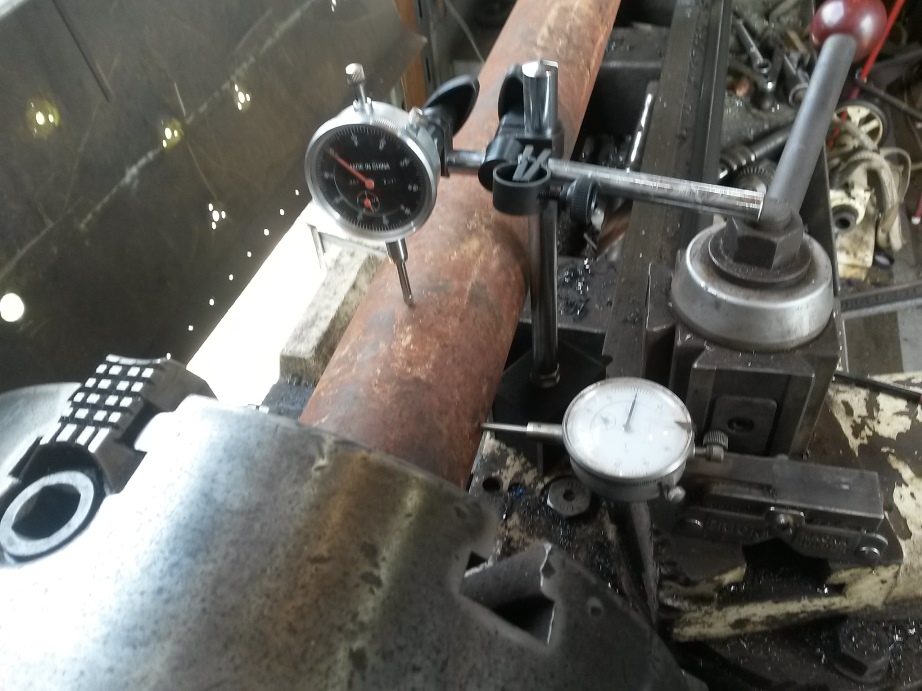
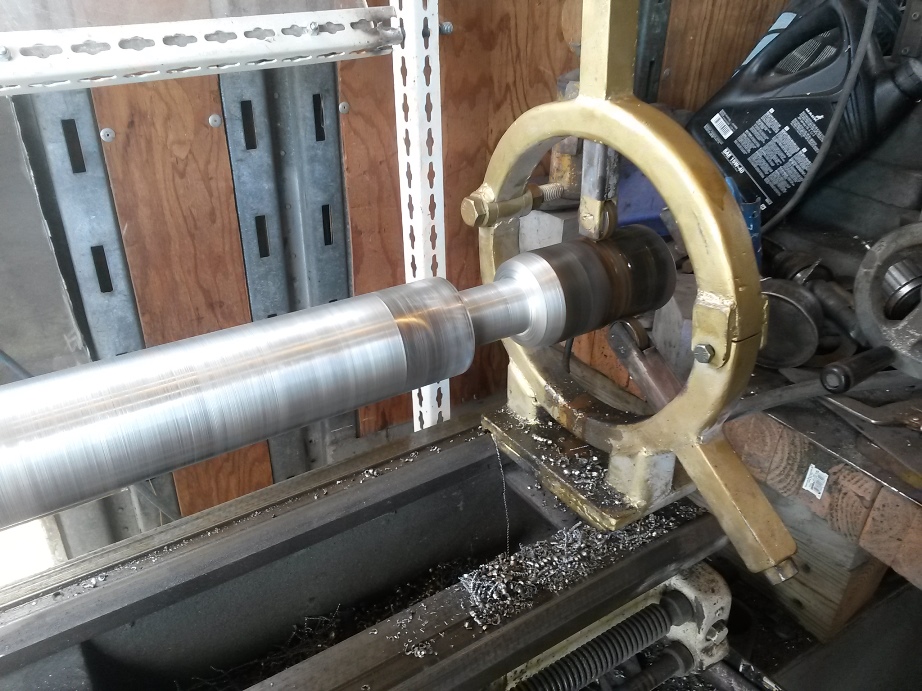
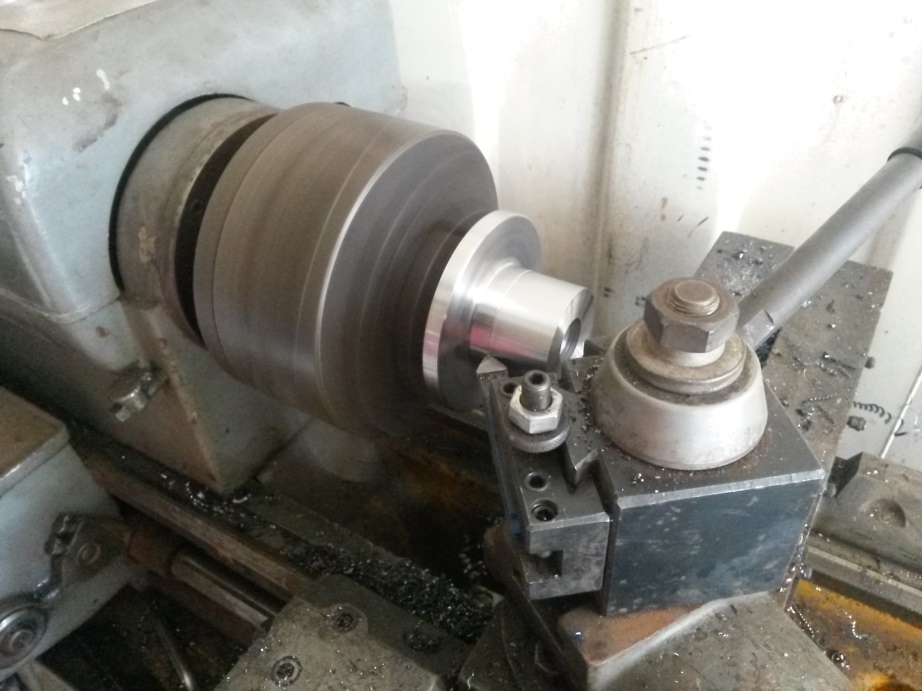
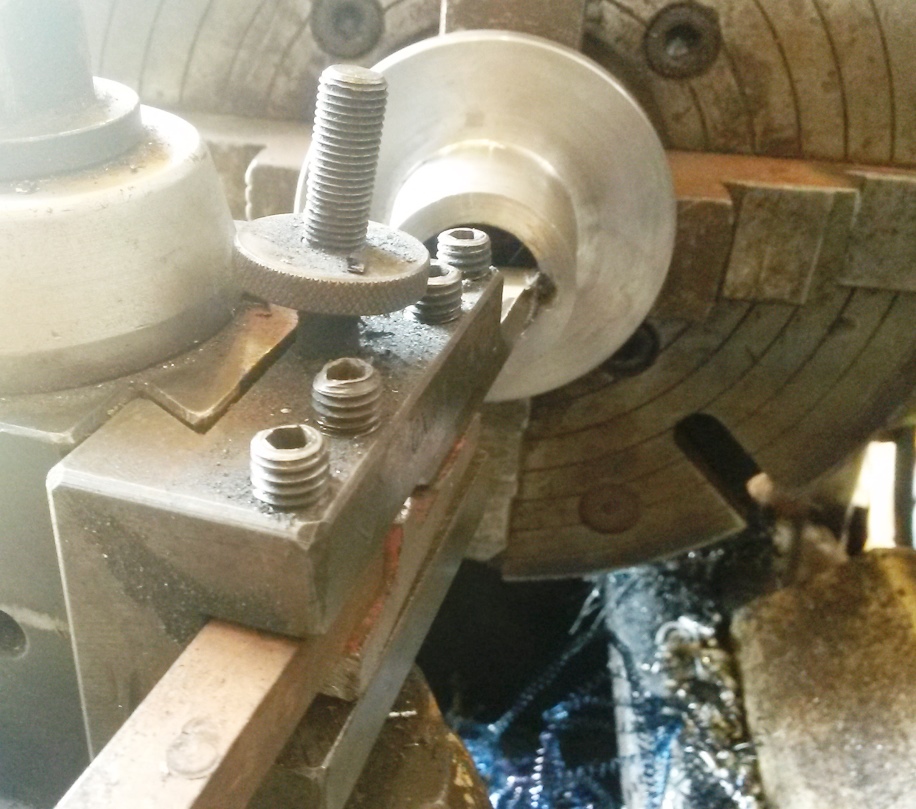
Then I had to machine both bearing ends on the top roll blind since my lathe is barely long enough to hold the shaft.
That and once I had it dialed to "0" "0" O didn't want toe move it
Attachment 30653
Attachment 30654
Attachment 30655
Attachment 30656
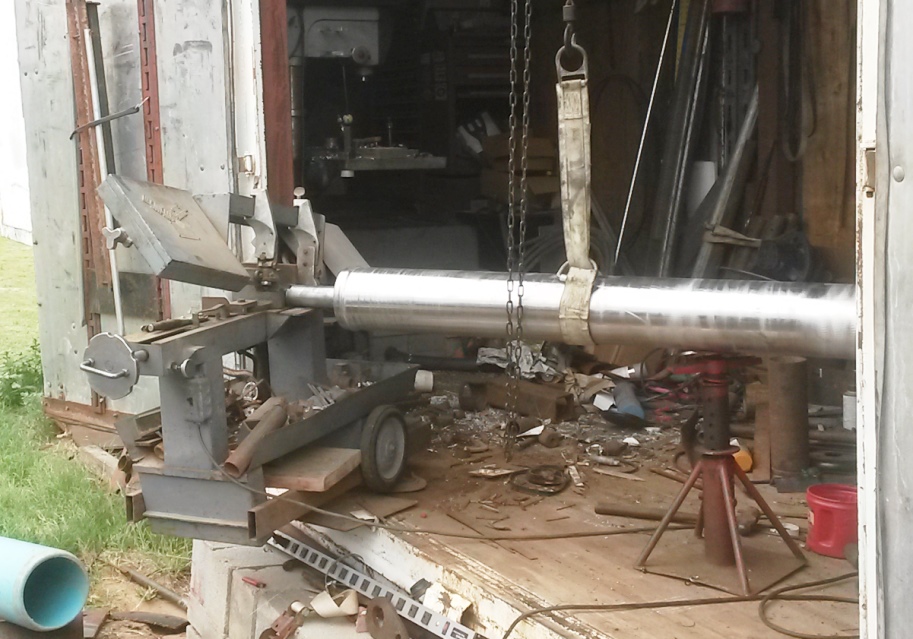
I just cut the ends off in the band saw for the pipes and the top roll
Attachment 30657
Next I made my bearing housings
Attachment 30658
Attachment 30659
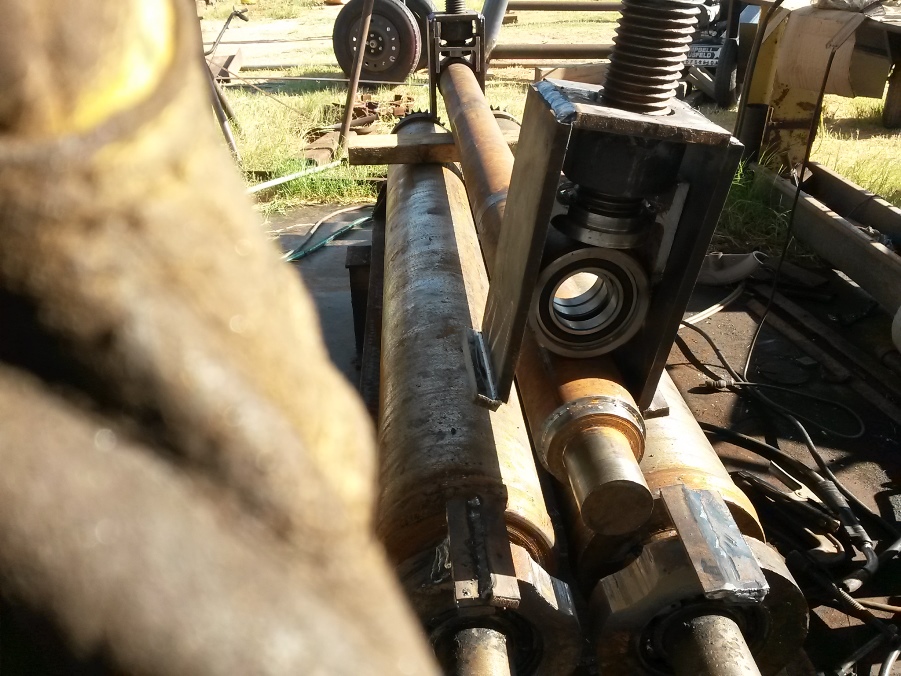
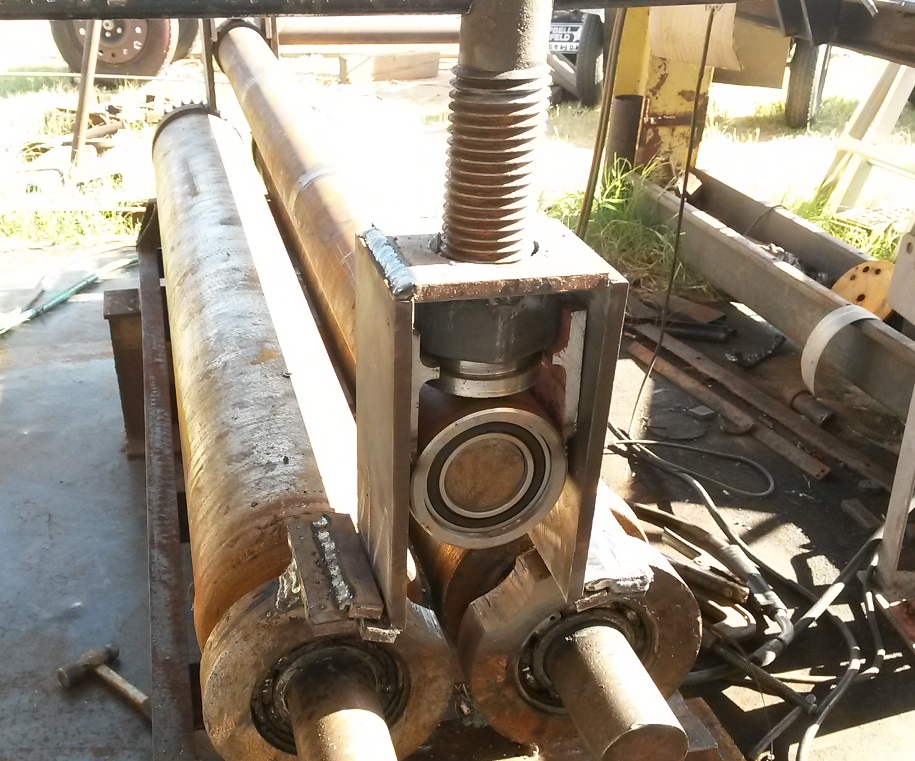
next I started assembling
the frame is an old trailer ramp with 12" I beam for the legs
Attachment 30660
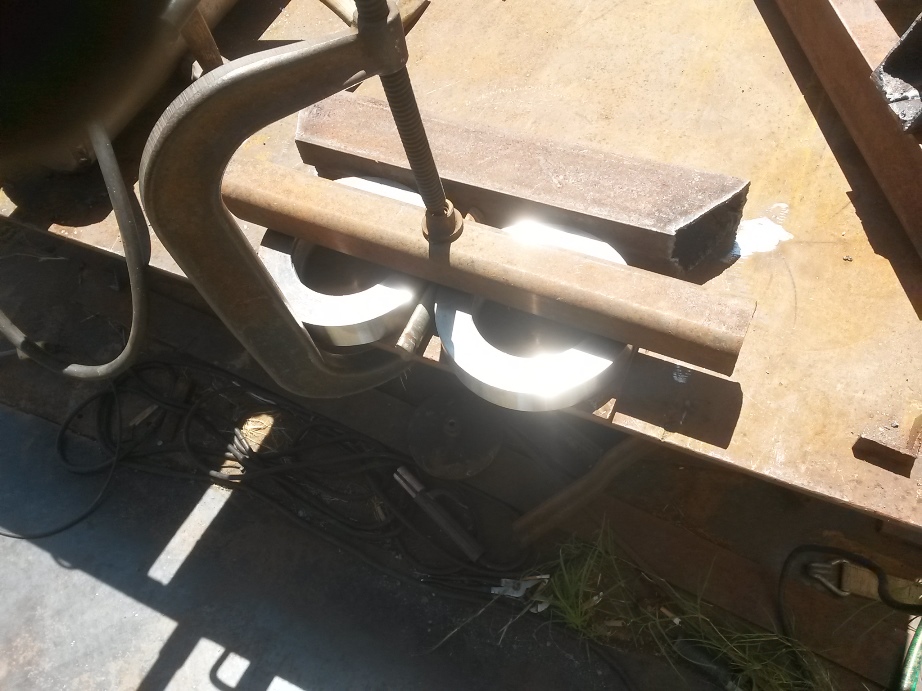
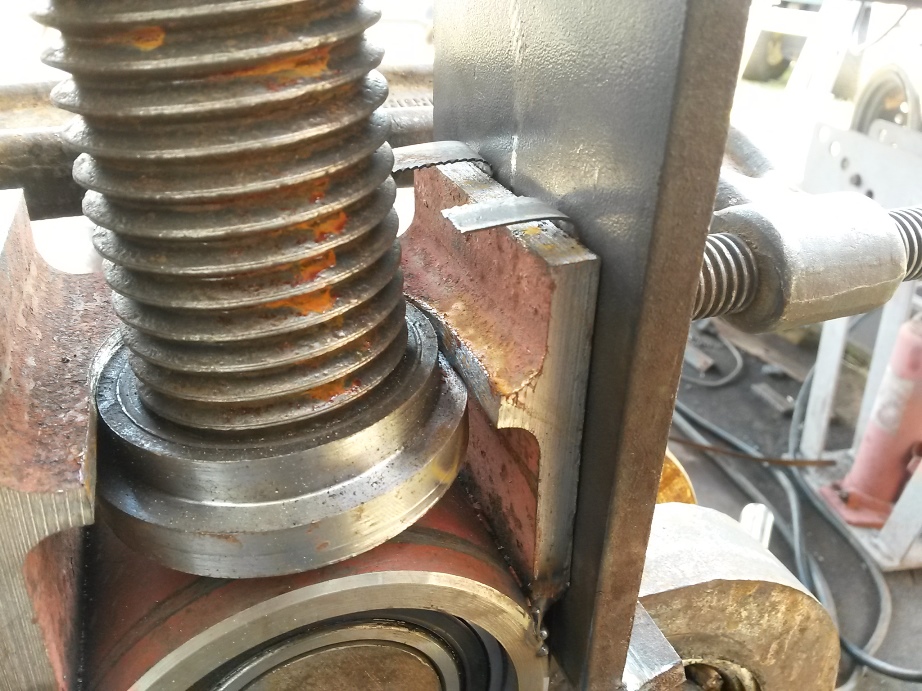
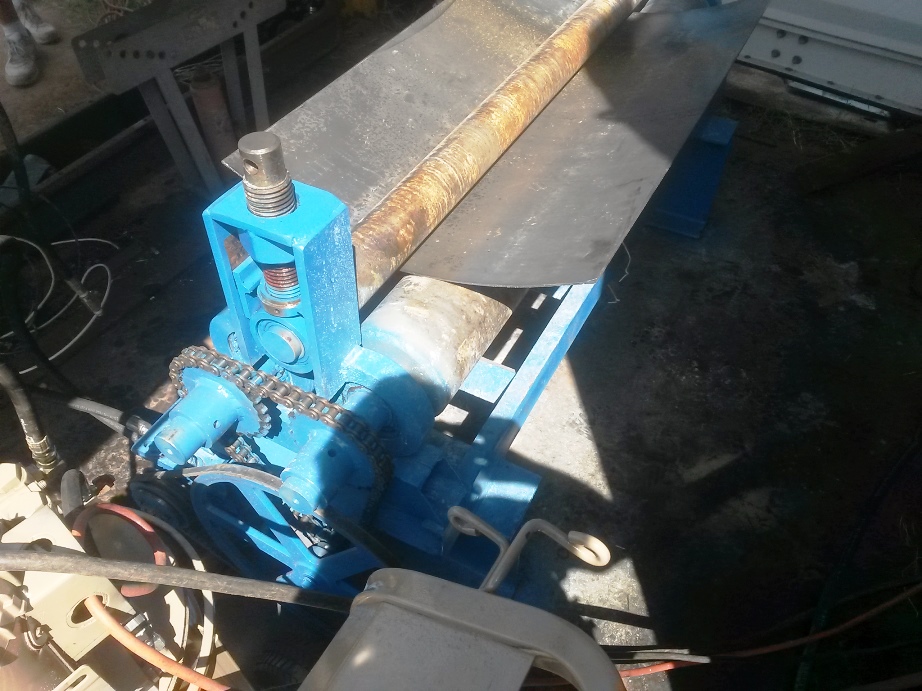
Next is the top roll mounts
Attachment 30661
I used a couple pieces of a brolen bandsaw blade to set a clearance for the bearing housings to slid up and down
Attachment 30662
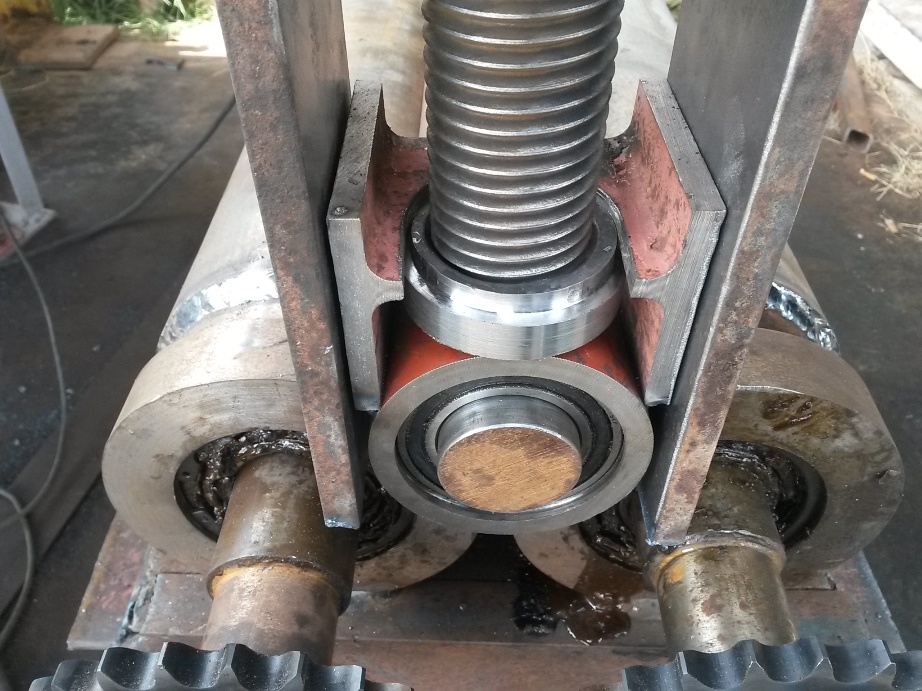
The down force screws are 2" B7 stud grade all thread. I turned 1 nut then split it to serve as the stop collar to raise and apply down force to the top roll The bearing housings are just some scrap cylinder stock I had
One end is made so I can slip it off when rolling complete cylinders
the slides are angled so as to cause the force to keep them held tight and not spread
Attachment 30663
Attachment 30664
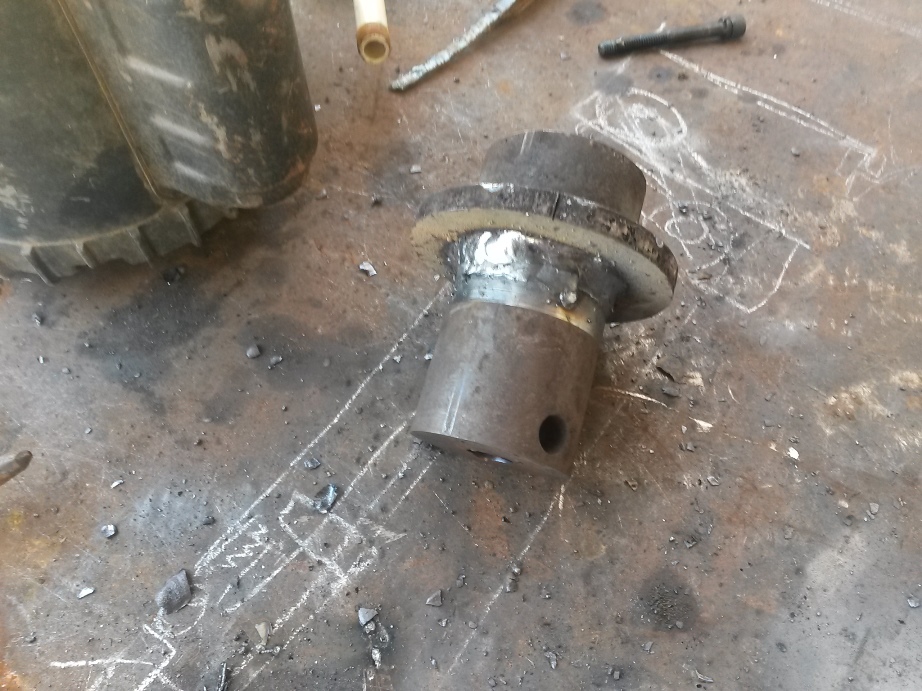
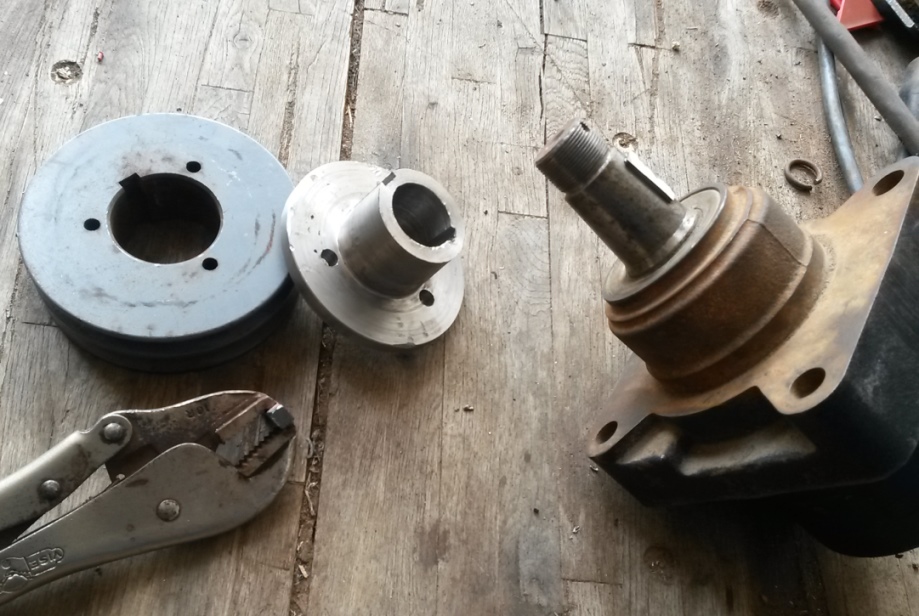
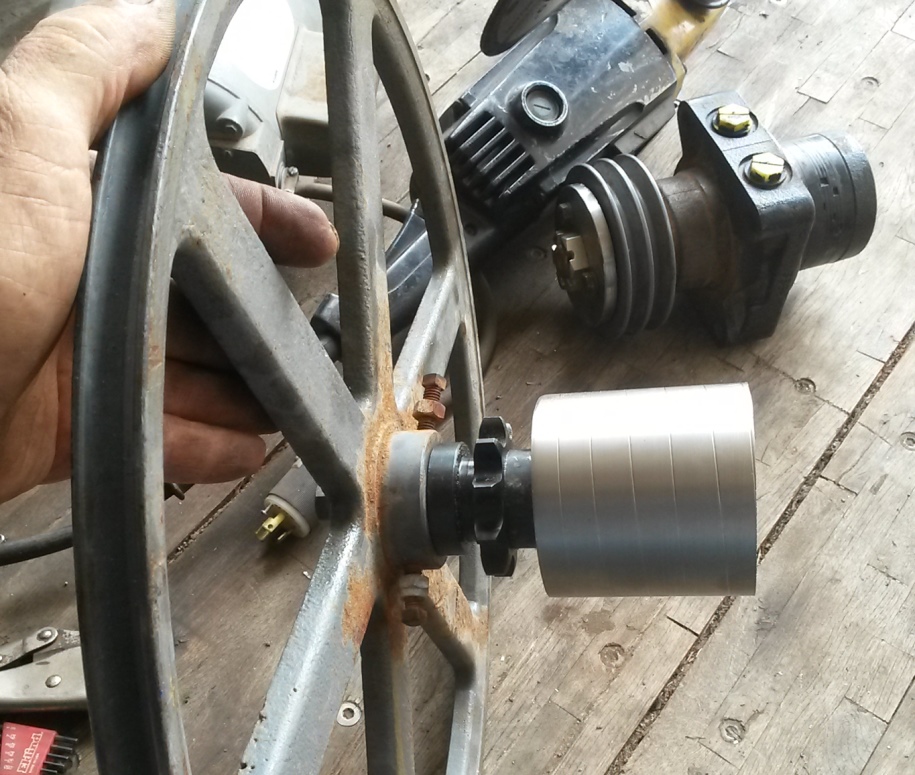
Then I had to make a drive adapter for the hydraulic motor to mount the pulley on
I started out by welding a round plate to a cylinder and tacked a sacrificial piece on the opposite side this way all machining could be done without removing the work piece
Attachment 30665
The machining was done on my little Sheldon 12x36 lathe
there is a taper to the inside and a taper on the outside 1 fits the pulley the other the motor shaft
Attachment 30666
Attachment 30667
To make the keyways I milled the outer one then chucked the piece in my Leblond 17x54 I used the tool post and carriage as a shaper to broach the keyway
Attachment 30668
Now I know why you want bigger machines.
So what is the first job this plate roller is going to produce?
Nice build, and even painted.
All I made today was a die stock tube, so I could thread the rust off the protruding bolts under the 57 Chevy truck. These hold the gas tank in. I twisted one bolt off, as well one of the seat bolts. But I did get the other gas tank strap bolt to come out without damaging the threads. The original manufacture spot welded in nuts to the sheet metal floor. My typical technique for rusty bolts is to back them out till resistance, then back in to let the crud drop out, then out again. That was working until it just snapped off.
I also let this truck sit in dry storage for 22 years without starting it, that was a mistake as the engine froze. Used an extrusion of aluminum with a floor jack, using the starter ring gear as a pushing point. But it did not want to let loose. PB Blaster failed, so I used ATF with acetone. That did the trick. I wish I had a borescope so I could look down the spark plug holes for any damage. I did replace all the coolant and had to install a new water pump, as when checking the engine for rotation, I pulled on a fan blade, and the water pump seal failed. I know this engine only has about 4000 miles since a full overhaul in 1980. I could not get the original water pump as they morphed the design to be used on various years of the inline six. I did run it up to full heat, and I hope any ring cylinder wall corrosion is rubbed clean. So now I'm taking the rest of the truck apart for restoration. I'm making tools to hammer on rusted parts. I do not want to pull the engine. LMC truck parts is getting lots of my money. I am making a few bolts that are not sold. The salt used on roads has done much damage. But that was before I purchased the truck from the friend I helped do the engine rebuild with. That and some one messed with the electric harness under the dash. They removed from the instrument cluster the temp gauge and ampmeter. Cut and spliced wires, hacked at the dash for some junk Ford radio install. I've let this project sit long enough unfinished. I just wish summer was not fading so fast.
Attachment 30669
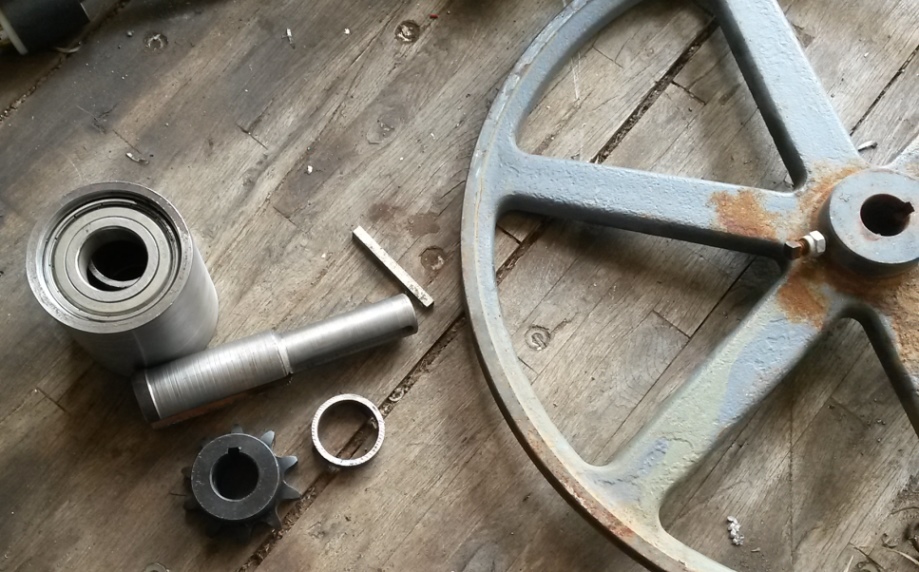
Next I made a jackshaft and bearing housing for the pulley to sprocket transition
Attachment 30670
It has a zero space stack up so no movement side to side is possible
Attachment 30671
Attachment 30672
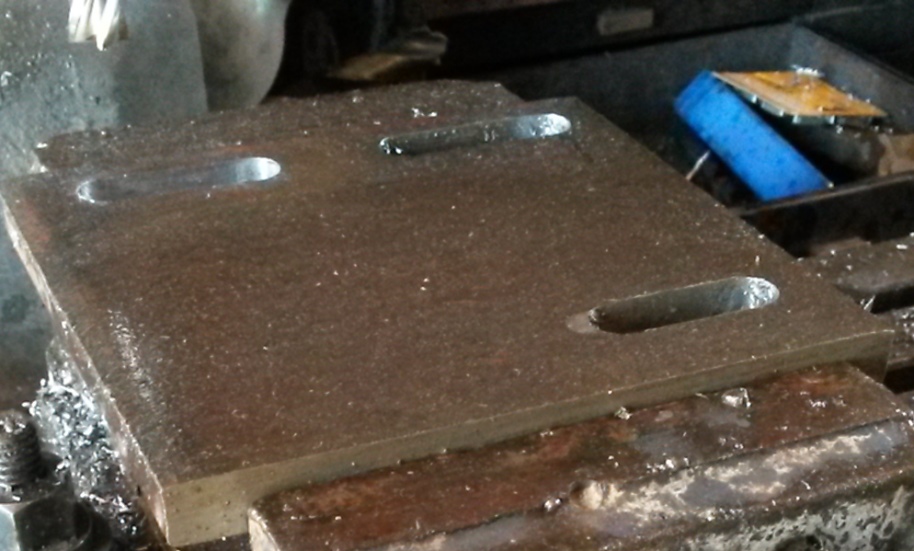
Next I had to make an adjuster plate to mount the hydraulic motor on
Attachment 30673
Attachment 30674
The roll is ready now b ut the power unit I had planned on using is AWOL either that or it is buried all the way to the front of one of two trailers so now I have to make a power unit or wait until Bob shows up and plug into his truck before I can use it
Anyway a little about the specs of the roll
54" max sheet width the main rolls are on 8" centers so this is going to limit the gage thickness of rolling a 4 ft sheet to around 10 ga possibly 3'16" if I want to roll back and forth many times.
the 2" down force screws can develop 30 tons of force each but that would mean having to use a long cheater bar on them.
the top roll is mill shaft out of an old cotton mill so I have no idea tis grade other than it was hard and free machining similar to stress proof or 4130.
Yep can never have machines too large, because I never know what I might need to do with them.Quote:
Originally Posted by metric_taper
the first job for the roll is to roll some 10 or 12 ga into cylinders then make air tanks for a 1927 chain drive Sterling truck
For your restoration project I have a few tips that might be of some help for you.
First off it was a good thing that once you had the engine running you ran it long enough to get it up to full operating temp. Hopefully it ran long enough to dislodge any built up corrosion and varnish on the push rods I started up a 49 chevy 3100 with the 216 years ago that had too few miles since rebuild and had been sitting outside on an Island in the Puget sound for 20 some years after I bought it I let it set another few years then one day said I'm going to drive it put a battery in it cleaned the points checked the oil filled the radiator with water set a gallon can of gas on the fender then primed it and was driving it around the shop in half an hour but I didn't leave it running the next day when I went to start it every push rod bent. Lesson learned sitting engines need to be ran up to temp to clean the old varnish and oil off of and out of everything.
Anyway your 57 with the rust issues take a look at my signature and copy the web address my friend sell some stuff there called rust blast it is a phosphoric acid product with some other stuff in it the product contains the highest concentration of phosphoric acid allowed by law it doesn't convert rust into a hardened scale like Ospho does it EATS the rust to bare metal. then leaves a thin zinc coating which can be painted right over or you can brush off the chalky white layer and prime then paint. If you have rusty bolts and nuts you want to clean up just toss them in a container pour the rust blast over them and the next day they will be like new unless they have been eaten away by the rust then they are going to look like a new bolt that has been eaten.
Follow the direction implicitly apply to an area until wetted then spray the area again and again every few minutes for about an hour leave until the next day and have bare metal. one tip that I do is to spray and area then cover with plastic wrap when ever I can this helps to keep the area wet longer by keeping the air of it the product loves high humidity and works better it is almost trying to sprinkle or is fogy. he has too many products to talk about.
the plate roll is painted with the KBS blue top coat from an aerosol. hard as nails and 100% UV stable.
Frank; Thanks for the suggestions. My floor pan has rotted through, mostly from salt being tracked in during the winters up here. I've not found a product that will disable the "tunneled in" Sodium ions. It is too much work to remove the cab. And the bolts holding that to the frame look horrible, with no hex head left to grab. And it's too tight to get a sawz-all in to cut between the frame and the cab floor. I'll figure something out. I'm going to wire wheel the floor of the cab to remove the massive scale pieces. I'll probably end up with more holes to the outside. I can get floor patching panels. That seems like a huge effort to fit the parts together, but I may have to go that route. I was more hoping for smaller rectangle pieces. I have the truck in a different garage then my Tig welder, it's a Miller Sychrowave 250. Not one of those light weight inverter machines available recently. And like everything, it's buried so moving it to the truck is another task. One that will have to be done to do the repair correctly.
I need one of those sand blasters with a vacuum system, but they look to only work on flat plate areas. As well get negative reviews on Amazon. The truck is no longer on wheels, so I can't move it from the garage, and from pressure pot blasting many years ago, it makes a horrible mess of sand everywhere. I had removed all the brake shoes back 22 years ago, then got lost in many other projects, so getting it back on rolling stock is first order now that the engine runs. I'll end up doing it right, which I hate from the time aspect. I don't like doing things twice.
Spray the rust blast into all of the cavities to kill off the rust then spray a product called cavity coater by KBS into all known hidden cavities you don't have to fill the cavities just use a wand poked through a 1/4" hole the KBS cavity coater is the same wax based product that the US navy has been using for decades protecting places that can not be reached to be painted or even cleaned Trapped moisture in these cavities is largely where the rust and corrosion begins. I use it as a way of protecting machined surfaces on machines that have to remain outside their only other protection being that of tarps I leave the patina of age on them alone and just spray it on them.Quote:
Originally Posted by metric_taper
As you can see on my plate roll the rollers already show a layer of surface rust from it taking so long to build it and my not having treated them before hand this happened partially because I did not immediately rinse them and coat then once I had finished machining them being summer time I never gave it a thought not that it hurts anything yet. But I do need to get some more product soon before they get any worst.
I ordered the Rust Blast from the web address. Eddy Lucast must be your friend (I hope as your a great sales helper). We shall see how that treats the floor of the truck. I looked up the MSDS on this, looks like 2 active ingredients, Zinc phosphate and Phosphoric acid. I can not find a seller of the Zinc phosphate (in small quantities). It shows up in gopher and mole poison, so must be toxic and not sold over the counter.
Thanks for the suggestions. I did watch their videos, they are selling a system, including the final coat of paint, which looks pretty good for exposed frames and suspension parts.
I want to stop and fix the rust on the cab and fenders. But I don't want to go to far down that "rabbit hole" of removing every thing and exposing the frame. Mostly the frame is not in that bad of condition. I do want to fix all the leaks from old seals and bearings.
I've known Eddy for probably 30 years but only met him for the first time about 6 years ago. He heard that I was making a trip to Ca. to pick up a lathe and some other equipment and called to ask if I had room to haul a small enclosed trailer back for him. Id then once I brought it to Texas I turned it into this for himQuote:
Originally Posted by metric_taper
http://www.homemadetools.net/forum/t...602#post102010
His grandfather started Lucast Paints way back when then sold the company which is now Sherwin Williams.
I built this plate roll because when We went to Ct. to Visit Eddy in May A friend of his had invented a lift that I am redesigning for him also had a need for some special made air tanks for a rare old 1927 Sterling chain drive truck. Hence the need to roll cylinders out of sheet metal and not finding any fab shop willing or with the correct size roll to do them for me I suppose I could have bought this one https://www.baileigh.com/plate-roll-pr-409 to make them but who has that amount of money laying around? At least I had the satisfaction of making it myself and was out only a hundred bucks or so in a few ot the things I didn't have laying around going to rust.
It looks like bob is going to arrive with his truck long before I can finish my power unit if not I may slip the belt off add a handle to the pulley then manually roll the sheets that I need to get done I might even be able to get that done by late tonight
I like the fold out display/sales shelves. The hinge had to be somewhat beefy to support all that product while going down the road. I understand there is a parked/stowed condition, so the cantilever load is not active during driving. Took some engineering to make this sturdy for the long term use.
I've done something similar with 2x4 foot sheets of peg board, that are hinged so both sides of the 2x4 peg boards are used over the work bench. The peg board material is 1/8", and I assembled them into 2"x4" stud lumber wood frames. I used a saw kerf to hold the edges of the peg board in the stud lumber frame (there are two peg boards spaced an inch apart). I've not had problems with this thin of board. This was supposed to be a prototype, but it worked too good, even the 2x4s were weathered scrap. I've always wanted to add another layer with hinges that accommodate that movement in front of these. I just wish my organization was better, they seem to collect odd things over the work bench not used that often, outside of hammers, pliers, and screw drivers.
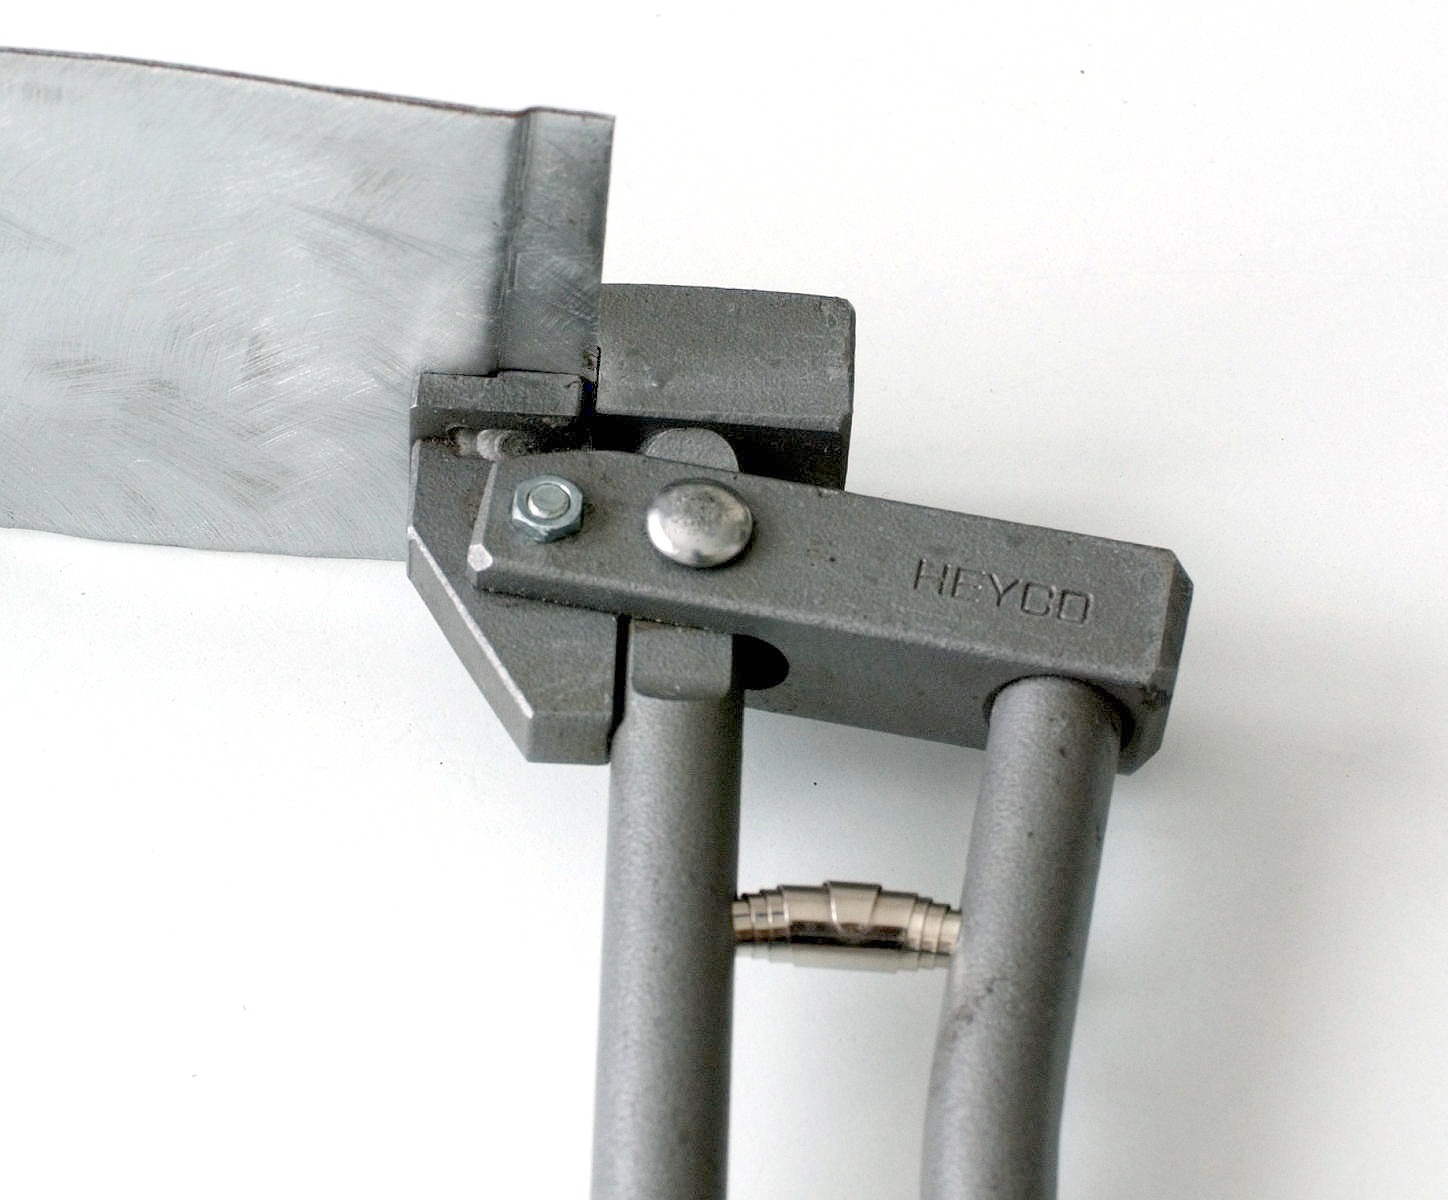
Today's task is repair the horrible fright parts washer. The outlet pump tube just flops. I found they did a weld from a hose barb to the sheet metal box the pump is in, which was horrible in quality, and broke, This then stressed the pump, and it broke its plastic mount. So I fabbed an aluminum mount. And I was going to use a lock nut on the threaded end of the hose barb where an elbow is fitted that then connects the flexible tube that delivers the solvent. Pipe thread, right? Thread pitch is 1.25mm, and straight (not tapered) threads 12.8mm diameter. WTF is this? 1/4 male pipe fitting will start on it, but wrong thread pitch. So now I need to fab this as single point on the lathe. I don't want to weld it again, but that may be easier. I don't stock any metric pipe taps or dies in my tools.....yet.
.
So 12.8mm 1.25mm pitch, what is even close in this chart?;
Attachment 30695
So it's some sort of Frankenstein bastard thread. And the chart is incomplete as the taper angle is not specified.
It's looking like a weld will be done.
Or I should just break down and buy a better parts washer. After this truck, then I have a 1924 model TT 1ton with a Ruckstell rear axle.
From your description of the thread this sounds more like an SAE-5 fitting size. is there a 45° beveled land at the face of the hole? If so then the fitting would also require an O ring for the seal. Do you have a 1/2" fine thread bolt laying around? If so see if it will screw into the holeQuote:
Originally Posted by metric_taper
1.25 mm pitch equals 20.32 TPI pretty easy to confuse a metric thread with UNF at that size.
It is China made junk from 30 years ago when their quality was half of what it is now. I'm sure this is all bastard thread, at least to the world, but maybe an old standard that China had.Quote:
Originally Posted by Frank S
There is an elbow that threads onto the hose barb fitting. No there is no bevel for an Oring.
The elbow did tighten up as if the fitting were tapered.
They used hose clamps that were for much larger hose diameter, so they just clipped the excess band length off. The problem is it was made from too thick of material for the 5/8" ID hose, and it would not tighten down to that small of a diameter, so one of the clamps was stripped. Clearly someone made decisions to produce them this way.
A short piece of hose connected the pump outlet to the hose barb fitting. The weld failure of the hose barb to the case of the pump, then caused the pump mount fitting and its failure. I did re-weld it in place, this time instead of a tack, I got 180 degree around the fitting. Other then touching the filler rod to the electrode a few times :D, the weld looks pretty good. I like TIG as you can go back over your weld and make it look better, but my welds don't look as good as they used too. I had forgotten that I have special prescription lens for just welding, once I put them on, everything was in focus. I like welding about 18" from my eyes, so I had the optician set me up for that distance of focal length. My tri-focals are set up for distance, computer (out stretched arm length) and reading (too close for welding). I just have to remember to put them on.
So one of the goals was to get the pump to sit on the bottom of the tank. The pump is in a box, with an solvent filter. Many years ago, I fixed a problem where the hole the electric box came in on the side of the tank, had a large rectangular hole that let solvent evaporate. So I cut out a piece of aluminum larger then the hole and marked the mounting holes and electric feed through to the pump. This fixed the evaporation problem, but raised the pump about an inch off the bottom. I had to always put in more then 5 gallons of solvent to keep it pumping.
HF is still selling this same parts cleaner, I'll have to see if they fixed this original design defect. Seems I'm always fixing those.
Sorry I've totally screwed your post up.
Do you have photos of your 1927 Sterling chain drive truck? I've never heard of this manufacture.
What were the air tanks used for, or was this a service truck with compressed air?
I see there is a wiki article on Sterling trucks, they went out of biz in 2009. Looks like they kept chain drive for a very long time.
Seems they must be very rare, and I bet WWII scrap drive removed many from existence.
I don't know if the pics showed it very well or not but addition to the top shelves folding out the center shelf unit not only raises and lowers but is on a 4 link parallel set up and is raised by an electric winch puling 2 cables to lift from the ends the shelf moves forward into the window cavity as it raises . When everything is parked for transport the product is held in place by a slip in panel between the wing shelves and the lowered center shelf. I designed it to have 2 more fold out thinner fold out doors attached to the wing shelves which would have held a pair of 48" flat screen TV's but he never bought the TV's so I never added the 2 extra wings. All of the shelves when parked take up less than half of the trailer so the opposite side is used as bulk storage Some of the larger car shows he sets up at he will average 10k in sales per weekend. He is very knowledgeable about application methods and trouble shooting someone's coating problems for rust prevention.
Hey it's my thread and if it strays from the build so be it. Others may not agree but all information is useful when you find it.
the air tanks are for the air brake system Sterling had air brakes when many other manufactures were still running vacuum hydraulics But the truck in question could be a 37 not 27 he has maybe 20 of them in various states of disrepair some are so old they have wooden frames and some have a composite of wood and steel.
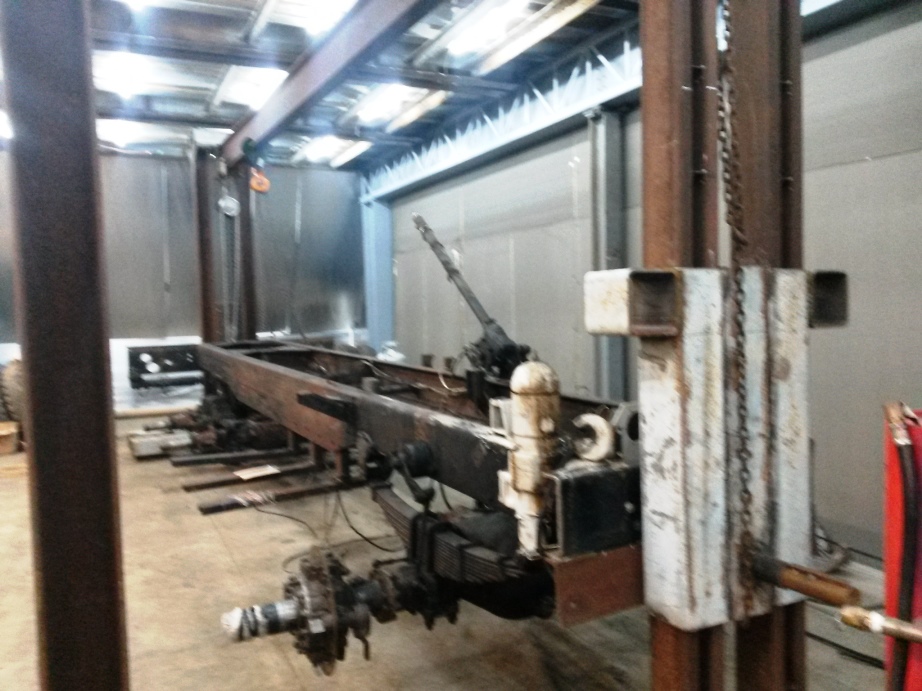
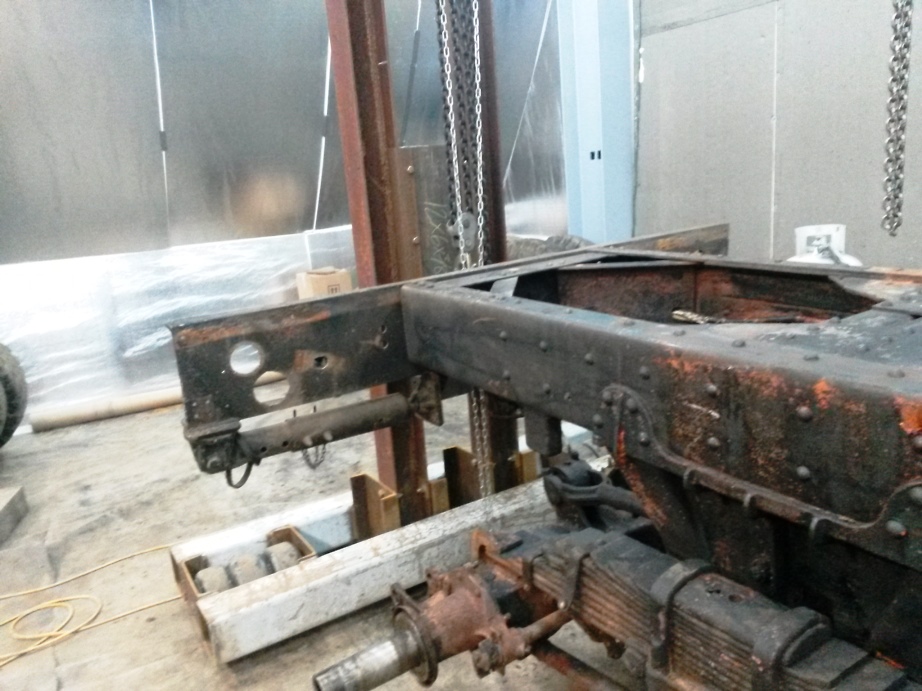
these are the only pictures of it since the cab had been sent to Canada to be dipped.
He built a rotisserie to work on the frame
Attachment 30696
Attachment 30697
That is one heck of a project, and to build a rotisserie to work the machine. And to collect a family of their truck designs.Quote:
Originally Posted by Frank S
And then you, building a custom sheet roller to make a very specific part. They had to have clever people to design air brakes and such. Making controllable flow valves and producing them took some ingenuity.
Frank, the Rust Blast arrived, that was fast.
So I can't flood rinse the truck floor, is putting baking soda on after a sponge wash OK to neutralize the acid? I'm going to try spray application with plastic sheet to keep from drying. The instructions say DO NOT allow surface to dry, with that emphasis. I assume oxygen gets back in, and surface rust occurs.
Sorry for asking you this, as the web site does not have any way to contact them via email or online support.
Thanks.
I went to their main site and did a live chat and have all the answers.
No need to neutralize the reason for keeping the surface/s being treated wet for a time is to aid the process in devouring the rust,Quote:
Originally Posted by metric_taper
Here's one good way first if you have heavy rusted surface that has large built up amounts of layered rust If at all possible chip or brush off any chucks of rust that you can wire brush the area to remove more loose rust. I have a pneumatic needle scaler that does a great job just like removing flux from welds. Also have cup brushes for angle grinders that I sometimes will don a respirator goggles and a full face mask to lightly go over the entire area. But not always sometimes I will simply wash large sheet metal areas with water to remove as much loose dust and any rust that will readily wash away. then blow dry to evaporate the excess water I don't worry about getting the parts completely dry.
I am almost positive a small 1qt hand sprayer was included in your order I know it did if it was sent by Eddy from his warehouse stock but there have been times when products have been drop shipped from the factory that these sprayers have been left out. If you did not receive one you can locate his phone number on his site or PM me with your info such as phone number and email and within 24 hrs I will see that he gets your information he will call you within an hour after I call him usually while I'm still on the phone with him.
Ok, fill the sprayer adjust the nozzle to a fine mist spray the surface until it looks wet ( when I am spraying say a floor pan by the time I get it covered I will start at the beginning again and do this until the whole surface remains glistening with moisture then what I do to save time and product is I cover the area when ever possible with plastic film the stuff you use to wrap sandwiches in or the 18 to 24 inch wide shrink wrap film you don't have to stretch it tight just lay the film over the areas then check back in an hour or so if it still looks wet forget about it for a while Depending on how badly the area is corroded will depend on how many applications you want to use once it gets to bare metal there will be no further reactions. Disclaimer if doing this on aluminum surfaces certain alloys of aluminum will continue to etch even after all corrosion is gone if you keep renewing the process but if allowed to dry any further eching stops.
I have sprayed badly corroded lamp sockets like the old 1157 stop/ taillights that were so bad it was impossible to remove the bulbs and if the bulbs were good after a couple sometimes a few hours of treatment the light would begin working when power was applied to them sometimes without ever removing the bulb.
I have tossed nuts and bolts in a plastic or glass container of the stuff left them over night the next day the color will have all been faded to a dirty clear simply pour out the bolts spread them on a cloth then re use them.
For rusted on stuck nuts and bolts I have tried little experiments like holding a plastic tube over them filling it with the product then taped the tube in place of have pre glued them in place left the product over night to do its work then the next day unscrewed the bolts sometimes helping them along with a little lubricant.
Hope this gives you some useful info.
Yes, I got the spray bottle with the order.Quote:
Originally Posted by Frank S
I did start out yesterday with a large cup wire wheel on my 7" Milwaukee grinder. And full dust mask and eye shield. I removed all the surface flaky rust. It is pitted pretty bad from salt that got under the original weathered rubber floor mat. This mat was falling apart when I removed it last week. And per your earlier description, I washed the loose dust off first. Then I sprayed on the product and covered with Glad brand plastic wrap (had a box in the kitchen). I kept rewetting this through most of the day every hour or so. I just got up in the middle of the night here, and washed the black iron phosphate off the surface, then reapplied the rust blast product again. I'm not seeing any bare metal yet.
I like the suggestion of dripping the product onto a corroded bolt. I had just such a bolt on the left front steering linkage that attaches to the spindle. I was using PB Blaster (un impressed) as well mix of ATF and acetone (also didn't work) after two days. I did make a soft metal punch as the bolt sticking out was 1/2", so I counter bored a 1" piece of aluminum round bar. And ran a boring bar to relieve the inside edge so it would only push near the center of the bolt. I did mushroom the aluminum, it finally broke free, and I saved the bolt. I did have to run a die on the NF threads, and put a new clean chamfer on the edge (used a brass hammer initially, didn't like seeing the bolt distressed), as well redrill the cotter key hole. I'm going to sand blast the bolts and nuts.
I'll keep reapplying product through the day. I probably should have bought their detergent degreaser, as they really have a system for improving the outcome.
We shall how much bare metal I can recover. The ultra pitted stuff needs to be cut out and replaced. Should be a fun location to TIG weld.
If you decide later to try their aquaclean I found it works best when diluted with 'HOT' water,
Waiting an hour between initial applications of the rust blast was not frequent enough in my opinion. I like starting out with re aplications every few minutes up to 15 or 20 minutes apart doing it 3 or 4 times then covering and forgetting
Frank, It's true, I've not been proactive on applying the rust blast. There's just too many things to do around here. And loosing sunlight puts me in overdrive.
I know I'm doing this restoration wrong. It should be a total tear down, the term I've heard around here is a "Texas overhaul" where paint is slapped on to make it look newish. But that's probably derogatory to some.
I just finished taking the clutch pedal and linkage out, as it was preventing working further under the cab on the frame. That and the holes in the floor were dripping rustblast onto the clutch mechanisms.
What I've been finding working better is taking a scrub brush and hitting the area being worked then applying more rustblast. I have a few areas now of gray sheet metal.
I need to go and apply some more now. This probably is a many day task to get to where it needs to be. It is a very thin coating of chemicals versus the very thick rust.
I need to get a needle scaler, as a cup wire wheel does not do well with the very rough surface.
Frank; As I've seen your posts on your pickup body repair, you've gone down this path of restoration, that I've never been.
What is the tools and tricks to separate seams between sheet metal body panels. In my case it is seams between the floor panel and side panels. I need to remove the rocker panel on both sides. This panel is also a step up into the cab on the 55-57 truck cabs. I don't see simple spot weld dimples to drill out. I would like to keep the metal joints lapped over each other as original build. The youtube videos I see use a plasma cutter and then they MIG the new parts in making a butt weld. I want to use pop rivets to temporarily fixture the parts in place, then I can TIG weld them. If I have to, I will buy a MIG machine, shouldn't be too expensive as I'll only use it on sheet metal, a low current model.
There must be some thin profile chisels used to separate panels at their seams. I'm just not familiar with doing this.
There are several ways to go about this one way if you cannot locate the spot-welds would be to slice away the panel you are replacing leaving the lap joint intact you would then have just a 1/2 to 3/4Inch strip of the old panel left. At this point you have a few options One is what a professor showed me while he and I were teaching a couple of concurrent college courses to military personnel over in Germany. He was teaching body shop while I was instructing a course in Automotive chassis and suspensions I was supposed to be taking the course I was instructing but what I would often do was to challenge the final exam on a course then depending on how high I scored I would simply get the credit hours instead of having to sit through months of boring meaningless (to me) lectures. I would then Assist DR. Tulla in one or more of the courses this way he could cram in 2 or sometimes 3 additional courses on the docket per semester. I got my credit hr's and earned enough money to pay for my challenges + put some spare change in my SGT E5 pocket at the same time.
Anyway about the little trick he showed me on older vehicles back when body and seam fits were never perfect he said you could get away with a 1/16" deviation in layer height. when the panel was not a crucial side skin having to match perfectly with an adjacent panel so at those times when doing crash repairs he might actually leave the thin offending strip in place.
His repairs would turn out looking factory and only someone like me or him or a persnickety inspector would ever know the difference.
Note I don't do this because to me the additional layer of metal left in place is a potential new place to cause problems.
When I cannot use my rivet drills to drill out the spot welds I slice off the bad panel as close to the lip of the adjoining panel then use an air chisel to separate them Usually once I start chiseling between the edges the spot dimple will show up then drilling it out saves a lot of time trying to cut it away with the chisel or damaging the lip of the panel I want to re attach a new patch panel to. I then grind away any burs or parts of the strip or welds and reform the offset in the edge.
Sometimes when sectioning in a patch like on the skin of a roof where I am doing away with a moon roof or other patch sections where I am only using a part of a replacement panel what I do is to form an offset in the edge to the panel that the new piece will be attached to by using a sheetmetal edge offset tool like one of these
I like one similar to this one best as it is faster and offers more leverage. You can make one fairly easy from taking a close look at the picture
Click on pics to expand
Attachment 30710
Attachment 30711
This is the desired profile which is the thickness of the sheet you are adding and about 5/8" wide.
Attachment 30712
You will also want to practice straightening the edge lip to be as near flat and straight or curved which ever the case may be to match the profile of the patch. and the profile of how the original should look. I use shaped anvil dolly and a planishing hammer I don't swing and beat on it just grip the handle between thumb and fore finger then rapidly rock the hammer I can almost imitate the sound of a pneumatic hammer sans the escaping air and the noise of the piston rattling back and forth.
good luck and any help needed or advice requested if I know the answer I'm happy to share.
(IF I DON"T KNOW THE ANSWER I am real good at making things up LOL
Since I'm waiting on my sheet steel to arrive to make the air tanks out of on my plate roll I discovered another use for it
I'm pulling some circuits in my 53 ft shipping container to run some of the equipment in there
the Plate roll was just sitting there so I grabbed a length of 3/8" rebar slid it through the holes for the top roll adjusting screws and hung 3 rolls of 10 ga wire on it
Attachment 30986
10AWG, that's a tough pull, now I see why you ran 1" conduit.Quote:
Originally Posted by Frank S
I made the mistake of running 3/4" EMT on my garage build 30 years ago, I pulled up to 12 (the max) 12AWG TW insulated wires, that was too much work, and I did it solo. I swore if I ever run conduit again I would only use 1".
I ran parallel conduits 1"into 6x6x4 J boxes and 3/4 into 4x4x2 boxes the 3/4 has my 120v lines such as for future duplex drops and lighting. another reason for running parallel is because I may 1 day go 3 ph. Since My panel is already a 200 amp 3ph panel I'm just not using the center lug at this time. if I do go with 3 ph which is most likely as most of my machines are 3 ph I'll set a secondary panel then pull all of my single ph stuff over to it move a few wires around and add colored tape to the ones that need it then I can have what ever voltage the electric company will provide which will probably be 240 according to what the line men told me when they dropped a quad 000 service line to the pole. then hung 00 service drop to my meter. while they were setting the pole I relocated my meter and pulled 000 coper from the base into my 200 amp service panel in the house. and 00 to the outside 125 amp disconnect that currently feeds my shop they drove a 20 ft ground rod near the meter for me and connected a #4 bare copper earth wire, as the house had never had one where the meter had previously been located.Quote:
Originally Posted by metric_taper
<!-- BEGIN /var/www/html/homemadetools/protected/modules/zeus/views/tool/postUpdate.php -->
Thanks Frank S! We've added your Hydraulic Plate Roller to our Metalworking category,
as well as to your builder page: Frank S's Homemade Tools. Your receipt:
<div id="blocks"> <div class="block b1 pngfix"> <div class="bimg"> <div> <a href="https://www.homemadetools.net/homemade-hydraulic-plate-roller"> <img src="/uploads/226123/homemade-hydraulic-plate-roller.jpeg"/> </a> </div> </div> <div class="head pngfix"></div> <div class="left pngfix"></div> <div class="right pngfix"></div> <div class="blockover b1 pngfix"> <div class="title"> <a href="https://www.homemadetools.net/homemade-hydraulic-plate-roller">Hydraulic Plate Roller</a> <span> by <a href="https://www.homemadetools.net/builder/Frank+S">Frank S</a></span> </div> <div class="tags">tags: <a href='https://www.homemadetools.net/tag/roller'>roller</a> </div> </div> </div> </div>
<!-- END /var/www/html/homemadetools/protected/modules/zeus/views/tool/postUpdate.php -->
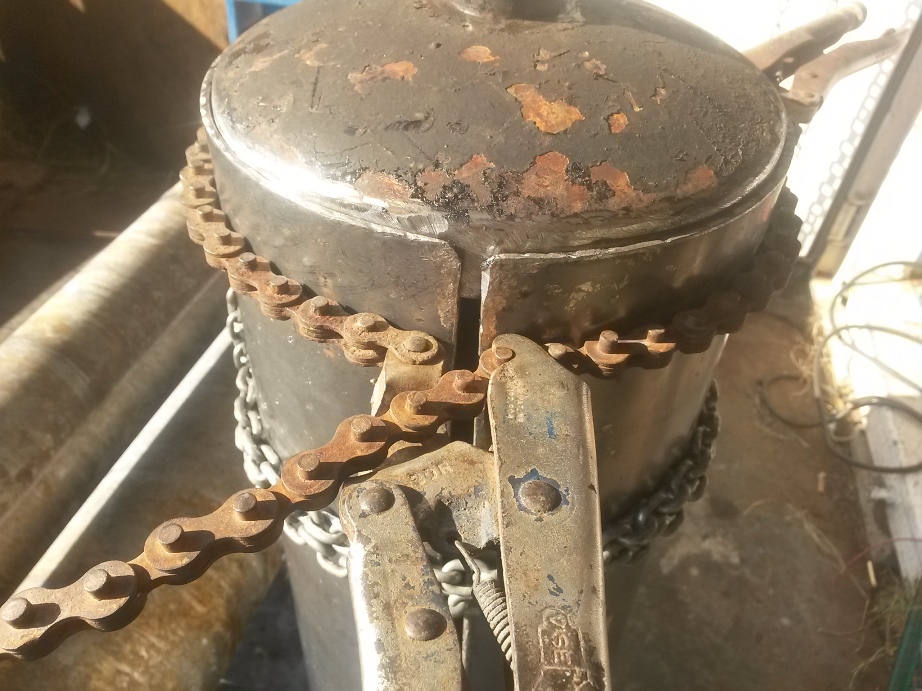
I finally got around to hooking up my power unit to the plate roll.
As I suspected even with the almost 10 to 1 reduction I still need to reduce it further but it works fine
Attachment 31202
Attachment 31203
The ID is 8" so that should have been 25.132" length required to roll but knowing there is some shrinkage I cut the sheet at 25.250" forgetting that I should have allowed at least double the thickness of the sheet instead of allowing only a single thickness. for the next one I will cut the sheet at 25. 400 hopefully this will leave me with a gap of 0.060to 0.090" to weld up instead of the 0.250" I have now which is no problem it will just tale as little longer to weld is all
Attachment 31204
This video shows the speed as you can see it is a little fast for doing tight small rolls by yourself
https://youtu.be/iAXC0rJ9q1M
Has to be a good feeling when the tool works as expected. I was wondering where you went, as I didn't see any posts on this or other projects.
I knew going in that the speed was going to be faster than I wanted also by reducing it to another 3 to 1 or 4 to 1 it will multiply the amount of torque available.Quote:
Originally Posted by metric_taper
Although had I a 2 grove large pulley it would have helped as well I cannot stall the hydraulic motor as it is right now the belt will slip.
I'm pretty sure that I could possibly roll full width 7 ga or 3/16" plate once I reconfigure the reduction system and possibly add an idler pulley or 2 to get more wrap on the small pulley but will probably go to a 6" diameter one to mate with the large one which will reduce my ratio then make up for it with another jack shaft to hit pair up to the motor.
Ultimately I would like to come up with a 4 or 5 to one epicyclical drive to mount directly on the motor and come off of that with the 6 inch pulley.
I have 6 more of those hydraulic motors and now that I know their capacities I may some day decide to build the mini dozer I designed years ago using 2 of them in each final drive unit and 2 of them for a PTO or I may make a wood chipper with a couple of them who knows they're not going anywhere stashed away in my storage.
I don't know how you have the time to do all the things you post. It took me two days to drill out the spot welds and remove the rocker panel step on the 57 chevy truck. It's going to take lots longer to remove all the rust and paint stuff before I can get the new panel installed. And I have to replace half the floor as well. I ordered a panel off eBay, and don't like the quality or how it fails to mimic the OEM pressed stiffening grooves, so now I need to find something better. And that panel will be mega more work.Quote:
Originally Posted by Frank S
I'm doing simple stuff compared to you making a slip roller for heavy gauge sheet. And I am fully retired from a prostitution job.
I just work at things until I get to a point where they require $$$ to be thrown at them. then set them aside until the monthly arrives in the bank. if there is anything left over after bills and food some $$ may get allocated to one project or another Or I may come up with a trade item to acquire things I need.
I have a guy who is forever bringing me new projects that I'll never get around to doing even if suddenly the earth slowed to a 60 hour day and I was to live to be a 150. I have 2 of his trailers here now to work on. one is hopefully going to be simple if I can get my cheapo spool gun to work well enough to weld the aluminum. and on the trailer is a pair of Honda Pilots he bought at auction 1 wrecked with good engine one good shape with bad engine. My little Masda pickup that I use to go out and get larger trucks then tow it back home overheated on me Friday on my way back from Little rock the temp gage went from normal to all the way out of sight in an instant then back to normal I figured the engine was toast before I could find a place to get off the interstate about 2 miles So now I will have to pull the engine out of one of the parts trucks to put in it. Would like to have the 3 air tanks made and both engines swapped by Monday but probably won't happen. That's what I get for being retired. I wouldn't have time to have a job if it only required 1 day a week to work at it.
At one time I thought I would retire and offer unique repair services for antique machines (casting and machining). But I have sufficient cash flow, and now would never lock into a schedule of fixing stuff for others. And I have a lifetime of hoarded stuff to fix of my own.Quote:
Originally Posted by Frank S
And you know, you look at all the repairs needed on stuff you built over the past 35 years, and see work everywhere (the shop needs new windows and gutter work). And then ground hogs think they should live under your buildings, and you get to repair their nasty of undermining the concrete slabs. I also, never seem to finish stuff 100%, and that is unlimited in time consumption. Then this spring the furnace quits, and opening it up, cracked plastic parts that result in installing a new furnace before winter frost starts up. That's my task this week, as hot and humid outdoors limits working on the truck floor in the afternoon.
I do enjoy retirement, and don't know how I ever had time for the projects I did while working. I only hire things out, where physical strength, or fear of falling makes me cough up the cash. And I'm never disappointed from my now expectation of poor quality of workmanship when paying others. I'm not perfect, but if I run into a problem when I repair something, I don't cover it up.
I hope your new shop is finished. I did look at your youtube videos you posted showing 3 years of some of the many tasks you've done. Making a powered slip roller so you can make an air tank for an antique truck, which will create more work in the future. How do you say no to all these folks that see your talent and want to consume it?
My shop, which should be priority #1 is one of those things that requires net positive excess cash flow. Even though I have the poles up and the trusses made and enough materials to add in bridging cross and diagonal bracing between the trusses and steel to make a top plate for the perimeter of the building. I don't have purlins to attach the sheet metal or a means to secure the trailer load of PIR cold storage grade insulation that I have before the sheet metal can be installed on the roof.
I also have enough 38ft long sheets of corrugated galvanized sheets to cover a building 1 1/2 times the size of the one I am building.
What I need to do is to get a couple of these trailers finished so we can either sell them or lease them on for use to get the cash flow required to push me into resuming work on the building.
I live on Frank's time out here and things get done when they get done or they don't get done at all much to the aggravation of my wife LOL
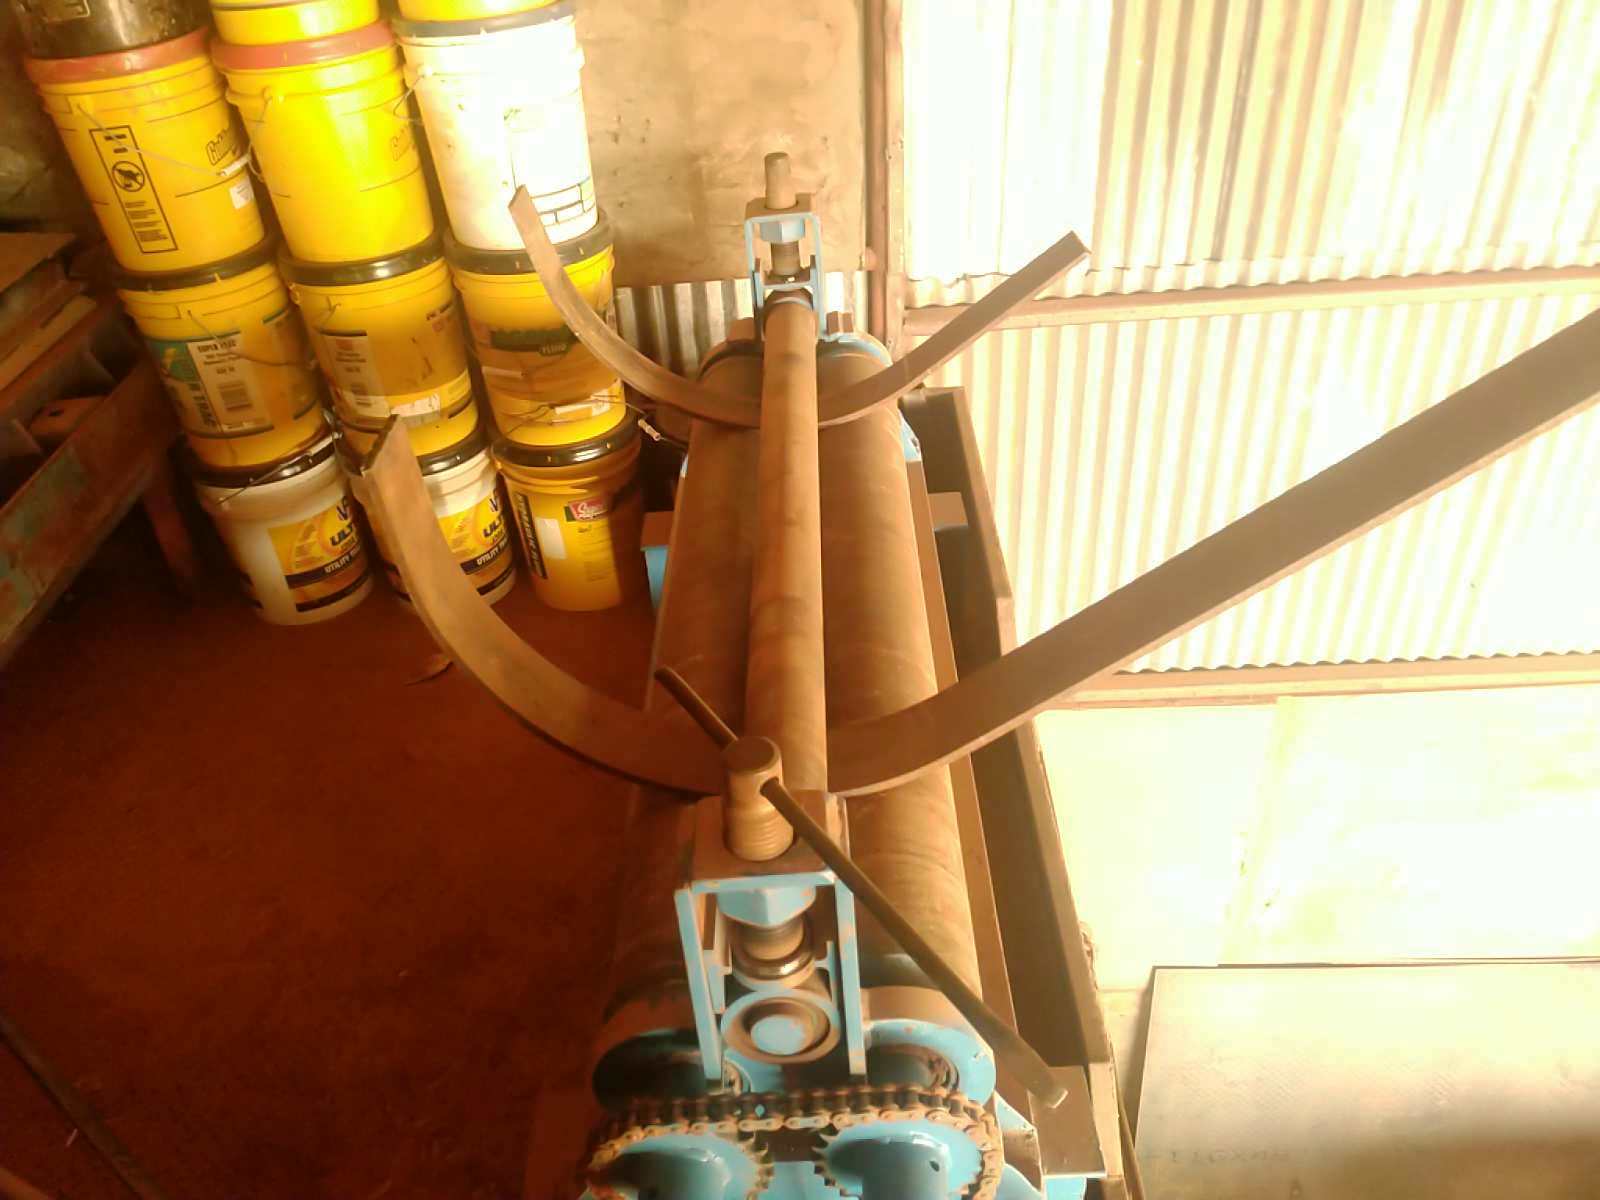
While working on a new repair project I decided that I was going to need to roll a couple strips of 3/8" thick 4 1/2" wide T1 steel Now the grade of the metal I have has a minimum yield of 100,000 PSI and a Brinell hardness of between 235 & 290 RC 26 in its natural state.
So a pretty good work out for my plate roll I figured. Actually due to there only being 9 inches total width the roll acted like it was no big deal.
This was one of the reasons why a built it like I did
Attachment 40126
These 2 strips would be about equal to a single piece 1/8" of hot rolled mild steel 54 inches wide
I recall you built this to make those airbrake pressure tanks for the antique truck. Any idea how that customer is coming with the restoration? As well you have an old truck to restore.
He had the truck at the ATHS national Convention last month in Harrisonburg PA.Quote:
Originally Posted by metric_taper
I have a whole acre of old trucks to restore, some mine but most belong to others
My 49 Chevy c3100 is still tucked away in 1 of my storage trailers. My 1944 EQ Mack is hiding behind my 1963 mack 755 And I use the 64 Mack C600 once in a while to move things around with when I have my 85 Cabover freightliner hooked up to another trailer
and then there is the 59 Ford F100 4 wheel drive belonging to a friend that is tucked away in a storage container. A 65 Dodge D300 and of course the 1916 CT Electric to restore plus a couple more B61 macks And a 1950 round nose 33 ft Dry van that my 49 chevy is in that I am thinking about pairing behind the EQ because of its size and both could have been rolling up and down the Highway at the same time back in the day