Free 186 More Best Homemade Tools eBook:  
Get 2,000+ tool plans, full site access, and more.

User Tag List

Page 1 of 3 1 2 3 LastLast
Results 1 to 10 of 24

Thread: Dust cyclone separator

  1. #1
    Supporting Member C-Bag's Avatar
    Join Date
    Aug 2015
    Location
    California, central coast
    Posts
    720
    Thanks
    689
    Thanked 876 Times in 471 Posts

    C-Bag's Tools

    Dust cyclone separator

    I always feel cheezy posting something that I can't give direct credit for but here goes.

    I looked at a lot of different homemade cyclones and as typical with me I engineered to stock. I went to Home Depot and stood there looking at the ducting available and decided for reasons that were apparent at the time that I'd go with 8" single wall pipe. Forgive me if I get the lingo wrong as I'm not a certified sheet metal man.

    The 8" pipe was flat, not in pipe form. I think the length was 24" It did have the rolled over edges for the lock seam, but I was not going to need them because I needed to make the pipe taper from 8" to 4" so I trimmed them off. I got an 8" pipe cap and that is the top. A 4" coupler is the bottom. I rolled up the pipe and put it inside the cap taped the 8" pipe cap on it to hold it with masking tape. With a long welding vice grip c clamp I held the 4" coupler to the edge of the table and what was going to be the bottom of the cyclone skin. It helped to clamp it because it's like wrestling a greased pig with razor blades because of the trimmed sheet metal.

    I used a progressive cut and mark strategy of holding the formed taper and marking then use a straight edge make the straight lines. Then trimmed and worked my way down till I had a nice 1" overlap. It should be noted that my cyclone swirls counterclockwise as seen from the top so that side of the skin is on the inside. This presents a smoother way than the other way that would expose an edge to the swirl and cause less buildup of dust.

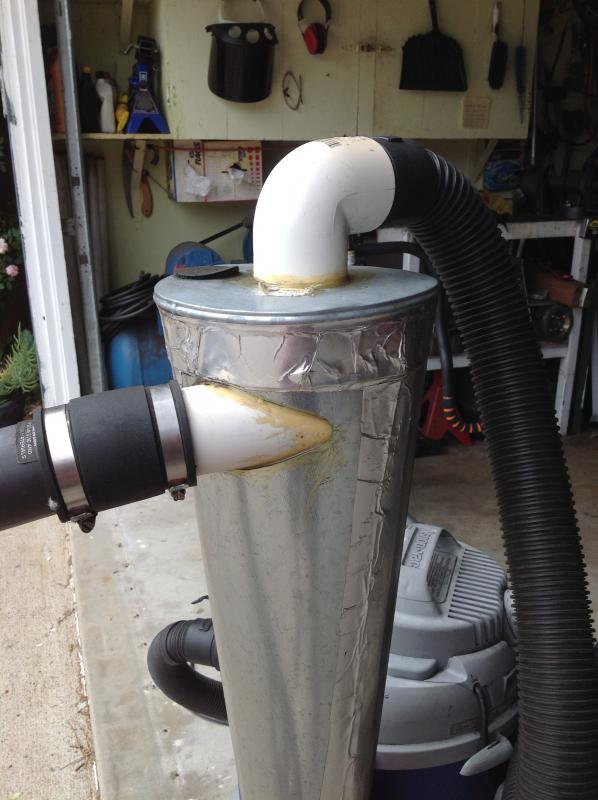
    After getting everything trimmed up(top and bottom because the taper causes misalignment) I pop riveted the body together. Then sealed the whole thing with the real metal duct tape. Next was the inlet pipe. All of it is 2" pvc. I had a couple of feet of it lying around and I also already had a 2" hole saw. Put one hole in the side 3" from the top(this would be the inlet) and one in the middle of the cap(the outlet or vac side).

    As you can see from the pic the inlet cutout is kind of a tear drop shape. I did it with aircraft snips and half round file. Keep trimming until you get a nice fit. The object is to get it as close to side as possible to get that stuff going in the right direction right off.
    Dust cyclone separator-image.jpg

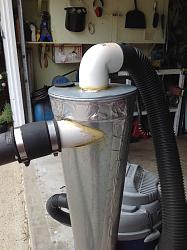
    Next I cut the straight pvc for the vac side pipe that goes down inside the middle of the cyclone. You don't want to be too short and if too long it also starts sucking up debris so I made mine 14" with the the 2" elbow glued onto it before the assembly on to the cap. The wonderful thing I found is only 2" elbows because of the lip inside will fit the common hose ends of shop vacs. Everything else is your usual plumbing nightmare.

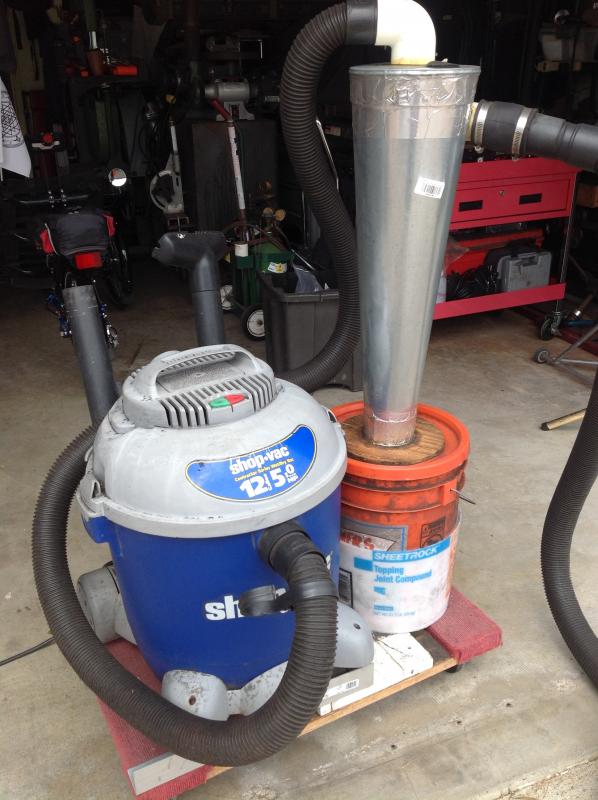
    I used a 5 gal plastic bucket because they are easy to find and remember it has to seal or you lose suction. Took the lid and cut a hole big enough for the 4" duct coupler and took some scrap plywood and made about a 9" round piece with the 4" hole in the middle. This is my mount for the cyclone to stiffen the top of the bucket. Put caulk on the plywood mount and used short deck screws under the lid to mount the stiffener to the lid.

    Now all three pieces, the inlet, outlet and cyclone base are all ready to be glued. I used 5min epoxy. The outlet is pretty easy, just lake sure it's hanging straight down on the inside. The inlet is tricky and I glued it and held it until the epoxy set. I also glued the duct coupler/cyclone to the stiffener/lid, hold that straight until set. I really gooped it on the make sure each joint was sealed.

    I hope that makes sense and hopefully the pics will fill in the rest.Dust cyclone separator-image.jpgDust cyclone separator-image.jpg

    186 More Best Homemade Tools eBook
    Last edited by C-Bag; Apr 12, 2016 at 04:49 PM.

  2. The Following 5 Users Say Thank You to C-Bag For This Useful Post:

    Paul Jones (Apr 12, 2016), PJs (Apr 13, 2016), rendoman (Aug 8, 2016), TomBrose (Apr 13, 2016), voodoo59 (Aug 7, 2016)

  3. #2
    Supporting Member C-Bag's Avatar
    Join Date
    Aug 2015
    Location
    California, central coast
    Posts
    720
    Thanks
    689
    Thanked 876 Times in 471 Posts

    C-Bag's Tools
    Shameless bump as I posted in another sub forum and Jon just transferred to this sub forum but back a page.

    wadyagonnado?

    2000 Tool Plans

  4. #3
    Supporting Member Paul Jones's Avatar
    Join Date
    May 2014
    Location
    Del Mar, California
    Posts
    1,231
    Thanks
    5,810
    Thanked 1,441 Times in 655 Posts

    Paul Jones's Tools
    C-Bag,

    Fantastic narrative on your thinking and fabrication instructions. It is also fun to read because I laughed out loud imagining seeing you wrestling with this "greased pig with razor blades ". So true about the statement "your usual plumbing nightmare" and my four trips to Home Depot (three to buy and the fourth one to return everything I didn't need) trying to find the correct plumbing thread. I am not very good at plumbing. Thank you for the photos and advice.

    Question: How do you know when it is time to empty the bucket below the cyclone?

    Thank you,

    Paul
    Last edited by Paul Jones; Apr 13, 2016 at 08:46 AM.

  5. The Following 3 Users Say Thank You to Paul Jones For This Useful Post:

    C-Bag (Apr 12, 2016), PJs (Apr 13, 2016), Toolmaker51 (Aug 7, 2016)

  6. #4
    Supporting Member C-Bag's Avatar
    Join Date
    Aug 2015
    Location
    California, central coast
    Posts
    720
    Thanks
    689
    Thanked 876 Times in 471 Posts

    C-Bag's Tools
    Thanks so much Paul.

    As far as the bucket I mostly only use this for pulling powdercoat dust out of my little powdercoating booth. It's amazing what it does to that stuff...it compacts it so hard it's just flakes in the bottom. I try to check it once a month. The dead giveaway I've forgotten is when I hear the vac pulling hard because powdercoat plugs the hepa filter in a heartbeat. If I keep the bucket empty my filters don't clog....ever. It's paid for itself many times over because once you get powdercoat packed in a filter, it's done. Sorry I can't be more specific. And if I was doing wood it would fill up quicker but you can blow that out of a filter and it's still good. I wish I was still around gas stations because we used to get our grease in 15gal metal barrels that would be perfect. But it would REALLY be tall then

  7. The Following 3 Users Say Thank You to C-Bag For This Useful Post:

    jjr2001 (Oct 8, 2016), Paul Jones (Apr 13, 2016), PJs (Apr 13, 2016)

  8. #5
    Content Editor
    Supporting Member
    DIYer's Avatar
    Join Date
    Aug 2013
    Posts
    3,056
    Thanks
    772
    Thanked 1,852 Times in 1,653 Posts


    Thanks C-Bag! We've added your Dust Cyclone Separator to our Cleaning category,
    as well as to your builder page: C-Bag's Homemade Tools. Your receipt:


  9. #6
    PJs
    PJs is offline
    Supporting Member PJs's Avatar
    Join Date
    Sep 2014
    Location
    Northern CA
    Posts
    1,841
    Thanks
    8,337
    Thanked 1,118 Times in 718 Posts

    PJs's Tools
    C-Bag,

    Fantastic narrative on your thinking and fabrication instructions. It is also fun to read because I laughed out loud imagining seeing you wrestling with this "greased pig with razor blades ". So true about the statement "your usual plumbing nightmare" and my four trips to Home Depot (three to buy and the fourth one to return everything I didn't need) trying to find the correct plumbing thread. I am not very good at plumbing. Thank you for the photos and advice.

    Thank you,

    Paul
    I'm with you Paul, busted a gut with the pig and razorblades, the plumbing hit was priceless, and you are so right about trips to the store...think that sums it up!!

    C-Bag,

    Nice build and presentation, Bud! I've studied these things till the cows went to bed including the Thein type. Love the simple set up you have. Maybe you could come up with a sight glass on the inside of the bucket with some acrylic, say 1/2-3/4 up from the bottom to ease your tensions on when to empty. Tap plastics is a great resourse for me with there scrap bin. You could form some thin flat to the ID and bond it with CA or some caulking(?)...not a lot of pressure in the bucket. A thought¿

    I've been working on a hybrid system (way too long) for a friends jewelry blast cabinet. Basically a cone under a Thein in the bucket to lower the pressure more and pull more fine stuff through. Some nasty dust from the tiny media and material, tiny particulates and almost smoke level powder, similar to your Powder coating but not as sticky. The design parameters are a bit daunting because he wants it to run off 12VDC and use a box fan, and a Cheap and Cheerful budget of course. The main difficulty is the static pressure of the fans even though I found an 80mm with 130CFM all the runs need to be short because of the static and it runs out of steam with any type of micro filter on the fan.

    Great build and Way Fun write up!! Thanks, ~PJ
    ‘‘Always do right. This will gratify some people and astonish the rest.’’
    Mark Twain

  10. The Following 3 Users Say Thank You to PJs For This Useful Post:

    C-Bag (Apr 13, 2016), Paul Jones (Apr 19, 2016), voodoo59 (Aug 7, 2016)

  11. #7
    Supporting Member C-Bag's Avatar
    Join Date
    Aug 2015
    Location
    California, central coast
    Posts
    720
    Thanks
    689
    Thanked 876 Times in 471 Posts

    C-Bag's Tools
    Thanks Wiz. Ok, you got me I'm going have to look up a "Thein type" cyclone!

    I've thought and still am thinking about a sight glass or something but you can't believe what a mess it is inside that bucket. It's all black (that's the main color I use) and it literally coats the inside of the bucket. It's worse than when it went straight into the vac. So I'm thinking I'm not going to see through a sight glass setup. Dunno. I also forgot that it's really easy just to unplug the hose from the top vac hose and look into the white PVC elbow. If there's any black dust there....it's time. It is a bit of a hassle to pull the top of the bucket with the "razor pig tower" attached. But whatchagonnado? Depending on how many runs of powdercoat I do it could be a month, sometimes two before I have to empty it.

    Wow, your buddy doesn't want much, eh? My rig I've also used for my HFT sandblast cab and it works great. Keeps the air clear in the cab so you can see what you are doing and not even a hint of that totally nasty dust in the shop. But 12v and no filter? You crack that nut Wiz, I wanna see!

  12. The Following 2 Users Say Thank You to C-Bag For This Useful Post:

    Paul Jones (Apr 19, 2016), PJs (Apr 13, 2016)

  13. #8
    PJs
    PJs is offline
    Supporting Member PJs's Avatar
    Join Date
    Sep 2014
    Location
    Northern CA
    Posts
    1,841
    Thanks
    8,337
    Thanked 1,118 Times in 718 Posts

    PJs's Tools
    Hi C-Bag,

    Been thinking about the black goo since I posted the sight glass...have to think about it some more but you are probably right. Better to pull the hose and have a look...then deal with the Razor Pig! It may be a moisture/temp thing inside the bucket that makes it so messy.

    Thein type are pretty cool and got interested in them 3-4 years ago when my buddy G (ghostses) on YT built a big one on a 30 gallon waste can...go back 4 years in his video list to see them. Last time I linked a video it posted the video in the thread. He has the big HFT collection system (coupon of course) and got sick and tired of cleaning the bag. Also Matthias Wandel made one for his shop. The principles are similar to a cone but horizontal and from my research is better at taking the small stuff also. And both types are scalable for this small cabinet.

    I'll finger it out I think...It's all about keeping the Yang up to the fan with diameters and lengths to get straight air, I believe...and finding the right filter material. May have to go to a 100mm or 120mm fan though. Also came up with a venturi for the inlet. If I get it to work I'll definitely post it.

    Thanks, ~PJ
    ‘‘Always do right. This will gratify some people and astonish the rest.’’
    Mark Twain

  14. The Following User Says Thank You to PJs For This Useful Post:

    Paul Jones (Apr 19, 2016)

  15. #9
    Supporting Member C-Bag's Avatar
    Join Date
    Aug 2015
    Location
    California, central coast
    Posts
    720
    Thanks
    689
    Thanked 876 Times in 471 Posts

    C-Bag's Tools
    You know Wiz I forgot one thing. There is a whale of a static charge on the whole thing when it's running. I've gotten zapped so many times I don't even pay attention. That's what makes the powdercoat cling everywhere but also there's the fact when I do a run of powdercoat I set the cyclone unit in the doorway of the garage, in the sun. So it gets hot enough to help it set also.

    Thanks for the links. When I have time I'll do some rabbit hole diving see what this Thein thing is all about.
    Last edited by C-Bag; Apr 13, 2016 at 02:22 PM.

  16. The Following User Says Thank You to C-Bag For This Useful Post:

    PJs (Apr 13, 2016)

  17. #10

    Join Date
    Mar 2016
    Posts
    2
    Thanks
    2
    Thanked 2 Times in 1 Post
    Looks great. It also looks easier than the ones I have on Youtube. I don't think you should feel chessy at all. I will try this myself.

    Thank you

    Dave Simpson

  18. The Following 2 Users Say Thank You to Dave 2051 For This Useful Post:

    C-Bag (Apr 13, 2016), PJs (Apr 19, 2016)

Thread Information

Users Browsing this Thread

There are currently 1 users browsing this thread. (0 members and 1 guests)

Bookmarks

Posting Permissions

  • You may not post new threads
  • You may not post replies
  • You may not post attachments
  • You may not edit your posts
  •