-
7 Attachment(s)
Easy Follow Rest
A current project requires an odd size steel rod about 13 long x 0.236 diameter. This made me think a follow rest might be a good addition to my tooling inventory. The rod could be turned by moving the stock out of the collet a little at a time, but I also see another use for it later in this project. So.. here is what I did.
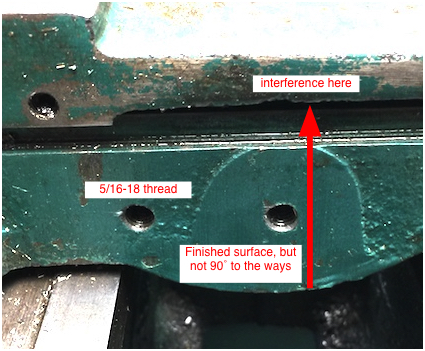
My lathe has two 5/16-18 tapped holes on tailstock side of the carriage to mount the follower. I discovered this spot is not 90˚ to the ways. The cross slide also hangs over the mounting spot
Pic 01
Attachment 48801
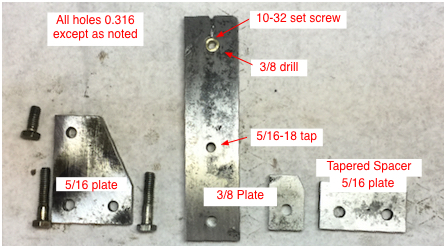
I keep a box of materials that are too large to discard and too small to keep organized on a shelf. Rummaging through that box I found some pieces that looked like that might become parts of a follow rest. The pieces turned into these parts. Minimal dimensions given as there are so many different situations. If someone has an 11 Logan or similar, I would be happy to add some dimensions.
Pic 02
Attachment 48802
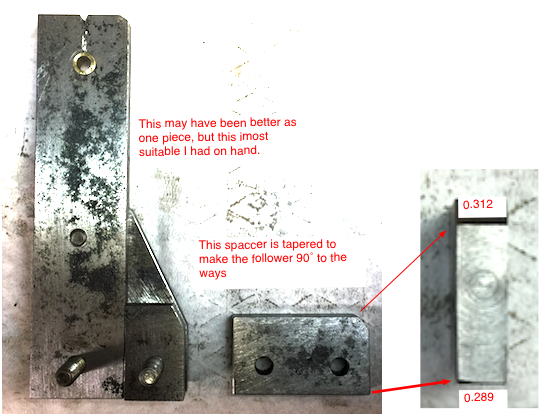
The parts fit together like this. The tapered spacer provides clearance for the cross slide and adjusts the follower to 90˚ with the ways.
pic 03
Attachment 48803
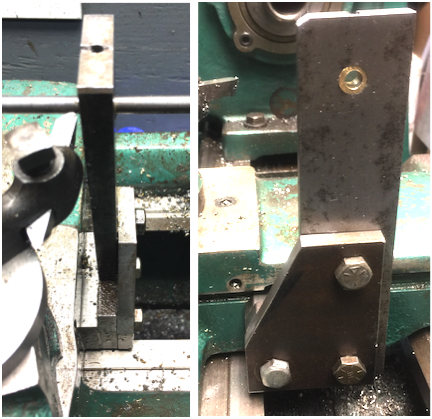
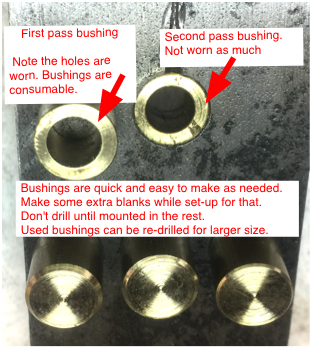
This is the final result. Rather than mess around with adjustable fingers, This design just has a hole with a replaceable, sacrificial brass bushing. This was quicker and much easier that making adjustable fingers with replaceable tips. The piece of 3/8 brass dictated the hole size. It can be enlarged in the future if necessary. The bushing is held in place with a 10-32 set screw. The bushing hole was drilled with the rest bolted in position. The drill bit held in the chuck. The bushings are also drilled in position. This assures the hole is centered, even if the rest is not in the exact same position each time you mount it. A correctly sized bushing is needed for each pass. This limits size options to your drill bit collection.
Pic 04
Attachment 48804
Bushings are drilled in place as needed.
Pic 05
Attachment 48805
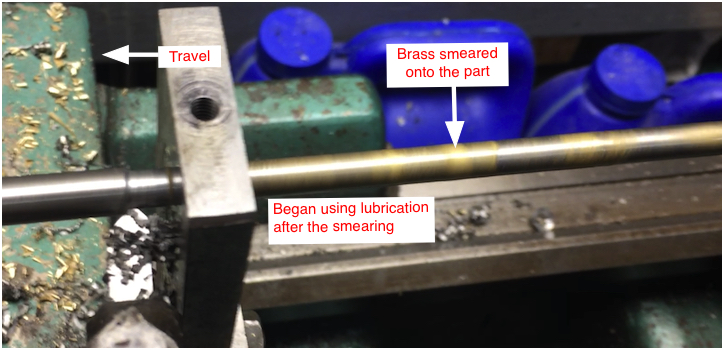
I learned a lot on this very first pass. Most important the bushing needs to be lubricated. Second as the bushing wears, the shaft moves away from the cutter and becomes larger, Third the tool needs to be freshly sharpened and honed to provide the best surface finish and to reduce deflection forces as much as possible.
Pic 06
Attachment 48806
There is a lot of discussion on various forums, does the follower ride on the original surface, or the fresh surface. There are too many variables to settle that discussion here. I believe the right answer is the one that works in your situation. Mine rides on the fresh surface.
Since the bushing wears, the shaft becomes tapered. On my first pass, starting with no lubrication, the taper was about 0.010 over 13. The wear was evident by the brass left on the shaft.
I think I had the depth of cut a little too shallow. This made the shaft too tight in the bushing. This wore the bushing, leaving brass on the shaft, let the shaft move away from the cutter, made the shaft larger, etc. About 1/2 way through that pass, I moved the tool in about 0.0005 closer and things improved.
The second pass, with a new bushing, the taper was 0.0025 over that 13. I attribute the improvement to; Continuous lubrication of the bushing, Freshly honed tool creating better surface finish, Slower feed rate. Better initial depth of cut setting.
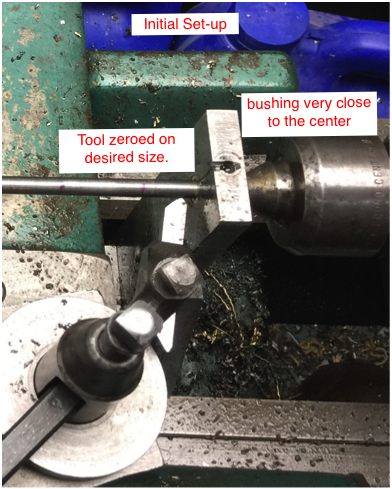
In use, choose a drill of appropriate size and drill the bushing. The drill size would be the desired finished size of your shaft. OR a size that would provide an appropriate depth of cut on your way to finished size. With the shaft mounted close to the chuck, collet is best, center drill and turn a short section that size on the end of the shaft. In my case this is about 1 1/2 of length.
Next move the shaft into position, one end in the chuck and the other on the center. Set the rest as close to the center as possible. Then zero the cutting too. on the finished surface,
Pic 07
Attachment 48807
Good Luck
-
<!-- BEGIN /var/www/html/homemadetools/protected/modules/zeus/views/tool/postUpdate.php -->
Thanks hemmjo! We've added your Follow Rest to our Machining category,
as well as to your builder page: hemmjo's Homemade Tools. Your receipt:
<div id="blocks">
<div class="block b1 pngfix">
<div class="bimg">
<div>
<a href="https://www.homemadetools.net/homemade-follow-rest-4">
<img src="/uploads/274699/homemade-follow-rest-4.jpeg"/>
</a>
</div>
</div>
<div class="head pngfix"></div>
<div class="left pngfix"></div>
<div class="right pngfix"></div>
<div class="blockover b1 pngfix">
<div class="title">
<a href="https://www.homemadetools.net/homemade-follow-rest-4">Follow Rest</a>
<span> by <a href="https://www.homemadetools.net/builder/hemmjo">hemmjo</a></span>
</div>
<div class="tags">tags:
<a href='https://www.homemadetools.net/tag/steady-rest'>steady rest</a> </div>
</div>
</div>
</div>
<!-- END /var/www/html/homemadetools/protected/modules/zeus/views/tool/postUpdate.php -->