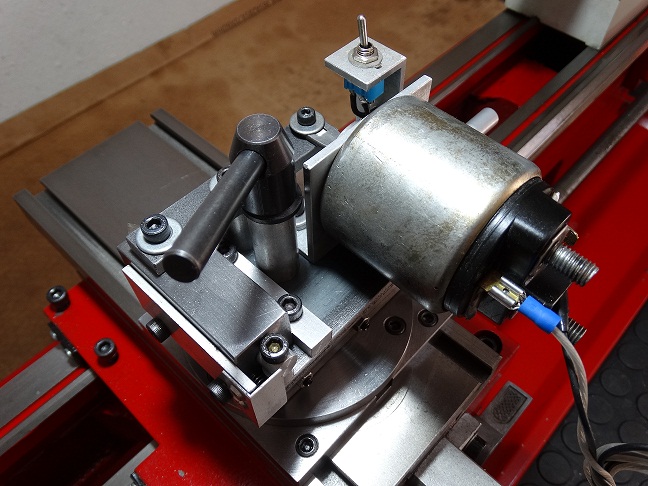
Design of a device to assist the threading process.
Watch on my Youtube channel:
https://www.youtube.com/channel/UCqw...E3eBi7w/videos
https://www.youtube.com/watch?v=eKhD1M-lOSI
Leave your like, subscribe and share!
Thanks for watching!
Printable View
Design of a device to assist the threading process.
Watch on my Youtube channel:
https://www.youtube.com/channel/UCqw...E3eBi7w/videos
https://www.youtube.com/watch?v=eKhD1M-lOSI
Leave your like, subscribe and share!
Thanks for watching!
Looks like a fantastic idea - one of those "Why didn't I think of that ones". Are you going to wire it to a movable stop switch one the bed?
I won't be liking or subscribing on YouTube as they deleted my channel for posting historical documentaries that oppose their political masters narrative.
Try starting a channel on :
https://www.bitchute.com/
https://worldtruthvideos.org/
https://brandnewtube.com/
NortonDommi, thanks for the comments! Yes, I can use an electrical or mechanical limit switch system, or I can use only the on / off switch. When I post the video of the device working, I believe I will answer your questions. Big hug!
Interesting.
Can you provide the mfg & model number of the solenoid used. I'd like to see the specifications.
Nice idea. Looks like a solenoid off of a starter!
Thanks for the interest rayh__! The code I have is 933A081039 BOSCH, but I don't know if it is universal. It is an automotive solenoid found in scrap metal.
That's right, it's a car starting solenoid. Mmwmkravchenko, thanks for watching!
The solenoid works in the same way as the car: carcass (-) + line 15 (+) = retention. Smaller pin (-) + line 50 (+) = overheating (caution).
Attachment 36486
Thread in reverse with the tool mounted on center upside down. That way it starts at the left and finishes out in the air on the right - no worries about crashes. Set a stop at your starting point, return the carriage to the stop, roll the chuck by hand until the mark lines up and engage, bring your tool in for the next cut and let 'er roll.
Good suggestion Crusty, I will try to do some tests. Thank you for your interest!
As the construction seems to be lacking any means of hold-down of the tool that method remains to be seen with this device...Quote:
Originally Posted by Crusty
It also seems to have some side-to-side play, and perhaps the tip will dip down when the rear of the tool holder lifts when threading?
Most threading swing/ reversing tools I've seen are quite a lot more rigid than this.
Guess we'll see the results in the next video?
OTOH- Your suggested L-R method almost makes this device entirely unnecessary, Crusty - were you joking?
2 cents
Johan
Exactly, when I filmed I was finishing the project. When showing in operation, subtle changes can be observed. All comments are always welcome! Thank you for your interest DIYSwede!
No - I commented with what I think is a better way to achieve the same end and with no special tooling required to implement..
Satisfied because this project was able to generate good discussions...
Not criticizing - many's been the time that I got a way to do something in my head and then after some work someone else showed me another better way that I hadn't thought of. We all get better sharing tips.
Thanks Crusty, certainly if I were to redo some of my projects, I would have done it in a totally different way. Learning and relearning is part of the fun!
Please add this project to my builder page. Thank you!
I see how that could be used in woodworking jigs.
The idea is there, hopefully it will inspire you. Thank you for your interest sams wood creations!
Crusty, I appreciated the thread you started on inverted tool, left to right threading back in July (found here: https://www.homemadetools.net/forum/...que-ever-80497). That video really showed the technique clearly concisely.
Please add this project to my builder page. Thank you!
To complete this project, a photo of the finished mechanism. Thank you!
Attachment 36508
machining 4 all, thank you for posting your idea, video & pictures.
IAMSatisfied, I thank you for your interest in watching!
Thanks for the many views. For a post of almost a week, I couldn't predict this! Undoubtedly, until now this was the project I most enjoyed doing! Keep supporting the content creators, also watching other videos from my YouTube channel!
M4A.
<!-- BEGIN /var/www/html/homemadetools/protected/modules/zeus/views/tool/postUpdate.php -->
Thanks machining 4 all! We've added your Electric Threading Attachment to our Tapping and Threading category,
as well as to your builder page: machining 4 all's Homemade Tools. Your receipt:
<div id="blocks"> <div class="block b1 pngfix"> <div class="bimg"> <div> <a href="https://www.homemadetools.net/homemade-electric-threading-attachment"> <img src="/uploads/235278/homemade-electric-threading-attachment.png"/> </a> </div> </div> <div class="head pngfix"></div> <div class="left pngfix"></div> <div class="right pngfix"></div> <div class="blockover b1 pngfix"> <div class="title"> <a href="https://www.homemadetools.net/homemade-electric-threading-attachment">Electric Threading Attachment</a> <span> by <a href="https://www.homemadetools.net/builder/machining+4+all">machining 4 all</a></span> </div> <div class="tags">tags: <a href='https://www.homemadetools.net/tag/lathe'>lathe</a>, <a href='https://www.homemadetools.net/tag/threading'>threading</a> </div> </div> </div> </div>
<!-- END /var/www/html/homemadetools/protected/modules/zeus/views/tool/postUpdate.php -->
Hallelujah brother!