-
Help!!!
Ok. I screwed up!! Anyways... I need to build a jig of some sort to fix a spindle on a rear axle... The inner bearing blew up n damaged the axle tube... I need to either build it up n machine it or replace the spindle. But getting it all square is always the criticle part.
-
you sound like you may have access to a lathe and a welder if so I have started drawing up a relatively simple grinding jig that will mount to the spindle you will have to finish the actual size to fit your spindle It may take me a day or so to finish drawing it up though
-
that would be great thanks I have an idea for a jig as well but cant seem to put it on paper to see it first...
-
3 Attachment(s)
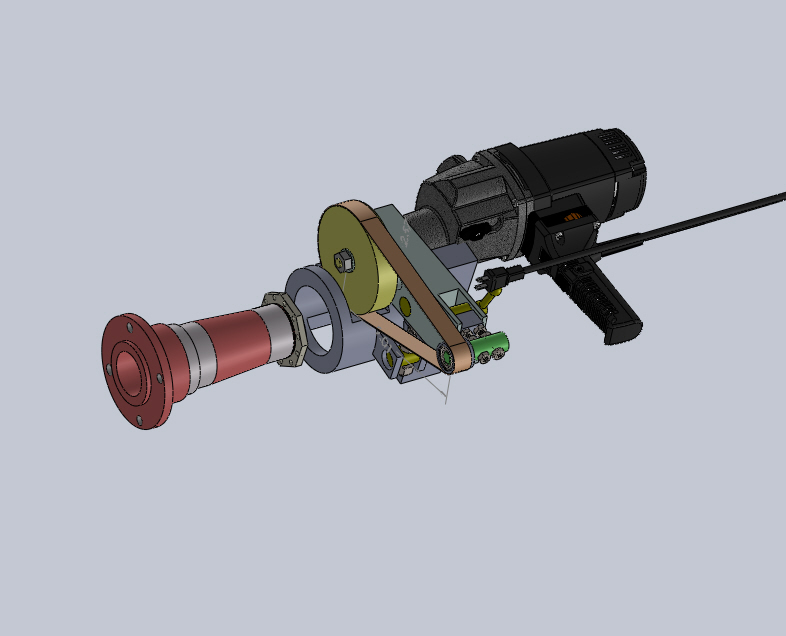
OK here is a start for you to think about
this tool would only do the inner race area in the current configuration but you could have a nice little belt sander when finished LOL
to start off you would want to protect the seal surface area from any possible weld splatter and obviously the outer bering surface and thread areas.
the whole assembly would slide over the spindle then use the outer nut just tight enough to hold it in place you would rotate everything around the spindle adjusting the depth of cut as needed until the spindle was repaired and ground to the correct diameter you would be able to use a micrometer to check the diameter without removing the tool hopefully.
Attachment 5607
I didn't add in any dimensional specs since you will be constructing this yourself
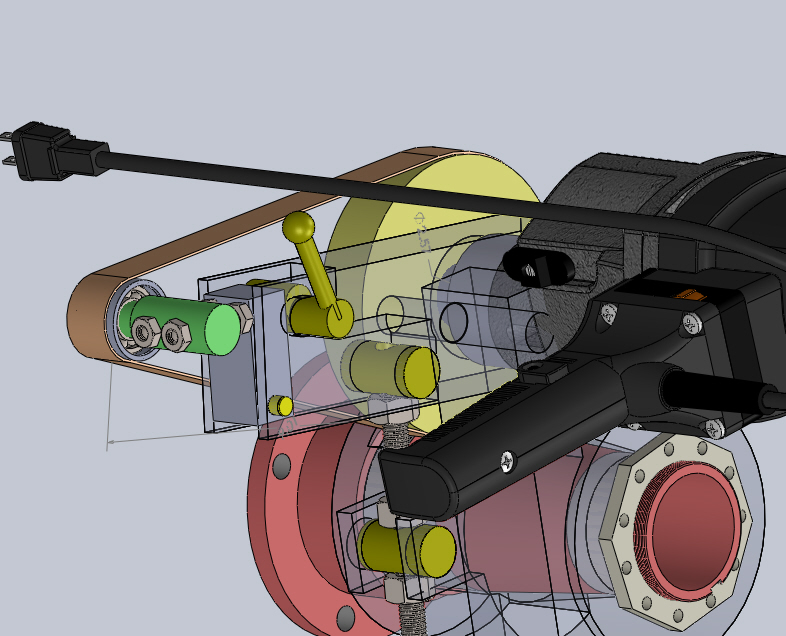
Attachment 5608
I believe you should be able to see most of the parts involved. It is a bit more of a complicated build than a simple jig but if done this way y9ou will have a guarantee that your spindle is fully concentric you will just have to be careful not to dilly dally around while grinding otherwise flat spots will develop
Attachment 5609
the size of the belt I have drawn in could be a standard 3or4x24" belt ripped to 1 " wide that way you can buy them almost anywhere and you would get 3or4 for 1
years ago I made up something similar to repair the end of a hydraulic cylinder rod so I know the idea has been tested to work.
with just a little more complicating of the build the seal area as well as the outer spindle area can be repaired in a similar fashion making a single point attachment to re-thread the spindle really adds to the complexity of a build but I once started top design a portable rotary lathe to do something like this for Large hydraulic cylinders
-
What is the make, model and year of your vehicle?
I have found that it is far easier to go to pick-n-Pull and get a whole rear differential. Then you can rebuild it at your leisure on an axle stand, while sitting comfortably on your swivel chair. This is far easier than laying on your back, or crawling around on the floor under the vehicle trying to fix it in situ.
-
4 Attachment(s)
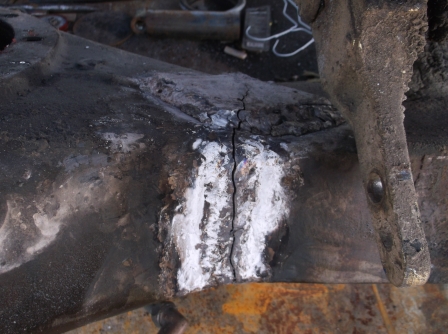
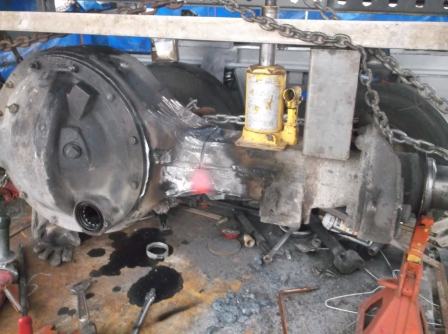
of course then there are those times when you absolutely must do this because no banjo housings with the same mounts are available.
the houshing had been patched at several times in the past
Attachment 5620
it even had bondo on it if you can believe that
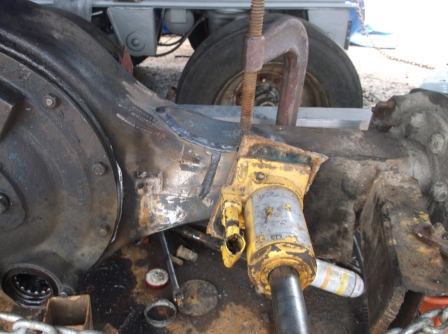
but never had whoever who had tried to repair the cracks had even bothered to check it for straightness
Attachment 5621
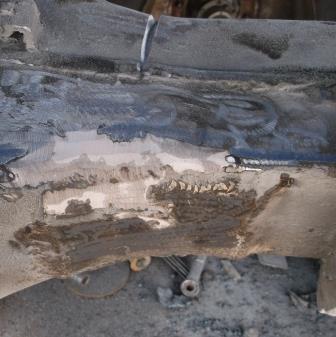
After I had it all gouged out and cleaned up I had to heat it and pull it back straight in 2 directions,
Attachment 5622
then everything had to be held in place to weld it up
Attachment 5623
Cheaper to get another? possibly! but not at the expense of having to wait weeks to find one. I had the guy back on the road over the weekend.
-
I would only go through this kind of effort if this particular part was the last one on the planet.
What vehicle has this type of differential housing?
I also did not mean that it would be cheaper or faster - just a whole lot easier.
Plus you could modify it by reinforcing the potential weak areas while it is sitting on the axle stand in front of you.
-
1 Attachment(s)
That housing was the front differential of a 96 Peterbilt with the Pete lowleaf air suspension and for some unknown reason 1 1/2 inch wider than 20 other housings of the same differential model numbers he had looked at Yes he could have changed it out by changing both of them. a lot of work to do that. as well.
When the OP asked for help about repairing an inner bearing location I figured he had a reason.
In my experience most of the wheel bearings that go out it is the outer one that goes first because it is smaller and the oil level in the hub doesn't always bathe them. especially if the level in the rear end is low as well because then not much oil will wick along the axle shaft.
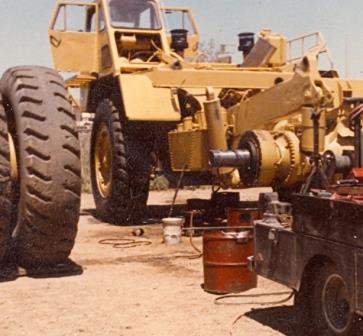
Back when I had my mobile shop I repaired a lot of spindles on trucks and trailers sometimes they were so bad that it was easier to just cut them off and machine new ones then weld the new one back on.
Still easier than having to try and pull one of these off
Attachment 5624
-
I knew there had to be a reason why and either scarcity or extreme difficulty are usually the reasons. I did not realize that there were people on this web site dealing with heavy equipment that large. When large equipment ages to the extent that you are experiencing these kinds of failures, it is usually time to do a cost benefit analysis. Then it becomes clear whether it would be cheaper to replace or to continue repairing. At some predetermined amount you inevitably reach that cross over point.
In the aviation industry, I was continuously faced with those issues when we were flying old DC8 aircraft. Some parts were so scarce it was almost impossible to find them and when we did, they were often in worse shape than the one we had.
Good luck with this project.
-
Correct you are, I am really hoping that the OP will chime in soon and possibly share a picture of the carnage he is having to deal with it would have helped me to determine a more reasonable coarse of action. I have in the past had to just weld up the locations then hand grind and file then use crocus cloth to finish up the surfaces once I even had to cut new threads in one using a file and a thread chaser. while the owner of the truck held a drop light and an umbrella for me while I worked. When your sitting on the side of the road with a 15 axle rig under load out in the middle of nowhere you only have 1 option, that is to repair in place. cost or difficulty are two factors that are never entered into the equation. I've even welded broken axle shafts back together when the situation was dire enough to warrant doing so.
-
Frank:
Now the quality assurance side of me is kicking in. If your idea is to do a weld repair and insitu machining - this can only be a stop gap measure until you get it back to the shop. Any welding in a highly stressed area needs to be heated up to a pretty high temperature before, during and after welding. Then you need to stress relieve that welded area, or it will just crack again and again. You might also consider MIG welding a 60 series wire in the root and then stick weld the filler and cap using 7018 rods. This way you can control the warping a bit better. After your all done, use magnetic particle inspection to check for surface cracks you might have induced during your welding and or grinding process.
Hope this helps.
Nixrox
-
now that you brought that up we might help out the op with a few tips on WPQR. I don't know about the OP but I passed my first 6G back in 1967. and most recently before I retired in 2013 I spent 10 years in the middle east as the senior engineer for a company among my many duties I was over the QAQC,
For my elevators and freight lifts that I designed i was probably a little strict when it came to fabrication procedures but some of them had to lift 30 to 40 tons as high as 60 feet others were just human meat boxes with no more requirement than to carry 10 to 15 passengers up 15 to 30 floors. No real challenge there after all OTIS had been doing it for over 100 years.
7018 has its place and has been the gold standard in the industry for years but it is hardly the only filler for all applications.
about everything I've spec to be welded out structurally for the past 30 years has been FCGMAW for those who are not aware of the acrnym that is fluxcored gas-shielded metal arc welding. OR AWS D1-1 FCAW for short.
My filler of choice (mostly just a personal preference) because I can use it in a very wide variety of applications, has been Hobart Excell 550 E71T1-1 with either 100% Co2 or 75/25 Argon Co2.
Here again this is not the absolute last in fillers particularly when dealing with building up the bearing race of a small er truck spindle, larger ones OK' anything thicker than 3/8" wall, unless the welder is well versed in being able to use very low amperages and voltages. ER 70S6 with 75/25 set just high enough to have a stable arc will do just fine even beter than a much stronger filler due to not wanting to induce more heat than needed.
Prior to welding on a truck spindle it needs to be cleaned any work hardened bilby layer needs to be ground off using iether a small belt sander or a rt angle grinder whit a soft 36 grit floppy disc. then the spindle should be slowly and evenly heated to not more than 300°f a few inches to both sides of the proposed weld area.
if using a mig as I said try to obtain the smallest possible stable arc. weld in a cross stringer pattern never starting or stopping at either end if using stick electrode NEVER EVER EVER USE 6011 filler material. the arc pattern is too random and deep penetrating. the same goes for the all favorite pipe welders root rod 6010 or 5P as we know it.
7018 as stated will work just fine but use the smallest diameter filler you can buy. the idea here is to build up not to fill a crack.
years ago before the filler material manufacturs gobble up Murex (spelling) products made a 1/16" diameter rod that welded like 7018 will overhead but had the buttering flow characteristic of an iron powder 7024 in the flat position.
make only a few side to side stringers at a time then wait until the temp. is below 250°f in the weld area before makeing a few more passes. start the process at 6o'clock weld to 7oclock then start at 1 o'clock and weld to 12o'clock then 6 o'clock to 5 o'clock then 11 o'clock to 12 o'clock then 7 to then 8 to 11 then 2 to 1 then 5 to 4 then 10 to 11 then 4 to 3 then 8 to 9 then 3 to 2 then 9 to 10. the pattern is not absolute but maintains a reasonably even flow of heat . after welding is complete a low post heat of around 300°f gradually reducing over 10 minutes or so. you will be ready to start dressing the weld to round. and the finished size but the final grinding should not be done until the spindle has returned to ambient temp. for a 3to 4" diameter bearing surface you will want +0000'-.0005" max.
Another way to weld up the spindle would be with an Exothermic metalizing spray like that of Ram Airco or Study they use ox/act flame and powdered metal dust. the torch is held several inches away for the preheated part and the powder is sprayed through the flame. the part never receives the electrical shock treatment that mig or wire can do and stays at around 300 to 400°f throughout the whole build up process. I've used them to weld up everything from crankshafts to the leading edges of gas turbine blades in the past.
-
Nixrox the repairs need not always be a stop gap measure your are correct though in most cases about the recovery of highly stressed parts. sometimes things absolutely must be stress relieved prior to any repair procedure such a broken crankshaft we repaired once it would have been impossible to rejoin the 2 pieces with any success had we not placed in in an oven for 24 hours to soften and normalize it then it had to be returned to its hardened condition prior to regrinding it back to origonal like new condition.There was also a pretty heavy duty fixture that had to be made then normalized then machined to hold the shaft before the shaft could even be put in the oven as well
but in the case of spindles housings like the OP has the practicality of doing this and the necessity is not warranted.
Some guys I know who have an Axle Doc. Franchise can repair on location as many as 4 spindles or replace all 4 in a day . and never remove an axle from under a truck or trailer.
-
Frank:
I really did not want to get into the finer details of the welding procedure - we use welding engineers to do that here in Alberta. You would need to be either a CWB certified level 3 weld inspector, or a welding engineer to make any welding recommendations - especially on a motor vehicle.
However, I have been a certified non-destructive technologist and teacher for the last 30 years. I have worked with many engineers on hundreds of failures. I can tell at a glance whether a weld will pass a visual inspection. But if I really want to thoroughly check out a weld, I use either ultrasonics or x-ray to inspect it. I always follow up with either magnetic particle, or die penetrant to check for surface defects.
In the aircraft industry - no defects are allowed. It was real easy to inspect anything.
On the industrial side, I have had to deal with ASME and CSA specs and codes. Trust me - they allow a significant amount of defects to pass, as long as they are round with no sharp edges that can initiate a stress riser crack.
So having said all this - getting back to my original point - field repairs are just that - they probably need to be thoroughly checked out once the vehicle gets back to the shop. In addition, this is also a good time to use the services of a structural and/or welding engineer to put a plan and procedure in place to mitigate this ever having to be done again.
Just my two cents worth.
nixrox
-
Frank:
You are right about that. The most absolutely rediculous field repair I ever saw, was that guy up in Alaska who flew his piper cub into a remote location for some prime fishing. They caught a bunch of fish and then put those inside the aircraft and proceeded to go out and catch some more. When they got back a really big bear had feasted on the fish they left in the aircraft. However in doing so he literally wrecked the aircraft - remember it is only fabric covered. He came up with an ingenious idea to do a field repair - use duct tape. They had a mobile phone and were able to call their base to deliver a case of duct tape and a new tire because the bear had even flattened one of those. A few hours later he flew the aircraft back to base. It looked awful but it flew. It never ceases to amaze me what some people are willing to fly.
-
1 Attachment(s)
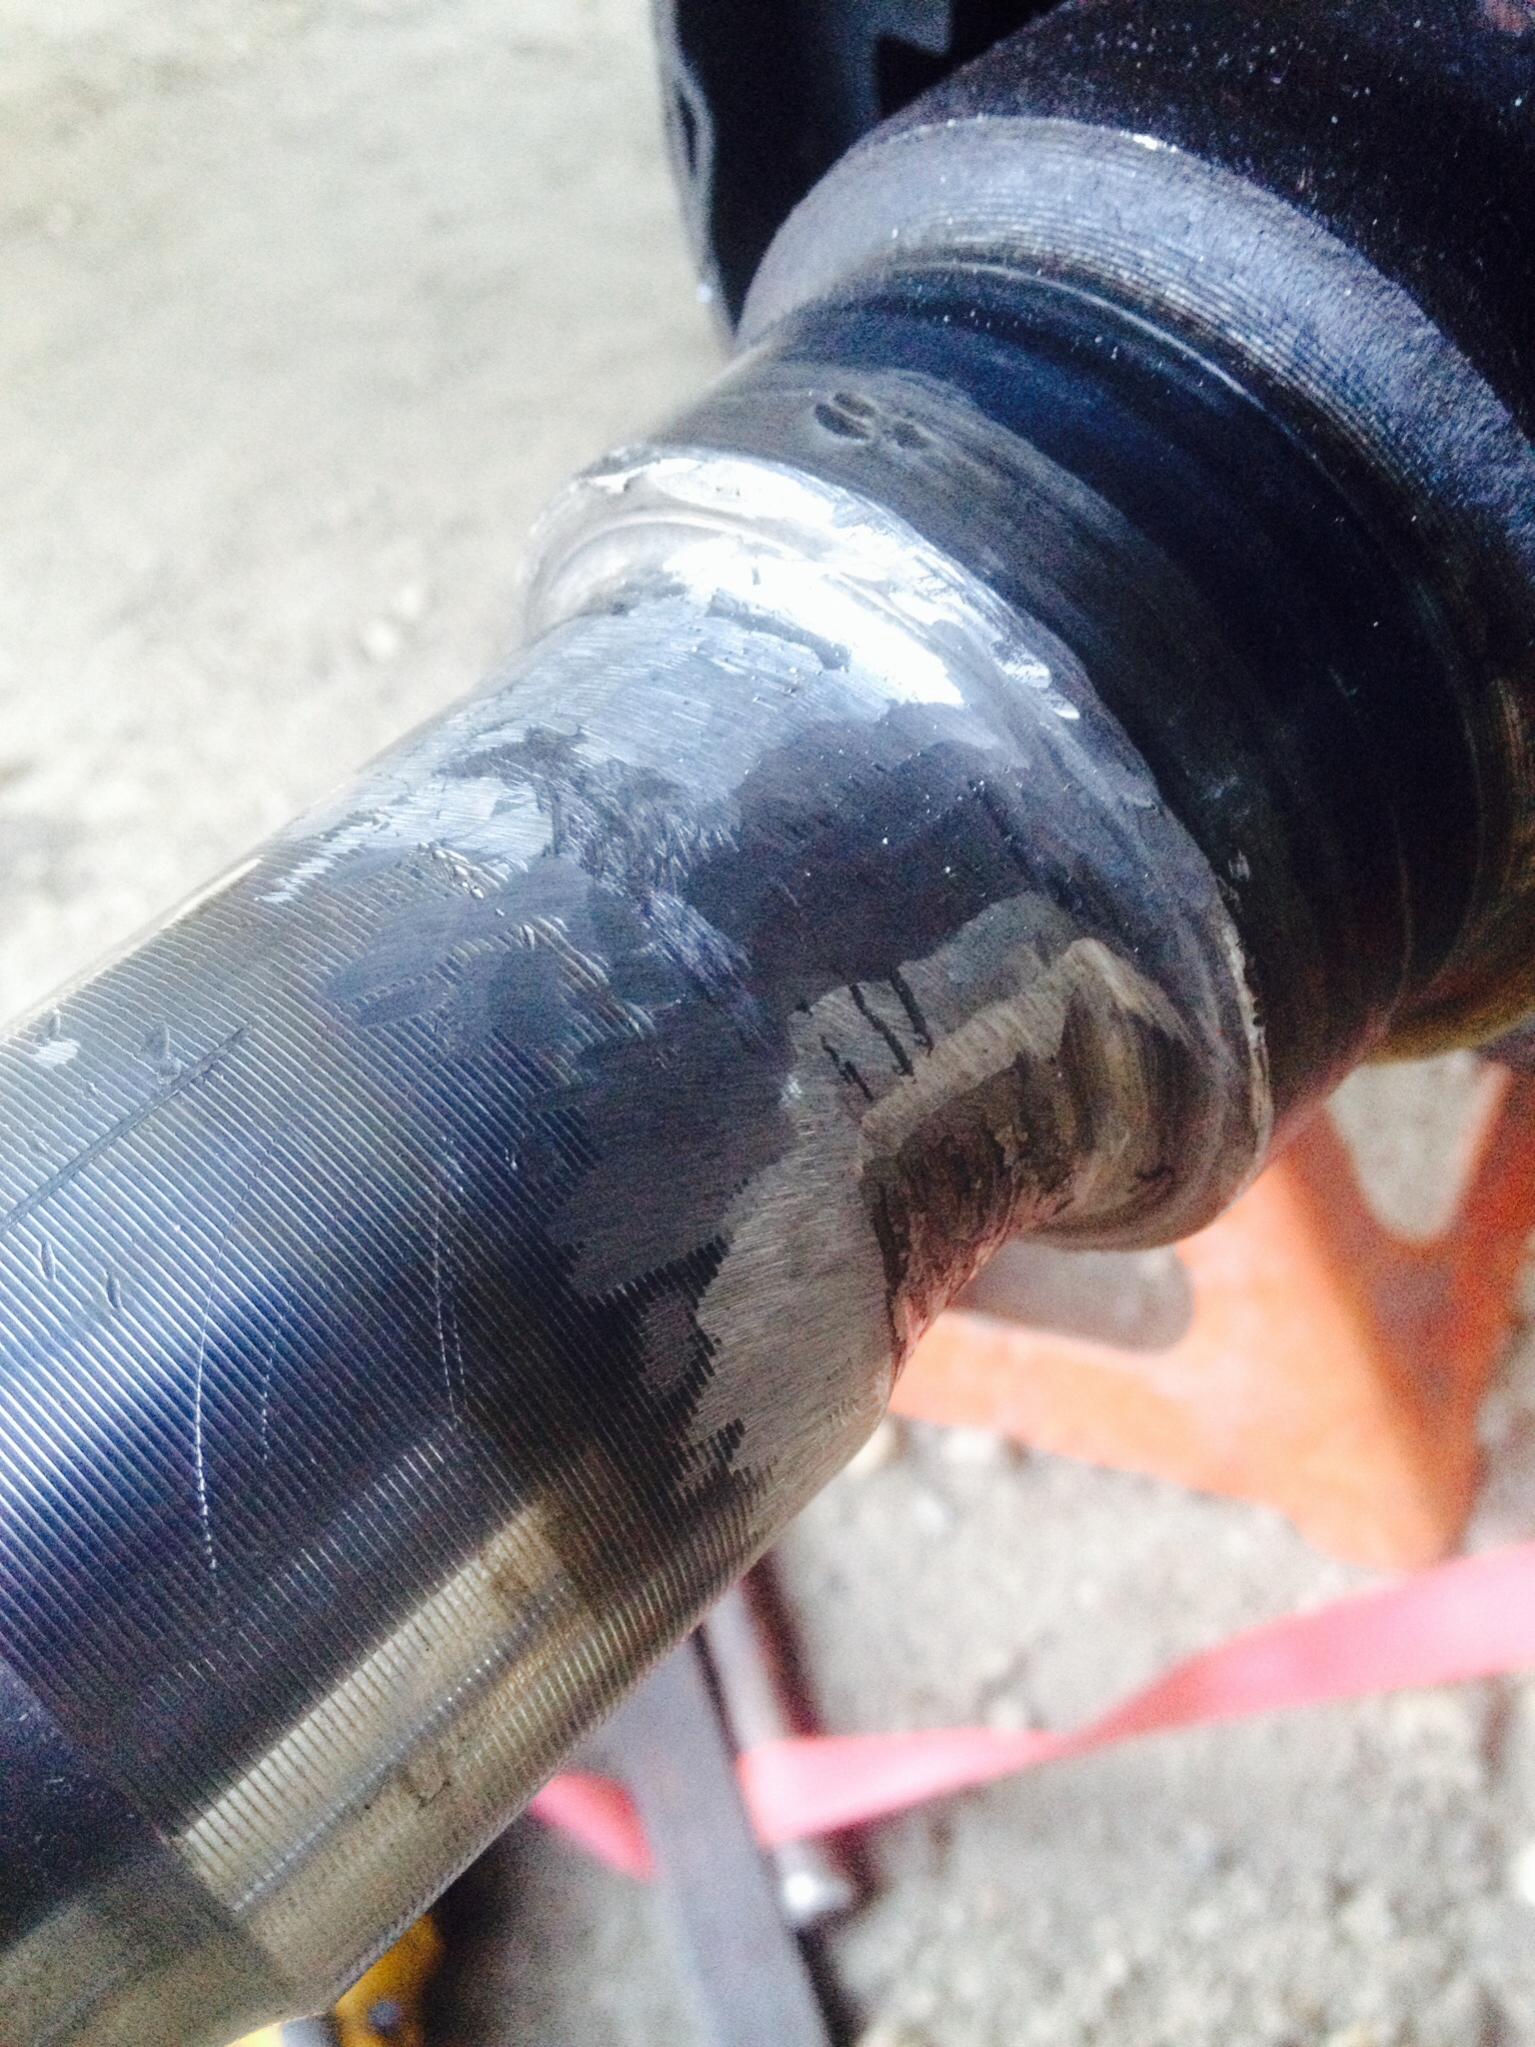
I'm trying to upload a photo.. But it's a bit tricky from this phone. Attachment 5632 this truck is an 08 dodge 1 ton dually.
-
So after seeing the picture and explanation provided by Chrishd - I can ask this question - why would you go to so much effort when there are literally hundreds of Dodge dually rear ends at your local Pick-n-Pull? You could spend your time and money replacing all the bearings and seals on an axle that has not been as badly damaged as yours and still be out the next weekend seeing if you can do it again.
I have a Chev with a dually 11,000 pound rear axle and every time I go there to find parts - the Dodge trucks out number the Chevys or Fords two to one. There should be plenty available in your area.
-
Basically because I'm cheap. Lol. And I can't afford to buy the housing. At least not right now. And so I'm on a time deadline. And this is an after work project for a friend and he is also cheap
-
OK thanks for the pic.looking at it Nixrox has a valid point. However you still have other possibly less expensive and time consuming options available to you that is"maybe". Because from what AI am seeing you also have seal area damage this could possibly be fixed with a micro sleeve though
One very easy thing to do would be to call around and ask for a damaged housing buy just a cut section from it as long as the cut was made on the tube far enough from where the spindle is welded on to allow you to chuck up the spindle and remove the tube keeping the 2inch long location boss of the spindle intact.
Next it would still be better to pull the whole diff out from under the truck just to make the repair that much more accessible and easier. With a good impact a couple of good jack stands a floor jack and an hour's time the rear end can be out from under the vehicle and on a pair of pipe stands ready for mutilation so to speak.
if you are good with a torch ad have a scarfing tip some call it a gouge or washing tip for your torch you can scarf off the weld and see the join line of the tube and spindle if you are careful you wont even damage the end of the tube. but if you do it is not the end of the world. After scarfing off the weld or removing it with a grinder if you want. you will need to remove the spindle from the tube. heat the tube all the way round enough that the spindle can be removed. a good 10 lb slide hammer is helpful here. clean up the weld area for both parts warm the tube again and tap the new spindle in place. getting it square is fairly easy with a few parallel bars and a couple of long straight edges and a vernier caliper.
weld it up as if your were going to try and pass a pipe weld test or cheat and roll it reassemble and job done.
another option would be same as above but build up the spindle and turn it back to size in a lathe.
In my opinion either of the solutions above would be faster than having to spend the time and expense to make the belt grinder apparatus I drew for you. Plus you would get a better job done doing it.
-
The part that is really scary for me about this project - is these fellows will try to complete a complex repair on a pretty critical piece of equipment without having either the skills, training and/or experience to even understand that they might endanger someone's life - even their own. I can only hope that this is an 'OFF ROAD' vehicle. If they are going to drive it on the highway, I guess I can rest comfortably knowing they are thousands of miles away from me.
I will keep repeating this - if you don't have the tools, training and experience please do not attempt to alter a vehicles basic undercarriage or steering components. The reason being is that if you screw up - someone is going to be killed.
-
I have learned to never assume a person knows how to do something until I see them do it. Nor do I assume they do not have skills training or experience either.
I can only hope that if a person does not that they will seek out someone who has done a similar act before no matter the simplicity or complexity of the project.
In his first post I noted that he was just unsure about how to make sure it was square. I jumped on the doing the build up repair technique instead of cutting it off and replacing it. which actually can induce far less stress into the spindle than one who has never done one would believe. However after seeing the picture I feel that he will be better off cutting the spindle off whether or not the rear end is removed from the vehicle to make the repair will have to rest on his confidence to make a proper weld in place. for me it would be a moot question I've spent more than my share of time at the 6 o'clock position welding on a critical part under heavy equipment, that sucker would be drug out from under the truck and placed on waist high stands where I could get to it easy and would probably even roll it as I welded it. I'd have that thing cut apart then either repair and machine the spindle back to new then return it to the housing, or preferably replace the spindle with a donated spindle if one could be had,a have it ready for someone to put the rear end back under the truck with my number stamped on the tube near the weld. Again as you stated it does take a particular skill set, and there will never be a replacement for experience. Until they have done a task for themselves all of the training in the world is nothing more than a base guideline.
-
Frank:
I tried to keep my response as generalized as possible, because in Canada it is getting more and more difficult for the 'backyard' mechanic to be able to do anything on a vehicle. I can see it may end up somewhat like the aviation industry - you will not be able to modify a vehicle in any way, shape, or form, without the signature of a licensed mechanic or a mechanical engineer.
The autobody industry is already at that point - if any insurance company writes a vehicle off, no one but a certified body mechanic can salvage it and put it back on the road. There is even a notation that gets added to that serial number stating that it has been salvaged.
The complexities of computers - as many as 20 on some of the newer models - also makes it more difficult for a 'backyard' mechanic - unless they are willing to invest in the diagnostic tools that will allow them to troubleshoot an electronic defect indication.
But for all the above reasons - LIABILITY will be the biggest deterrent to anyone trying to maintain their vehicle. Even now I am exceeding careful about what work I am willing to undertake - no one but close relatives and people I have known for a long time. Gone are the days when we could do a quick once over and sign off an insurance inspection. Here we cannot even build a trailer without taking it to an approved inspection center for certification and a license plate, plus up to $400.00.
The government is just taking all the fun out of working on your own stuff.
There - that is my lament.
Nixrox
-
Nixrox; I hear you.
having spent many of my 60+ years of my life working in developing and 3rd world countries I've seen a lot of changes come down the pike. During my 10 years in Kuwait I set up several factories. For my own factory there I went to the trouble to get it ISO9001-2000 compliant then later certified. By doing this I quite literally forced some huge out of the region structural engineering firms to at least take a look at our manufacturing capabilities as opposed to having their contracts made in the EU or the USA then imported to the Middle East. Plus when it came to Freight elevators My company was the only one with full ministry approval even huge elevator manufactures like Otis would contract our company to manufacture part of the structures they sold there. we were a small company that grew into what ever size needed when needed and I usually had 10 to 20 of our company's junior engineers attending my Saturday morning planning conferences.
Upon returning to the states I found it was a mere shadow of itself. I decided that I would be happier to just retire from that aspect of my life and go back to doing the things that I really loved, doing a little job shop work when I want to and more importantly IF I wanted to. my wife and I thought about us retiring to Australia where I used to own some land then I could have taken a professorship at my University in NZ but I've had my fill that stuff as well.
-
Frank:
I am on the far side of 60. It seems like we both spent our 40's and 50's in our 'GROWTH' years. I setup and operated 2 airlines one running passengers and cargo between Canada and Russia and another just cargo between Canada and Vietnam/Hong Kong. Then I had a heart scare and that forced me to look at something with a whole lot less stress. I chose teaching and playing with my 8 grandchildren. I also putter around with auto mechanical projects and NDT consulting with people I have known for many years.
Life is good and I really appreciate the time I spend with family.
My father on the other hand just took the engine off his Cessna 172 (designed in the 1940's 180hp) and put on a Corvette LS3 430hp fuel injected turbocharged monster engine. I have not witnessed him take it off the lake, but he says it only takes about 100 feet before he is airborne. Keeping in mind he is 88 years old.
I don't think I want to do anything quite like that.
nixrox
-
I do appreciate the info and the concern... With all that being said I am a licenced mechanic and a 3rd year apprentice welder... I do understand the legalities and the risks involved in any kind of repair work done to anything much less than critical components... I do have the skill and knowledge required to do complex repairs.. This one was just a case of **** happens.. If I do have any serious concerns about appropriate course of action it is as simple as asking a question to the correct people
-
Nixrox. Just a statement to scare you... I am in alberta as well. So not so many thousands of miles away :)
-
Why am I not surprised? Well that means everything I said previously has taken on a lot more relevance. I achieved journeyman aircraft mechanic status in 1970. I got my Journeyman Auto Mechanic license in 1975. I got my NDT industrial Radiography and Ultrasonic certification in 1978. I have owned and operated my own NDT inspection and consulting companies since 1984. I have conducted failure analysis on thousands of breakdowns and explosions. So I am speaking from a position of experience gained through the school of hard knocks. I'll give you just one example - A certified welder in Alberta repaired a holding strap on a propane tank attached to a large RV. Several months later the strap failed and one of the occupants was killed. My company was called in to conduct a failure analysis of the welded strap by the insurance company. We determined that the welder did not follow the manufacturers recommended welding repair procedure. The manufacturer was absolved of liability, but the welding company was successfully sued for millions. The welding company was bankrupt in less than 6 months. So if you, as a certified welding apprentice take on the repair of this rear differential and if it fails any time in the future - you could be held responsible and liable for tremendous financial penalties. So you think long and hard about what you are willing to risk, by helping your friend before you actually do any welding on a motor vehicle in Alberta.
-
Nixrox is exactly spot on with everything he said. the single most important thing when contemplating a repair such as this is your liability insurance policy. you have to make sure that there are no exclusions to coverage in this area. and if you do not have a policy or are not covered under a company's policy for a repair such as this call someone like the Axle Doc. and hire them to do the repair.