Free 186 More Best Homemade Tools eBook:  
Get 2,000+ tool plans, full site access, and more.

User Tag List

Page 1 of 2 1 2 LastLast
Results 1 to 10 of 19

Thread: I Didn't Like the Pulleys on My Drill Press

  1. #1
    Supporting Member Crusty's Avatar
    Join Date
    May 2019
    Location
    Dry Gulch, Tx
    Posts
    749
    Thanks
    220
    Thanked 845 Times in 324 Posts

    Crusty's Tools

    I Didn't Like the Pulleys on My Drill Press

    So I decided to make new ones, casting them in aluminum and then machining to final form.

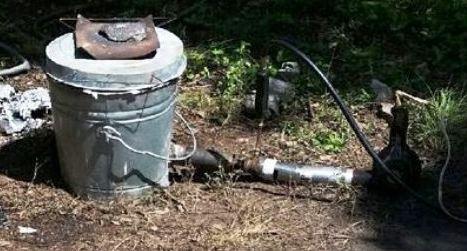
    So first I needed a furnace to melt aluminum. I made one from a Homeless Depot bucket, some Kaowool and a refractory coating. I needed a propane burner too so I made one from steel pipe and other scrap steel with a hair dryer for a blower. I used the handle valve from a propane torch to control the gas into my furnace and a waste gate on the feed tube controls the air into the burner.

    I Didn't Like the Pulleys on My Drill Press-furnace.jpg


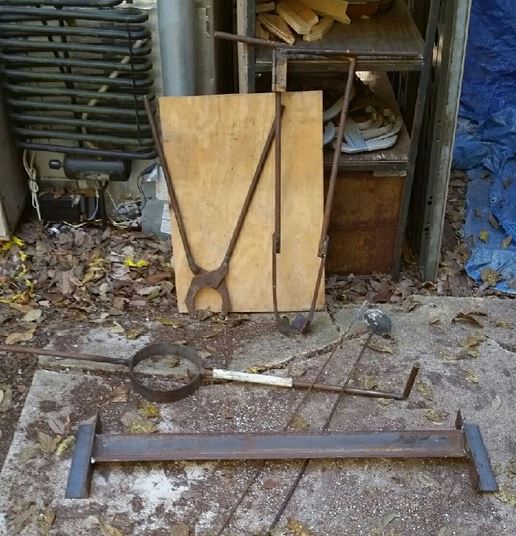
    So then I needed things for casting. I bought a crucible then I made lifting tongs and a pouring shank for it, as well as a pair of general grabbing tongs, a stir rod and a dross remover, along with a mold for ingots.

    I Didn't Like the Pulleys on My Drill Press-tools.jpg


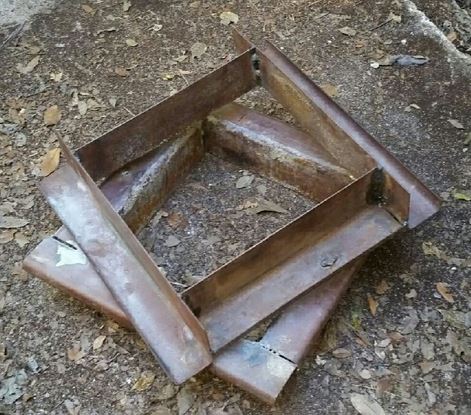
    What else? I need a flask to mold the parts in so I made one.

    I Didn't Like the Pulleys on My Drill Press-flask.jpg


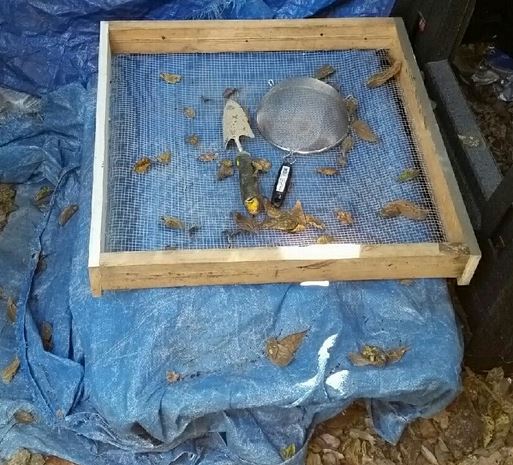
    I needed greensand for molding so I sifted and mixed up two tubs of facing and bulk greensand plus made a screen sifter.

    I Didn't Like the Pulleys on My Drill Press-greensand.jpg


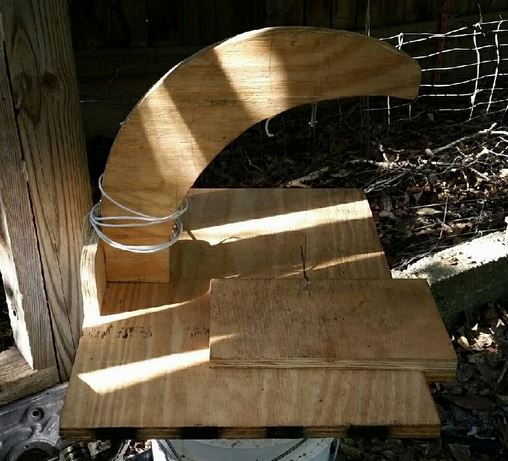
    OK then, I intended to use the lost foam process so I needed a hot wire cutter to make the forms. I made this one using a 16 banjo string which seems about the right resistance for the 12v, 2 amp battery charger.

    I Didn't Like the Pulleys on My Drill Press-hot-wire-cutter.jpg


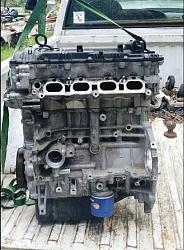
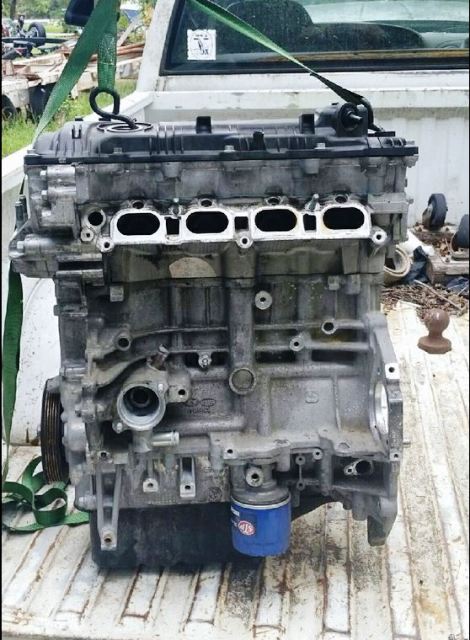
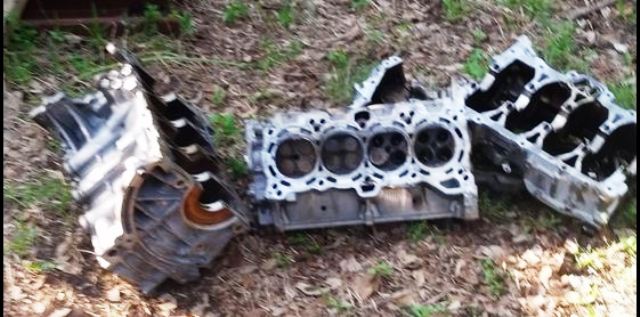
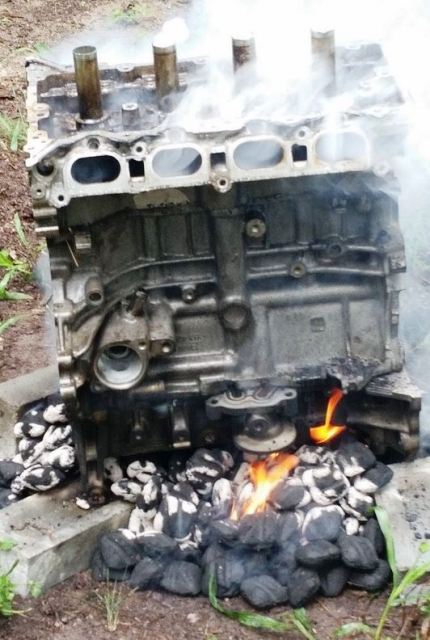
    What else? I needed some aluminum to cast so I bought a Kia engine from a junkyard, disassembled it and then broke it down into chunks which would fit into the crucible.

    I Didn't Like the Pulleys on My Drill Press-al-engine.jpg I Didn't Like the Pulleys on My Drill Press-gutted-quartered.jpg I Didn't Like the Pulleys on My Drill Press-fired-up.jpg


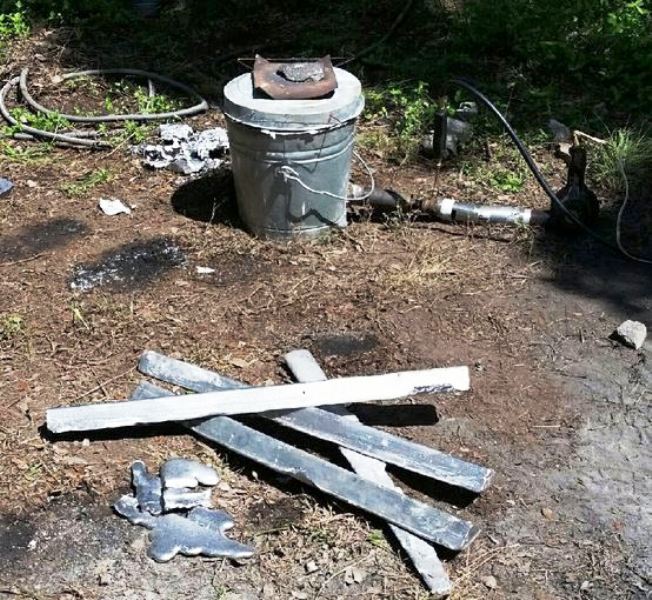
    And the spirit sayeth unto me "Goest thou forth and cast thine ingots upon the mold, and so I did for the most part though I slipped on some lion scat and struggled to finish a weak sixth.

    I Didn't Like the Pulleys on My Drill Press-ingots.jpg
    Those are 5lb ingots and I got 11 of them from that engine. The aluminum seems to cast well.

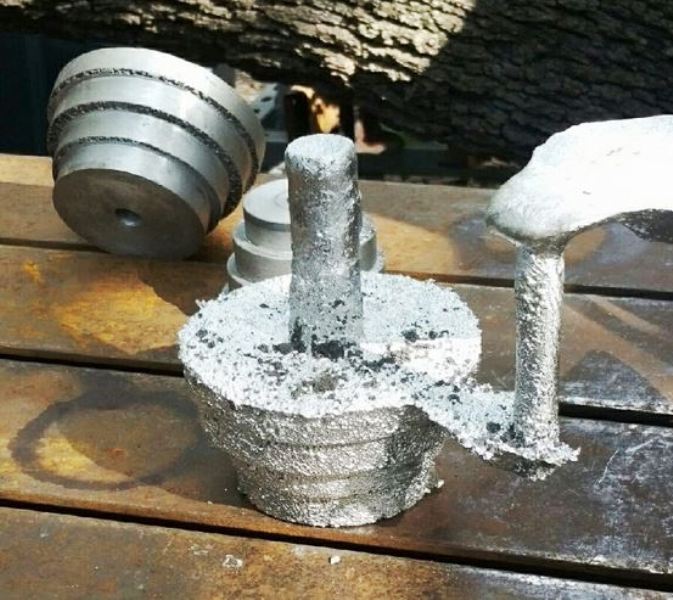
    So finally I was ready to try to make some castings. Here's a couple after rough machining and one straight out of the mold. It took a couple of attempts and the lost foam process left pretty rough surfaces so I'll likely use the traditional greensand casting method in the future, though making foam forms is a time saver over wooden ones.

    I Didn't Like the Pulleys on My Drill Press-unmolded-rough-machined-pulleys.jpg


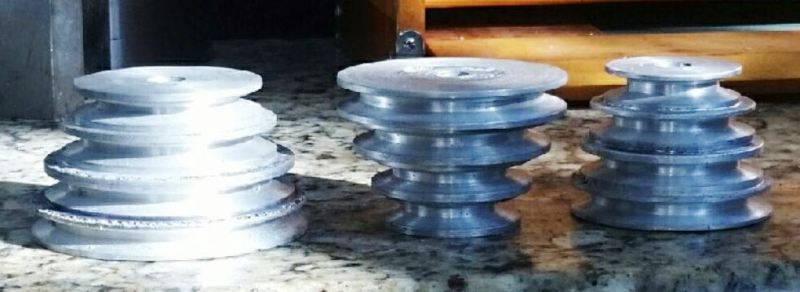
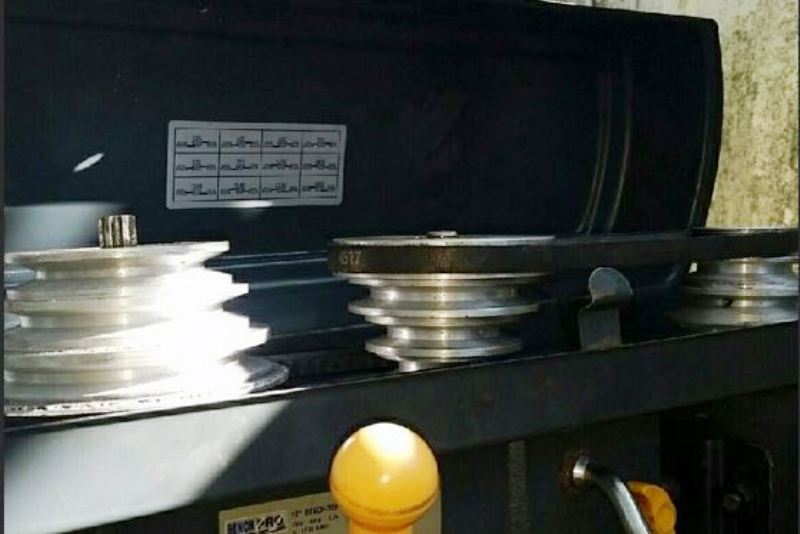
    And here are my pulleys with the external machining done.

    I Didn't Like the Pulleys on My Drill Press-step-pulleys.jpg


    And here they are fitted to my DP finally.

    I Didn't Like the Pulleys on My Drill Press-installed.jpg

    186 More Best Homemade Tools eBook
    If you can't make it precise make it adjustable.

  2. The Following 13 Users Say Thank You to Crusty For This Useful Post:

    57_210 (Mar 20, 2021), baja (Nov 10, 2020), bruce.desertrat (Nov 9, 2020), clydeman (Nov 15, 2020), Jon (Nov 12, 2020), NortonDommi (Nov 11, 2020), olderdan (Nov 9, 2020), rlm98253 (Nov 9, 2020), robertblacksmith (Nov 29, 2023), sacco1 (Nov 9, 2020), Slim-123 (Nov 15, 2020), trigger (Nov 9, 2020), verticalmurph (Nov 28, 2023)

  3. #2
    Content Editor
    Supporting Member
    DIYer's Avatar
    Join Date
    Aug 2013
    Posts
    3,056
    Thanks
    772
    Thanked 1,850 Times in 1,652 Posts


    Thanks Crusty! We've added your Furnace to our Forging and Casting category,
    as well as to your builder page: Crusty's Homemade Tools. Your receipt:


    2000 Tool Plans

  4. #3
    Content Editor
    Supporting Member
    DIYer's Avatar
    Join Date
    Aug 2013
    Posts
    3,056
    Thanks
    772
    Thanked 1,850 Times in 1,652 Posts


    Thanks Crusty! We've added your Casting Tools to our Forging and Casting category,
    as well as to your builder page: Crusty's Homemade Tools. Your receipt:


  5. #4
    Content Editor
    Supporting Member
    DIYer's Avatar
    Join Date
    Aug 2013
    Posts
    3,056
    Thanks
    772
    Thanked 1,850 Times in 1,652 Posts


    Thanks Crusty! We've added your Drill Press Pulleys to our Drilling and Drill Presses category,
    as well as to your builder page: Crusty's Homemade Tools. Your receipt:


  6. The Following User Says Thank You to DIYer For This Useful Post:

    sacco1 (Nov 9, 2020)

  7. #5
    trigger's Avatar
    Join Date
    Jun 2018
    Posts
    198
    Thanks
    216
    Thanked 57 Times in 40 Posts
    You do know Mc Master delivers ,saves you slipping in the Lion scat especially if it might still be lurking in the yard somewhere.I also recommend Chevy or Ford to keep it Made in the USA...;-)

  8. #6
    Supporting Member metric_taper's Avatar
    Join Date
    Mar 2017
    Location
    Marion, Iowa
    Posts
    585
    Thanks
    227
    Thanked 257 Times in 153 Posts

    metric_taper's Tools
    The last time I priced step V-belt pulleys, there was shock. So what was wrong with the original ones on the drill press?

  9. #7
    Supporting Member Crusty's Avatar
    Join Date
    May 2019
    Location
    Dry Gulch, Tx
    Posts
    749
    Thanks
    220
    Thanked 845 Times in 324 Posts

    Crusty's Tools
    Fantastic plastic slippers and replacement belts were unavailable so I converted to higher torque standard 3VX series belts on the new pulleys.
    If you can't make it precise make it adjustable.

  10. #8
    Supporting Member metric_taper's Avatar
    Join Date
    Mar 2017
    Location
    Marion, Iowa
    Posts
    585
    Thanks
    227
    Thanked 257 Times in 153 Posts

    metric_taper's Tools
    Quote Originally Posted by Crusty View Post
    Fantastic plastic slippers and replacement belts were unavailable so I converted to higher torque standard 3VX series belts on the new pulleys.
    I compliment you on all the tools built to do a casting, the cope and drag, the hot wire cutter. Did you make a crucible from steel pipe?
    I see you put the aluminum block on charcoal, was this to burn the oil film off? I didn't see how you would catch the melt into the ingot form you showed.
    Was the foam that white styrofoam 3/4" sheets you get from the material supply?
    That took some doing to hog out the V-grooves with a form tool. Takes lots of time as I know you can't grab the casting in a way that just lets the machine whittle away the unwanted. I don't see the chatter in any of the surface finish in the grooves.
    Sorry for so many questions....

  11. #9
    Supporting Member Crusty's Avatar
    Join Date
    May 2019
    Location
    Dry Gulch, Tx
    Posts
    749
    Thanks
    220
    Thanked 845 Times in 324 Posts

    Crusty's Tools
    The shocking prices for step pulleys is the primary factor which drove this project.

    I bought a clay graphite crucible since I intend to make more castings and steel crucibles don't last very long. The PMC brand seems to be OK. Buy your crucible first and then build the furnace around that crucible so that it all fits when you're done. Two inches of Kaowool is plenty. Closer walls to the crucible improves the heating of the furnace but there has to be room enough to get the lifting tongs in there.

    I highly recommend that you build a forced air burner rather than a naturally aspirated one because it can be tough to get a natural one sized to draw correctly. A hair dryer with a blower setting provides more than enough air and you can discharge the excess air through a waste gate, plus the propane orifice isn't a critical dimension on a forced air burner.

    I was trying to anneal the aluminum block so that I could bust it up with a sledge. It didn't get hot enough and only worked for the lowest section but I thought the pic was cool. The fire no doubt helped but I still got a lot of dross when I cast the engine into ingots, but $40 for 55 lbs of ready to cast aluminum is still a good deal to me.

    The form is just a tray made from a piece of angle iron with ends welded on and I pour the ingots from the crucible. The open corner points upwards and it produces long triangular ingots which can be readily cut into crucible sized pieces on the bandsaw.

    I used the extruded insulating foam from Homeless Depot rather than typical expanded polystyrene foam. Half inch thick and spray adhesive to join the pieces.

    I plunged with a cutoff tool into the middle of each groove to the proper depth and then cut tapers on either side using the cutoff tool again and the compound set to the correct half angle for each side. Didn't take long and left nice surfaces. The central plunge provides relief so the taper cuts go easily and quick. Form tools can be a pain to use on a small lathe. Touch up the tool cutting edge often because it deforms in the process.

    I'm going to make two of the three pulleys over again because with my limited fixturing they didn't turn out concentric enough for me (I want my DP quiet and smooth). I've ordered a couple of mandrels with expanding collets to turn the new pulleys on between centers so I can guarantee concentricity. Doing it like that I'll be able to machine all important surfaces without changing my fixturing so that the part stays centered.

    If you don't have to turn the part around then mounting a central hole drilled through the rough part onto a bolt chucked up with the head behind the jaws and a nut forcing the part into the chuck can work, but the bolt ought to have a divot on the end for the live center in the tailstock so that it's exactly on center and the central hole should be a close fit to the bolt shank (mine wasn't close enough).

    It's worthwhile to make all this stuff because it's a joy to unmold a pour and see a rough casting which can be made into something useful, and melting metal is flat out fun. Buy a pair of aluminized leggings and wear good boots which you can get off quickly just in case.
    Last edited by Crusty; Nov 10, 2020 at 10:05 AM.
    If you can't make it precise make it adjustable.

  12. #10
    Supporting Member Saltfever's Avatar
    Join Date
    Apr 2012
    Location
    NorCal
    Posts
    350
    Thanks
    389
    Thanked 123 Times in 84 Posts

    Saltfever's Tools
    Very nice. I can't see from the finish-machined pics; how was the porosity? You mentioned skimming dross/slag but did you do any out gassing before the pour? If so what did you use?

Thread Information

Users Browsing this Thread

There are currently 1 users browsing this thread. (0 members and 1 guests)

Bookmarks

Posting Permissions

  • You may not post new threads
  • You may not post replies
  • You may not post attachments
  • You may not edit your posts
  •