Free 186 More Best Homemade Tools eBook:  
Get 2,000+ tool plans, full site access, and more.

User Tag List

Page 1 of 2 1 2 LastLast
Results 1 to 10 of 11

Thread: Leaf spring HACK - Metal Cutter

  1. #1
    Supporting Member Let'sLearnSomething's Avatar
    Join Date
    Nov 2018
    Posts
    67
    Thanks
    7
    Thanked 193 Times in 31 Posts

    Let'sLearnSomething's Tools

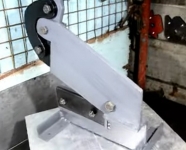
    Leaf spring HACK - Metal Cutter

    Let's Learn Something: Project no.18

    Good day guys
    Today i will show to you how i make this straight sheet/metal cutter using leaf spring that i got in the junkyard.
    Using 10mm metal plate.

    Quotes: (Abhinav)
    "Work while they sleep, Learn while they party, Save while they spend, Then live like they dream."

    186 More Best Homemade Tools eBook
    Last edited by Let'sLearnSomething; Jul 22, 2019 at 04:56 AM.

  2. The Following 14 Users Say Thank You to Let'sLearnSomething For This Useful Post:

    Andyt (Jul 23, 2019), baja (Jul 23, 2019), clydeman (Dec 9, 2022), high-side (Jul 23, 2019), Jon (Jul 22, 2019), Little Rabbit (Dec 10, 2022), Maszynotwór (Jul 28, 2019), Midwestern640 (Jul 30, 2019), NortonDommi (Sep 3, 2021), rlm98253 (Jul 22, 2019), sossol (Oct 4, 2022), Trojan Horse (Jul 31, 2019), will52100 (Jul 23, 2019), zarembak (Jul 22, 2019)

  3. #2

    Join Date
    Apr 2019
    Posts
    31
    Thanks
    0
    Thanked 10 Times in 9 Posts
    Yep, my cutter uses HD truck leaf spring as the blade.
    Works just great.

    2000 Tool Plans

  4. #3
    Supporting Member madokie's Avatar
    Join Date
    Oct 2017
    Posts
    165
    Thanks
    1
    Thanked 53 Times in 46 Posts
    good vid and all BUT,, this guy needs to learn basic metal working skills that include the word SAFETY !!! i mean REALLY ,, holding plates while u drill a hole in the drill press ??? !!!! and using a wood block to support a steel part while u drill through it ???!!!! use a vise or clamp part down to table.or at the very least mount a bolt in the table slot so the part cant sling around, u have the part against the side of bolt when starting drilling,,.that table moves around once you loosen the clamps and there is a reason for that..u clamp part down on table,so that drill bit will go through center hole or a slot after it drills the part,,loosen drill press column and table clamps,, get part exactly where you want it, tighten those clamps back up, and drill away.the center hole and slots are in the table for that reason,and to use metal clamps to bolt down a part to the table,like u would on a milling machine,yes i know the table is on the small side but u can still do that...as to when you have two identical parts that need holes drilled in them(C shaped parts) first line them up flat together.clamp together, and tack weld in 4 places equally spaced apart spots,on the sides where they meet,, then drill holes,and grind off tack welds. the two holes will be exactly in the same spot..faster too..dont grind down welds to make it look smoother, just weakens the weld and some people will think u just bolted it together, since they can t see any welds..and your drill press needs some attention too, u can see the table flex down when drilling , that shouldnt happen,dull drill bits?? if u have too make a support, even a 2x4 with a notch to hold up the table will help make staighter holes.your next project could be a adjustable table support made of pipe and all thread.but your table and column clamps may just need work .. good luck..and seeing how u have internet access,, its not hard to find Machine shop and welding manuals FREE on line,and learn the right and safe way to make things..
    Last edited by madokie; Jul 22, 2019 at 10:43 PM.

  5. #4
    Supporting Member Let'sLearnSomething's Avatar
    Join Date
    Nov 2018
    Posts
    67
    Thanks
    7
    Thanked 193 Times in 31 Posts

    Let'sLearnSomething's Tools
    Thank you bro

  6. #5
    Supporting Member
    Join Date
    Aug 2016
    Posts
    635
    Thanks
    1
    Thanked 187 Times in 166 Posts

    wizard69's Tools
    Actually drilling into wood or aluminum is a fairly regular practice! But yes any drill bit of size requires clamping the work piece or otherwise restraining it. One of the reasons I do this rather often is to avoid the creation of a big burr on the exit side. That backing material also greatly reduces the chance of the drill bit catching as it plunged through the last bit of material. Drilling through into air actually is more problematic in my mind. Even in the case of using a vise I try to back the metal I’m drilling with something when I can.

    Otherwise you make good points about restraining the work piece. I’ve seen some horrific injuries in the workplace over the years. Usually they involve somebody in a hurry. Safety is important! Besides it really grossed out the guy that has to remove body parts from the machine that you left behind in your rush to the hospital.

    Quote Originally Posted by madokie View Post
    good vid and all BUT,, this guy needs to learn basic metal working skills that include the word SAFETY !!! i mean REALLY ,, holding plates while u drill a hole in the drill press ??? !!!! and using a wood block to support a steel part while u drill through it ???!!!! use a vise or clamp part down to table.or at the very least mount a bolt in the table slot so the part cant sling around, u have the part against the side of bolt when starting drilling,,.that table moves around once you loosen the clamps and there is a reason for that..u clamp part down on table,so that drill bit will go through center hole or a slot after it drills the part,,loosen drill press column and table clamps,, get part exactly where you want it, tighten those clamps back up, and drill away.the center hole and slots are in the table for that reason,and to use metal clamps to bolt down a part to the table,like u would on a milling machine,yes i know the table is on the small side but u can still do that...as to when you have two identical parts that need holes drilled in them(C shaped parts) first line them up flat together.clamp together, and tack weld in 4 places equally spaced apart spots,on the sides where they meet,, then drill holes,and grind off tack welds. the two holes will be exactly in the same spot..faster too..dont grind down welds to make it look smoother, just weakens the weld and some people will think u just bolted it together, since they can t see any welds..and your drill press needs some attention too, u can see the table flex down when drilling , that shouldnt happen,dull drill bits?? if u have too make a support, even a 2x4 with a notch to hold up the table will help make staighter holes.your next project could be a adjustable table support made of pipe and all thread.but your table and column clamps may just need work .. good luck..and seeing how u have internet access,, its not hard to find Machine shop and welding manuals FREE on line,and learn the right and safe way to make things..

  7. #6
    JeffEck's Avatar
    Join Date
    Jan 2017
    Location
    Kansas
    Posts
    29
    Thanks
    0
    Thanked 12 Times in 10 Posts

    JeffEck's Tools
    Punctuation and capitalization help the reader to understand... When judging others, it is good to make sure you are on solid ground and not using glass as a shield. Above all else, why attack?

    Let's Learn Something, Thanks for the video. I had not thought of using leaf springs in this manner. Be careful, I have been bitten by my machines before and having an arm in a cast and cuts stitched together does hurt a great deal! Keep up the good work!

  8. The Following 2 Users Say Thank You to JeffEck For This Useful Post:

    piper184 (Oct 5, 2022), Trojan Horse (Jul 31, 2019)

  9. #7
    Content Editor
    Supporting Member
    DIYer's Avatar
    Join Date
    Aug 2013
    Posts
    3,056
    Thanks
    772
    Thanked 1,852 Times in 1,653 Posts


    Thanks Let'sLearnSomething! We've added your Metal Cutter to our Metalworking category,
    as well as to your builder page: Let'sLearnSomething's Homemade Tools. Your receipt:


  10. #8
    Supporting Member
    Join Date
    May 2016
    Posts
    112
    Thanks
    52
    Thanked 31 Times in 21 Posts
    I'm surprised no-one's mentioned the 600 pound gorilla in the video: LLS's McGyveresque bicycle-chain driven, oxyacetylene saw. That doesn't look like your off-the-rack piece of kit.

    Cool factor and straight cuts?! You make that, too?

  11. #9
    Supporting Member NortonDommi's Avatar
    Join Date
    Jul 2014
    Location
    North Island, New Zealand.
    Posts
    990
    Thanks
    1,800
    Thanked 525 Times in 315 Posts

    NortonDommi's Tools
    Quotes: (Abhinav)
    "Work while they sleep, Learn while they party, Save while they spend, Then live like they dream." - What a wonderful saying. I used to live like that and then I stupidly got married.

  12. #10
    Supporting Member
    Join Date
    May 2016
    Posts
    112
    Thanks
    52
    Thanked 31 Times in 21 Posts
    I would imagine your lovely Kiwi bride fulfills the fourth part of that prophesy.

Thread Information

Users Browsing this Thread

There are currently 1 users browsing this thread. (0 members and 1 guests)

Tags for this Thread

Bookmarks

Posting Permissions

  • You may not post new threads
  • You may not post replies
  • You may not post attachments
  • You may not edit your posts
  •