Free 186 More Best Homemade Tools eBook:  
Get tool plans

User Tag List

Page 1 of 2 1 2 LastLast
Results 1 to 10 of 18

Thread: Moving a drill press table the easy way.

  1. #1
    Supporting Member tonyfoale's Avatar
    Join Date
    Nov 2016
    Location
    Spain
    Posts
    1,588
    Thanks
    706
    Thanked 2,684 Times in 718 Posts

    tonyfoale's Tools

    Moving a drill press table the easy way.

    I have two drill presses, a bench mounted Startrite from the UK which I have had for 40 years and a floor mounted Craftsman from the USA which has only been with me for 10 years. Surprisingly neither have a rack and pinion height adjustment. That has never been a problem with the Startrite but the Craftsman has a double table setup which of course is heavier and took considerable effort to change table height.

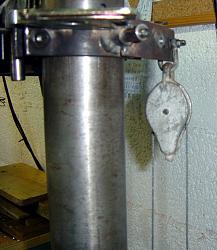
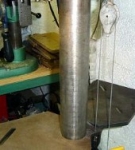
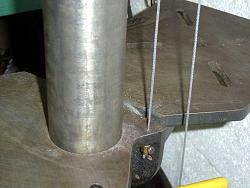
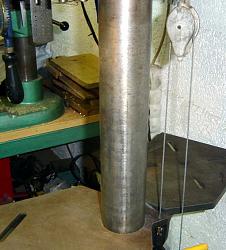
    I have always like the idea of counter weighting moveable heavy objects and that is what I did with the drill table. I hung a pulley from a clamp at the top of the column, drilled a 2.5 mm hole in the table for a thin steel cable which passed through the pulley down to an old lathe face plate as the counter weight. The faceplate weighed 11 kg which seemed to slightly overcompensate for the table weight.
    Moving a drill press table the easy way.-cw-00.jpg Moving a drill press table the easy way.-cw-01.jpg

    Moving a drill press table the easy way.-cw-02.jpg Moving a drill press table the easy way.-cw-03.jpg Click photos for full size.

    These photos show the table fixing, the pulley and the original counterweight.


    This arrangement worked well enough except that the diameter of the faceplate was a sizeable proportion of the available vertical movement space and it interferred with the table clamp lever when I wanted the table set in a low position, for years I have been intending to make a lead weight to replace the faceplate. The higher density of lead would result in a much smaller weight.

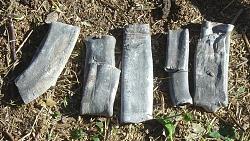
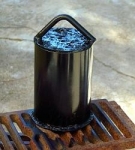
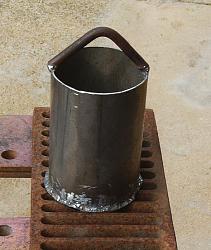
    Recently, I got so fed up with bruising my knuckles on the faceplate that I started collecting whatever lead I had laying around. mostly I had some old lead plumbing, but there were old wheel balance weights and a diving belt weight from my water based youth. In all it weighed in at 10 kg, just about right. The scrap tube box yielded a short length of 100 mm diameter steel tube. A quick calculation showed that it was just a touch longer than necessary to hold 10 kg of lead. Lady luck smiles sometimes. I welded a plate to close off the bottom and added a support loop at the top.
    Moving a drill press table the easy way.-cw-04.jpg Moving a drill press table the easy way.-cw-05.jpg

    On the left is the empty steel pot, to the right is some of the lead waiting to be melted.

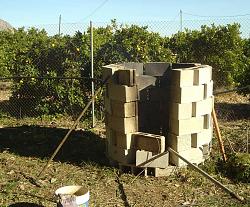
    It was time that we had a bonfire to get rid of some garden waste and it seemed convenient to use that to melt the lead. I decided to use the final container as its own melting pot, which meant that I had to melt the pieces in stages. That is, fill the pot with what I could, let it melt down and create space for more pieces.

    Moving a drill press table the easy way.-cw-06.jpg Moving a drill press table the easy way.-cw-07.jpg Moving a drill press table the easy way.-cw-08.jpg

    Showing the convenient foundry, the length of steel water pipe exiting the fire surround was used to hold the pot in the fire.

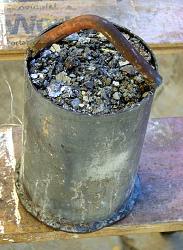
    That worked well, and I ended up with a pot nearly full of lead but with a layer of dross on the top, some of the plumbing lead pipe was quite dirty inside and the wheel weights had embedded steel pieces which also floated to the top. I didn't really want to play around with the dross to remove it and as it was contained within the height of the pot I decided to simply seal it off with some polyester resin.
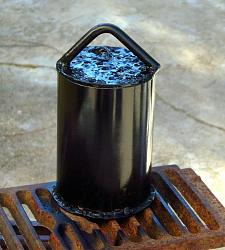
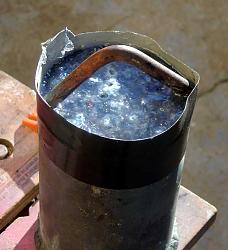
    I wrapped some Gorilla tape around the top for some added height to contain any excess resin, mixed some resin and simply poured it over the top, then left it to set. The photos show how it set with a volcanic like top surface. It was obvious that whilst still liquid it seeped down into gaps in the dross which gave rise to air bubbles rising to the top leaving the rough surface. That's no problem except aesthetically. A quick spay of paint and it was ready for use.
    Moving a drill press table the easy way.-cw-09.jpg Moving a drill press table the easy way.-cw-10.jpg Moving a drill press table the easy way.-cw-11.jpg

    On the left is the pot after the melting, the dross which floated to the top is clearly visible. Next shows the resin seal and finally the painted pot ready for use.

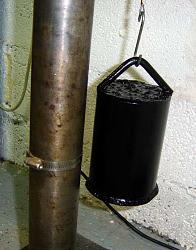
    A final weighing came out at spot on 10 kg. I now have the full range of table movement without bashing my knuckles and it is quicker to move the table large amounts than with a normal rack and pinion system.

    Moving a drill press table the easy way.-cw-12.jpg

    Showing the finished counter weight in service.

    FWIW. the density of lead is 11,340 kg/m^3, with that piece of information you can calculate the space needed for a given weight.

    I would love to fully counter balance the table and knee of my milling machine but that would need a 350 kg weight which is somewhat impractical. In a previous post http://www.homemadetools.net/forum/k...5951#post82823 I did outline how I partially balanced that weight which reduces the effort to raise and lower the table by a noticeable amount.

    PS. Lead has been determined to be dangerous to health so if anyone follows this example I suggest taking sensible precautions.

    186 More Best Homemade Tools eBook

  2. The Following 16 Users Say Thank You to tonyfoale For This Useful Post:

    aphilipmarcou (May 15, 2018), blkadder (May 16, 2018), clydeman (Jul 9, 2020), dpastuck (Oct 12, 2022), drum365 (Apr 18, 2019), emu roo (Jun 28, 2024), Jon (Jan 5, 2018), NortonDommi (Jan 7, 2018), olderdan (Jan 8, 2018), Paul Jones (Jan 6, 2018), Rangi (May 15, 2018), rlm98253 (May 15, 2018), Seedtick (Jan 6, 2018), sossol (Jul 9, 2020), Sprig1 (Jan 10, 2018), volodar (May 15, 2018)

  3. #2
    Supporting Member Captainleeward's Avatar
    Join Date
    Jul 2014
    Location
    San DIEGO, California
    Posts
    1,097
    Thanks
    496
    Thanked 1,334 Times in 525 Posts

    Captainleeward's Tools
    WOW that's a heavy solution for the drill press table mover....GOOD JOB...Cap

    2,000+ Tool Plans
    Last edited by Captainleeward; Jan 5, 2018 at 09:24 PM.

  4. #3
    Content Editor
    Supporting Member
    DIYer's Avatar
    Join Date
    Aug 2013
    Posts
    3,055
    Thanks
    787
    Thanked 1,873 Times in 1,671 Posts


    Thanks tonyfoale! We've added your Drill Press Table Height Adjuster to our Drilling and Drill Presses category,
    as well as to your builder page: tonyfoale's Homemade Tools. Your receipt:


  5. #4
    Content Editor
    Supporting Member
    DIYer's Avatar
    Join Date
    Aug 2013
    Posts
    3,055
    Thanks
    787
    Thanked 1,873 Times in 1,671 Posts


    Thanks tonyfoale! We've added your Pulley System Counterweight to our Miscellaneous category,
    as well as to your builder page: tonyfoale's Homemade Tools. Your receipt:


  6. The Following User Says Thank You to DIYer For This Useful Post:

    jjr2001 (Jan 6, 2018)

  7. #5
    Supporting Member jjr2001's Avatar
    Join Date
    Jun 2016
    Posts
    915
    Thanks
    1,182
    Thanked 2,065 Times in 554 Posts

    jjr2001's Tools
    Nice one Tony, I had a Craftsman like yours. Mine had two 12 step pulleys for speed control and I always liked that arrangement for speed setup.
    However like you I found lifting that dual table a chore. Since I was heavy into casting bullets at that time I could not use my lead for a counter weight!
    I like your solution and if you ever need to cast bullets you have a nice source of lead!

    I used a small manual boat trailer winch to raise and lower mine. Eventually I sold the Craftsman and bought one that had a rack and pinon setup.
    Still miss the speed control with the 12 step pulleys.

    Cheers, JR

  8. The Following User Says Thank You to jjr2001 For This Useful Post:

    Paul Jones (Jan 7, 2018)

  9. #6
    Supporting Member tonyfoale's Avatar
    Join Date
    Nov 2016
    Location
    Spain
    Posts
    1,588
    Thanks
    706
    Thanked 2,684 Times in 718 Posts

    tonyfoale's Tools
    Quote Originally Posted by jjr2001 View Post
    Nice one Tony, I had a Craftsman like yours. Mine had two 12 step pulleys for speed control and I always liked that arrangement for speed setup.......

    Still miss the speed control with the 12 step pulleys.

    Cheers, JR
    Yes the speed change is a nice feature, I love that tiny belt.
    I don't know if you have seen my earlier post in which I described a Morse Taper conversion to mine. http://www.homemadetools.net/forum/a...5232#post81401

    The second photo in this post http://www.homemadetools.net/forum/i...769#post102422 shows the problem that I described when a low table setting caused the old faceplate weight to compete for space with the table clamp location.

  10. The Following User Says Thank You to tonyfoale For This Useful Post:

    jjr2001 (Jan 7, 2018)

  11. #7
    Supporting Member jjr2001's Avatar
    Join Date
    Jun 2016
    Posts
    915
    Thanks
    1,182
    Thanked 2,065 Times in 554 Posts

    jjr2001's Tools
    Yep, that is just like my old drill press. Thanks for posting the links Tony.

    Cheers, JR

  12. #8

    Join Date
    Jan 2017
    Posts
    18
    Thanks
    0
    Thanked 11 Times in 5 Posts
    Some have made a pulley bracket that lets them hang a weight down inside the column. Even better!

  13. The Following User Says Thank You to jimirwin For This Useful Post:

    tonyfoale (Jan 8, 2018)

  14. #9
    Supporting Member tonyfoale's Avatar
    Join Date
    Nov 2016
    Location
    Spain
    Posts
    1,588
    Thanks
    706
    Thanked 2,684 Times in 718 Posts

    tonyfoale's Tools
    Quote Originally Posted by jimirwin View Post
    Some have made a pulley bracket that lets them hang a weight down inside the column. Even better!
    It would be neater, but I wouldn't say better. Function would be identical.

  15. #10
    Supporting Member aphilipmarcou's Avatar
    Join Date
    Dec 2016
    Location
    new zealand
    Posts
    58
    Thanks
    134
    Thanked 49 Times in 26 Posts

    aphilipmarcou's Tools
    I am going to my shop right now to sus out my Fobco drill press (Superior British made , similar to Startrite (). The older one gets the heavier these things become..../The older I am the faster I was (old motorcyclist adage)

Thread Information

Users Browsing this Thread

There are currently 1 users browsing this thread. (0 members and 1 guests)

Tags for this Thread

Bookmarks

Posting Permissions

  • You may not post new threads
  • You may not post replies
  • You may not post attachments
  • You may not edit your posts
  •