 LinkBack URL
 About LinkBacks
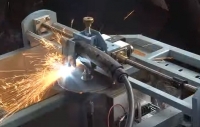
plasma motorized circle cutter......see the video here.


plasma motorized circle cutter......see the video here.

Last edited by Captainleeward; May 13, 2020 at 07:56 PM.
Jon (May 15, 2020), mwmkravchenko (May 14, 2020), thehomeengineer (Dec 20, 2021), Tuomas (May 15, 2020)


Hi Cap. I like your new machine and I think you may have already seen a tweak or 2 that you may want to incorporate if you want to cut multiple disk at any single session.
1 would be you probably noticed you may want a quick arbor.
One way to accomplish this would be to attach one of these
to the arbor that you screw into the drive. For most disks this could be a reasonably small one since they are very strong. then all you would need to do would be to lay the piece of metal on the magnet adjust for your diameter and cut to change parts just lift the finished part away and slap another in place.
To insure you had your part perfectly centered you could allow the arbor shaft to extend above the magnet just enough for the center hole to locate center. But for disks that you did not want or need a center hole use a shortened arbor which does not protrude.
I noticed something about the cutting process in your video which I feel you may have done for demonstration purposes you allowed the plasma to continue cutting through several complete revolutions. with speed control the plasma would make the cut in a single pass. For demonstration purposes going round and round does make a spectacular show but can be a bit misleading for a viewer who may never have used a plasma causing them to think that maybe plasma is not all it is cracked up to be, also re cutting over and over just induces more heat into the part and can cause it to be distorted when cooled this erodes the electrode and the nozzle pieces rapidly making your cuts more costly.
And one tip I might include if I may. If you will adjust your torch so the tip is closer to perpendicular to the workpiece or only very slightly angled into the cut the quality of cut is greatly enhanced plus the consumables will last longer as well.
This was not intended to be any criticism to you your machine or your video and please do not take it as such. just a few friendly comments you can use or disregard. And as always keep up the good work on your tools

Never try to tell me it can't be done
When I have to paint I use KBS products

Thanks Captainleeward! We've added your Motorized Plasma Circle Cutter to our Cutting Torches category,
as well as to your builder page: Captainleeward's Homemade Tools. Your receipt:
Captainleeward (May 15, 2020)
Hello Frank S. Good eye Frank, Yes, I was trying to think of a better way to attach the blank, your magnet Idea is the best with the stud protruding up a bit to ketch the blank hole much better. The reason is spins too fast is I underestimated the speed of the voltage regulator I bought, that is as slow as it goes so many passes is the only way unless I get a gear reduction motor. I will work on that.
I also noticed the blank was wobbling for some reason it is not level to the horizontal I think your magnet idea will fix that too.
I Really appreciate your input and thank you very much for the time you put into looking at this project. Feel free to chime in any time as better ideas work better..,,,Cap.
Frank S (May 15, 2020)
""I underestimated the speed of the voltage regulator I bought, that is as slow as it goes so many passes is the only way unless I get a gear reduction motor.""Originally Posted by Captainleeward

Lets take a look at your selection of drive motor. I am a little familiar with some of the motors used in automotive seats, window motors and windshield wiper motors Almost all of the newer motors of this type have ceramic magnets for fields and are very similar to the drive motors used in mig welders if this is true of your drive system it may be possible to tweak your voltage regulator by adding a resistor in line of course this will produce heat so a heat sink will be required I don't know the value of the potentiometer in your module so I cannot state whether or not it will be able to handle a lower input voltage and still function or if the amperage draw on the output at the lower input voltage would damage the module. It might be better to add in a resistor after the pot. limiting the voltage to the motor in this fashion.
A heavy duty variable resistor may be useful here as well.
Something else that could be tried to determine the optimum speed if you remember the old 1.5v dry cell ignition batteries that were used to start the cox airplane motors those things had a high amp output at only 1.5 volts . we used to string them together in series and parallel to obtain voltages and current outputs for lab experiments. Ok just finding one today might be difficult and expensive but nearly the same thing can be accomplished with D cells it just takes more of them in parallel to get the amps You might try setting up a bank of D cells and see what RPM the motor will rotate at what voltages then this would yield the information needed for constructing your modified voltage regulator.
just some random ideas I thought I'd throw at you good luck and stay safe Frank
Never try to tell me it can't be done
When I have to paint I use KBS products
Hi Frank. The seat motor will not go any slower with the power module I have. I choose to use the system as it is takes about 10 turns too fully cut the circle out.
Thanks. Cap.
Frank S (May 15, 2020)
Hey Cap, What is the input voltage range of the power module and the min/ max voltage output range plus output amps?
Do you remember the old 12 to 6 volt ign. coil resisters which were common on Chrysler vehicles? Those were pretty robust units. and they can be installed in the output of your module I have even mounted them in parallel to achieve higher output amp capacity. What ever the voltage output of your module is it would be halved by the installation of one of these
My Miller spectrum plasma cutter will cut through 3/4" mild steel but the IPM (inches per minute) would be 20" or less, it will cut 1/8" mild steel at up to 120 IPM.
Even at that if I were to cut say a 1/8" thick disk 6" in diameter on a circle cutting machine such as yours it would have to rotate at 6.6 RPM max.
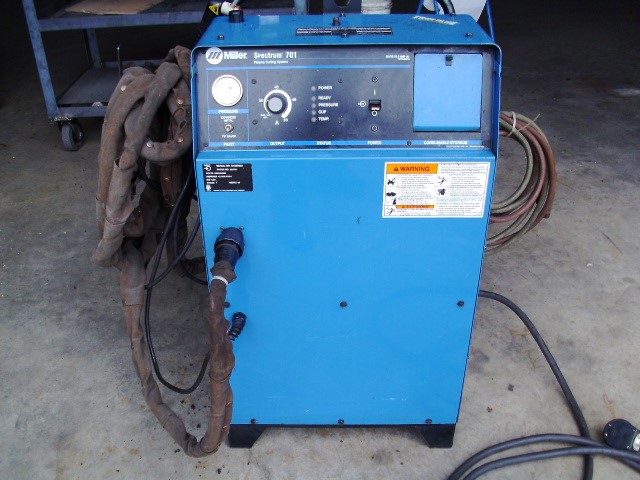
Here is a picture of a plasma machine exactly like mine
Your plasma machine is probably quite a bit smaller, if so it would have a slower IPM rating as well. Additionally your machine appears to be rotating around 50 RPM and it looks to be direct drive from the gear motor you possibly might want to consider creating a 10 to one reduction to do this cheaply find an old 18 speed bicycle use the largest peddle sprocket and the smallest wheel sprocket this should get you a lot closer to the desired RPM and would be relatively simple to incorporate on your machine. If it turned out not to be enough then add a jack shaft with 2 additional sprockets
I know it is not optimal but at the same time a quick simple solution
Never try to tell me it can't be done
When I have to paint I use KBS products
Captainleeward (May 16, 2020)
I ll give that some thought....Thanks....Cap.

Great ideas in that plasma table. I just put a cheap 115 volt household light dimmer switch ahead of a battery charger to power small 12 volt DC motors and control the speed. Keep up the innovating. Bob from Canada
Manitoba Man Hi how are you, I think you will be burning up that battery charger in short order, sorry for the bad news.....Cap.
There are currently 1 users browsing this thread. (0 members and 1 guests)
 Posting Permissions

 Reply With Quote
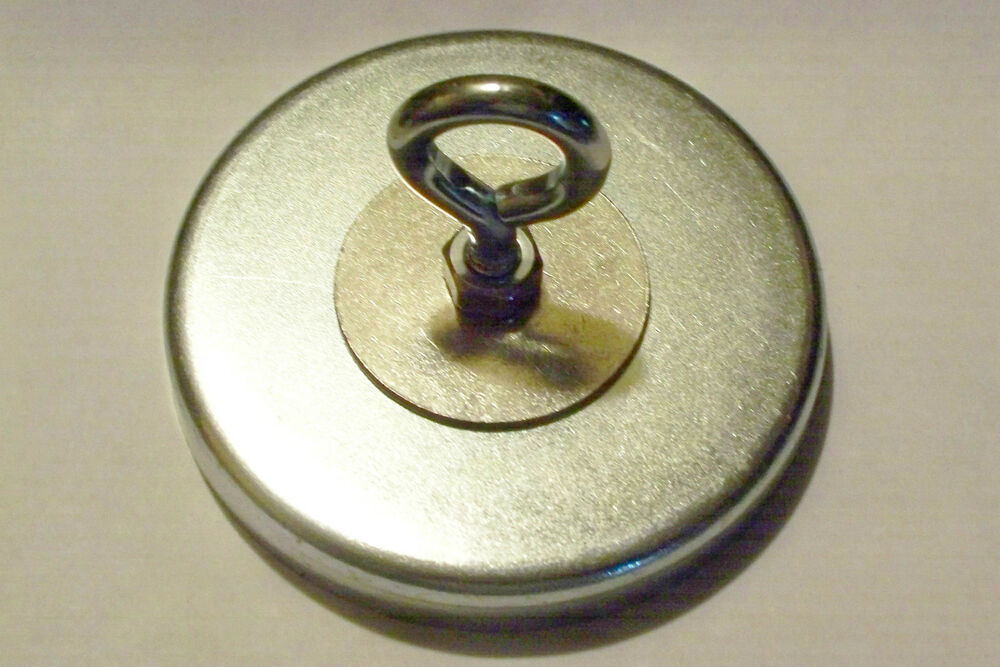

Bookmarks