Free 186 More Best Homemade Tools eBook:  
Get 2,000+ tool plans, full site access, and more.

User Tag List

Results 1 to 10 of 10

Thread: Portable one person pressure brake bleeder

  1. #1
    Supporting Member jere's Avatar
    Join Date
    Feb 2015
    Posts
    200
    Thanks
    183
    Thanked 117 Times in 69 Posts

    jere's Tools

    Portable one person pressure brake bleeder

    I put this together 10 years ago or so but used it today so I thought I would share. There is a commercial version for sale but it wasn't worth it for me. I was sick of using all the cheesy one man bleeding systems that didn't work sold at the auto parts stores. Speed bleeders, vacuum pumps, plastic containers with magnets... all a waste of time money and sanity.

    The pressure bleeder works with abs, can allow bleeding of calipers in any order, will bleed calipers that have the bleeder valve upside down and will bleed brake systems with the master cylinder below the calipers and other crazy setups. If you are using expensive brake fluid for your track car you can bleed the very minimum required by the tech.

    This is a very simple repurposed of a garden sparyer, a tire pressure gauge, some clear vinyl tube, a flat piece of rubber, a brass barbed fitting (or the tapered cap from some rtv if you are really cheap), a brass "T", hose clamps, some scrap metal/nuts and bolts. I payed under $20 for the stuff I couldn't find for free.

    The bug sprayer hand it's plastic wand/hose removed to be replaced with tubing. Tubing is malleable when heated with a small flame and will stretch to fit other similarly sized fittings. I spliced a " T" in the tubing next one end goes to the tire pressure gauge (with one way valve unscrewed and discarded), the other end goes to the master cylinder so make yours long enough. New brake fluid goes in the bug sprayer, make note of where the straw sits in the bottom of the sprayer tank. If you tip the tank and run the fluid to the bottom you might end up sending air up the straw.

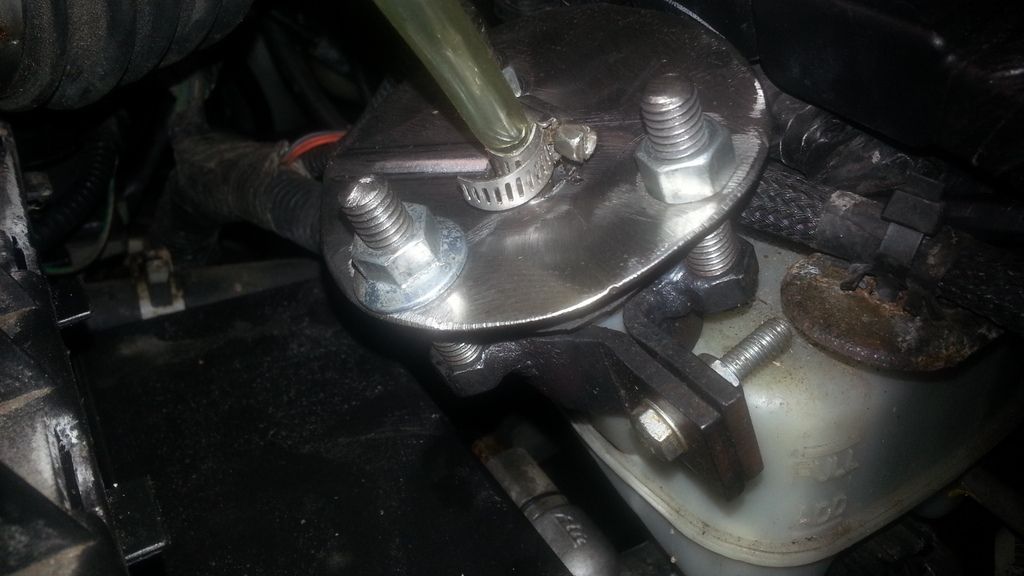
    Next is the pressure cap, these are also for sale, separately. Mine was harvested from bits of a lawn mover on the curb that I cut up and welded together as shown. (One could use plumbing solder and a propane torch if going cheap. ) the shackles on the sides of the brake fluid resivor just pull down the flat piece of steel and sandwich the rubber gasket to the master cylinder top. The design pictured will work for almost all sizes of filler neck even radiators ( also very handy for finding leaks and bleeding cooling systems at ambient temperature. Just get a new sprayer and tubing to avoid contamination). On the side of the tubing that sits in the brake resivor is the barbed brass fitting ( or tapered rtv cap) this just keeps the tube from getting pulled out and to make a seal.

    Hopefully the photos cover what I missed in the description if not just ask.


    I pressurize the tank to 10 psi or so then just turn the factory style bleeder screws until the brake fluid changes from yellow to blue and that's it.

    186 More Best Homemade Tools eBook

  2. The Following 2 Users Say Thank You to jere For This Useful Post:

    Jon (Jul 27, 2015), kbalch (Jul 27, 2015)

  3. #2
    Supporting Member
    Join Date
    Dec 2014
    Location
    Gone
    Posts
    136
    Thanks
    79
    Thanked 30 Times in 28 Posts
    Good build.I plan to build another simpler version than my last.I made one for reverse bleeding.Slowly adding brake fluid through the bleed screws up to the master cylinder,displaces the air and forces it to the top.Systems where the master cylinder is lower than the calipers, or wheel cylinders,works best when the fluid is pushed back through the system,from the master cylinder.The reason is the same,push the air out the highest point.

    2000 Tool Plans

  4. The Following User Says Thank You to Loose Ctrl For This Useful Post:

    jere (Jul 28, 2015)

  5. #3
    kbalch's Avatar
    Join Date
    Jun 2012
    Location
    Clermont, FL
    Posts
    5,034
    Thanks
    2,275
    Thanked 531 Times in 383 Posts
    Exactly. This is how I've always bled the brakes in my airplanes and how I'm planning to do so in my project car. From the calipers up to the master cylinder. I usually cobble something together with a sufficiently large oil can (new, of course) and a length of clear tubing.

    Ken

  6. The Following User Says Thank You to kbalch For This Useful Post:

    jere (Jul 28, 2015)

  7. #4
    kbalch's Avatar
    Join Date
    Jun 2012
    Location
    Clermont, FL
    Posts
    5,034
    Thanks
    2,275
    Thanked 531 Times in 383 Posts
    Thanks jere! I've added your One-Person Brake Bleeder to our Brake category, as well as to your builder page: jere's Homemade Tools. Your receipt:


  8. #5
    Supporting Member jere's Avatar
    Join Date
    Feb 2015
    Posts
    200
    Thanks
    183
    Thanked 117 Times in 69 Posts

    jere's Tools
    interesting methods I am intrigued guys thanks!

    but how do you get the old fluid out... gravity drain? do you have any issues with contamination ie rust clogging the masters valves? or does this issue not apply?

  9. #6
    kbalch's Avatar
    Join Date
    Jun 2012
    Location
    Clermont, FL
    Posts
    5,034
    Thanks
    2,275
    Thanked 531 Times in 383 Posts
    When doing the first fill on a new system (as with kitplanes and cars), old fluid is obviously not an issue. I just squeeze the oil can trigger to pump new fluid up through the caliper and lines to the master. Once the master's drain holes are covered, tighten the bleed screw and go on to the next one. When all are done (my Ultima GTR has eight!), top off the master if necessary and it's good to go.

    Changing fluid is much the same, though with the added step of removing the old stuff from the master with a turkey baster until all the lines are filled with the new fluid. The only real complication is if you're changing fluid types. In that case, I'd want to do a pressure flush from the master and force the old fluid out from each bleed screw until all the lines are clear. At that point, I'd fill it with the new stuff as if it were a new system.

    Ken

  10. #7
    Supporting Member
    Join Date
    Dec 2014
    Location
    Gone
    Posts
    136
    Thanks
    79
    Thanked 30 Times in 28 Posts
    When I bleed normally,I use a hose into a clear plastic drink bottle.When I reverse bleed,I use a large syringe to suck down the old fluid, as fresh fluid is pushed up through the system.I have found reverse bleeding to be faster,cleaner,and easier overall.Adding to Kbalch's statement,in aircraft,you don't want something as damaging inside an aircraft,so less mess the better.I was a pilot and aviation line service tech.When I wasn't managing aircraft,I was in the grease with the mechanics.Before that I was an auto mechanic and industrial mechanic.I have a thing for all things mechanical.It's better if it has an engine.It boarders on obsession.Can anyone recommend a 12 step program.

  11. #8
    Supporting Member jere's Avatar
    Join Date
    Feb 2015
    Posts
    200
    Thanks
    183
    Thanked 117 Times in 69 Posts

    jere's Tools
    Quote Originally Posted by kbalch View Post
    When doing the first fill on a new system (as with kitplanes and cars), old fluid is obviously not an issue. I just squeeze the oil can trigger to pump new fluid up through the caliper and lines to the master. Once the master's drain holes are covered, tighten the bleed screw and go on to the next one. When all are done (my Ultima GTR has eight!), top off the master if necessary and it's good to go.

    Changing fluid is much the same, though with the added step of removing the old stuff from the master with a turkey baster until all the lines are filled with the new fluid. The only real complication is if you're changing fluid types. In that case, I'd want to do a pressure flush from the master and force the old fluid out from each bleed screw until all the lines are clear. At that point, I'd fill it with the new stuff as if it were a new system.

    Ken
    thanks for the clarification, for bleeding as the only task I can see how working from the lowest point could have an advantage. maybe I should have used the words fluid flush rather than bleeder?

    I am not certain which way the air in the fluid goes with the bug sprayer it may still rise to the highest point. there is a pocket of air that stays in the fluid reservoir. I use a vinyl clear tube and clear glass bottle on the drain side too. Ido remember seeing air bubbles when the air bleeder valve lets( air getting in past the threads) them in while flushing/bleeding but not otherwise.

    I will have to watch out for physics professors and see what they can clarify on the matter.

    it is great to see how others address the same job and compare ideas

  12. #9
    Content Editor
    Supporting Member
    DIYer's Avatar
    Join Date
    Aug 2013
    Posts
    3,056
    Thanks
    772
    Thanked 1,850 Times in 1,652 Posts
    Interesting thread. Have always done my bleeding the normal way (ie gravity), and it's worked well for me. I'm gonna read up more on that reverse bleeding method.

  13. #10
    Supporting Member
    Join Date
    Dec 2014
    Location
    Gone
    Posts
    136
    Thanks
    79
    Thanked 30 Times in 28 Posts
    Quote Originally Posted by DIYer View Post
    Interesting thread. Have always done my bleeding the normal way (ie gravity), and it's worked well for me. I'm gonna read up more on that reverse bleeding method.
    Lots of videos on youtube and other such services.


    186 More Best Homemade Tools eBook

Thread Information

Users Browsing this Thread

There are currently 1 users browsing this thread. (0 members and 1 guests)

Bookmarks

Posting Permissions

  • You may not post new threads
  • You may not post replies
  • You may not post attachments
  • You may not edit your posts
  •