Free 186 More Best Homemade Tools eBook:  
Get 2,000+ tool plans, full site access, and more.

User Tag List

Results 1 to 10 of 10

Thread: quick change tool post

  1. #1
    Supporting Member
    Join Date
    Jun 2018
    Posts
    222
    Thanks
    90
    Thanked 639 Times in 101 Posts

    Stevohdee's Tools

    quick change tool post

    hello toolie people,

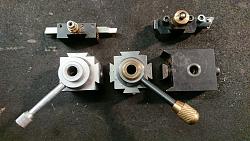
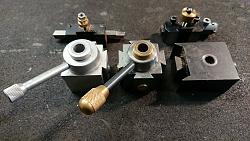
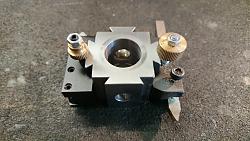
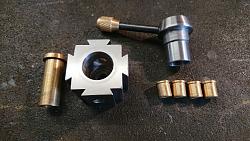
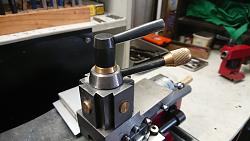
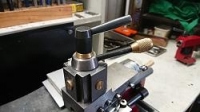
    I struggled with the standard mini lathe tool post for too long until I bought a steel Chinese qctp a while back with 3 inserts but found because of the large overhang chattered, then thought I'd give another one made from aluminum a go and found it was quite defective. The handle consistently came loose and was prone to bending and had a real problem with binding when tightening so alas decided to make one to accommodated both size inserts. Waste not want not.

    quick change tool post-dsc_2254-large-.jpg

    quick change tool post-dsc_2255-large-.jpg

    quick change tool post-dsc_2117-large-.jpg

    quick change tool post-dsc_2115-large-.jpg

    quick change tool post-dsc_2118-large-.jpg

    The aluminum inserts are actually quite good and lock the tool well, don't know about long term use but so far so good. After using the system can't imagine going back to standard system. My original post has my knurling tool mounted and has been for some time now.

    cheers stevoh

    186 More Best Homemade Tools eBook

  2. The Following 12 Users Say Thank You to Stevohdee For This Useful Post:

    aphilipmarcou (Jul 12, 2018), H.L (Aug 23, 2020), Jon (Jul 12, 2018), Mark Fogleman (Nov 7, 2018), markcawston (Nov 7, 2018), michaelszreider (Oct 22, 2020), Neil Jensen (Jul 12, 2018), PJs (Jul 15, 2018), redearthbonsai (Jul 12, 2018), rickmcolorado (Jul 12, 2018), Seedtick (Jul 12, 2018), sossol (Feb 21, 2023)

  3. #2
    Content Editor
    Supporting Member
    DIYer's Avatar
    Join Date
    Aug 2013
    Posts
    3,056
    Thanks
    772
    Thanked 1,852 Times in 1,653 Posts


    Thanks Stevohdee! We've added your QCTP to our Tool Holders category,
    as well as to your builder page: Stevohdee's Homemade Tools. Your receipt:

    tags: QCTP


    2000 Tool Plans

  4. #3
    PJs
    PJs is offline
    Supporting Member PJs's Avatar
    Join Date
    Sep 2014
    Location
    Northern CA
    Posts
    1,841
    Thanks
    8,337
    Thanked 1,118 Times in 718 Posts

    PJs's Tools
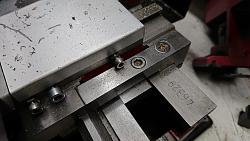
    Beautiful work Stevoh! Always wondered why they didn't make it a 4 way in the first place. The brass locks and barrel seems a nice touch. The thicker knurled knob on the holder is also a good design imho, and love the shape of the knob on the handle. Also noted it looks in the last picture that you added a lock screw on the gib for the cross slide. That has been a problem on mine as well with rocking, especially when parting...may give that a try. Constantly adjusting the gibs especially after working steel or hard material. Thanks for sharing a great idea.

    PJ
    ‘‘Always do right. This will gratify some people and astonish the rest.’’
    Mark Twain

  5. #4
    Supporting Member
    Join Date
    Jun 2018
    Posts
    222
    Thanks
    90
    Thanked 639 Times in 101 Posts

    Stevohdee's Tools
    Thanks pj, yeah these lathes are described in the mini lathe site like a kit you have to rebuild to get them to behave like a real lathe.. Haha, but so true. The first time I used it there was a clicking sound comming from the carriage, one of the hex screws holding the carriage on fell out & was sitting on the big geared wheel. Since then Ive spent considerable time fixing design & manufacturing probs, the gibs werent even flat... Grrr

    Cheers

  6. #5
    PJs
    PJs is offline
    Supporting Member PJs's Avatar
    Join Date
    Sep 2014
    Location
    Northern CA
    Posts
    1,841
    Thanks
    8,337
    Thanked 1,118 Times in 718 Posts

    PJs's Tools
    I hear you on being a kit, but have had a lot of fun doing them with the tools I have. Don't know if you've looked at my site but have a section called My Modifications for some of these. Got a lot of them from other sites but did them my way, scrap and tools at hand...like a shield over the Carriage gears to keep swarf out and screws ...a common Fix Or Repair Daily but works great. When and if at this point I get my 14" bed and extended carriage, cross slide and compound, scraped and square it should be a whole bunch better, plus adding tapered rollers and ER32 system.

    If/when I get a mill there will be a lot more as I think the mini's can be made to call a higher standard. First will be new gibs from unhardend 01 tool steel lapped, (think you guys call it silver steel), instead of beer cans...cheep beer at that. Paul Jones has done a bunch to his and now dedicated to small precision stuff, plus his pages on mods to his Unimat SL 1000 lathe are the best out there.

    Again, Great build, execution and pics/write up. Thanks,

    PJ
    ‘‘Always do right. This will gratify some people and astonish the rest.’’
    Mark Twain

  7. #6
    Supporting Member
    Join Date
    Jun 2018
    Posts
    222
    Thanks
    90
    Thanked 639 Times in 101 Posts

    Stevohdee's Tools
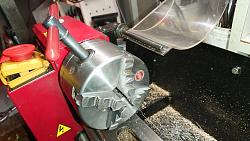
    Hey PJ thanks for the links, my 3 jaw packed up a while back so opted for a self centering 4 jaw, glad I did because found myself doing square stuff a lot.

    quick change tool post-dsc_2262-large-.jpg

    Yes, got into habit of leaving chuck handle in because lathe can't start with guard up... naughty!!

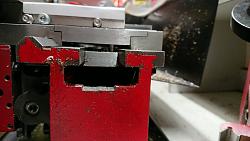
    Thought you might be interested in my carriage lock design, when I first got the lathe thought the screws for the travelling steady were for locking carriage, soon learnt by the dents they put in the ways...der!

    quick change tool post-dsc_2260-large-.jpg

    quick change tool post-dsc_2259-large-.jpg

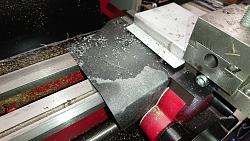
    And here's a pic of my swarth guard made from the plastic bottom from a shopping bag.

    quick change tool post-dsc_2261-large-.jpg

    After seeing your mod page worked out how to DRO my tailstock, sick of marking drills to get the depth, thanks, most helpful and your carriage stop looks great.

    cheers

  8. The Following 2 Users Say Thank You to Stevohdee For This Useful Post:

    Jon (Jul 17, 2018), Seedtick (Jul 17, 2018)

  9. #7
    PJs
    PJs is offline
    Supporting Member PJs's Avatar
    Join Date
    Sep 2014
    Location
    Northern CA
    Posts
    1,841
    Thanks
    8,337
    Thanked 1,118 Times in 718 Posts

    PJs's Tools
    Nice mods Stevoh! Carriage lock has been on the list and yours looks pretty good. Think I'm heading for a low profile lock handle and spring load it like I did on the tail stock slide. I see you have the saddle gear cover also and like the sheet metal cover on the cross slide too. Another thing on the list are felt way wipers.

    Mine didn't come with a flip guard, so I just hang my chuck key kitty corner from in the corner of the chip guard. Learned a long time ago Take the Chuck key Out on dads old radial head DP setup for high rpm, wizzed by my head and stuck in the wall...wheew dodged that bullet. After that it was tied to the head post with parachord, just long enough to reach the chuck plus an inch.

    The tail stock DRO was one of my favorite and useful mods, next to all the work I did on the tail shaft itself to clean up the rock and chisel work it came with. Appreciate that it was helpful.

    Don't know if you are familiar with the Tools and Mods website but Marty Nissen "A Project Lathe" was the inspiration for me to take the 14" bed the next levels. So many people sharing about these here and all over is a real treat!

    PJ
    ‘‘Always do right. This will gratify some people and astonish the rest.’’
    Mark Twain

  10. The Following User Says Thank You to PJs For This Useful Post:

    Jon (Jul 18, 2018)

  11. #8
    Supporting Member
    Join Date
    Jun 2018
    Posts
    222
    Thanks
    90
    Thanked 639 Times in 101 Posts

    Stevohdee's Tools
    Thanks for links pj, the arc article about the c3 pulldown most interesting. Makes you wonder how many buyers have packed seig machines up & sent them back without understanding they have to be adjusted and fixed before use. Many people just don't have the skill, knowledge, dertermination, patience and tools to do mods and repairs. These machines should come with warnings or disclaimers before purchasing so buyers can decide whether they want the hassle. Before buying anything now i always google reviews on products.
    Cheers & safe machining.

  12. The Following User Says Thank You to Stevohdee For This Useful Post:

    PJs (Jul 20, 2018)

  13. #9
    Supporting Member
    Join Date
    Jun 2018
    Posts
    222
    Thanks
    90
    Thanked 639 Times in 101 Posts

    Stevohdee's Tools
    Hey pj, before doing carriage lock consider handle will hit gib adjustment screws & tailstock housing in some cases, thats why i used socket head screw to lock down.

  14. The Following User Says Thank You to Stevohdee For This Useful Post:

    PJs (Jul 20, 2018)

  15. #10
    PJs
    PJs is offline
    Supporting Member PJs's Avatar
    Join Date
    Sep 2014
    Location
    Northern CA
    Posts
    1,841
    Thanks
    8,337
    Thanked 1,118 Times in 718 Posts

    PJs's Tools
    Quote Originally Posted by Stevohdee View Post
    Thanks for links pj, the arc article about the c3 pulldown most interesting. Makes you wonder how many buyers have packed seig machines up & sent them back without understanding they have to be adjusted and fixed before use. Many people just don't have the skill, knowledge, dertermination, patience and tools to do mods and repairs. These machines should come with warnings or disclaimers before purchasing so buyers can decide whether they want the hassle. Before buying anything now i always google reviews on products.
    Cheers & safe machining.
    I think the best thing I did when I got mine was take it pretty much down to the ground, clean it up and give a bit of a hair cut and TLC in a few places (gibs, half nuts and screws, etc.) then reassembled, lubed (white LI grease) and aligned everything I could. It also gave me a clue about future improvements I wanted to make and it's shortcomings and when to be patient. I had read a bunch of reviews and stuff on them and didn't expect it to be a Swiss screw machine but a good learning machine for some of my projects and if you add that to all the sites and YT stuff on them it's worth the price and effort. It's given me a lot of learning, fun and some irritants but for what I have in it and gotten out of it, it's been an 85% win in my book. I kind of agree with "Many people just don't..." but that's what I am about, acquiring the skill, knowledge...It's a hunger or itch that needs continual attention for me...too bad for them.

    I will keep the handle proximity issue in mind but found a clue somewhere a while ago and CRS has set in to where in my bookmarks. The big issue for me is to pull it up mid cross slide for equal pressure to the ways.

    Cheers,
    PJ


    186 More Best Homemade Tools eBook
    ‘‘Always do right. This will gratify some people and astonish the rest.’’
    Mark Twain

Thread Information

Users Browsing this Thread

There are currently 1 users browsing this thread. (0 members and 1 guests)

Bookmarks

Posting Permissions

  • You may not post new threads
  • You may not post replies
  • You may not post attachments
  • You may not edit your posts
  •