Free 186 More Best Homemade Tools eBook:  
Get 2,000+ tool plans, full site access, and more.

User Tag List

Page 1 of 2 1 2 LastLast
Results 1 to 10 of 11

Thread: Rotary Table Pallet

  1. #1
    Supporting Member jjr2001's Avatar
    Join Date
    Jun 2016
    Posts
    915
    Thanks
    1,182
    Thanked 2,035 Times in 553 Posts

    jjr2001's Tools

    Rotary Table Pallet

    I needed to round over the end of the recuperrator cylinder mount for my Deck Gun.
    I could have used the belt or disc sander but I wanted it more uniform than it would be using that method.
    The 4" rotary table is just about perfect for the small table top mill and that is the machine I wanted to use.
    Rounding over was a snap and worked without a hitch.

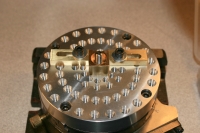
    A new pallet was designed with a few accessories that would be useful for many more jobs in the shop. 5/8" thick and 4" in diameter.
    An arbor was made with a 5/16-18 thread for the center hole in the rotary table and 1/4-20 thread on the top end for clamping.
    Length was made to be just enough for the part I was making. I can always make another one longer at a later date if needed.
    Bushings were made to fit the arbor and the inside diameter of the part I was needing to round over. Extra bushings were made as well.
    The first picture also shows some "bite" clamps and T-nuts that were made for future use also.
    The two straps were made with unequal sides and that makes them more useful than if they had equal sides.
    All threaded holes are 10-32 and the 4 pallet mounting holes are clearance drilled and counter bored for 10-32 allen cap screws.
    T-nuts are of course 10-32 (Sherline special) with a twist.
    I offset the holes from each end of the T-nuts so they would fit just inside the 4" diameter of the rotary table.
    When the rotary table is set vertical it barley clears the milling table so I shortened one end of each T-nut.

    The "bite" clamps are made from brass round stock that I milled hex using a collet block. They are Mighty handy.
    Counter bored .104" deep with a thickness of .187". These are pretty low profile and made for 10-32 eccentric screws.
    The screws were just button head allen screws that had the heads offset by .015" in the lathe. Custom arbor used that is not shown.
    The bite clamps work against the two straps and make a great way to hold parts on the little table.

    DXF files are provided in case anyone wants to build one.
    Attached Thumbnails Attached Thumbnails Rotary Table Pallet-img_2559_a.jpg   Rotary Table Pallet-img_2564a.jpg   Rotary Table Pallet-img_2565a.jpg   Rotary Table Pallet-img_2566.jpg   Rotary Table Pallet-img_2568.jpg  

    Rotary Table Pallet-img_2573a.jpg   Rotary Table Pallet-img_2574a.jpg   Rotary Table Pallet-img_2575a.jpg  
    Attached Files Attached Files

    186 More Best Homemade Tools eBook
    Last edited by jjr2001; Jun 1, 2020 at 07:18 AM.
    Back to the shop.

  2. The Following 18 Users Say Thank You to jjr2001 For This Useful Post:

    BrianW (Oct 7, 2021), Carnel (Jun 2, 2020), high-side (Jun 2, 2020), Home-PC (Jun 3, 2020), JoeH (Jun 2, 2020), Jon (Jun 1, 2020), Kevic (Jun 1, 2020), Macca Boy (Jun 3, 2020), metal2 (Jun 1, 2020), mklotz (Jun 1, 2020), N00b Machinist (Jun 1, 2020), olderdan (Jun 1, 2020), old_toolmaker (Jun 11, 2020), Paul Jones (Jun 7, 2020), Reysl (Jun 2, 2020), rossbotics (Jun 1, 2020), Toolmaker51 (Jun 7, 2020), Tuomas (Jun 11, 2020)

  3. #2
    Content Editor
    Supporting Member
    DIYer's Avatar
    Join Date
    Aug 2013
    Posts
    3,057
    Thanks
    771
    Thanked 1,850 Times in 1,652 Posts


    Thanks jjr2001! We've added your Rotary Table Pallet to our Workholding category,
    as well as to your builder page: jjr2001's Homemade Tools. Your receipt:


    2000 Tool Plans

  4. The Following 2 Users Say Thank You to DIYer For This Useful Post:

    jjr2001 (Jun 2, 2020), Paul Jones (Jun 1, 2020)

  5. #3
    Supporting Member
    Join Date
    Aug 2016
    Posts
    635
    Thanks
    1
    Thanked 187 Times in 166 Posts

    wizard69's Tools
    Quote Originally Posted by jjr2001 View Post


    DXF files are provided in case anyone wants to build one.
    pretty slick.

    what rotary table was this made for? I noticed that it doesn't center on a central hole in the rotary table, is that the case or does none exist on this rotary table.

    By the way great workmanship. It looks so good I'd be afraid to use it.

  6. The Following User Says Thank You to wizard69 For This Useful Post:

    jjr2001 (Jun 2, 2020)

  7. #4
    JoeH's Avatar
    Join Date
    Mar 2018
    Posts
    57
    Thanks
    37
    Thanked 25 Times in 21 Posts
    Very beautiful work. Thanks for sharing. This gives me some ideas for the little 4" Grizzly rotary table I have.

  8. The Following User Says Thank You to JoeH For This Useful Post:

    jjr2001 (Jun 2, 2020)

  9. #5
    Supporting Member jjr2001's Avatar
    Join Date
    Jun 2016
    Posts
    915
    Thanks
    1,182
    Thanked 2,035 Times in 553 Posts

    jjr2001's Tools

    Rotary Table Details

    Quote Originally Posted by wizard69 View Post
    pretty slick.

    what rotary table was this made for? I noticed that it doesn't center on a central hole in the rotary table, is that the case or does none exist on this rotary table.

    By the way great workmanship. It looks so good I'd be afraid to use it.
    Thanks,
    The table was purched on the bay a while back. No Name..Off Shore for sure but it works ok.
    I see one at Grizzly is about identical: https://www.grizzly.com/products/Gri...RoCgAsQAvD_BwE
    Thanks JoeH for pointing that one out, it looks identical to mine.

    Centering is not a problem with a couple of adapters. One is 3/4-16 by 5/16-18 and it is used with my small threaded chucks.
    The other arbor uses spacers and the new pallet to retain parts on the center of the table.
    The table can be centered first using the "spuds" that are shown in one of the pictures.
    The last picture shows a spanner nut that I just made using the 3/4-16 chuck adapter to hold a 3" 4 jaw syncro chuck. (chuck not shown).

    Here are the pics:

    Cheers, JR
    Attached Thumbnails Attached Thumbnails Rotary Table Pallet-img_2582.jpg   Rotary Table Pallet-img_2583.jpg   Rotary Table Pallet-img_2584.jpg   Rotary Table Pallet-img_2585.jpg   Rotary Table Pallet-img_2588.jpg  

    Back to the shop.

  10. The Following User Says Thank You to jjr2001 For This Useful Post:

    Home-PC (Jun 3, 2020)

  11. #6
    JoeH's Avatar
    Join Date
    Mar 2018
    Posts
    57
    Thanks
    37
    Thanked 25 Times in 21 Posts
    The one thing I dislike about my Grizzly table is the itty bitty handle. I may make something to replace it one of these days.

    By the way, when making those offset low profile clamps. Is there a way to figure how much offset to use for the eccentric screws? Just wondered if I made some different sizes.
    Last edited by JoeH; Jun 2, 2020 at 03:24 PM.

  12. The Following User Says Thank You to JoeH For This Useful Post:

    jjr2001 (Jun 2, 2020)

  13. #7
    Supporting Member jjr2001's Avatar
    Join Date
    Jun 2016
    Posts
    915
    Thanks
    1,182
    Thanked 2,035 Times in 553 Posts

    jjr2001's Tools

    Bite low profile clamps

    Quote Originally Posted by JoeH View Post
    The one thing I dislike about my Grizzly table is the itty bitty handle. I may make something to replace it one of these days.

    By the way, when making those offset low profile clamps. Is there a way to figure how much offset to use for the eccentric screws? Just wondered if I made some different sizes.
    My little Sherline mill handles are even smaller than the one on the rotary table! I usually turn it by the outside diameter knurl anyway.
    If I want to go fast then I use the speed handle. One of the speed handles was broken when I bought it. For $75.00 I was ok with that!
    It was easy to extract the broken end and now I can put in a small allen if I want to but usually just have the one handle installed.

    The way I see the offset for the eccentric bolt head is at about .015". I have enough throw to lock down any part. I made one with .030" and I was concerned that it would not "lock" so I stayed with .015. Even if the clamp is scaled up along with the bolt I think .015" is plenty. The key is the backup strap clamp. If you can make the backup clamps flush with the opposite side from the bite clamp then it will hold firm. Anyhow that is my take on them. Not very critical at all. Button head screws work fine but I think Low Head Socket Head Cap Screws would be best and that is what I plan to use for any new ones I make.

    Cheers, JR
    Back to the shop.

  14. The Following User Says Thank You to jjr2001 For This Useful Post:

    JoeH (Jun 3, 2020)

  15. #8
    Supporting Member Toolmaker51's Avatar
    Join Date
    Feb 2016
    Location
    Midwest USA
    Posts
    5,330
    Thanks
    7,041
    Thanked 2,977 Times in 1,892 Posts

    Toolmaker51's Tools
    .015-.020 offset is sufficient for #10 & 1/4" fasteners. Based on that; marginally increasing the ratio for larger screws works too. To increase clamping 'range', instead of making increasingly offset screws; offset the hole in the bite clamp. Biased toward one corner, but asymmetrical yields, 2,3, or 4 distances from the screw centerline.
    Sincerely,
    Toolmaker51
    ...we'll learn more by wandering than searching...

  16. The Following User Says Thank You to Toolmaker51 For This Useful Post:

    jjr2001 (Jun 8, 2020)

  17. #9

    Join Date
    Feb 2020
    Posts
    1
    Thanks
    1
    Thanked 1 Time in 1 Post
    Hi great looking pallet . Is it possible to get the dxf files for the pallet and clamps etc

  18. The Following User Says Thank You to ad1964 For This Useful Post:

    jjr2001 (Jun 8, 2020)

  19. #10
    Supporting Member jjr2001's Avatar
    Join Date
    Jun 2016
    Posts
    915
    Thanks
    1,182
    Thanked 2,035 Times in 553 Posts

    jjr2001's Tools
    Thanks TM, I did not think of offsetting the hole in the clamp but if my clamps don't have enough adjustment range for my next use then that is certainly a good option for increasing my clamping range. Each strap clamp would now have 12 settings. Thanks for the tip.

    ad1964, I did not make any drawings in cad for the strap clamps and the "bite" clamps. The dxf files for the table are in the very first post and are at the bottom of the pictures in that post. Thanks for checking in.

    Cheers, JR
    Back to the shop.

  20. The Following User Says Thank You to jjr2001 For This Useful Post:

    Toolmaker51 (Jun 8, 2020)

Thread Information

Users Browsing this Thread

There are currently 1 users browsing this thread. (0 members and 1 guests)

Bookmarks

Posting Permissions

  • You may not post new threads
  • You may not post replies
  • You may not post attachments
  • You may not edit your posts
  •