 LinkBack URL
 About LinkBacks
Another good build Tony, only questions are why do you make your own clutch baskets, I know there must be a good reason. Special sizes, better material, accuracy?, just curios.
Regards Alan


Another good build Tony, only questions are why do you make your own clutch baskets, I know there must be a good reason. Special sizes, better material, accuracy?, just curios.
Regards Alan


I replied to this earlier but it seems to have disappeared????????????Originally Posted by olderdan

The reason is because the originals are in steel and I want aluminium.


This may surprise you, but a manual shaper other than a table machine is not far-fetched, the base is in front of most of us.
In smaller work, a Toolmaker will build a clamp that encircles his mill quill, a cup about 2" deep. The lower end spigot clamps a tool bit, round or square, rather like a boring holder.
If he grinds a proper bit; a small radius, square or angled corner can be finished. This includes canting the head for draft.
The spindle is positioned and locked from turning, low gear helps. At initial position, the quill handle is simply stroked to depth and above, out of the part.
One axis is moved at a time incrementally, while shaving excess material.
Sincerely,
Toolmaker51
...we'll learn more by wandering than searching...
Cutting one keyway (maybe a few) might be feasible manually., but something like the clutch baskets that I showed is another matter altogether. I know someone who did it. It took him more than a day for the outer only and for some days afterwards he could not move his arm. If I did not have the pneumatic cylinder I would have got one. If I couldn't get one I would have made it with a motor powered crank.
I prefer the cylinder because it gives me some control options. As I had it the video it cycled automatically, I was hoping that with the soft ending set stiff at the retracted end that it would "rest" long enough at TDC for advancing the feed. That did not happen and I was concerned about dragging the tool when feeding on the upstroke. Since the video I have added an Arduino to the mix. When the ram returns to TDC there is an adjustable time delay (0 to 2 secs) to give time for even a geriatric operator to advance the feed without dragging to tool. I would not have been able to do that with a crank system.
For the inner clutch basket a form ground milling cutter would the job well, but that would not work for the outer basket.
Last edited by tonyfoale; Jun 15, 2021 at 03:09 AM.
Toolmaker51 (Jun 22, 2022)
Providing that dwell time for cutter is half the battle of vertical shaping. Unless an 'actual' shaper such as P&W, Rockford, the little Bridgeport; they don't have a clapper box relieving the cutter of load on retraction. Near guarantee of chatter, faster wear of toolbit and difficulty finishing parallel to bore.
The clamp-on I described is passable; where a long enough small enough rotating cutter just aren't available.
Sincerely,
Toolmaker51
...we'll learn more by wandering than searching...

Why, Tony? I would just turn the bit 180 deg and plunge away on the outside?
Many thanks for posting your latest project. This was already quite interesting and now you have added an Arduino! Between your "not CNC" lathe project and now this; I can hardly keep up! Hopefully, a post on the Arduino programming or logic is scheduled for the future.
Last edited by Saltfever; Jun 15, 2021 at 03:27 PM. Reason: grammar
I do not understand your first sentence, I wonder if you misunderstand the requirement.
I mentioned in a previous reply that I will give full details of the programming and schematics. There is one more video on the slotter to come but several on the lathe conversion. I do not exactly how many until I do them.
I have just posted the second part of this post here
Slotter part 2, with control details
Yes, I had the features reversed. I thought you were talking about the inside and outside (i.e., outer) of the same part. When, in fact, you were talking about 2 different parts. When you mentioned "inner" I thought you were shaping the inside of a basket. But you were referring to the inner-basket and not a particular surface at that point. Your video was clear, I just saw 2 baskets and thought you wanted to do both.
I can't see your features but I assume you could put a relief on the inside of the outer basket so the chip could curl into it. I see "relief" often on internal ring gears.
Thanks for answering back and not dismissing my question. All the best. Great work.
There is a relief groove at the bottom of the original. I would do the same with a new one.
Toolmaker51 (Jun 20, 2021)
There are currently 1 users browsing this thread. (0 members and 1 guests)
 Posting Permissions

 Reply With Quote
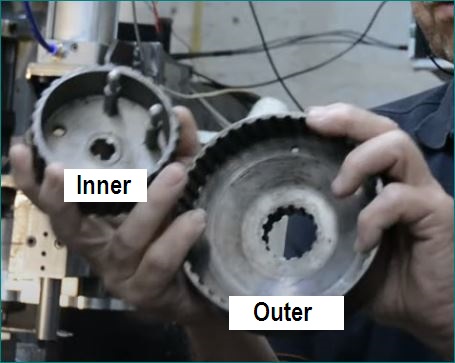
Bookmarks