Free 186 More Best Homemade Tools eBook:  
Get 2,000+ tool plans, full site access, and more.

User Tag List

Results 1 to 9 of 9

Thread: Small and easy to make Depth Gage

  1. #1
    Supporting Member Paul Jones's Avatar
    Join Date
    May 2014
    Location
    Del Mar, California
    Posts
    1,231
    Thanks
    5,810
    Thanked 1,441 Times in 655 Posts

    Paul Jones's Tools

    Small and easy to make Depth Gage

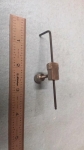
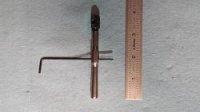
    I created this small depth gage to replace my work-around solution using a 5/64” Allen wrench and small tap wrench as a way to measure the depth in very small holes. Below is photo of how I preformed the depth measurements with this work-around solution before making the permanent new tool from 303 stainless steel left-over parts.

    Small and easy to make Depth Gage-using-tap-wrench-allen-wrench-depth-gage.jpg

    This new tool posting shows a permanently-made depth gage and includes the plans. I still used a 5/64” Allen wrench as the depth probe because it is made from hardened steel, has a beveled-end for a single point of contact, and consistently works very well.

    Small and easy to make Depth Gage-small-depth-gage-made-303-stainless-steel-allen-wrench.jpg

    Small and easy to make Depth Gage-smal-depth-gage.jpg

    The PDF file to the tool plans:

    Plans for Small Depth Gage.pdf

    The parts for the depth gage were made from left-overs from other knurled parts. I keep the left-overs of short knurled pieces just in case I may need to use these for other tools. In this case I used the top two pieces in the photo below for making the depth gage.

    Small and easy to make Depth Gage-lef-over-knurling-parts-future-projects.jpg

    The first part made from the left-overs knurled parts was the depth gage locking screw.

    Sometimes I pre-drill a through-hole into some of the left-over knurled parts before parting-off the wasted knurled-end. With this technique I can always easily re-chuck the left-over part into a collet and then drill and tap a new threaded hole into the knurled-part when needed. However, in this case the previously drilled #36 drilled through-hole for anticipating tapping a 6-23 screw thread was left as-is.

    Small and easy to make Depth Gage-depth-gage-6-32-locking-screw-before-joining-together.jpg

    The clean hole accommodates a cleanly machined minor diameter to a 6-32 stainless steel all-thread rod (i.e., I machined and removed threads from a section of the all-thread rod). I used Loctite 680 to attach the reduced all-thread diameter to the knurled part through-hole. I then finished the machining along the outer top-side by blending the two joined parts. The finished part doesn't even show where the two parts were joined together.

    Small and easy to make Depth Gage-finished-depth-gage-locking-screw-assembly.jpg

    Next, I used a 5C collet square holder to hold the short-end of another left-over knurled remnant for drilling and taping a 6-32 thread at 90 degrees to the major axis of the remnant to accommodate the locking screw The side locking screw was tested and it worked.

    Small and easy to make Depth Gage-threading-6-32-thread-into-depth-gage-body.jpg

    Small and easy to make Depth Gage-test-fitting-6-32-locking-thread-into-depth-gage-body.jpg

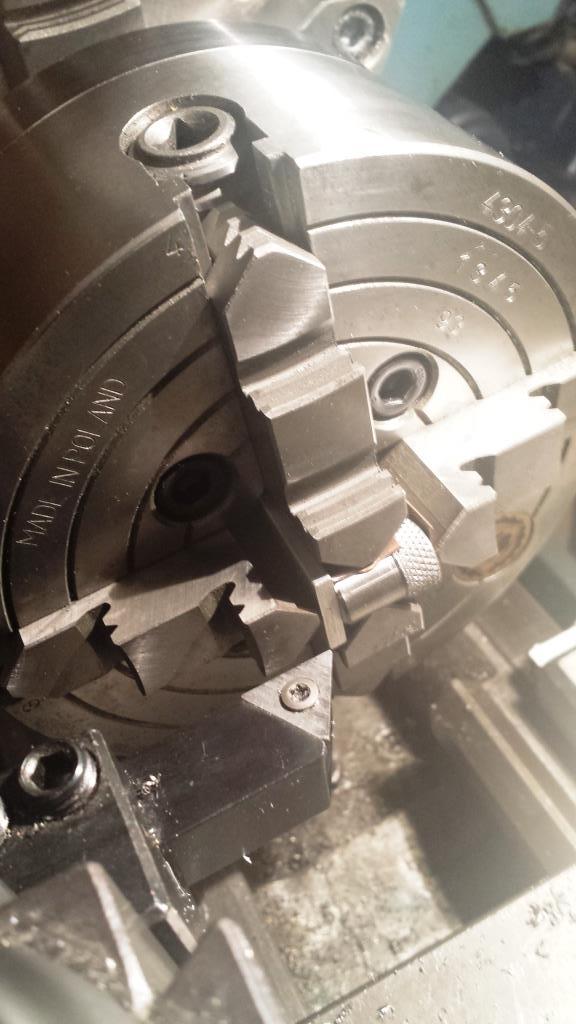
    The final step was to machine one flat-side on the depth gage to allow measuring a groove closer to a shoulder. The easiest way to hold and then remove 0.110” side material from the depth gage body was to use a 4-jaw chuck in the lathe. Rather than removing the heavier 6-jaw chuck, it was easier to chuck an even smaller 4-jaw chuck into the 6-jaw chuck and use it for this secondary operation. The depth gage part was protected with thick copper shims made from flattened-copper pipe and other shims made from 1/8" X 3/8" aluminum bar.

    I had previously built a mandrel to the smaller 4-jaw chuck just for this type of secondary operations (see http://www.homemadetools.net/forum/c...4848#post80696 ). The lathe cutting tool insert is a T15 HSS insert from A R Warner with a positive cutting relief and produces far less cutting pressure on the part than my normally used carbide equivalent with a negative relief. This machining technique works well for cases when a small part is barely held securely into the lathe chuck.

    Small and easy to make Depth Gage-using-4-jaw-chuck-held-6-jaw-chuck-set-up.jpg

    Small and easy to make Depth Gage-final-operation-machine-flat-side-depth-gage-4-jaw-6-jaw-chuck-.jpg

    Thank you for looking,

    Paul Jones.

    186 More Best Homemade Tools eBook
    Last edited by Paul Jones; Apr 3, 2018 at 02:34 AM. Reason: Added more details to the machining and corrected spelling errors

  2. The Following 9 Users Say Thank You to Paul Jones For This Useful Post:

    jjr2001 (Feb 8, 2018), Jon (Feb 5, 2018), LMMasterMariner (Feb 6, 2018), mklotz (Feb 6, 2018), PJs (Feb 6, 2018), rlm98253 (Feb 6, 2018), Scotsman Hosie (Feb 6, 2018), Seedtick (Feb 6, 2018), Toolmaker51 (Jun 6, 2018)

  3. #2
    Content Editor
    Supporting Member
    DIYer's Avatar
    Join Date
    Aug 2013
    Posts
    3,056
    Thanks
    773
    Thanked 1,852 Times in 1,653 Posts


    Thanks Paul Jones! We've added your Depth Gauge to our Measuring and Marking category,
    as well as to your builder page: Paul Jones's Homemade Tools. Your receipt:


    2000 Tool Plans

  4. The Following User Says Thank You to DIYer For This Useful Post:

    Paul Jones (Feb 6, 2018)

  5. #3
    Content Editor
    Supporting Member
    DIYer's Avatar
    Join Date
    Aug 2013
    Posts
    3,056
    Thanks
    773
    Thanked 1,852 Times in 1,653 Posts


    Thanks Paul Jones! We've added your Hex Key Depth Gauge to our Height and Depth Gauges category,
    as well as to your builder page: Paul Jones's Homemade Tools. Your receipt:


  6. The Following User Says Thank You to DIYer For This Useful Post:

    Paul Jones (Feb 6, 2018)

  7. #4
    Supporting Member mklotz's Avatar
    Join Date
    Aug 2015
    Location
    LA, CA, USA
    Posts
    3,438
    Thanks
    357
    Thanked 6,396 Times in 2,119 Posts

    mklotz's Tools
    Like you, I save knurled bits, both commercial and left-overs from stuff I made. Some time ago I lucked into some surplus thread inserts used to provide metallic threads in cast plastic products. They're short lengths of ~3/16" knurled brass with a blind hole threaded 6-32. The knurling was done to provide a grip for the liquid plastic that would be cast around the insert. They've been used in many of my depth gauges, some of which can be seen here...

    http://www.homemadetools.net/forum/d...ovements-27309

    I especially like the idea of a flat so the gauge can be used close to a vertical part feature. While some of mine have an overall flat profile, many of them are cylindrical and could benefit from a flat such as yours has.
    ---
    Regards, Marv

    Home Shop Freeware
    https://www.myvirtualnetwork.com/mklotz

  8. The Following User Says Thank You to mklotz For This Useful Post:

    Toolmaker51 (Jun 6, 2018)

  9. #5
    Supporting Member Paul Jones's Avatar
    Join Date
    May 2014
    Location
    Del Mar, California
    Posts
    1,231
    Thanks
    5,810
    Thanked 1,441 Times in 655 Posts

    Paul Jones's Tools
    Marv,

    I remember seeing your wonderful collection of various depth gages and the one shown in the top center of your photo was my inspiration for the depth gage I made. I like the ones you have with the spring-loaded grips for fast adjustment. I wanted the flat side to allow gaging close to a vertical feature. In fact my original design was to make the part 0.350" wide across the flat to the circular backside instead of 0.390". However during the machining on the lathe the part seemed to make some ominous chatter sounds and the more I machined off the flat, the more sound it made and decided to stop before I accidentally plucked the tiny part out of the 4-Jaw chuck. I think your ears are a very good judge of what can go wrong when cutting metal or wood. Probably holding a chuck within another chuck made the setup far less rigid.

    Great idea about using the knurled surplus thread inserts and having the 6-32 thread in a blind hole. Perfect part for making a thumb tightened locking screw with a 6-32 thread. Even though I had previously drilled a #36 hole through the stainless steel knurled left-over part, I decided not to tap it with a 6-32 thread and went with machining off the threads in the 6-32 all thread rod and gluing it in with Loctite 680. I used my old Unimat SL 1000 to remove the threads and it was a perfect fit and I can't see where it joined the knurled part in the through hole.

    I don't mind taping threads and typically do 00-90 to 3/4-12 with no problem. I have broken more 6-32 taps over the years than any other size. I no longer want to push my luck with the 6-32 taps if there is another way to avoid tapping. There is something about the thread to pitch ratio of the tap thread body that makes these taps more prone to breakage or maybe I am over thinking the problem.

    Thank you Marv,
    Paul Jones
    Last edited by Paul Jones; Feb 6, 2018 at 08:53 PM.

  10. The Following User Says Thank You to Paul Jones For This Useful Post:

    Toolmaker51 (Jun 6, 2018)

  11. #6
    Supporting Member mklotz's Avatar
    Join Date
    Aug 2015
    Location
    LA, CA, USA
    Posts
    3,438
    Thanks
    357
    Thanked 6,396 Times in 2,119 Posts

    mklotz's Tools
    Quote Originally Posted by Paul Jones View Post
    I don't mind taping threads and typically do 00-90 to 3/4-12 with no problem. I have broken more 6-32 taps over the years than any other size. I no longer want to push my luck with the 6-32 taps if there is another way to avoid tapping. There is something about the thread to pitch ratio of the tap thread body that makes these taps more prone to breakage or maybe I am over thinking the problem.
    You're not overthinking. 6-32 is the weakest thread in the inferial spectrum for exactly the reason you suggest - too deep a thread for the overall diameter. I avoid it as much as possible but we're frequently forced to deal with it because it's so common in electrical equipment.
    ---
    Regards, Marv

    Home Shop Freeware
    https://www.myvirtualnetwork.com/mklotz

  12. The Following User Says Thank You to mklotz For This Useful Post:

    Paul Jones (Feb 6, 2018)

  13. #7
    Supporting Member Frank S's Avatar
    Join Date
    Aug 2015
    Location
    Peacock TX
    Posts
    11,224
    Thanks
    1,985
    Thanked 8,789 Times in 4,207 Posts

    Frank S's Tools
    Like Marv said I try to avoid the 6-32 but not always an option. So instead of using a #36 drill if the material is over 1/8" in thickness I normally use a 7/64"
    Never try to tell me it can't be done
    When I have to paint I use KBS products

  14. The Following 2 Users Say Thank You to Frank S For This Useful Post:

    Paul Jones (Feb 6, 2018), PJs (Feb 6, 2018)

  15. #8
    Supporting Member Toolmaker51's Avatar
    Join Date
    Feb 2016
    Location
    Midwest USA
    Posts
    5,333
    Thanks
    7,042
    Thanked 2,981 Times in 1,893 Posts

    Toolmaker51's Tools
    I fully approve of the dedicated depth rods, having a couple of my own and use in the same instances. Mine are wire gauge drill rod, with press-on knobbed SHCS. Shear-Loc Products: Instant Thumb Screws Shear-loc Thumb screw knobs Not crafty like self knurled buttons, cause I like 'em red, and #4-40.

    But employing a tap wrench as the clamp tickles me no end. Really makes me think, how else one could utilize tap wrenches?
    Last edited by Toolmaker51; Jun 6, 2018 at 04:40 PM.
    Sincerely,
    Toolmaker51
    ...we'll learn more by wandering than searching...

  16. #9
    Supporting Member mklotz's Avatar
    Join Date
    Aug 2015
    Location
    LA, CA, USA
    Posts
    3,438
    Thanks
    357
    Thanked 6,396 Times in 2,119 Posts

    mklotz's Tools
    Quote Originally Posted by Toolmaker51 View Post
    But employing a tap wrench as the clamp tickles me no end. Really makes me think, how else one could utilize tap wrenches?
    I use mine as an easily relocatable captive driver for my tap extender; shown in the second picture here...

    http://www.homemadetools.net/forum/tap-holders-26298

    IMNSHO, that style tap wrench is the worst thing to use to actually hold taps; they loosen up just too easily.

    I will admit that little one has a seductive tactile appeal. I love handling it; I just don't want to use it to hold taps.


    186 More Best Homemade Tools eBook
    ---
    Regards, Marv

    Home Shop Freeware
    https://www.myvirtualnetwork.com/mklotz

  17. The Following 2 Users Say Thank You to mklotz For This Useful Post:

    Paul Jones (Jun 7, 2018), Toolmaker51 (Jun 6, 2018)

Thread Information

Users Browsing this Thread

There are currently 1 users browsing this thread. (0 members and 1 guests)

Tags for this Thread

Bookmarks

Posting Permissions

  • You may not post new threads
  • You may not post replies
  • You may not post attachments
  • You may not edit your posts
  •