Free 186 More Best Homemade Tools eBook:  
Get 2,000+ tool plans, full site access, and more.

User Tag List

Results 1 to 10 of 10

Thread: Small parts clamping block for the mill

  1. #1
    Supporting Member EclecticNeophyte's Avatar
    Join Date
    Apr 2013
    Location
    TriCities, WA.
    Posts
    82
    Thanks
    34
    Thanked 113 Times in 35 Posts

    EclecticNeophyte's Tools

    Small parts clamping block for the mill

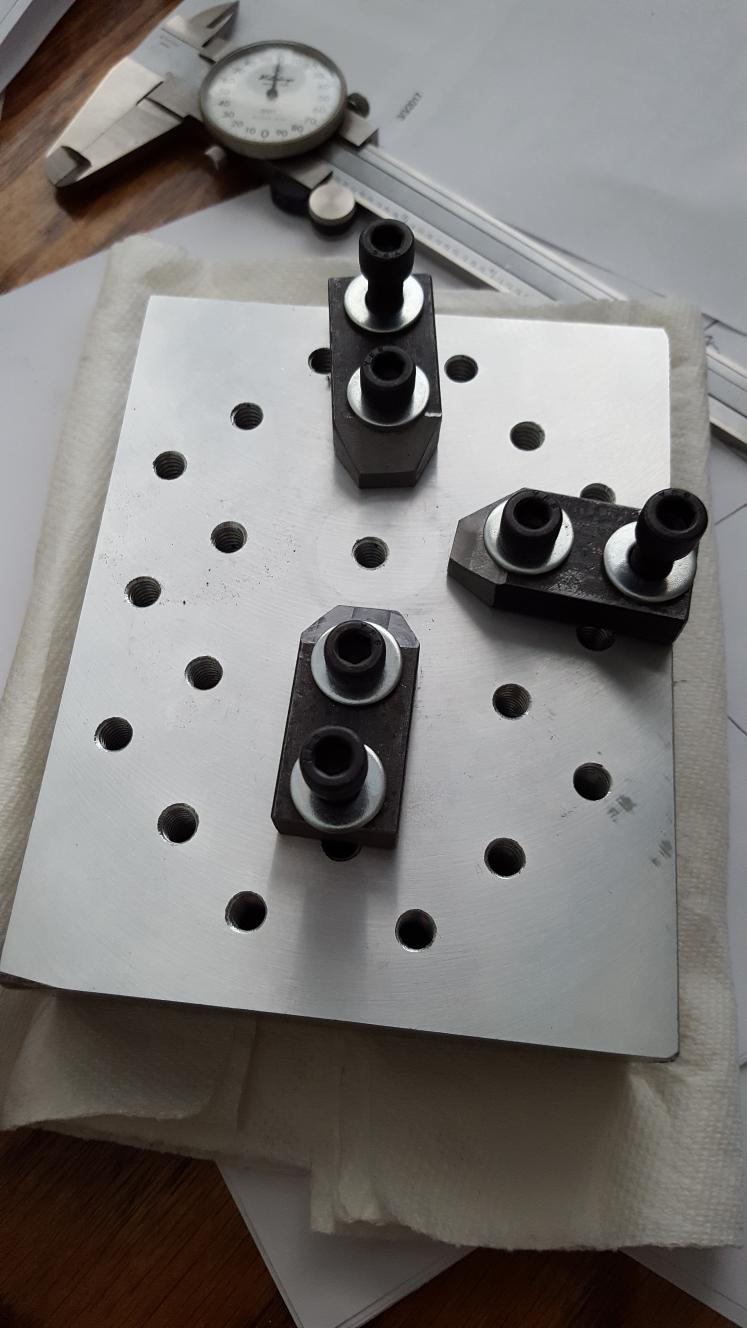
    Milling small parts on my RF-30 clone, can often be a pain. But after viewing a YouTube video by Tom Lipton (OxTools), I decided to build a clamping block that can be held firmly in the 6" mill vice. The block of aluminum measures approximately 4" x 5" x 1 1/4", and was fly cut; then drilled and tapped for 1/4-20 allen type socket head screws. I also made a set of hold downs from some 3/8" x 3/4" hot rolled mild steel. Placement of the threaded holes was somewhat arbitrary, but are spaced no more than 1" apart, with a few at 1/2" spacing. The nice thing about it is, the base block is thick enough that any milling or drilling marks can easily be done away with, using the fly cutter; making it as good as new whenever needed.

    Small parts clamping block for the mill-20170430_172359_small.jpg

    -EN

    186 More Best Homemade Tools eBook

  2. The Following 5 Users Say Thank You to EclecticNeophyte For This Useful Post:

    bobs409 (May 1, 2017), Jon (Dec 5, 2019), LMMasterMariner (May 1, 2017), rlm98253 (May 1, 2017), Seedtick (May 1, 2017)

  3. #2
    Supporting Member LMMasterMariner's Avatar
    Join Date
    Jan 2016
    Location
    Dubrovnik - Croatia
    Posts
    233
    Thanks
    586
    Thanked 568 Times in 131 Posts

    LMMasterMariner's Tools
    EN, Very nice idea and very nice job. It's going to my to do list. The only thing which I will do differently is the size. Will try to find bigger block; 8" x 6" to fit my 6" milling vise and have some extra length. Thanks for sharing.
    LMMM

    2000 Tool Plans

  4. The Following User Says Thank You to LMMasterMariner For This Useful Post:

    EclecticNeophyte (Feb 11, 2021)

  5. #3
    Content Editor
    Supporting Member
    DIYer's Avatar
    Join Date
    Aug 2013
    Posts
    3,056
    Thanks
    772
    Thanked 1,850 Times in 1,652 Posts


    Thanks EclecticNeophyte! We've added your Small Parts Clamping Block to our Clamps category,
    as well as to your builder page: EclecticNeophyte's Homemade Tools. Your receipt:


  6. #4
    Supporting Member EclecticNeophyte's Avatar
    Join Date
    Apr 2013
    Location
    TriCities, WA.
    Posts
    82
    Thanks
    34
    Thanked 113 Times in 35 Posts

    EclecticNeophyte's Tools
    Quote Originally Posted by LMMasterMariner View Post
    EN, Very nice idea and very nice job. It's going to my to do list. The only thing which I will do differently is the size. Will try to find bigger block; 8" x 6" to fit my 6" milling vise and have some extra length. Thanks for sharing.
    LMMM
    Thanks LMMM. A larger plate would likely be better as you'd have more mounting options for orientation of parts, size, etc.. If I make another, I'll certainly use thinner stock. As usual in my shop, I used what I had to hand, which in this case was a bit 'overkill' for the application...

    -EN

  7. #5
    Supporting Member Frank S's Avatar
    Join Date
    Aug 2015
    Location
    Peacock TX
    Posts
    11,179
    Thanks
    1,974
    Thanked 8,766 Times in 4,195 Posts

    Frank S's Tools
    Never worry about overkill unless it interferes with function Under kill is the real demon
    Never try to tell me it can't be done
    When I have to paint I use KBS products

  8. The Following User Says Thank You to Frank S For This Useful Post:

    Toolmaker51 (May 3, 2017)

  9. #6
    Supporting Member mklotz's Avatar
    Join Date
    Aug 2015
    Location
    LA, CA, USA
    Posts
    3,434
    Thanks
    357
    Thanked 6,380 Times in 2,117 Posts

    mklotz's Tools
    When I made mine...

    http://www.homemadetools.net/forum/m...ng-table-27312

    I included removable fences as aids to aligning work with the mill axes. In several years of using the table, I've found the fences to be very useful.

    You may want to think about adding some to your design.

    The edges of my table have been milled to be parallel with the mill axes when the table is mounted in a certain orientation. To remember this orientation, I stamped a large letter 'F' (for Front) into the bottom of the T-slot that faces to the front when the plate is correctly oriented.
    ---
    Regards, Marv

    Home Shop Freeware
    https://www.myvirtualnetwork.com/mklotz

  10. The Following 4 Users Say Thank You to mklotz For This Useful Post:

    jjr2001 (May 4, 2017), LMMasterMariner (May 3, 2017), Seedtick (May 3, 2017), Toolmaker51 (May 3, 2017)

  11. #7
    Supporting Member Toolmaker51's Avatar
    Join Date
    Feb 2016
    Location
    Midwest USA
    Posts
    5,330
    Thanks
    7,041
    Thanked 2,977 Times in 1,892 Posts

    Toolmaker51's Tools
    Quote Originally Posted by Frank S View Post
    Never worry about overkill unless it interferes with function Under kill is the real demon
    In agreement. In this case, thicker is not overkill. It allows refinishing or re-configuring when needed..
    Underkill really imposes limitations; in current use and perhaps creativity later on.
    Sincerely,
    Toolmaker51
    ...we'll learn more by wandering than searching...

  12. The Following User Says Thank You to Toolmaker51 For This Useful Post:

    jjr2001 (May 4, 2017)

  13. #8
    Supporting Member EclecticNeophyte's Avatar
    Join Date
    Apr 2013
    Location
    TriCities, WA.
    Posts
    82
    Thanks
    34
    Thanked 113 Times in 35 Posts

    EclecticNeophyte's Tools
    Quote Originally Posted by mklotz View Post
    When I made mine...

    http://www.homemadetools.net/forum/m...ng-table-27312

    I included removable fences as aids to aligning work with the mill axes. In several years of using the table, I've found the fences to be very useful.

    You may want to think about adding some to your design.

    The edges of my table have been milled to be parallel with the mill axes when the table is mounted in a certain orientation. To remember this orientation, I stamped a large letter 'F' (for Front) into the bottom of the T-slot that faces to the front when the plate is correctly oriented.
    Thanks for the suggestion Marv. I hadn't considered needing to align parts with the axis of the table. I also like the t-nut slots on your table.

  14. #9
    Supporting Member mklotz's Avatar
    Join Date
    Aug 2015
    Location
    LA, CA, USA
    Posts
    3,434
    Thanks
    357
    Thanked 6,380 Times in 2,117 Posts

    mklotz's Tools
    Quote Originally Posted by EclecticNeophyte View Post
    Thanks for the suggestion Marv. I hadn't considered needing to align parts with the axis of the table. I also like the t-nut slots on your table.
    In any workholding device there's always a choice dilemma between an array of tapped holes and T-slots.

    T-slots allow positioning at any point but only along their length. It's usually impractical to mill new slots when the existing ones don't quite match the geometry of your workpiece so one must make some form of adjustable clamps which take up space and can get in the way of machining paths.

    Unlike slots, tapped holes restrict one to only certain clamping locations but that restriction is easily overcome by drilling and tapping new holes. This also allows one to place the new holes in the best locations relative to the geometry of the workpiece.

    In most cases I tend to adopt a mixed approach. Put T-slots in seemingly good locations and drill and tap holes as needed. I regard such jigs as expendables; keep adding holes/slots/stops until the thing is too bullet-ridden to be usable and, at that point, make a new one.

    Such a "this won't last forever" approach has the further advantage of giving one the opportunity to include everything one learned about design requirements into the new model.
    ---
    Regards, Marv

    Home Shop Freeware
    https://www.myvirtualnetwork.com/mklotz

  15. #10
    Supporting Member Frank S's Avatar
    Join Date
    Aug 2015
    Location
    Peacock TX
    Posts
    11,179
    Thanks
    1,974
    Thanked 8,766 Times in 4,195 Posts

    Frank S's Tools
    Another reason for making these fixtures whether they are small enough to be clamped in the vice or for much larger parts which would normally be clamped to the table itself is they serve to prevent those Uh-OH disasters. if anyone has ever been around a fast paced production shop I'm quite sure they have seen the results of those moments where something didn't go as planned leaving a deep gouge or divot from a cutter or drill point in the table.This can happen to anyone from the greenest novice to a seasoned professional
    I have an American Vertical Knee mill that I am cleaning up and semi restoring to be added to my cadre of machines that has many such gouges in the table. There is no way to know how many years this poor old regal machine suffered through countless such tool encounters. I am hoping to eventually fill them by welding then re grind and scrape the table back to something more presentable even though for my purposes the uh-oh's from past users won't effect anything I might make on it.they just look bad


    186 More Best Homemade Tools eBook
    Never try to tell me it can't be done
    When I have to paint I use KBS products

  16. The Following User Says Thank You to Frank S For This Useful Post:

    jjr2001 (May 4, 2017)

Thread Information

Users Browsing this Thread

There are currently 1 users browsing this thread. (0 members and 1 guests)

Bookmarks

Posting Permissions

  • You may not post new threads
  • You may not post replies
  • You may not post attachments
  • You may not edit your posts
  •