Free 186 More Best Homemade Tools eBook:  
Get 2,000+ tool plans, full site access, and more.

User Tag List

Results 1 to 9 of 9

Thread: Vent Hood for Boiler System

  1. #1
    Supporting Member bimmer1980's Avatar
    Join Date
    Jan 2018
    Posts
    69
    Thanks
    93
    Thanked 38 Times in 23 Posts

    bimmer1980's Tools

    Vent Hood for Boiler System

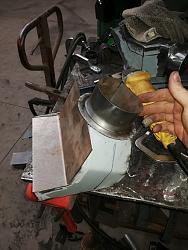
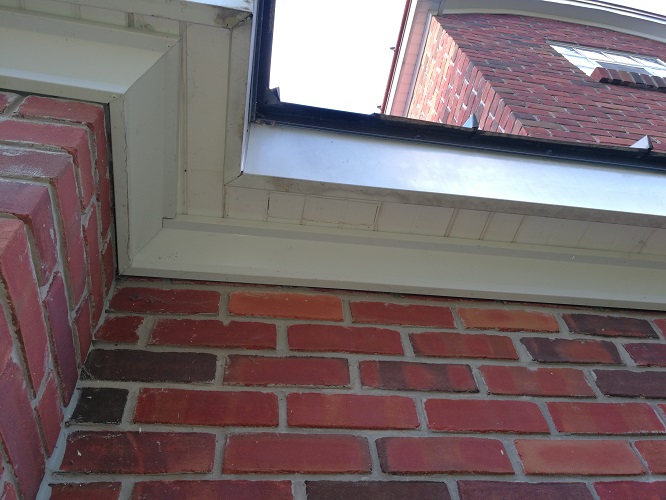
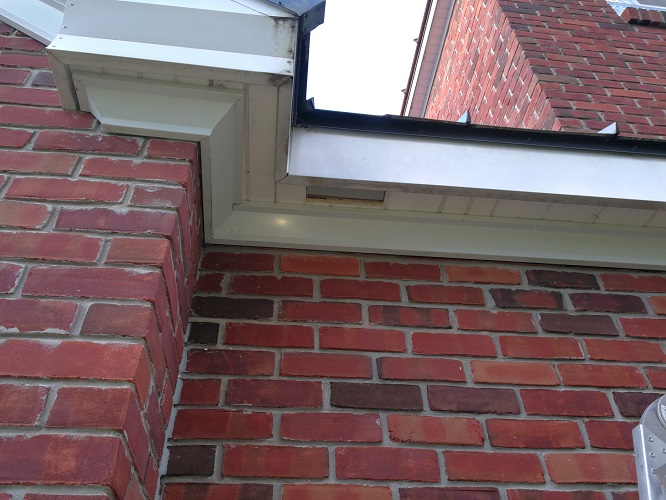
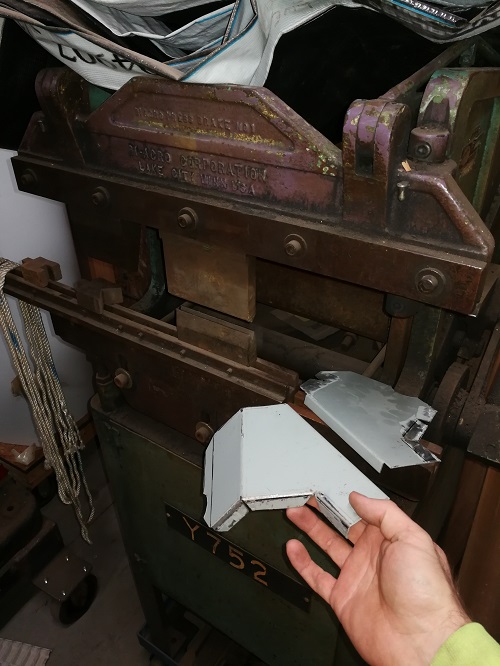
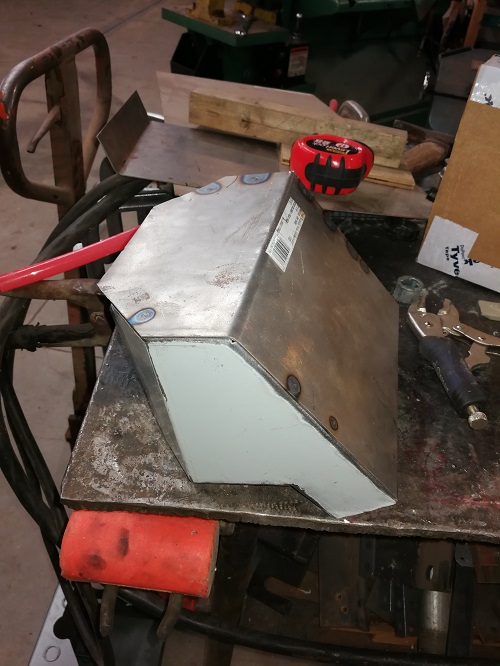
    I'm in the process of doing the preparation work for a boiler system for my radiant floor heat. While I could just punch a hole thru the brick, I wanted a cleaner and sleeker system for the intake and exhaust vents. I came up with the idea of venting thru the soffit. This would be pretty tough to see when it is done and it would keep the venting above the ceiling. I also would not have to cut thru the brick...even tho I have the tools to do that...

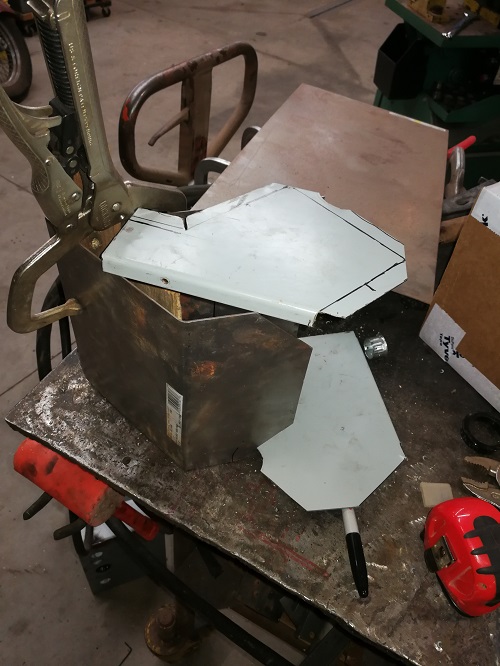
    I started by coming up with a cardboard design. Then refined it and transferred the pieces to steel. I was able to use some 16 ga sheet from a couple of salvaged 12" j-boxes and some from new sheet metal. I bent the flanges on the first one. I made the transition to PVC pipe on the shinker/stretcher.

    Vent Hood for Boiler System-img_20181103_164618.jpg

    Vent Hood for Boiler System-img_20181103_165246.jpg

    Vent Hood for Boiler System-img_20181103_184923.jpg

    Vent Hood for Boiler System-img_20181104_200407.jpg

    Vent Hood for Boiler System-img_20181104_203045.jpg

    Vent Hood for Boiler System-img_20181110_202018.jpg

    Vent Hood for Boiler System-img_20181110_202219.jpg

    186 More Best Homemade Tools eBook

  2. #2
    Supporting Member bimmer1980's Avatar
    Join Date
    Jan 2018
    Posts
    69
    Thanks
    93
    Thanked 38 Times in 23 Posts

    bimmer1980's Tools
    After I got the pieces cut, I started tacking it together.

    On the second vent hood, it needed some additional shaping, so I made a quick wood buck and hammered in the relief. Then I tacked it back together and trimmed the excess metal so the joints lined up.

    I proceeded with welding using my Hobart Beta-Mig 250 running 0.045 wire. Yes, this is thick wire for sheet metal, but it worked surprisingly well.

    After a little work with the blending wheel on the grinder and the flapper disc, they are about done.

    This weekend I need to fine tune the hole thru the soffit and get them fitted into place. Then start running the vent pipes....

    I also need to put a coat of galvanizing paint inside and out.

    **NOTE: The grey coating is the powder coat from the salvaged j-boxes.
    Attached Thumbnails Attached Thumbnails Vent Hood for Boiler System-img_20181110_205426.jpg   Vent Hood for Boiler System-img_20181113_213901.jpg   Vent Hood for Boiler System-img_20181113_214906.jpg   Vent Hood for Boiler System-img_20181113_214917.jpg   Vent Hood for Boiler System-img_20181113_215109.jpg  

    Vent Hood for Boiler System-img_20181113_215520.jpg   Vent Hood for Boiler System-img_20181113_221146.jpg   Vent Hood for Boiler System-img_20181113_222156.jpg  

    2000 Tool Plans

  3. #3
    Content Editor
    Supporting Member
    DIYer's Avatar
    Join Date
    Aug 2013
    Posts
    3,056
    Thanks
    772
    Thanked 1,850 Times in 1,652 Posts


    Thanks bimmer1980! We've added your Vent Hood to our Miscellaneous category,
    as well as to your builder page: bimmer1980's Homemade Tools. Your receipt:


  4. #4

    Join Date
    Feb 2016
    Posts
    8
    Thanks
    11
    Thanked 1 Time in 1 Post
    That Looks impressive, I take it is for a thicknesser . what angle is the back angle.

  5. #5
    Supporting Member bimmer1980's Avatar
    Join Date
    Jan 2018
    Posts
    69
    Thanks
    93
    Thanked 38 Times in 23 Posts

    bimmer1980's Tools
    Thanks! Not sure what you are asking in regards to "thicknesser"

    The back angle is about 35 degrees so that it matches the angle of the roof.

    The thickness of all the metal is 16ga.

    More details to follow as I hopefully make some more progress this weekend .

  6. #6
    Supporting Member Frank S's Avatar
    Join Date
    Aug 2015
    Location
    Peacock TX
    Posts
    11,178
    Thanks
    1,974
    Thanked 8,766 Times in 4,195 Posts

    Frank S's Tools
    I'm still trying to figure out where you are going with this.
    Ir you are attempting to exhaust the carbon monoxide gas of the exhaust from the boiler then it should have gone straight up through the roof to allow for the natural air flow over the roof to draw the exhaust out. If you are using it for the air intake then careful calculations need to be done to insure there is no negative pressure restriction of the intake of the combustion air due to the directional changes or flow and piping length these are different for natural gas or propane. Compensating for intake air flow restrictions can be accomplished via a muffin fan installed inline to create a positive intake flow this will insure a more efficient combustion.
    I once installed a vent a hood over a grill in the food court at a shopping mall due to the requirement that the duct work had to traverse a horizontal distance before exhausting through the roof it had to be clad with several layers of non flammable heat resistant materials and certified by the fire marshal and before he would do that an HVAC engineer had to certify the the design. Due to there being a horizontal section in the duct work the exhaust stack height above the roof had to be increased proportionate to the horizontal distance.
    I love the idea of concealing the intake and or exhaust in the soffit as you are doing as long as every characteristic of the design is taken into account.
    Never try to tell me it can't be done
    When I have to paint I use KBS products

  7. #7
    Supporting Member bimmer1980's Avatar
    Join Date
    Jan 2018
    Posts
    69
    Thanks
    93
    Thanked 38 Times in 23 Posts

    bimmer1980's Tools
    It's pretty simple. Short run of 3" pipe from one soffit vent to the intake of the Combi boiler.

    Then a run of about 28' of 3" pipe to the other side of the garage and out the soffit vent for the exhaust.

    Intake is on the north side of garage and exhaust is on the south. I could put both vents on the same side with some spacing between them, but it works out much better for my situation to vent to each side of the garage.

    Boiler has a built in fan for power vent and has a maximum pipe length of 100'.

    Trust me, I've read the manual for the boiler and evaluated the venting requirements. There is more than sufficient venting. 2" pipe is actually sufficient up to about 50' if I recall correctly.

    This boiler can use a concentric vent thru the wall and other options. My plan is within the necessary requirements.

    I understand that not all natural gas or propane boilers or appliances have the power vent, however, this boiler is set up for method.

    I'm not poking a vent pipe thru my standing seam roof. I would go thru the brick wall before I did that.

    More details and pics to follow as this progresses...

  8. #8
    Supporting Member Frank S's Avatar
    Join Date
    Aug 2015
    Location
    Peacock TX
    Posts
    11,178
    Thanks
    1,974
    Thanked 8,766 Times in 4,195 Posts

    Frank S's Tools
    ""Boiler has a built in fan for power vent and has a maximum pipe length of 100'.""
    That one feature right there is the all important factor I was wondering about.
    In the past I have heard of too many folks installing boilers and other things requiring venting but not designed for forced air lateral run outside air intakes and exhaust. only to fins out that they had to have positive flow chambers designed
    I can full well appreciate not wanting a hole cut in the roof
    Never try to tell me it can't be done
    When I have to paint I use KBS products

  9. #9
    Supporting Member bimmer1980's Avatar
    Join Date
    Jan 2018
    Posts
    69
    Thanks
    93
    Thanked 38 Times in 23 Posts

    bimmer1980's Tools
    Good points.

    I'm hoping to make some additional progress over the Thanksgiving Holiday. I was able to start the run of pipe. It was a real treat running a 4" hole saw thru some of the 2x10 wood blocking.... The saw liked to grab and kick a little... But by bracing the Milwaukee Hole Hawg it punched them thru!


    186 More Best Homemade Tools eBook

Thread Information

Users Browsing this Thread

There are currently 1 users browsing this thread. (0 members and 1 guests)

Bookmarks

Posting Permissions

  • You may not post new threads
  • You may not post replies
  • You may not post attachments
  • You may not edit your posts
  •