Free 186 More Best Homemade Tools eBook:  
Get 2,000+ tool plans, full site access, and more.

User Tag List

Results 1 to 9 of 9

Thread: Chamber Headspace Gage

  1. #1
    Supporting Member hemmjo's Avatar
    Join Date
    Feb 2017
    Posts
    2,562
    Thanks
    226
    Thanked 1,459 Times in 825 Posts

    hemmjo's Tools

    Chamber Headspace Gage

    Long time ago, over 50 years, I was into shooting and reloading. Toward the end of that phase of life I bought a Remington XP-100 target pistol. It came with a set of dies and a couple of boxes of cartridges. I only got to the range a couple of times with it and was never very impressed with it’s performance. At most I have fired maybe 15-20 rounds with it. I have no idea the history of the gun, but I am getting started shooting again. My goal is to see if I find a load to make this shoot better. I was never sure if the cartridges I got with it were reloads or unfired factory rounds.

    Now that I am getting back into loading, some of the cartridges show signs of either excessive head space in the chamber or improper resizing which made the cases too short. Some of the primers were pushed out a and a few of those were pierced. I have misplaced my fading data from back. Even if I had the data, the powders I used to use are not easy to get anymore. So I am starting from scratch

    I bought a Wilson Head space gage to check the fired cases and the few unfired rounds I have from 50 years ago. According to the Wilson gage, none of the fired rounds are too long. Which should mean the headspace is not too long. I wanted a way to measure the chamber to see if it matched the Wilson gage. Not questioning the Wilson gage, but perhaps the chamber was not right.

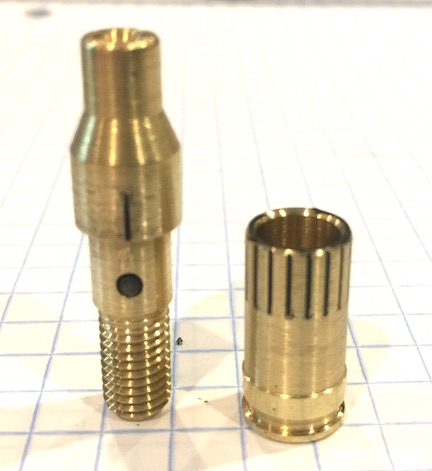
    I know that precision chamber gages are available, but a 3 gage set is over $100.00, so I decided to make a tool to measure the chamber. Using the SAAMI specifications, I drew up a gage the size of the critical dimensions of the .221 Fireball. I made the gage in two pieces that screw together similar to a micrometer. I later added some friction to the gage using a piece of O-ring.

    Fig 1

    Chamber Headspace Gage-01-gauge-parts-1.jpg

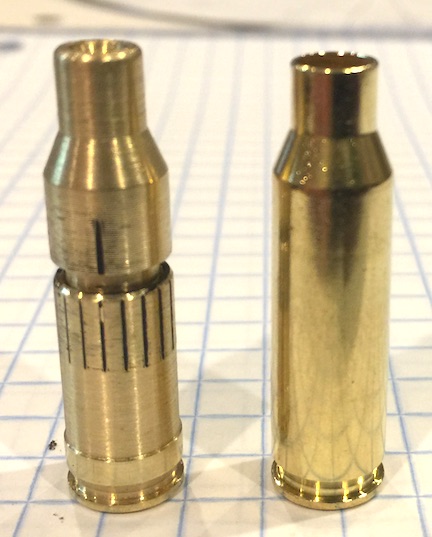
    The gage is the correct size for the important features. The neck taper and the base are correct. The neck itself is proper diameter, but a left a little long for to help with later measurements. The gage does not have sidewall taper as an actual case does.

    Fig 2

    Chamber Headspace Gage-02-gauge-case.jpg

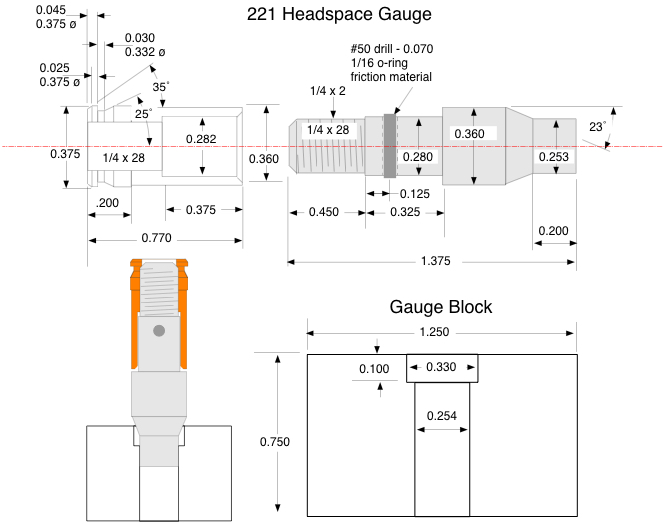
    The drawing shows the important dimensions for the gage.

    Fig 3

    Chamber Headspace Gage-03.-221-gauge-drawing.jpg

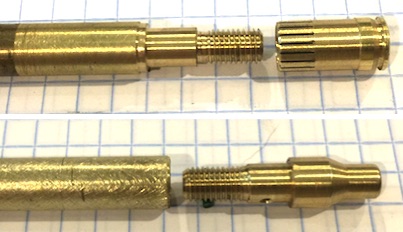
    Nothing out of the ordinary was required to make the tool. I did need to make a long mandrel with ends matching the male and female ends of the gage. The mandrel was used to hold the parts away from the chuck to turn the neck taper, the rim of the base and do the engraving.

    Fig 4.

    Chamber Headspace Gage-04-mandrel.jpg

    I needed reference marks on the gage when adjusting. These will not give you direct measurement value, but allow you to know how much you are changing it. The threads are 1/4 - 28. That pitch moves ≈ 0.03571” per turn. I decided to say it was 0.036 per turn. This would make each of 36 graduations be ≈ 0.0009920. I could have purchased a 1/4-40 tap and die, to make 25 graduations of 0.001, but that would be over $100.00 which I prefer to use for more important things.
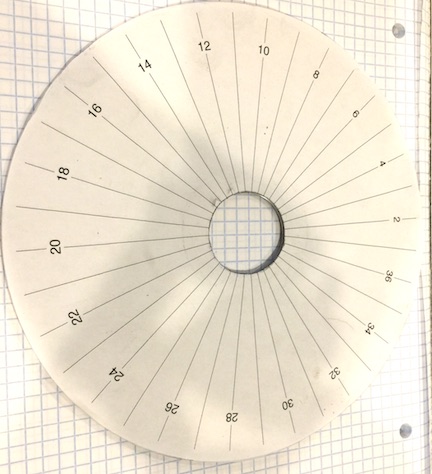
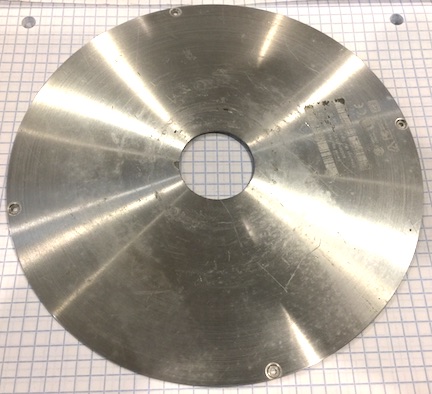
    I made a “dividing head” with a drawing program, printer and a piece of aluminum sheet. The paper with the divisions and the aluminum sheet are held tight on the spindle with the chuck.

    Figs 5, 6

    Chamber Headspace Gage-05-dividing-paper.jpgChamber Headspace Gage-06-backing-disk.jpg

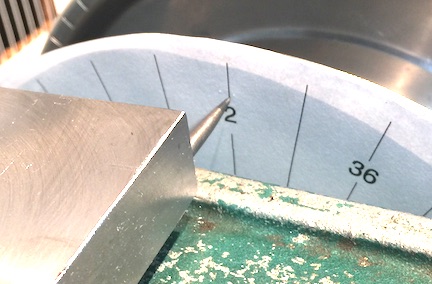
    The pointer is just a scribe held in place by gravity and a hunk of steel. 36 graduations would be too on the small part. I made only 18, so each graduation is 0.0019841 or about 0.00001587 too short. I can live with that error and just say each graduation is 0.002

    Fig 7

    Chamber Headspace Gage-07-pointer.jpg

    The engraving tool is a 60˚ HSS cutting tool turned on its side and adjusted to proper height. A small relief space was cut on the mandrel for the tool exit the part.

    Fig 8

    Chamber Headspace Gage-08-engraver.jpg

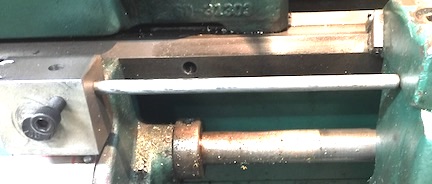
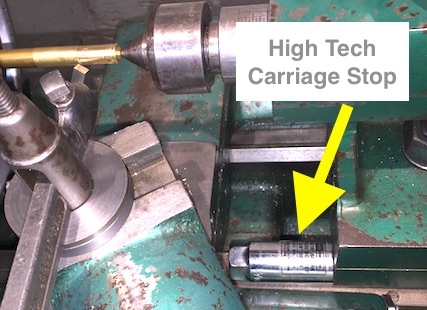
    Simple carriage stops assure the engraved lines are proper length. One is just a socket of appropriate leength.

    Fig 9, 10

    Chamber Headspace Gage-09-carraige-stop.jpgChamber Headspace Gage-10-carriage-stop.jpg

    The gage is used in a “guess and check manner”. Set it short, Insert, close the bolt . If the bolt closes, remove the gage, make it longer, close the bolt, repeat. When you feel resistance on the bolt, the gage is too long. I discovered when using the gage, when you get to 0.001 too long, closing the bolt the ejection pin contacts the gage and will actually turn the gage to allow the bolt to close. If you then set the gage 0.002 larger the bolt will not close. After fitting the gage to the chamber, it can be measured with appropriate tools, or slipped into the Wilson headspace gage to verify the chamber is within tolerance.

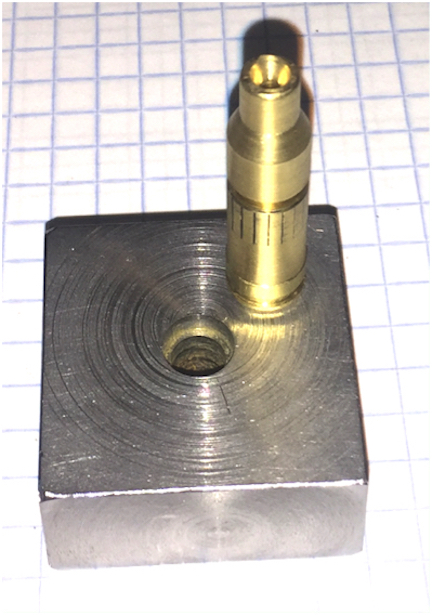
    A gage block with 0.330 recess to locate the shoulder and 0.0254 hole for the neck hold the gage vertical for measurement with a depth micrometer or depth measurement with a digital caliper.

    Fig 11, 12

    Chamber Headspace Gage-11-gage-block1.jpgChamber Headspace Gage-12-gage-block2.jpg

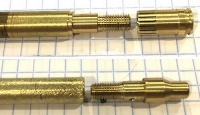
    Not sure why these thumb nails are here, I do not see how to delete them..
    Attached Thumbnails Attached Thumbnails Chamber Headspace Gage-11-gage-block1.jpg   Chamber Headspace Gage-12-gage-block2.jpg  

    186 More Best Homemade Tools eBook

  2. The Following 5 Users Say Thank You to hemmjo For This Useful Post:

    baja (Apr 26, 2024), ductape (Apr 25, 2024), Jon (Apr 25, 2024), mr mikey (Apr 26, 2024), piper184 (Apr 29, 2024)

  3. #2
    Content Editor
    Supporting Member
    DIYer's Avatar
    Join Date
    Aug 2013
    Posts
    3,056
    Thanks
    773
    Thanked 1,854 Times in 1,655 Posts


    Thanks hemmjo! We've added your Chamber Headspace Gauge to our Firearm and Weaponry category,
    as well as to your builder page: hemmjo's Homemade Tools. Your receipt:


    2000 Tool Plans

  4. #3
    meyer77's Avatar
    Join Date
    Feb 2019
    Posts
    314
    Thanks
    2
    Thanked 63 Times in 43 Posts
    I too had a X-P100 maybe 45 years ago, which I traded off I never did reload for that gun. About three years ago I picked up a CZ 527 in .221 Rem Fireball I have reloaded for it and used Reloader 7 which turned out to be very accurate.

  5. #4
    Supporting Member NeiljohnUK's Avatar
    Join Date
    Dec 2017
    Posts
    632
    Thanks
    59
    Thanked 231 Times in 164 Posts

    NeiljohnUK's Tools
    Looks like a tool many of us could use, in suitable calibres, chamber variation between same model guns means reloads often need to be specific to each, my Mod 94's in 30-30 were like that, and some donated brass (.357 mag) once fired in a 'yellow boy' won't chamber in my '94 of the same calibre until it's been resized, unlike the native fired in it empties. Of course barrels made towards the end of the chambering cutters life will be tighter, my match 7.62/308 is one such gun, done that way by a very experienced Olympic shooting gunsmith, factory loads and full length resized reloads are fine, a few rounds my father made up in once fired cases, from a 'new' cutter chamber new gun wouldn't allow the bolt to cam let alone close!
    Last edited by NeiljohnUK; Apr 26, 2024 at 09:23 AM.

  6. #5
    Supporting Member mr mikey's Avatar
    Join Date
    May 2022
    Location
    Michigan
    Posts
    277
    Thanks
    864
    Thanked 61 Times in 47 Posts

    mr mikey's Tools
    I bought a TC barrel back in the eighties that never performed well. I sent it back and the chamber was to short, shot better after that. A few years ago I sold all my TC's and started shooting Bullseye. Lots of fun.

  7. #6
    PG1
    PG1 is offline

    Join Date
    May 2017
    Posts
    2
    Thanks
    0
    Thanked 0 Times in 0 Posts
    Hi, Hemmjo
    Nice work. An adjustable transfer gauge to measure actual headspace is very useful when installing a barrel so that you can know exactly how much over minimum headspace exists and whether you choose to change it.

    Especially when working with barrels that are pressed in as opposed to screwed into the receiver, this becomes a big timesaver. Think of pressing in an AKM barrel for example.

    If I may offer a modification that will speed up adjusting the transfer gauge: in the top part, in the neck extension, make a hex opening to drive it with an Allen wrench. The hex can be broached if you want to sacrifice a hex wrench, or you can simply soft solder in a hex-head setscrew. For adjusting, use a cleaning rod that has an 8-32 screw screwed into the end. The opposite (head) end of the screw has an Allen hex stub attached (brazed, soldered--the torque requirements are minimal). It is a simple task to insert the cleaning rod, and by feel find the corresponding hex opening on the gauge neck.

    To use, adjust the gauge to be shorter than anticipated headspace, chamber it and close the bolt, and then adjust using the cleaning rod as described above. When solid resistance is felt, the gauge is locked up in the chamber, and can be exrtacted.

    In my experience, extractors need to be removed from the bolt as well as ejectors (if present) -- Mauser actions for example do not use a bolt mounted extractor, it is on the receiver. The absence of extractor will not be a problem, the gauge should fall out when the barrel is tipped upward. If there is some stickiness, tap it out with the cleaning rod.

    Thank you for sharing, clever design. I am lazy and would not have bothered with scribing the marks on the lower half of the tool. I use a comparator for measuring headspace gauge length, and do this with an adjustable transfer gauge like this.

    I've made a similar transfer gauge but using empty cases of the appropriate caliber with a threaded sleeve inserted and epoxied into the neck. The thread pitch is very fine, 80 tpi. There is a threaded 3/16" shaft that is longer than the case which fits into the sleeve, upper end has a 1/8" hex socket. The primer pocket is reamedto a clearance fit for the threaded shaft to slide in. Before use, the threaded shaft is unscrewed so that it does not protrude from the case bottom. Then chamber the contraption, close the bolt, and adjust the shaft with the cleaning rod until the gauge is tight. At this point the gauge contacts the bolt face via the threaded shaft , and the case shoulder is in contact with the chamber shoulder. Then remove the gauge and measure with comparator.

    regards,
    Paul

  8. #7
    alainbiggun's Avatar
    Join Date
    Oct 2019
    Posts
    48
    Thanks
    2
    Thanked 9 Times in 8 Posts
    voilà un superbe outil!!!

  9. #8
    Supporting Member
    Join Date
    Feb 2016
    Posts
    59
    Thanks
    130
    Thanked 33 Times in 21 Posts
    Very nice work, Hemmjo!

  10. #9
    Supporting Member cubcouper's Avatar
    Join Date
    Dec 2020
    Posts
    6
    Thanks
    2
    Thanked 7 Times in 3 Posts
    As a Benchrest and wildcat gunsmith, I deal with this kind of issue all the time. Your tool looks interesting and certainly is a fantastic display of craftsmanship.

    I have generally found that the discussions and measurements of headspace are loaded with misconceptions. SAAMI specifications include drawings for both the cartridge and the chamber and each of those include (usually unspecified) tolerances. Particularly, headspace dimensions on a bottleneck cartridge like the .221 Fireball is officially referenced to a midpoint on the shoulder angle which is not readily measured with any standard calipers or micrometers.

    While a full set of gages is over $100, you can usually get by with just the chamber Go-Gage. Two layers of Scotch tape (~.004) on the base of the gage will turn it into a NoGo-Gage.

    Reloading Tip:
    Most headspace issues are actually easily resolved by correctly setting up the resizing dies. Every manufacturer publishes garbage instructions about screwing the die until it touches the shellholder, then backing off a 1/4 turn. This does not account for stacked tolerance errors of the press, the dies, and shell holder, and the eyeball of the reloader. A correct method is to set the die up to push the shoulder back .0015 to .0025". No more. No less.
    Method: Using a shoulder bump gage that slips over the case neck and sits on the shoulder, measure the length of freshly fired new brass, resize, then measure again. Adjust the die depth in your press until the difference is exactly .002". You need to use a fresh piece of brass for each adjustment -- the springback/workhardening in the brass after even one resizing will prevent getting an accurate measurement. This setup will be accurate for that specific chamber. Reset your dies and use different brass if you are loading for another firearm in the same caliber.

    I've used these methods for years on my competition rifles and regularly get more than 150+ firings off my brass with no issues. Setting the shoulder back just .005 once or twice can reduce the life of the brass down to 5-10 firings and result in sticky extraction and ultimately case failure. Over-sizing the brass is the actual cause of most headspace issues.


    186 More Best Homemade Tools eBook

  11. The Following 2 Users Say Thank You to cubcouper For This Useful Post:

    astroscuba (May 1, 2024), Frank S (May 2, 2024)

Thread Information

Users Browsing this Thread

There are currently 1 users browsing this thread. (0 members and 1 guests)

Bookmarks

Posting Permissions

  • You may not post new threads
  • You may not post replies
  • You may not post attachments
  • You may not edit your posts
  •