Free 186 More Best Homemade Tools eBook:  
New: 300+ fresh build posts/day from 275 forums → BuildThreads.com

User Tag List

Page 1 of 2 1 2 LastLast
Results 1 to 10 of 18

Thread: 28" wood / coal forge build

Hybrid View

  1. #1
    Supporting Member Frank S's Avatar
    Join Date
    Aug 2015
    Location
    Peacock TX
    Posts
    12,617
    Thanks
    2,677
    Thanked 11,111 Times in 5,391 Posts

    Frank S's Tools

    28" wood / coal forge build

    For 55 years I have wanted my own forge for the past 50 years I have made do with either a rose bud on a torch or tossed together small temporary forges when I needed one.
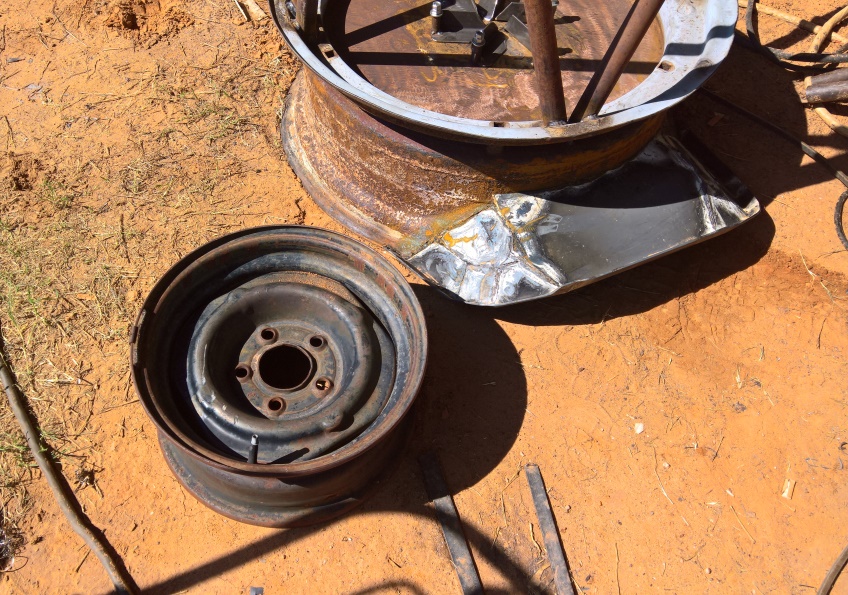
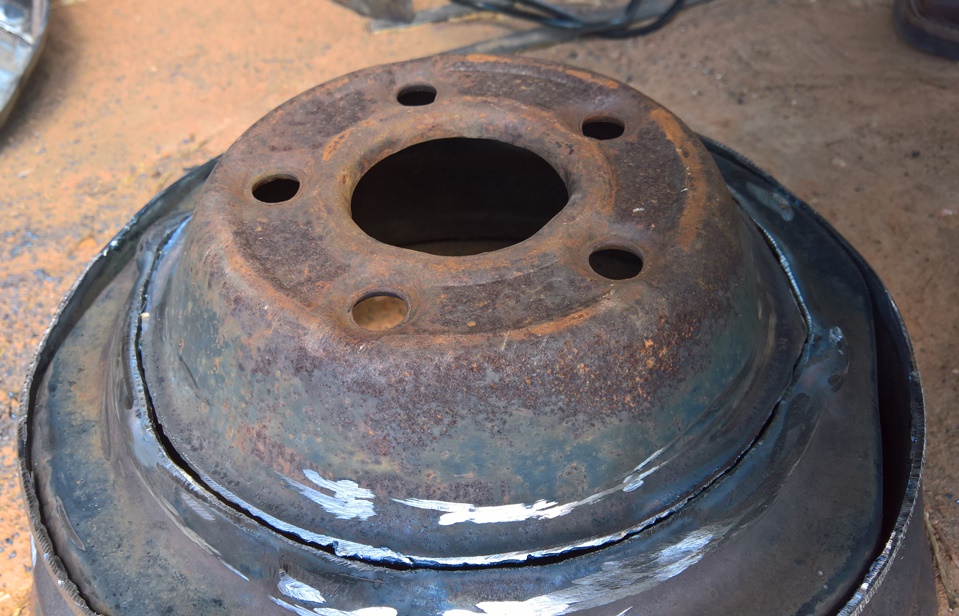
    A while back I had to replace one of my 8n tractor rims because the old one would not hold air if I wanted to mount up tubeless.
    What better use for an old rim than to make a forge out of it. Actually I don't really have the time to build a forge right now, with trying to mine and haul fill for my shop but I have an excavator with a broken drive and a bent drive sprocket that if I had a forge I could repair the drive then use the excavator to mine with and either the loader of the backhoe or the 863 Bobcat that I am repairing to haul and level the fill with so I said BUILD THE STUPID THING frank and be done with it at the very worst you can use it as a means of heating the shop next winter LOL
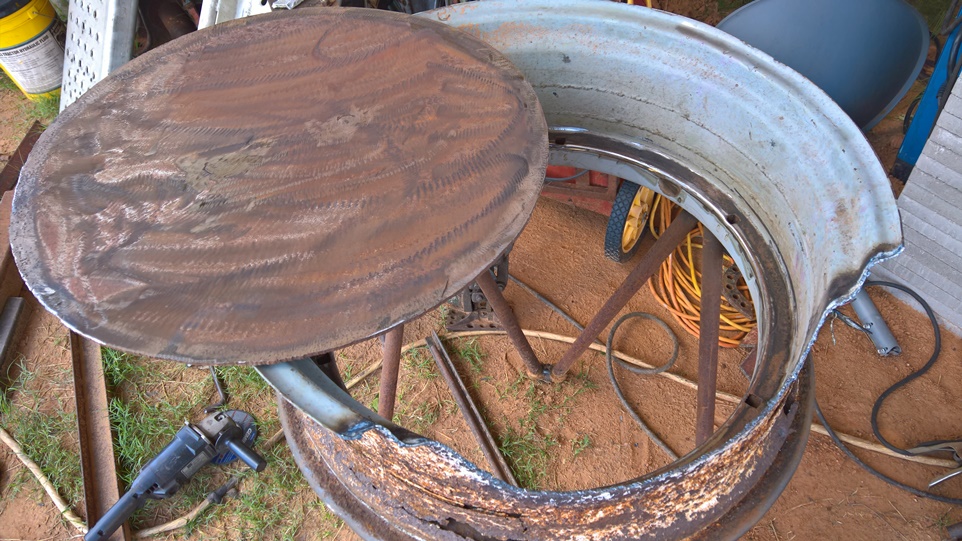
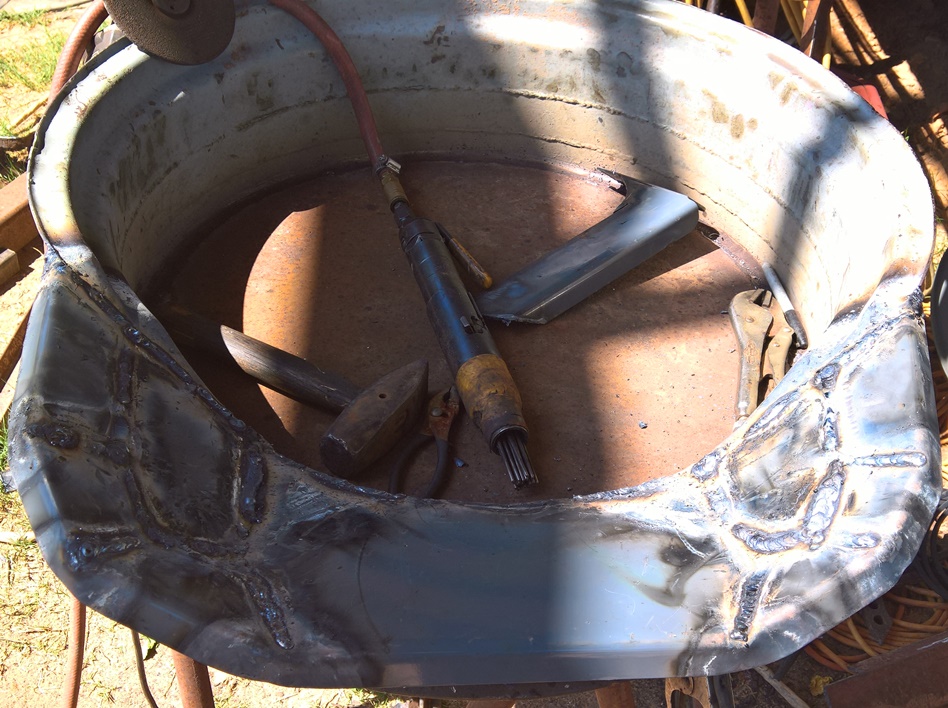
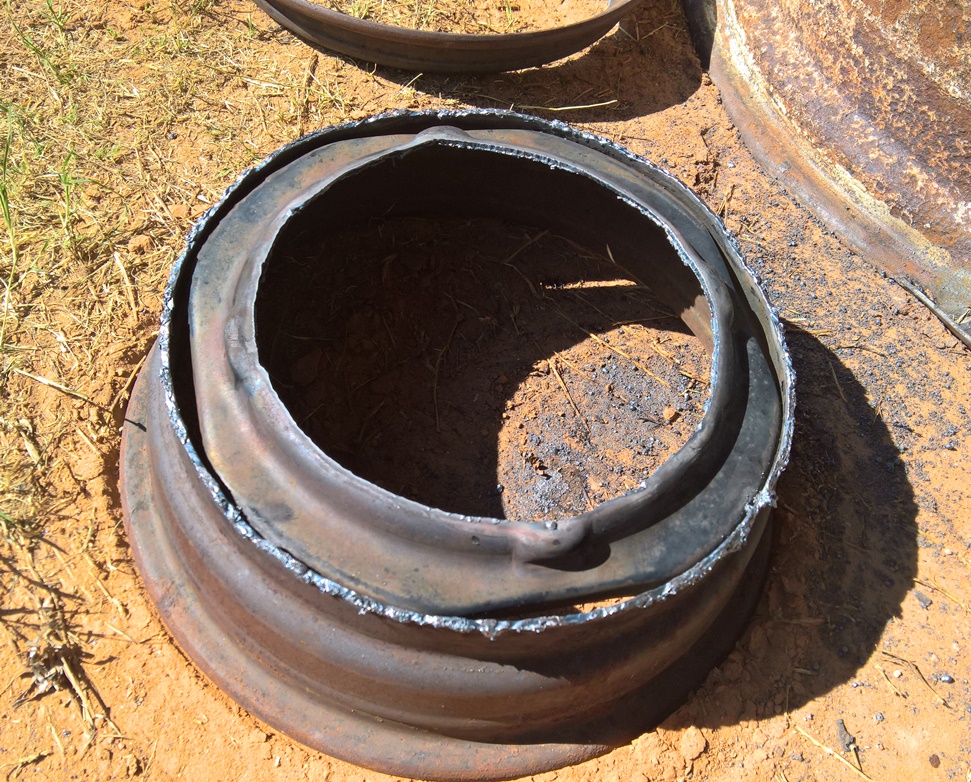
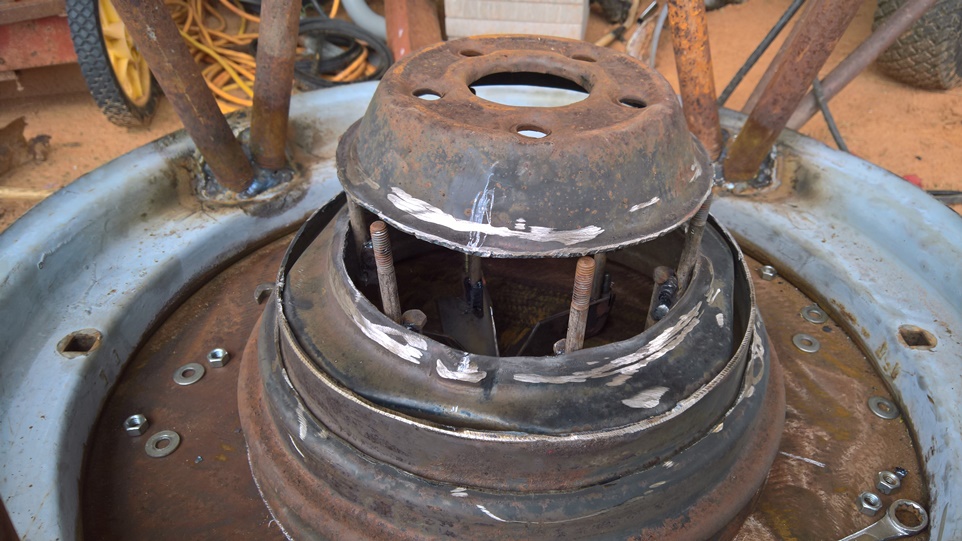
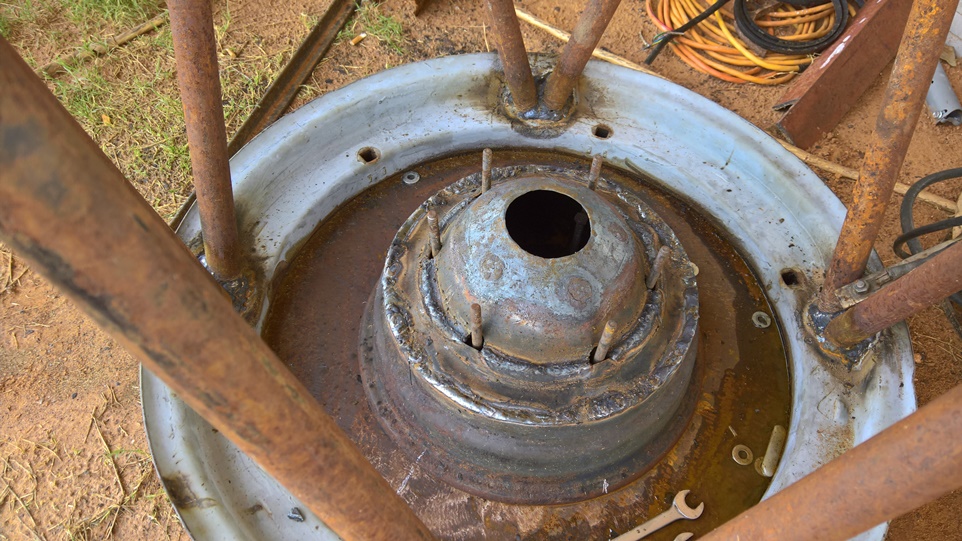
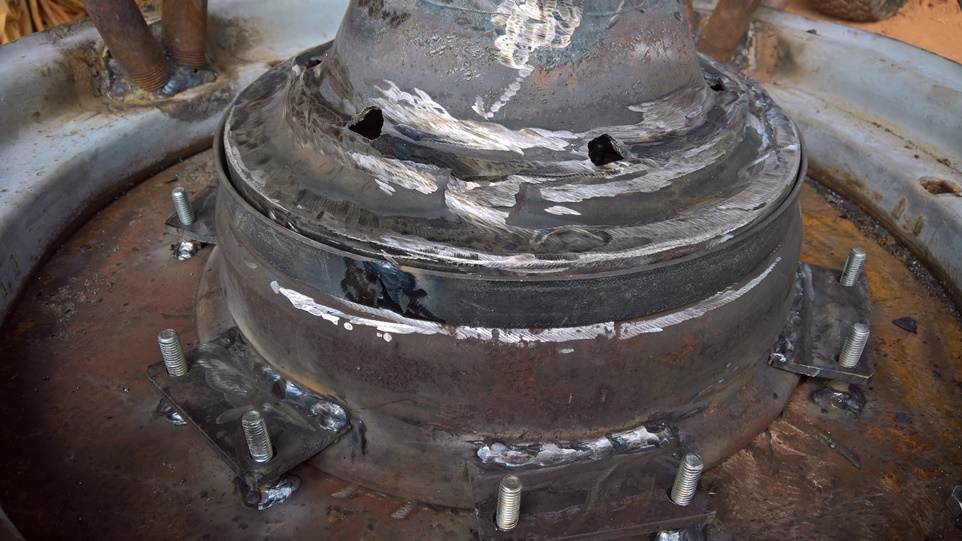
    Ok 28" tractor rim salvaged from my 8n
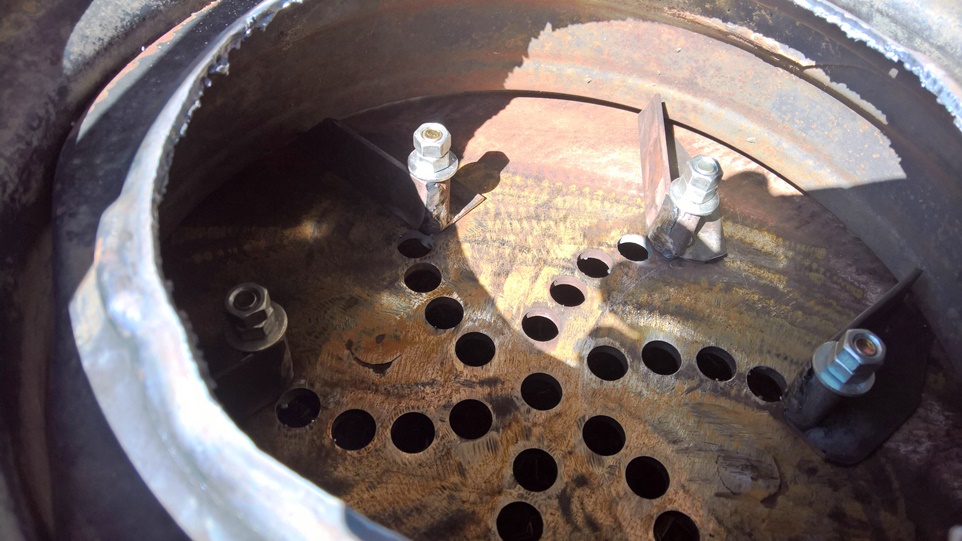
    the bottom of the forge is a 26" diameter 1/4" plate the previous property owner used as a lid for his burn barrel
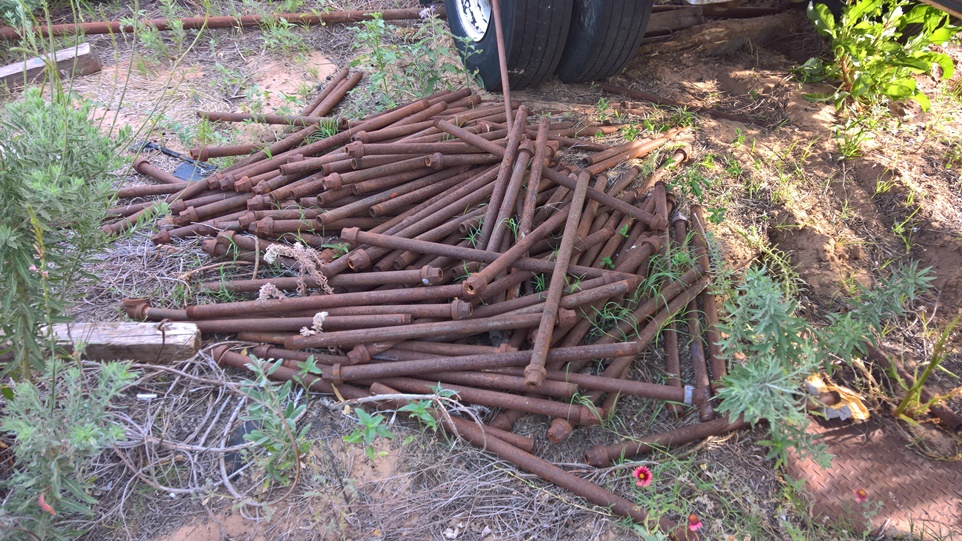
    the legs were taken from my stock of 100s of salvaged sprinkler down pipes
    the apron was made out of a piece of auction scrap I bought years ago
    that is the basic list of materials for the forge itself More about the toyere later
    28" wood / coal forge build-wp_20200511_18_26_51_profor.jpg
    28" wood / coal forge build-wp_20200502_12_40_07_profor.jpg

    28" wood / coal forge build-wp_20200517_13_14_20_profor.jpg
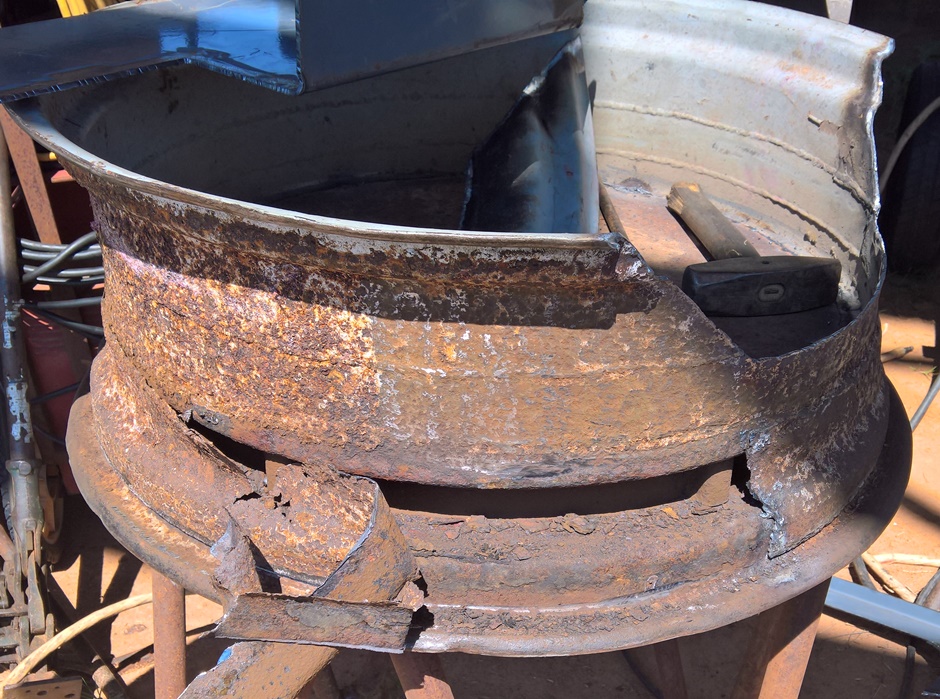
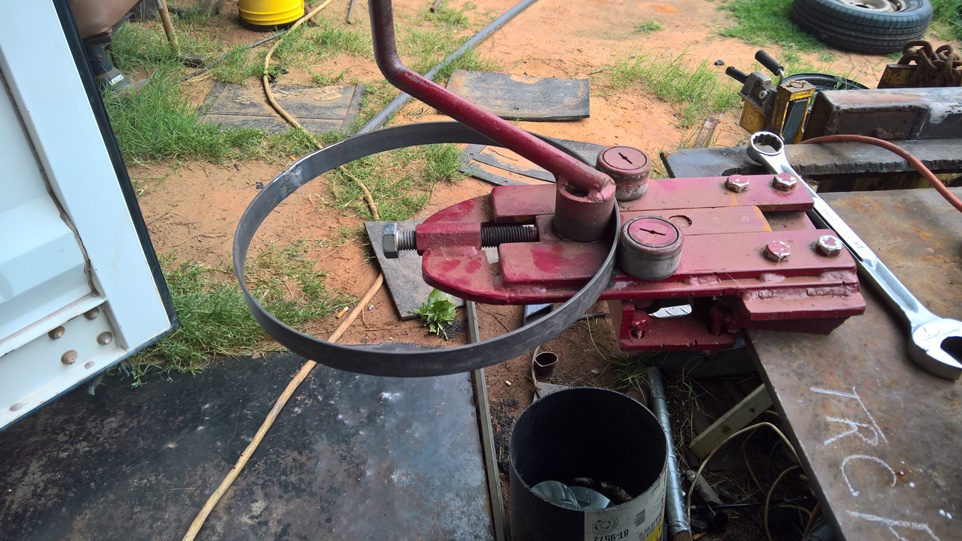
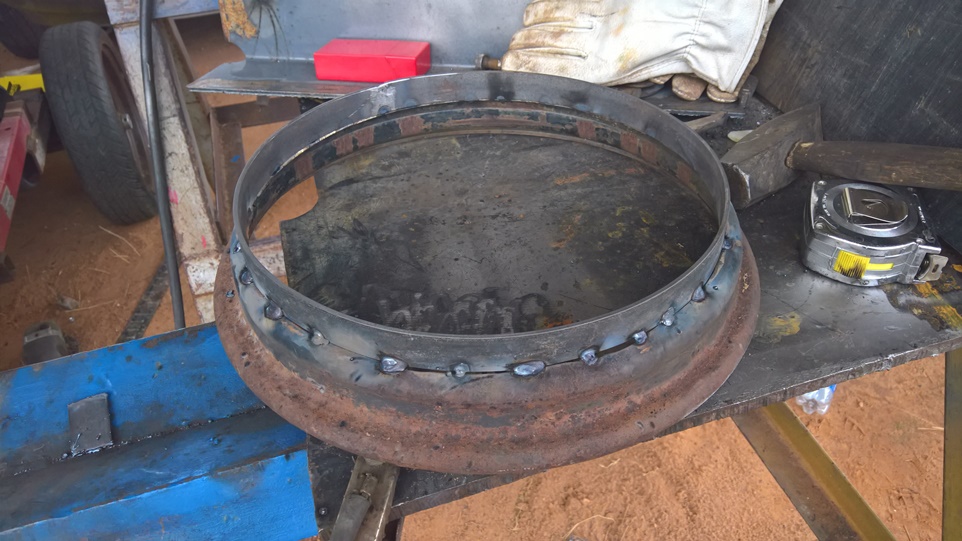
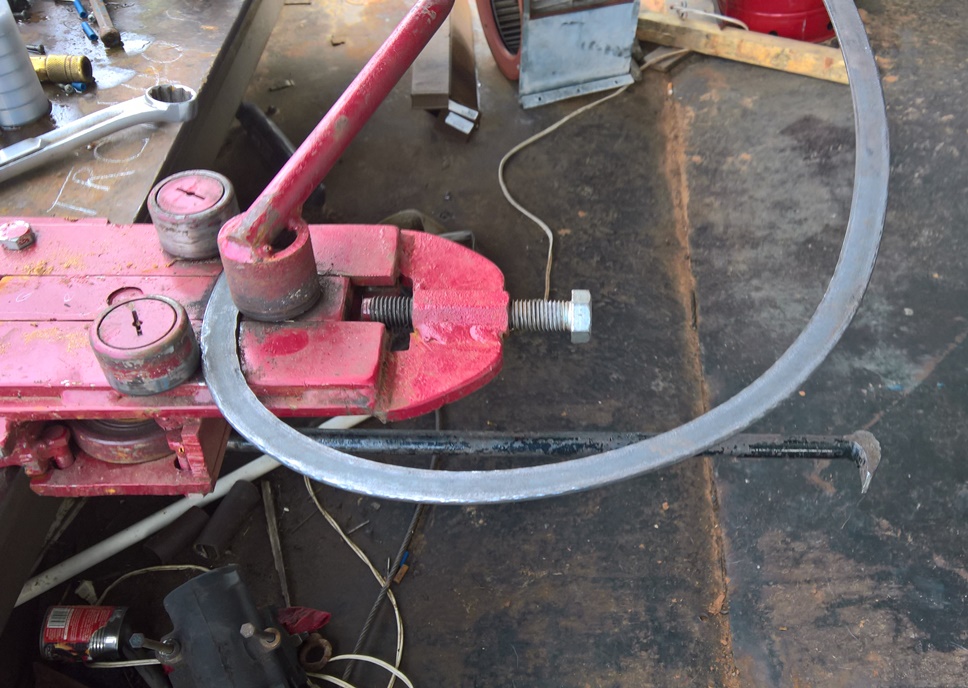
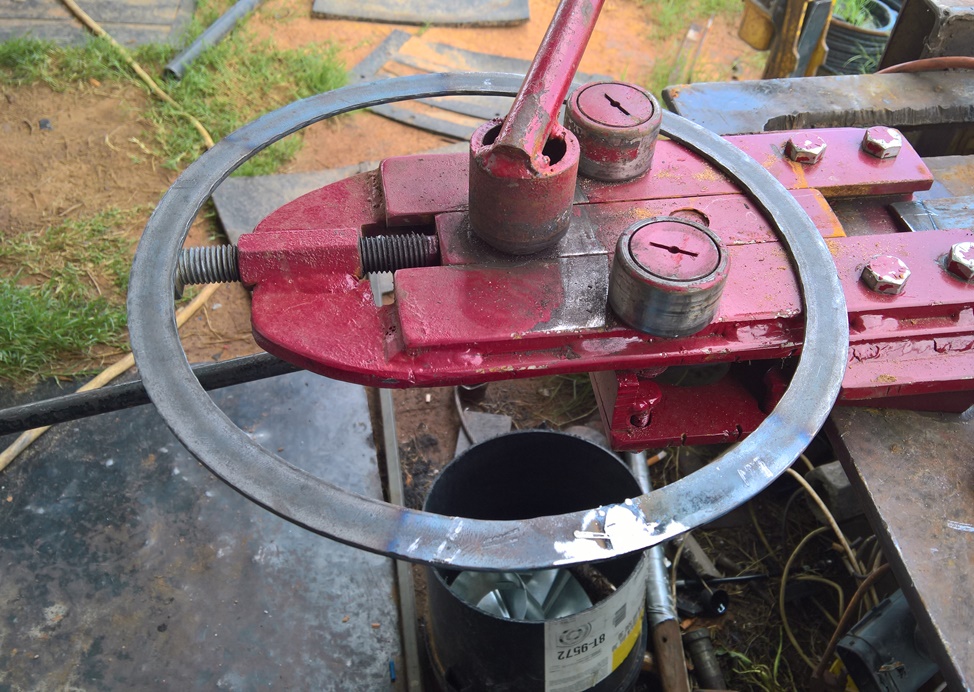
    It seemed like a good idea to remove the rotted out band
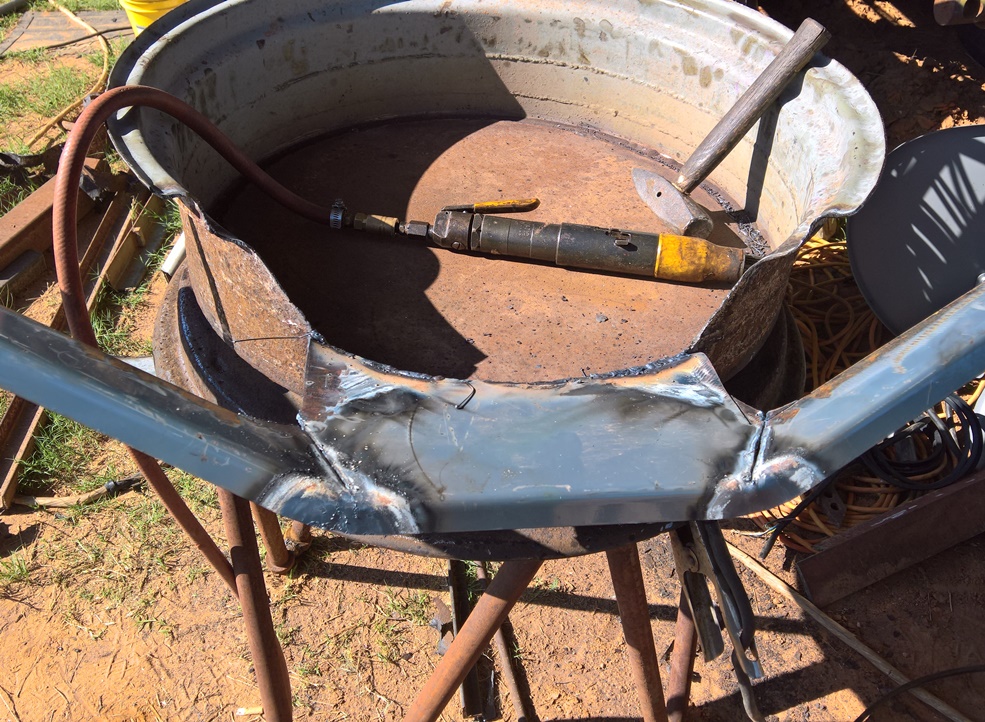
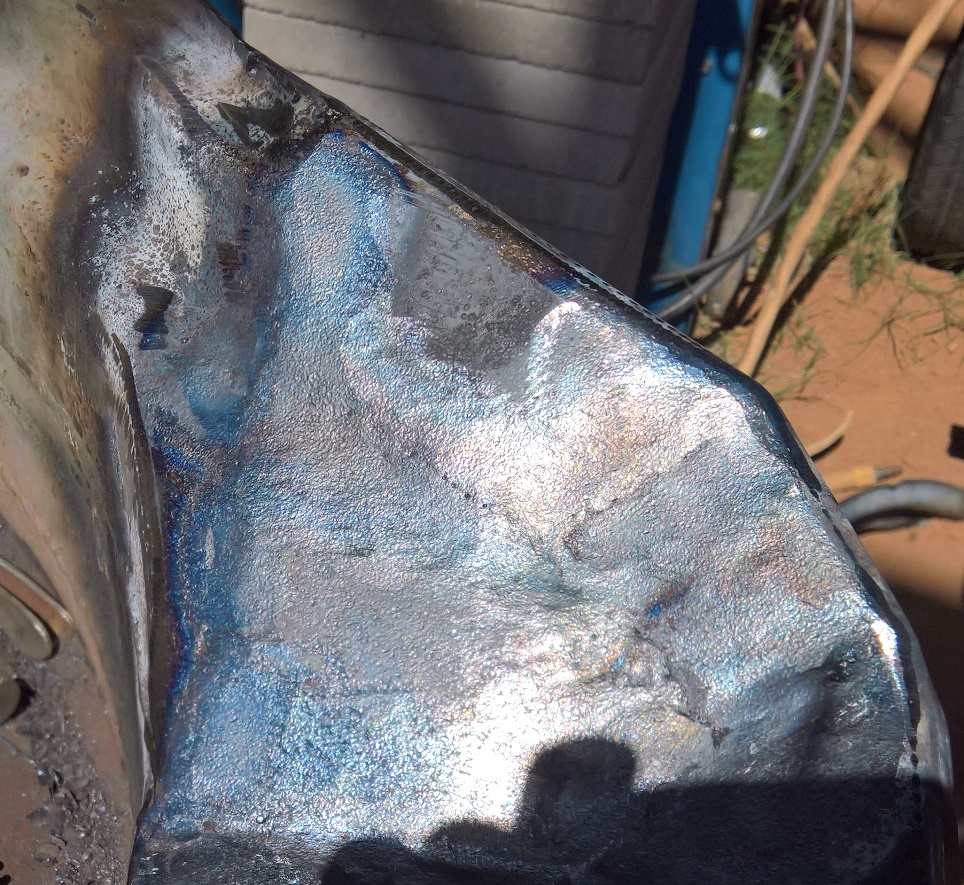
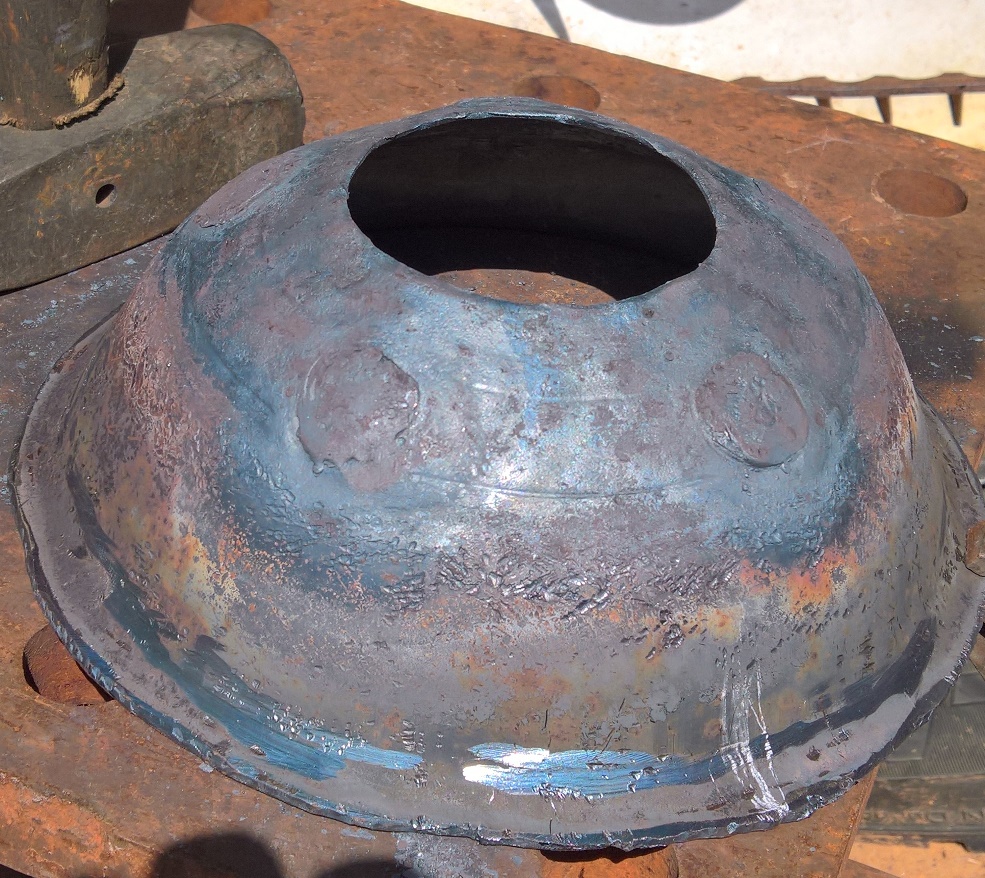
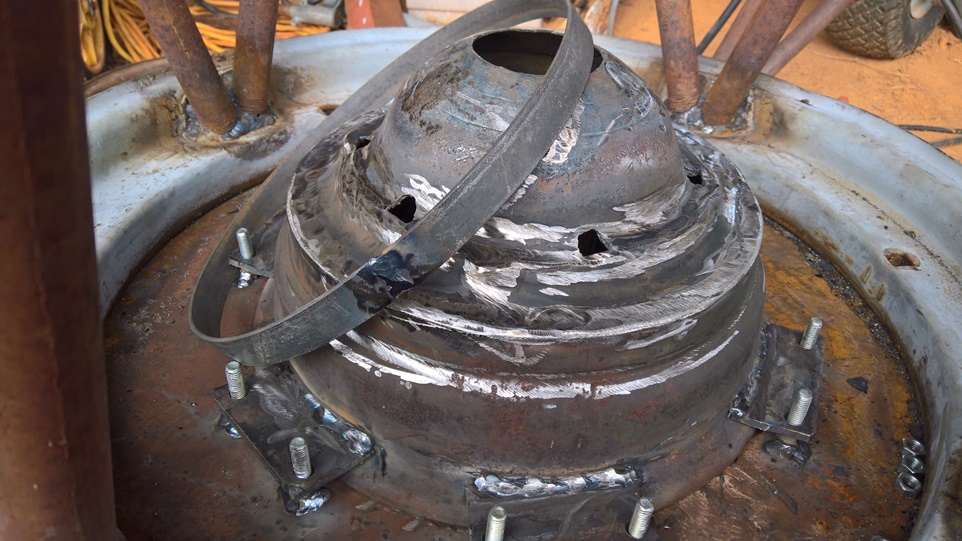
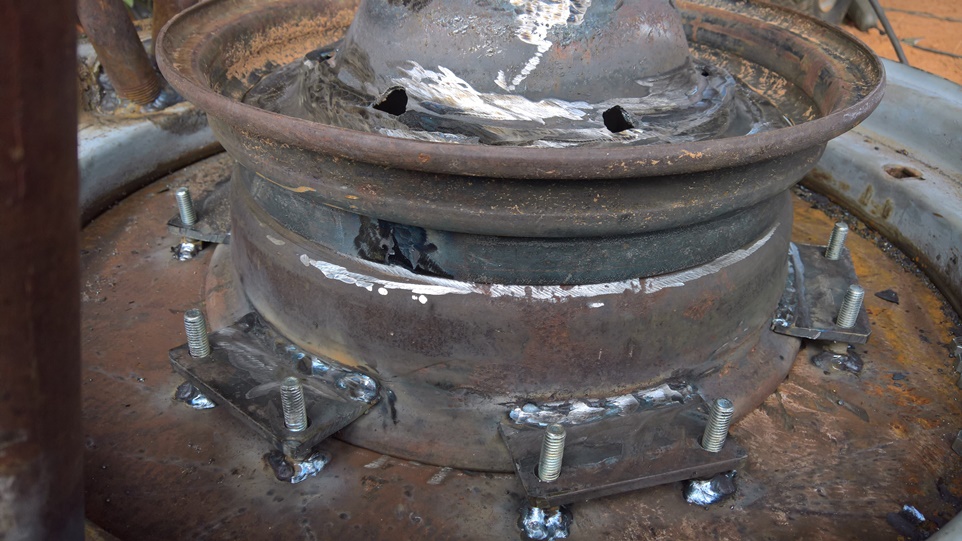
    28" wood / coal forge build-wp_20200517_15_50_14_profor.jpg
    Starting the apron
    28" wood / coal forge build-wp_20200517_17_19_04_profor.jpg

    28" wood / coal forge build-wp_20200518_15_51_38_profor.jpg
    after welding and grinding the welds I used my needle scaller to give it a hammered effect
    28" wood / coal forge build-wp_20200518_16_16_10_profor.jpg
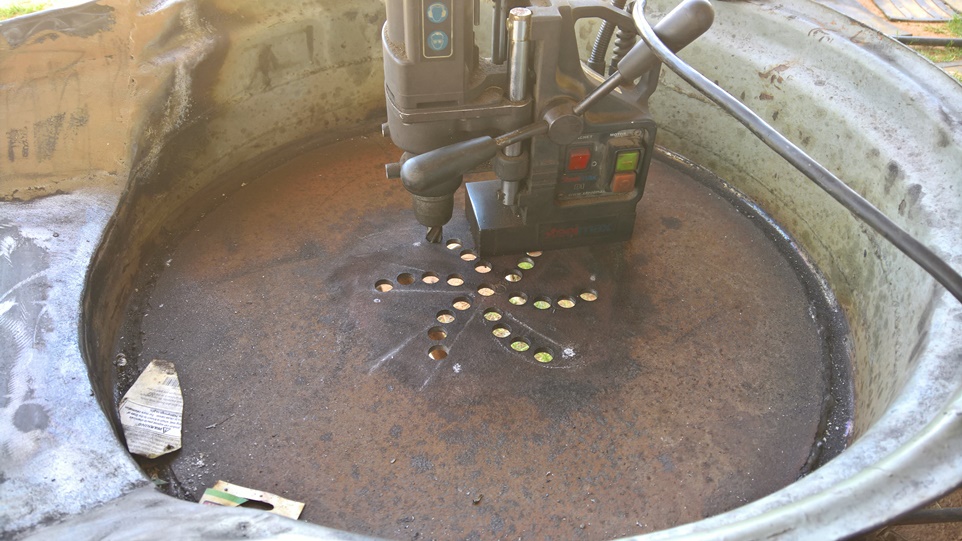
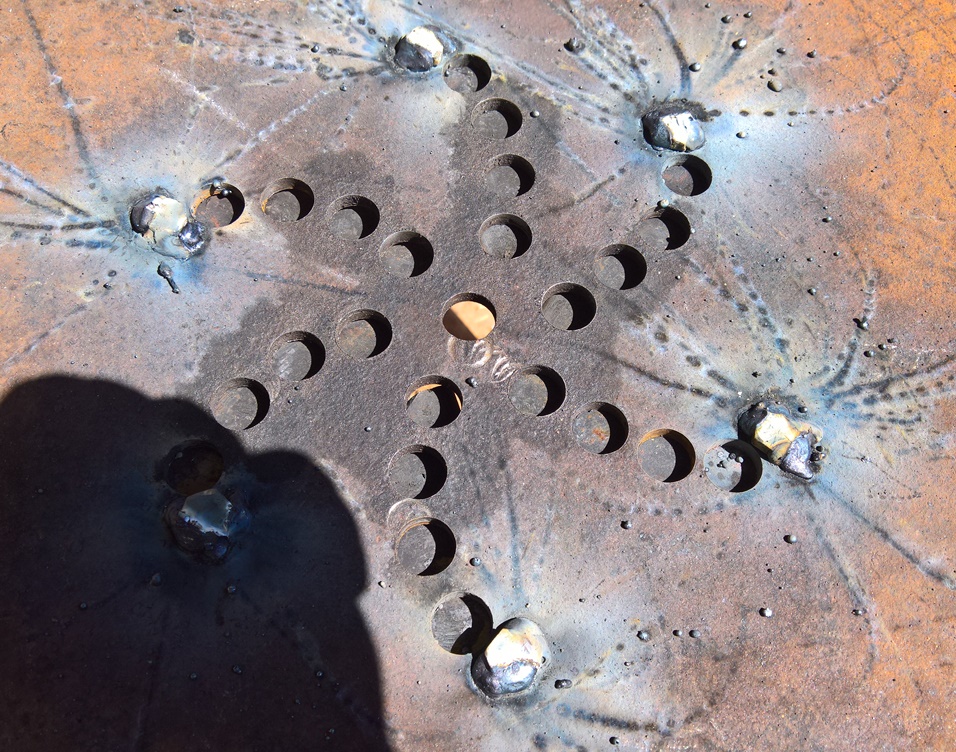
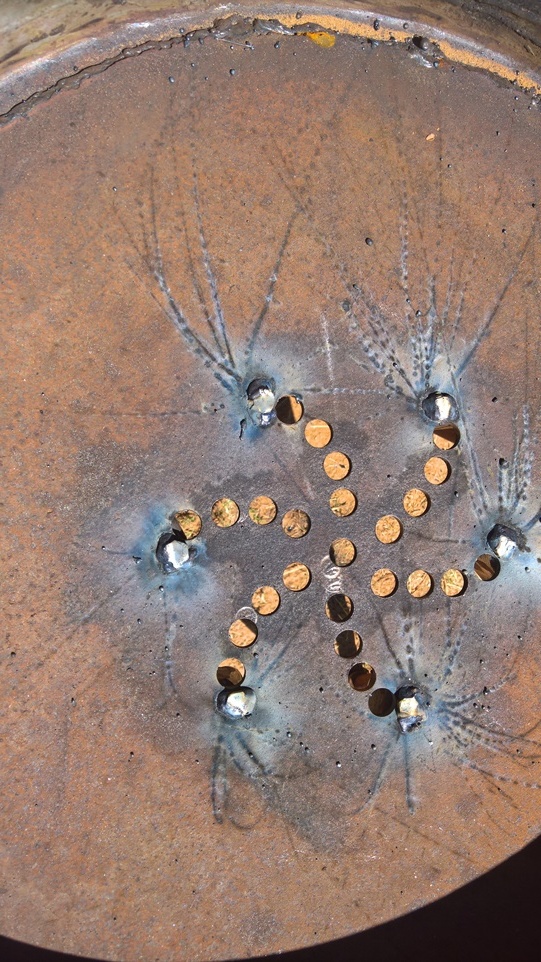
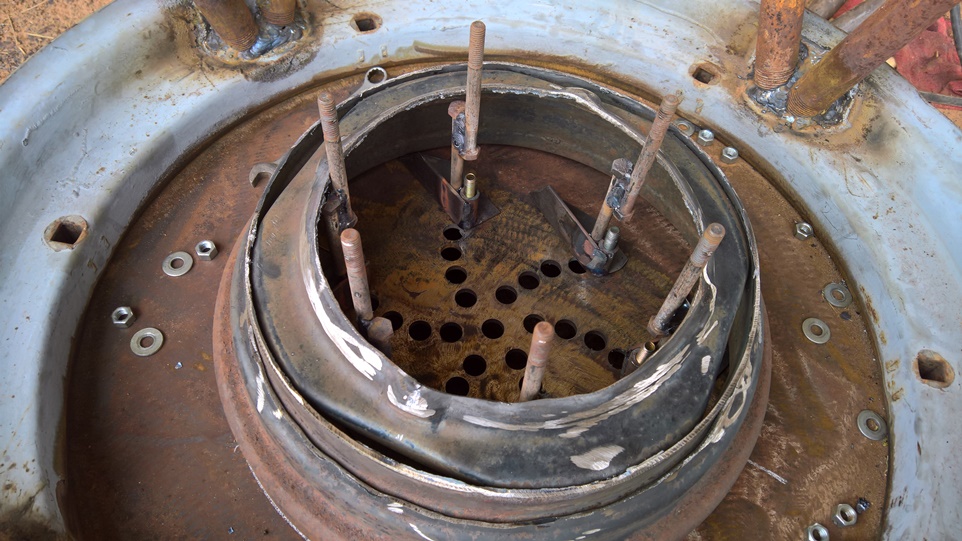
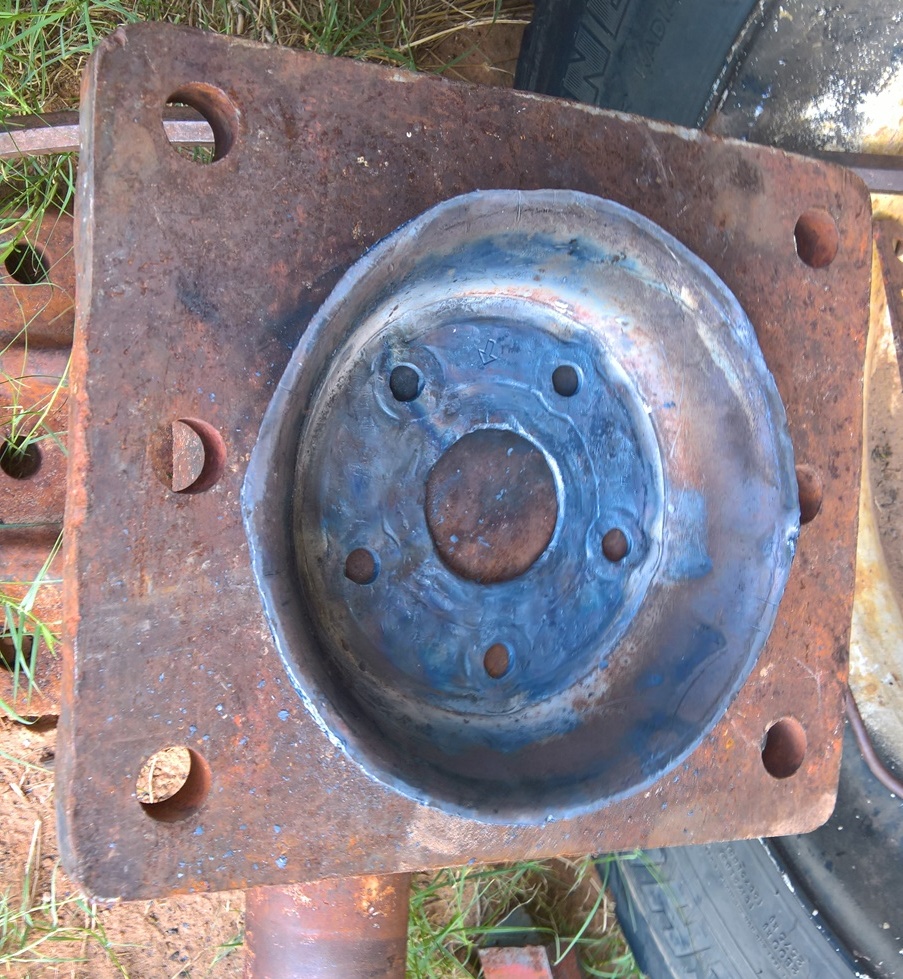
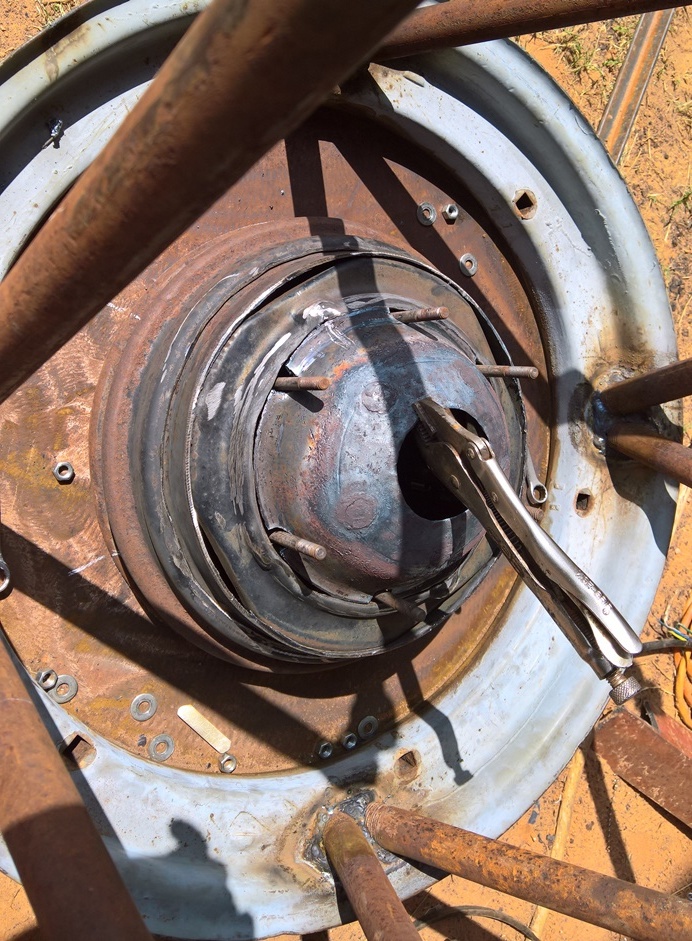
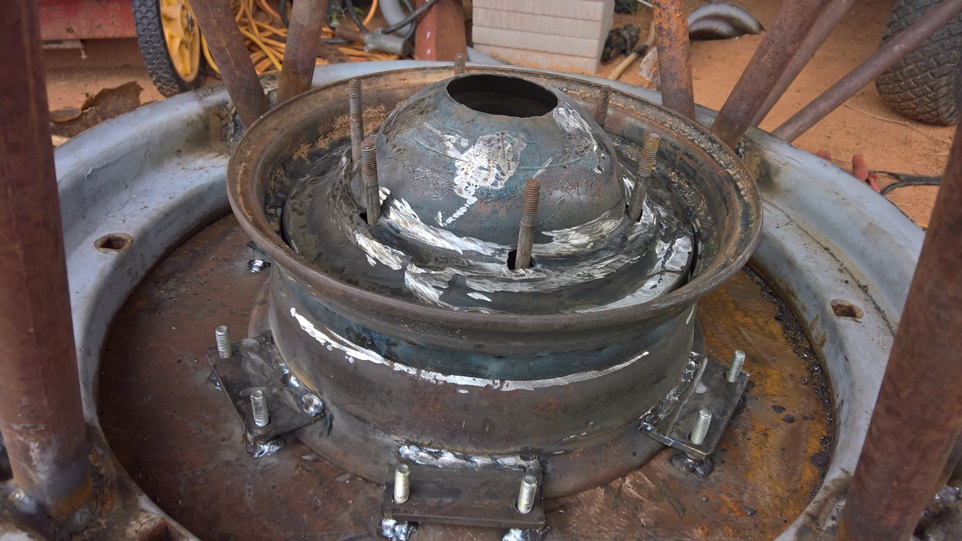
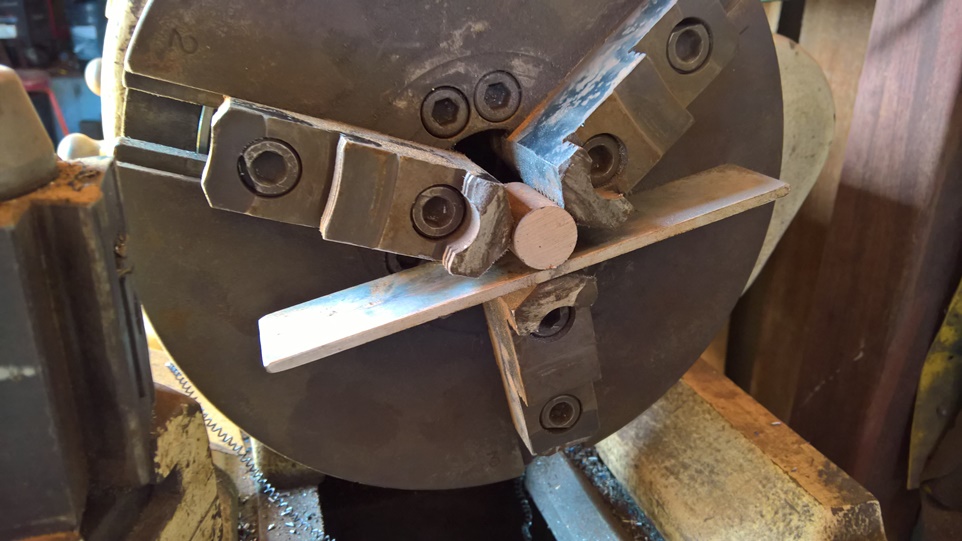
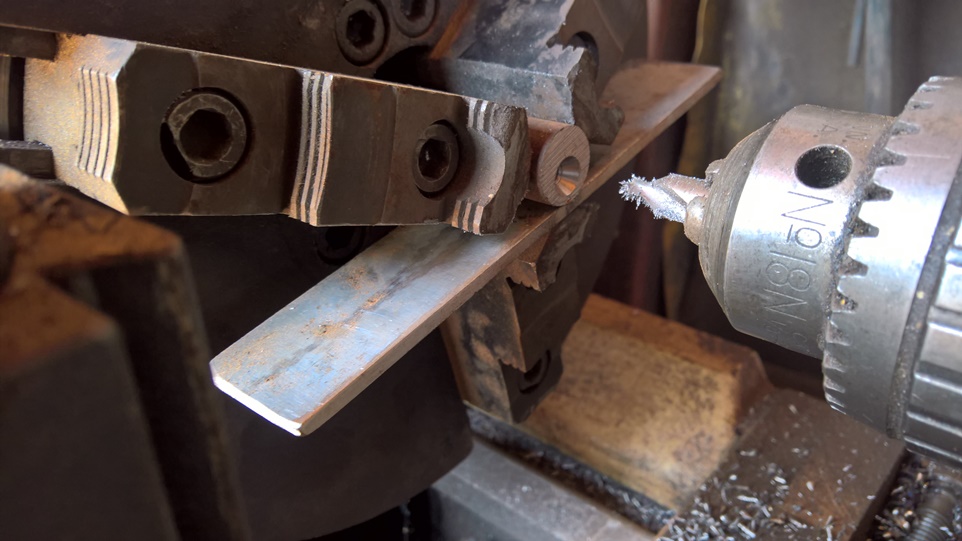
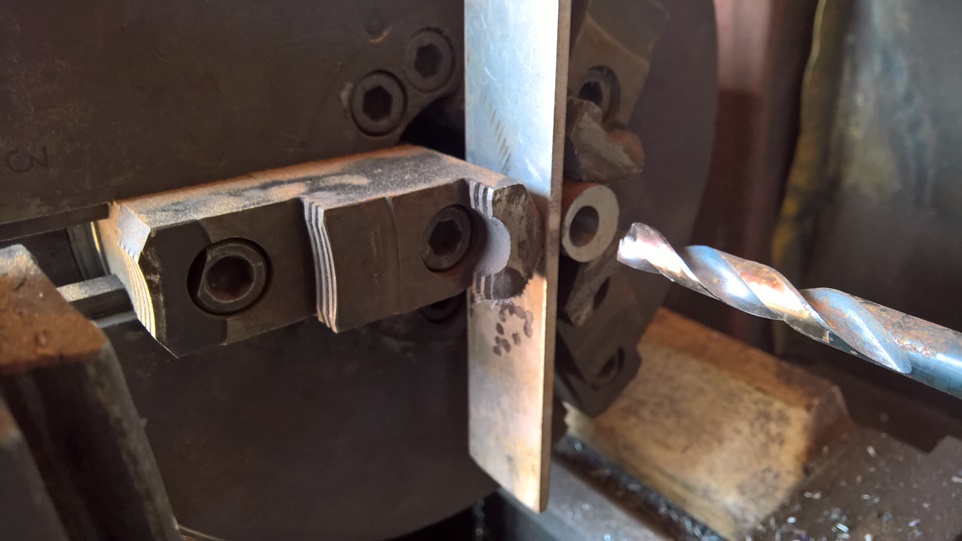
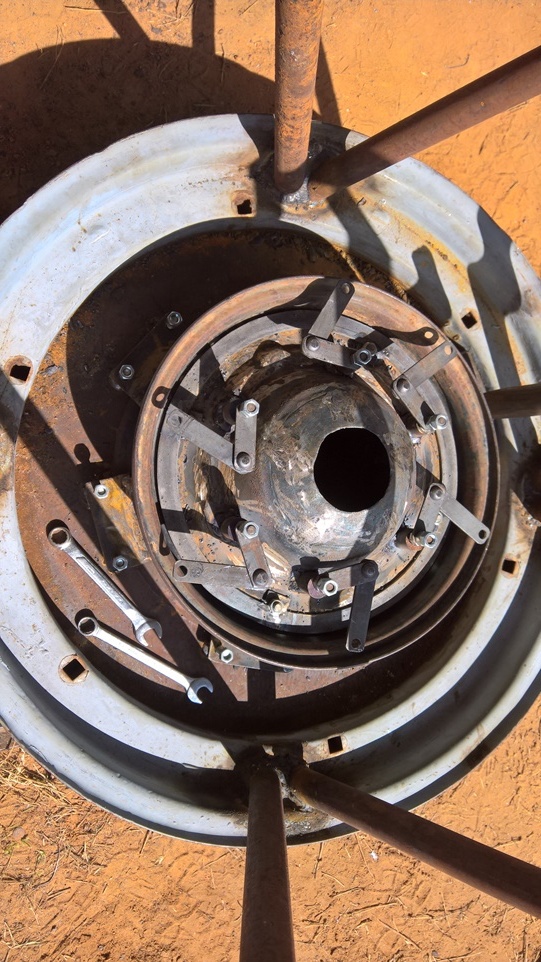
    drilling the air holes for the toyere I decided that I wanted an iris for air control and flame modulation this is why the holes are drilled in a spiral
    28" wood / coal forge build-wp_20200519_12_50_16_profor.jpg
    Shown here the iris is closed leaving only a single hole exposed
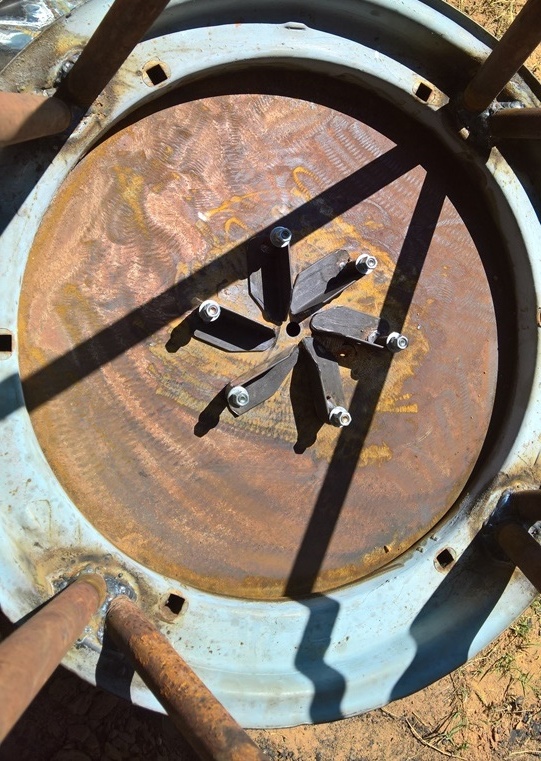
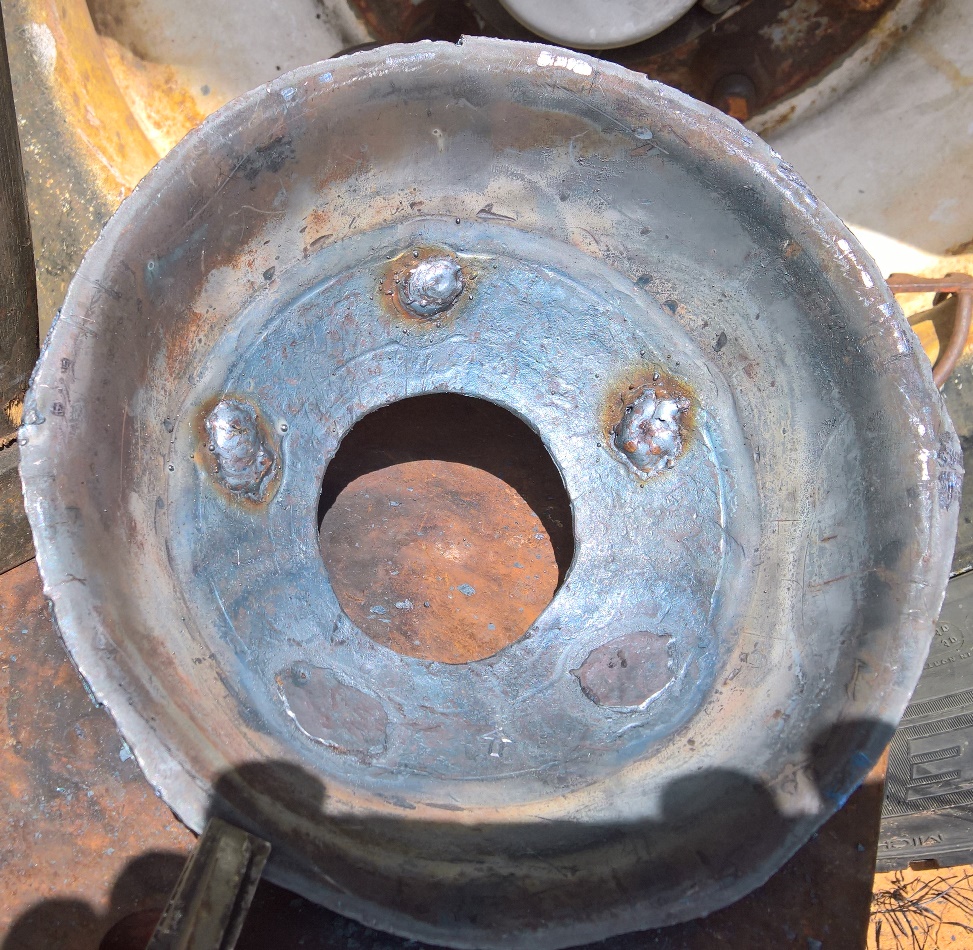
    28" wood / coal forge build-wp_20200521_16_01_55_profor.jpg
    Open phase 1
    28" wood / coal forge build-wp_20200521_16_02_29_profor.jpg
    Never try to tell me it can't be done
    When I have to paint I use KBS products

  2. The Following 9 Users Say Thank You to Frank S For This Useful Post:

    baja (May 26, 2020), Crusty (May 24, 2020), Drew1966 (May 31, 2020), DuayneI (May 24, 2020), Jon (May 25, 2020), rossbotics (Jun 1, 2020), Scotsman Hosie (May 26, 2020), Scotty12 (May 25, 2020), Sleykin (Jun 1, 2020)

  3. #2
    Supporting Member Frank S's Avatar
    Join Date
    Aug 2015
    Location
    Peacock TX
    Posts
    12,617
    Thanks
    2,677
    Thanked 11,111 Times in 5,391 Posts

    Frank S's Tools
    Forge post 2
    Open phase 2
    28" wood / coal forge build-wp_20200521_16_03_16_profor.jpg
    open phase 3
    28" wood / coal forge build-wp_20200521_16_04_03_profor.jpg
    full open
    28" wood / coal forge build-wp_20200521_16_04_58_profor.jpg
    the blades of the iris are made from bed frame angle left over from the battery box hold down project
    28" wood / coal forge build-wp_20200521_16_26_08_profor.jpg
    The main body of the toyere will be this 14" car rim
    28" wood / coal forge build-wp_20200521_16_36_13_profor.jpg
    with the center removed the iris blades open all the way to the edge of the rim when fully opened
    28" wood / coal forge build-wp_20200521_16_41_03_profor.jpg
    I really should clean the torch tip shown here the second bead of the rim is removed
    28" wood / coal forge build-wp_20200521_16_47_40_profor.jpg
    the center is placed upside down
    28" wood / coal forge build-wp_20200522_15_34_20_profor.jpg
    Requiring a way to open and close the iris blades I selected these used bolts and welded them together to give me the offset I needed to make them center over the pivot of the blades
    28" wood / coal forge build-wp_20200523_11_05_46_profor.jpg
    showing the control rods welded to the iris blades
    28" wood / coal forge build-wp_20200523_12_19_39_profor.jpg
    Never try to tell me it can't be done
    When I have to paint I use KBS products

  4. The Following 6 Users Say Thank You to Frank S For This Useful Post:

    baja (May 26, 2020), Crusty (May 24, 2020), Drew1966 (May 31, 2020), DuayneI (May 24, 2020), Scotsman Hosie (May 26, 2020), Sleykin (Jun 1, 2020)

  5. #3
    Supporting Member Frank S's Avatar
    Join Date
    Aug 2015
    Location
    Peacock TX
    Posts
    12,617
    Thanks
    2,677
    Thanked 11,111 Times in 5,391 Posts

    Frank S's Tools
    Forge post 3
    showing how the center is going to be fitted over the control rods
    28" wood / coal forge build-wp_20200523_12_21_02_profor.jpg
    Hammering out the center on Moilneer (Thor's hammer) the name given to what I use for an anvil by my wife
    28" wood / coal forge build-wp_20200523_12_43_36_profor.jpg
    the lug hole welded up and the cone shape started for the center of the toyere
    28" wood / coal forge build-wp_20200523_15_51_25_profor.jpg
    final shape
    28" wood / coal forge build-wp_20200523_16_00_26_profor.jpg
    More to follow tomorrow
    Never try to tell me it can't be done
    When I have to paint I use KBS products

  6. The Following 7 Users Say Thank You to Frank S For This Useful Post:

    baja (May 26, 2020), Crusty (May 24, 2020), Drew1966 (May 31, 2020), DuayneI (May 24, 2020), Scotsman Hosie (May 26, 2020), Sleykin (Jun 1, 2020), Toolmaker51 (May 25, 2020)

  7. #4
    Supporting Member Frank S's Avatar
    Join Date
    Aug 2015
    Location
    Peacock TX
    Posts
    12,617
    Thanks
    2,677
    Thanked 11,111 Times in 5,391 Posts

    Frank S's Tools
    So far not getting much done today
    Have the cone welded to the toyere housing and the slots of the rim welded up where the center piece was riveted to it. Everything is roughed together and before I can go further to tube around the iris blade control stems I need to make the bolting clamps to hold things in place then it is all about some much needed clean up to the welds
    Initial fit up
    28" wood / coal forge build-wp_20200523_16_12_05_profor.jpg
    welded up
    28" wood / coal forge build-wp_20200524_11_24_34_profor.jpg
    this pic shows a better view of the legs there will be some bracing but this can not be done until I have completed the toyere and the iris controls
    28" wood / coal forge build-wp_20200524_11_24_43_profor.jpg
    Never try to tell me it can't be done
    When I have to paint I use KBS products

  8. The Following 5 Users Say Thank You to Frank S For This Useful Post:

    baja (May 26, 2020), Drew1966 (May 31, 2020), DuayneI (May 24, 2020), Scotsman Hosie (May 31, 2020), Sleykin (Jun 1, 2020)

  9. #5
    Supporting Member Frank S's Avatar
    Join Date
    Aug 2015
    Location
    Peacock TX
    Posts
    12,617
    Thanks
    2,677
    Thanked 11,111 Times in 5,391 Posts

    Frank S's Tools
    today I came up with a real simple blade stem for controlling the iris blades but didn't get all 6 of them finished as I was not able to spend much time working on the forge pictures tomorrow
    Never try to tell me it can't be done
    When I have to paint I use KBS products

  10. #6
    Supporting Member Frank S's Avatar
    Join Date
    Aug 2015
    Location
    Peacock TX
    Posts
    12,617
    Thanks
    2,677
    Thanked 11,111 Times in 5,391 Posts

    Frank S's Tools
    I did get a bit more done in-between having my mechanic neighbor come over for a chat and before the storms started to set in
    28" wood / coal forge build-wp_20200524_18_18_01_profor.jpg

    28" wood / coal forge build-wp_20200524_18_21_45_profor.jpg

    28" wood / coal forge build-wp_20200524_18_18_10_profor.jpg

    28" wood / coal forge build-wp_20200524_18_19_45_profor.jpg

    28" wood / coal forge build-wp_20200524_18_39_56_profor.jpg

    28" wood / coal forge build-wp_20200524_18_40_18_profor.jpg
    Never try to tell me it can't be done
    When I have to paint I use KBS products

  11. The Following 5 Users Say Thank You to Frank S For This Useful Post:

    baja (May 26, 2020), Drew1966 (May 31, 2020), madmick77 (May 24, 2020), Scotsman Hosie (May 26, 2020), Sleykin (Jun 1, 2020)

  12. #7
    Supporting Member Frank S's Avatar
    Join Date
    Aug 2015
    Location
    Peacock TX
    Posts
    12,617
    Thanks
    2,677
    Thanked 11,111 Times in 5,391 Posts

    Frank S's Tools
    There is always something that gets in the way of completing some of my projects. and this project is no exception. If it was not repairing a aluminum fuel tank for another welder , rebuilding my 50 year old transmission jack or freshening up the automatic transmission I needed the jack for in the first place then re instlling it in the Dodge 2500 to having to completely rebuild a 42" mower deck for my wife's lawn tractor.
    However I did manage to get the stems re made the only pictures I took of them are blurred so badly I can hardly make out what they are so I will just describe them for now until I take some new pictures after cleaning the camera lenz.
    First I cut off all of the stems leaving about an inch sticking up then I remounted the blades with a single nut instead of using 2 nuts to lock them together I slightly deformed the shape of the nut to make it a friction locked nut. this left about half an inch of the pivoting bolt exposed. then I bored half of the threads out of 6 3/8 coupling nuts then screwed them to lengths of 3/8" all thread locking them in place with more nuts these nuts also serve as length or height limiters to hold the stems in the proper relationship to the blades and the toyere housing I then bent half round loops out of 1/8 by 1/2" flat bar and welded them to the sides of the coupling nuts now the bored out end of the coupling nut can sit over the exposed portion of the blade pivot bolts and the loops fit over the stubs of the old stems, so when the stems are rotated by the linkages outside f the housing the loops will force the blades to turn exposing or covering the holes in the forge bottom as required for air flow and heat adjustments. Maybe I will finish up the dodge pickup tomorrow and get it out of my way before my truck driver friend shows up Tuesday with another project to do to his truck. And wouldn't you know it this evening a mechanic friend of mine showed up with a 2500 Chevrolet with transmission problems so now I'm not only winding up with welding jobs that my welder neighbor can not do but I am going to have to rebuild a transmission for a mechanic because he can't do it. What's next someone showing up with an airplane? Sorry I draw the line on getting involved with the FAA
    Never try to tell me it can't be done
    When I have to paint I use KBS products

  13. The Following User Says Thank You to Frank S For This Useful Post:

    Sleykin (Jun 1, 2020)

  14. #8
    Supporting Member Frank S's Avatar
    Join Date
    Aug 2015
    Location
    Peacock TX
    Posts
    12,617
    Thanks
    2,677
    Thanked 11,111 Times in 5,391 Posts

    Frank S's Tools
    quite a bit of progress today all things considered
    First off I had to make a retaining ring for the iris blade control disk
    the retaining ring is 1/8 by 3/4" flat bar bent the hardway. I used my bender roller to accomplish this
    Bender roller combo
    28" wood / coal forge build-wp_20200525_10_15_38_profor.jpg

    28" wood / coal forge build-wp_20200525_11_02_57_profor.jpg
    setting up for offset drilling of the iris blade stem support sleeve
    28" wood / coal forge build-wp_20200525_12_58_14_profor.jpg

    28" wood / coal forge build-wp_20200525_12_59_11_profor.jpg

    28" wood / coal forge build-wp_20200525_13_00_32_profor.jpg
    the retaining ring the stem supports and the control linkages are now in place
    I just have to weld on some bolts to the control disk then make a flange and "T" for the air supply and the cleanout of the toyere then the underside will be pretty much done
    28" wood / coal forge build-wp_20200525_16_32_43_profor.jpg
    Never try to tell me it can't be done
    When I have to paint I use KBS products

  15. The Following 9 Users Say Thank You to Frank S For This Useful Post:

    baja (May 26, 2020), clydeman (May 25, 2020), Drew1966 (May 31, 2020), Jon (May 25, 2020), Lee Bell (May 25, 2020), Scotsman Hosie (May 26, 2020), suther51 (May 25, 2020), thevillageinn (May 25, 2020), toeless joe (May 25, 2020)

  16. #9
    Supporting Member JoeVanGeaux's Avatar
    Join Date
    Jun 2018
    Location
    Magnolia, TX
    Posts
    168
    Thanks
    160
    Thanked 70 Times in 53 Posts

    Frank's Forge

    Awesome piece of work! BUT, I can't tell you how much I was looking forward to seeing a video of your forge in action at the end of your posting!

    So.... how about a video?? Please??

  17. The Following User Says Thank You to JoeVanGeaux For This Useful Post:

    Sleykin (Jun 1, 2020)

  18. #10
    Supporting Member Frank S's Avatar
    Join Date
    Aug 2015
    Location
    Peacock TX
    Posts
    12,617
    Thanks
    2,677
    Thanked 11,111 Times in 5,391 Posts

    Frank S's Tools
    Quote Originally Posted by JoeVanGeaux View Post
    Awesome piece of work! BUT, I can't tell you how much I was looking forward to seeing a video of your forge in action at the end of your posting!

    So.... how about a video?? Please??
    I rarely do videos unless there is a particular point I can not stress any other way such as a wrong sound coming from an engine.
    I find videos are more of a waste of time than anything else. There is rarely anything that I do using only 1 hand and that doesn't leave one free to shoot a video.
    I don't even bother to watch 90% of the videos here on HMT and when I do watch them it is usually at 2x speed slowing only to catch a particular bit of content. Entertainment videos excepted.
    But who knows once I turn it up right get the fire clay mixture in place and the a temporary blower connected I just well might make a video ot it heating up and show the operation of the iris valve. I bought a 50 lb bag of charcoal this morning to use as a test run. I'm not ready to shell out $300.00 + $400.00 shipping for a 2,000 lb pallet of coal just yet when 1.6 tons of hard mesquite has the same potential total BTU output as a ton of Bituminous coal or anthracite coal of course bituminous has more Sulphur and other impurities than anthracite but it is quite a bit cheaper
    I might find that converting my wood into charcoal will give a lot better results as well, because many of the impurities such as creosote and moisture gets burned away in a pressure cooker of sorts.
    I have a single particular job which requires the use of a forge and the job would have been too large for a smaller forge and I didn't want to have to rig up 2 #10 rose bud torches and burn up 2 bottles of oxygen and acetylene just to heat it up. I have been putting off the job for 5 years now because I didn't have a forge or any scrap materials to build one the size I wanted.
    Once it is finished and tested I will have to build a hood for it for fume extraction. If for nothing else the forge could be used to add some heat to my shop next winter assuming I get sides and doors on it by then
    Never try to tell me it can't be done
    When I have to paint I use KBS products

  19. The Following User Says Thank You to Frank S For This Useful Post:

    Sleykin (Jun 1, 2020)

Thread Information

Users Browsing this Thread

There are currently 1 users browsing this thread. (0 members and 1 guests)

Bookmarks

Posting Permissions

  • You may not post new threads
  • You may not post replies
  • You may not post attachments
  • You may not edit your posts
  •