Free 186 More Best Homemade Tools eBook:  
Get 2,000+ tool plans, full site access, and more.

User Tag List

Results 1 to 8 of 8

Thread: Alignment drift punch

  1. #1
    Supporting Member Frank S's Avatar
    Join Date
    Aug 2015
    Location
    Peacock TX
    Posts
    11,224
    Thanks
    1,986
    Thanked 8,789 Times in 4,207 Posts

    Frank S's Tools

    Alignment drift punch

    The other day I was replacing all 3 motor mounts on a Mack truck, there is always a lot of drama involved in doing this, no matter the make of the truck. Some worst that others. With this particular model of Mack the only real drama is being able to get to the mounts or getting the old ones out of the truck once you manage to get the bolts removed.
    Reinstalling them is hardly any less tedious. Once you have one bolted to the frame it is time to lower the engine back onto the mount then drop the 2 long bolts in an tighten them up. However on this model as well as many others there is usually a spacer block to position the engine at the correct height these are doweled to the mount and sometimes to the matting support on the flywheel housing by a single dowel either on top/ bottom or both, During installation these blocks can rotate slightly or the engine can shift just enough to prevent the bolts from passing through all corresponding components.
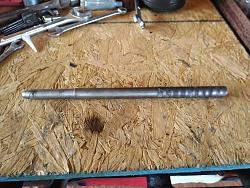
    To assist in alignment the best thing is to pass a drift through them, the drift needs to have a long enough straight shank near to the hole diameter with a slight short taper to bring everything in alignment, this is especially true when aligning multiple components whether a motor mount or structural steel
    here is my alignment drift for this application.
    I slightly knurled one end to identify it as a tool and not just some machined piece of stock to be later forgotten what it had been made for
    Alignment drift punch-img_20210625_134046dr.jpg

    186 More Best Homemade Tools eBook
    Never try to tell me it can't be done
    When I have to paint I use KBS products

  2. The Following 5 Users Say Thank You to Frank S For This Useful Post:

    Jon (Jul 1, 2021), luvmygto (Jun 29, 2021), mdhatter3 (Jun 28, 2021), Scotty1 (Jun 28, 2021), sossol (Jun 28, 2021)

  3. #2
    Content Editor
    Supporting Member
    DIYer's Avatar
    Join Date
    Aug 2013
    Posts
    3,056
    Thanks
    773
    Thanked 1,852 Times in 1,653 Posts


    Thanks Frank S! We've added your Alignment Drift Punch to our Engine category,
    as well as to your builder page: Frank S's Homemade Tools. Your receipt:


    2000 Tool Plans

  4. #3
    Supporting Member
    Join Date
    Apr 2016
    Location
    Buffalo, NY
    Posts
    405
    Thanks
    489
    Thanked 54 Times in 49 Posts
    Very nice idea. I’ve rounded the ends of bolts to make them easier to start. It definitely works. Thanks.

  5. #4
    Supporting Member Frank S's Avatar
    Join Date
    Aug 2015
    Location
    Peacock TX
    Posts
    11,224
    Thanks
    1,986
    Thanked 8,789 Times in 4,207 Posts

    Frank S's Tools
    Quote Originally Posted by mdhatter3 View Post
    Very nice idea. I’ve rounded the ends of bolts to make them easier to start. It definitely works. Thanks.
    yep been there as well.
    In this case I actually had to use 2 drifts to get the mount to align up enough to start the bolts, but 1 of the drifts was just a piece of round stock with a slight champer that I drove up from the bottom as it pushed the tapered drift upwards then put the drift in the other hole once both holes were aligned the mount stayed in place.
    After 1,157,980 miles the old mounts were bad enough to have allowed the torque of the engine to shift in the frame about 1/8" and had settled 1/4"
    The mounts hadn't failed and would probably last another 10 years if on a stationary engine mounting like a generator or a water pump, but they were to a point of beginning to allow the transmittal of annoying vibrations through the truck
    Never try to tell me it can't be done
    When I have to paint I use KBS products

  6. #5
    Supporting Member Toolmaker51's Avatar
    Join Date
    Feb 2016
    Location
    Midwest USA
    Posts
    5,333
    Thanks
    7,042
    Thanked 2,981 Times in 1,893 Posts

    Toolmaker51's Tools
    When a long taper aligns holes (usually 2) it is a drift pin/ punch, usually termed by mechanics. Iron workers use the idea, but call it a spud. Their heavier version is a bull pin; headed for striking with a hammer. The tool is shifted around so a fastener can be inserted in adjacent position. After one hole receives fastener, the remainder are closer yet to alignment.

    When a near full size pin awaits fasteners, it is a slave pin/ punch. This is a particularity on pivoting members. A drift doesn't achieve very good axial alignment, compared to a cylinder.
    Sincerely,
    Toolmaker51
    ...we'll learn more by wandering than searching...

  7. #6
    Supporting Member Frank S's Avatar
    Join Date
    Aug 2015
    Location
    Peacock TX
    Posts
    11,224
    Thanks
    1,986
    Thanked 8,789 Times in 4,207 Posts

    Frank S's Tools
    Quote Originally Posted by Toolmaker51 View Post
    When a long taper aligns holes (usually 2) it is a drift pin/ punch, usually termed by mechanics. Iron workers use the idea, but call it a spud. Their heavier version is a bull pin; headed for striking with a hammer. The tool is shifted around so a fastener can be inserted in adjacent position. After one hole receives fastener, the remainder are closer yet to alignment.

    When a near full size pin awaits fasteners, it is a slave pin/ punch. This is a particularity on pivoting members. A drift doesn't achieve very good axial alignment, compared to a cylinder.
    Hence the name drift punch much shorter than drift slave pin or drift slave punch
    Oh yes and you forgot the iron workers weevil bar usually a cylindrical or hex bar about 29 to 36 inches long from 1 1/4 to 1 1/2" in diameter 6 to 12 inches taper on 1 end down to 1/2" with a dog knot or a collar about 8 inches from the other end to keep it from slipping out of the ring on the tool belt.
    Drop one of those 29 stories and it will pass all the way through a Lincoln continental and pin it to the ground . I saw it happen once
    Never try to tell me it can't be done
    When I have to paint I use KBS products

  8. #7
    Supporting Member Toolmaker51's Avatar
    Join Date
    Feb 2016
    Location
    Midwest USA
    Posts
    5,333
    Thanks
    7,042
    Thanked 2,981 Times in 1,893 Posts

    Toolmaker51's Tools
    Weevil bar? New one on me, for sure.

    An issue just occurred to me, regarding bad copies of good tools.

    Good Tools, for example; there are dozens of differently patterned 'bars', designs related to wide range of work. A couple versions I like are 2-3 feet long, one end bent into either a pinch bar to start a lift, or lady-foot, the other decent taper.
    The old ones are correct, as are newly made; if brand names; tapers gradual enough to actually line up two holes, and prying tip fine enough to enter a small gap. Those generalizations of course, make those features proportional to overall length.

    Bad Tools. Despite hordes of good pieces to COPY, tapers wind up too short for alignment function, leverage ends too coarse for all but a serious gap.

    Bad tools assure sales of quality product, but in lower quantities.
    Folks unaware of differences, can't realize crummy versions hamper them.
    It's obvious, those who make bad tools probably don't have experience using proper equipment.

    Speaking of which; here's a trick to positioning equipment.
    Pinching easiest with two matching bars. Long enough, it's quite possible to walk a fair size machine many feet with little effort, and sometimes less trouble than skates/ rollers. Once machine is near intended spot, pinch up end you want to 'steer', and poke two tapers in there. Pinch adjacent corner, will move quite easily.
    Sincerely,
    Toolmaker51
    ...we'll learn more by wandering than searching...

  9. #8
    Supporting Member Frank S's Avatar
    Join Date
    Aug 2015
    Location
    Peacock TX
    Posts
    11,224
    Thanks
    1,986
    Thanked 8,789 Times in 4,207 Posts

    Frank S's Tools
    Now that you brought up the subject of the lady-foot bar. I find that almost all have a decent taper to length ratio save for the absolute bottom bargain basement verity.
    This is where any semblance of a useful lady-foot ends though. Even long standing high end branded ones far too often get this end of the bar completely wrong by adding way too much curve angle. I've seen some which the tip can not be inserted under an object without the bar being held almost horizontal over the object in question, this usually means that if the part is more than an inch tall you are never going to get the tip under it. Some have a very pronounced tall heal and a poor curvature angle.
    Some may know what we call the lady-foot bar as a Heal bar or the Military term as bar long tapered with rolled head or just roll head pry bar.
    And many iron workers use the name sleever bar instead of the term weevil bar


    186 More Best Homemade Tools eBook
    Never try to tell me it can't be done
    When I have to paint I use KBS products

Thread Information

Users Browsing this Thread

There are currently 1 users browsing this thread. (0 members and 1 guests)

Bookmarks

Posting Permissions

  • You may not post new threads
  • You may not post replies
  • You may not post attachments
  • You may not edit your posts
  •