Free 186 More Best Homemade Tools eBook:  
Get 2,000+ tool plans, full site access, and more.

User Tag List

Results 1 to 9 of 9

Thread: Broaching on the Lathe

  1. #1
    Supporting Member jjr2001's Avatar
    Join Date
    Jun 2016
    Posts
    915
    Thanks
    1,182
    Thanked 2,045 Times in 553 Posts

    jjr2001's Tools

    Broaching on the Lathe

    Not a new idea but I thought I would post my latest use of a tool I did not have.
    The price of broaching sets is right up there to the point of tools I would like but
    have not purchased yet. Since my new pulley needed a keyway slot and it was
    made from aluminum I thought I would try the lathe method.

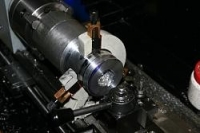
    On hand were a couple of cutoff tool bits that I don't use on my lathe since they
    are a bit on the large size for a mini lathe. So I mounted one HORIZONTALLY in a
    tool holder and went to work. The pully was still attached to the 3.5" chunk of
    aluminum round stock. I only took .001" on each pass to keep the pressure down.
    After 30 minutes I had "broached" a 4mm keyway in my new pulley. Since I was
    broaching in a blind hole I added an extra step to move the cut curl inside the
    pulley after each cut. This doubles the time to complete but was necessary
    to get the "chip curls" out.

    One thing to note is the steady rest. It is being as a spindle lock in this picture to
    hold the pulley firm and not allow it to rotate. Don't forget to unlock it prior to
    running the lathe with power! No I did not do that, just thought I would mention it for safety reasons.

    This should work with steel but I would take a .0005" cut for the first attempt.

    Cheers, JR
    Attached Thumbnails Attached Thumbnails Broaching on the Lathe-img_2183.jpg   Broaching on the Lathe-img_2184.jpg   Broaching on the Lathe-img_2185.jpg   Broaching on the Lathe-img_2186.jpg   Broaching on the Lathe-img_2187.jpg  

    Broaching on the Lathe-img_2188.jpg  

    186 More Best Homemade Tools eBook
    Last edited by jjr2001; Dec 4, 2018 at 11:43 AM.

  2. The Following 6 Users Say Thank You to jjr2001 For This Useful Post:

    Home-PC (Mar 19, 2021), Jon (Dec 4, 2018), Lee Bell (Dec 4, 2018), Paul Jones (Dec 6, 2018), PJs (Dec 6, 2018), Seedtick (Dec 4, 2018)

  3. #2
    Supporting Member Let'sLearnSomething's Avatar
    Join Date
    Nov 2018
    Posts
    67
    Thanks
    7
    Thanked 193 Times in 31 Posts

    Let'sLearnSomething's Tools
    thats awesome tool bro

    2000 Tool Plans

  4. The Following 2 Users Say Thank You to Let'sLearnSomething For This Useful Post:

    jjr2001 (Dec 4, 2018), suther51 (Dec 4, 2018)

  5. #3
    Supporting Member Toolmaker51's Avatar
    Join Date
    Feb 2016
    Location
    Midwest USA
    Posts
    5,331
    Thanks
    7,042
    Thanked 2,980 Times in 1,893 Posts

    Toolmaker51's Tools
    Great job jjr2001. Times call for broaching without standard means. Cutoff blades are made in enough width/ height sizes to render most keyways. I can't say whether flat or hollow ground type work better. I do think flat tapered blades are stiffer than T's, helpful when goal is depth. A cutoff tool normal edge will shear, but found a hook [per broach or bandsaw tooth ] break chips best. Easy with an abrasive cut off wheel.
    If possible, drill through part wall, perpendicular and just beyond end of keyway. When cutting blind, the relief lessens crowding.
    Last edited by Toolmaker51; Dec 5, 2018 at 02:32 PM. Reason: silly me. wtf's a ''tooth bandsaw'', other than painful?
    Sincerely,
    Toolmaker51
    ...we'll learn more by wandering than searching...

  6. The Following 3 Users Say Thank You to Toolmaker51 For This Useful Post:

    jjr2001 (Dec 5, 2018), Paul Jones (Dec 6, 2018), PJs (Dec 6, 2018)

  7. #4
    Supporting Member jjr2001's Avatar
    Join Date
    Jun 2016
    Posts
    915
    Thanks
    1,182
    Thanked 2,045 Times in 553 Posts

    jjr2001's Tools
    Thanks for the tips Toolmaker51. Next time I think I will grind a hook on the cutoff blade.

    Cheers, JR

  8. #5

    Join Date
    Mar 2012
    Location
    Virginia Beach, VA
    Posts
    1
    Thanks
    0
    Thanked 0 Times in 0 Posts
    Quote Originally Posted by jjr2001 View Post

    One thing to note is the steady rest. It is being as a spindle lock in this picture to
    hold the pulley firm and not allow it to rotate. Don't forget to unlock it prior to
    running the lathe with power! No I did not do that, just thought I would mention it for safety reasons.
    Nice technique, but I have questions about your steady rest. It looks like a Plamgren. I'm looking for a steady rest for my Logan 400 9" lathe and wonder about your specifics and if I could adapt it to my lathe.

  9. #6
    Supporting Member jjr2001's Avatar
    Join Date
    Jun 2016
    Posts
    915
    Thanks
    1,182
    Thanked 2,045 Times in 553 Posts

    jjr2001's Tools
    Hello Hoyt and thanks for checking in.

    Not sure where to find a stead rest for the Logan.
    My lathe is a small one known as a mini lathe and it is only 7x16" and my steady is from LMS.
    Littlemachineshop.com has steadies for that lathe and some that are larger.
    It might be possible to modify one of them to fit the bed or your Logan.
    Grizzly might also have some that might be modified for the Logan.

    There also some builds on Homemadetools.net that could be built to use on the Logan.

    Homemade Tools Search: steady rest - HomemadeTools.net

    Cheers, JR

  10. The Following 3 Users Say Thank You to jjr2001 For This Useful Post:

    Home-PC (Mar 19, 2021), Paul Jones (Dec 6, 2018), PJs (Dec 6, 2018)

  11. #7
    Supporting Member Paul Jones's Avatar
    Join Date
    May 2014
    Location
    Del Mar, California
    Posts
    1,231
    Thanks
    5,810
    Thanked 1,441 Times in 655 Posts

    Paul Jones's Tools
    JR,

    As you stated, the broaching operation on the metal lathe is not very fast when taking only 0.001" per pass but it does work. I too did a similar operation with a larger 12" swing lathe but never moved in more than 0.001" to 0.002" per pass without too much "digging" into the metal (see http://www.homemadetools.net/forum/b...7110#post23249 ).

    Lathe broaching works okay for one-off operations for key dimensions where one does not have the exact key way broach (in my case I don't have metric-sized broaches).

    Thanks for posting,

    Paul
    Last edited by Paul Jones; Dec 6, 2018 at 02:29 PM. Reason: URL error

  12. The Following 2 Users Say Thank You to Paul Jones For This Useful Post:

    Home-PC (Mar 19, 2021), jjr2001 (Dec 6, 2018)

  13. #8
    Supporting Member jjr2001's Avatar
    Join Date
    Jun 2016
    Posts
    915
    Thanks
    1,182
    Thanked 2,045 Times in 553 Posts

    jjr2001's Tools
    Thanks Paul, I checked out your post and that reminded me of the lathe broaching tools that I have seen here on HMT and other sites.
    I have on my list of to make tools this:
    Toolpost slotting tool - mikesworkshop
    Looks like a lot of leverage so a larger cut could be made. Maybe next time!

    Cheers, JR

  14. The Following 2 Users Say Thank You to jjr2001 For This Useful Post:

    Home-PC (Mar 19, 2021), Paul Jones (Dec 14, 2018)

  15. #9
    Content Editor
    Supporting Member
    DIYer's Avatar
    Join Date
    Aug 2013
    Posts
    3,056
    Thanks
    772
    Thanked 1,852 Times in 1,653 Posts


    Thanks jjr2001! We've added your Lathe Broaching Method to our Machining category,
    as well as to your builder page: jjr2001's Homemade Tools. Your receipt:


    186 More Best Homemade Tools eBook

  16. The Following User Says Thank You to DIYer For This Useful Post:

    jjr2001 (Dec 11, 2018)

Thread Information

Users Browsing this Thread

There are currently 1 users browsing this thread. (0 members and 1 guests)

Tags for this Thread

Bookmarks

Posting Permissions

  • You may not post new threads
  • You may not post replies
  • You may not post attachments
  • You may not edit your posts
  •