Free 186 More Best Homemade Tools eBook:  
New: 300+ fresh build posts/day from 275 forums → BuildThreads.com

User Tag List

Page 1 of 3 1 2 3 LastLast
Results 1 to 10 of 24

Thread: A different style boring head

Hybrid View

  1. #1
    Supporting Member Frank S's Avatar
    Join Date
    Aug 2015
    Location
    Peacock TX
    Posts
    12,623
    Thanks
    2,679
    Thanked 11,120 Times in 5,397 Posts

    Frank S's Tools

    A different style boring head

    No argument when it comes to boring heads the way to go is with a dovetailed slide with index-able adjustment screw.
    But not everyone can afford to buy a good one or simply do not want to have to drive to the machinist supply store. So they make their own and several here on HMT.net have made some really great ones.
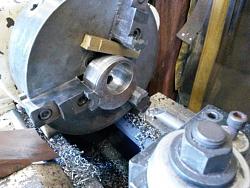
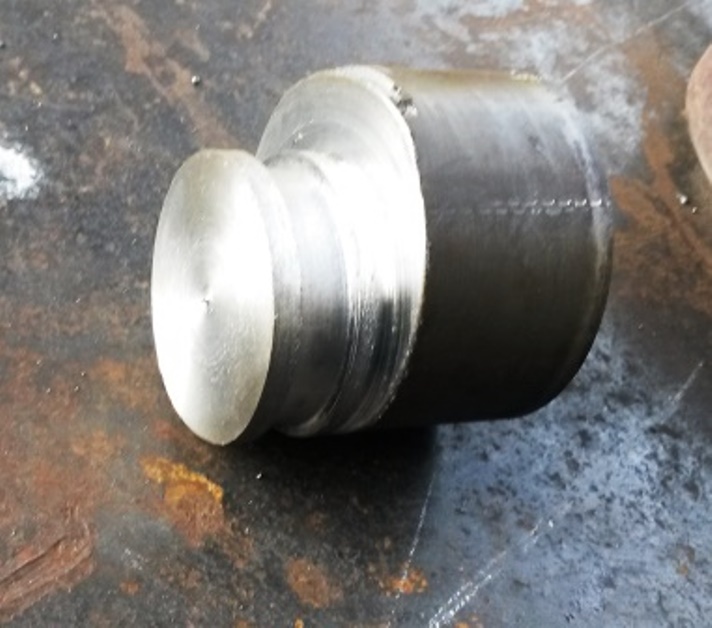
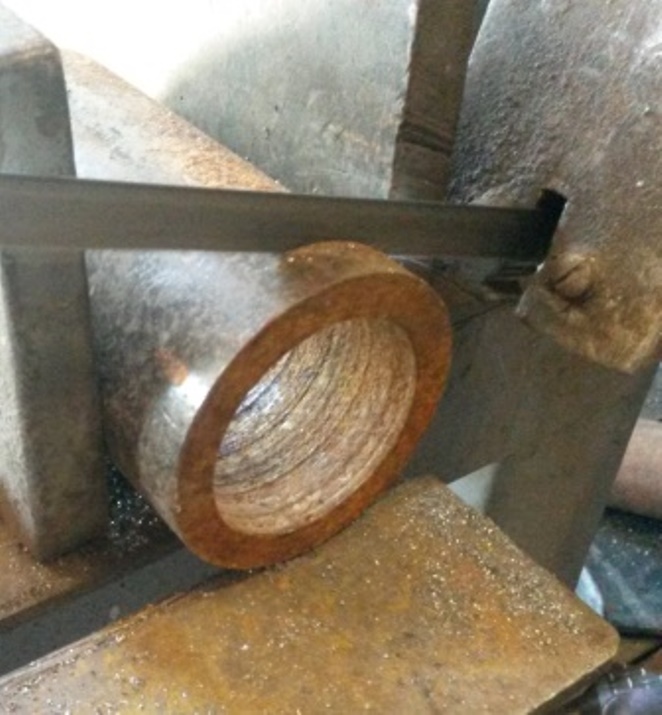
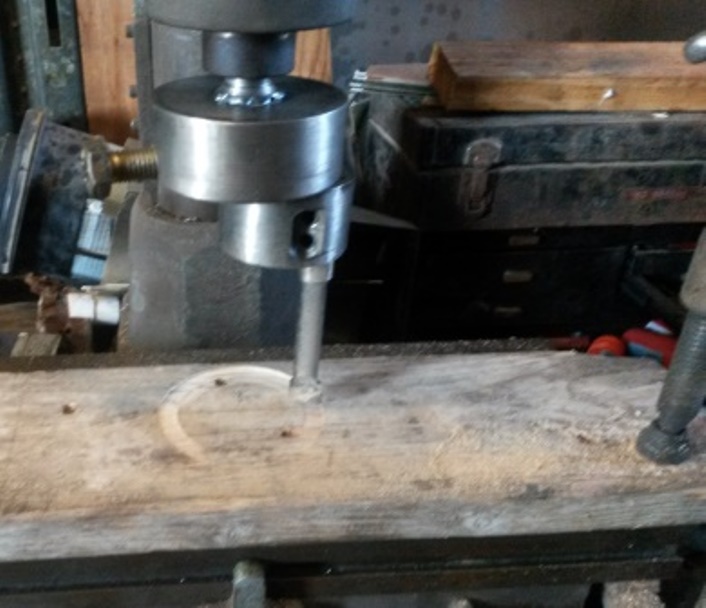
    I am working on a project that is going to require 2 holes bored in 1 inch steel plate these holes will need to be somewhere in the neighborhood of 3.5" or just under 90 mm. SO I started digging around for some scrap pieces to make a boring head out of I found a cutout slug from a piece of ASTM 514 or T1 steel, about 1 1/2" thick and roughly 3 3/4" diameter perfect for the main body then I located a piece of cut off mystery round bar 3 inches long and 2 3/4" diameter.I'm pretty sure it was left over from some excavator pins I made but don't remember if I even knew what steel it was. anyway it was the only piece I had, this would work perfect for the sliding cutter holder.
    I'm all set but there is only 1 little problem my dovetail cutters are packed away over 200 miles away. I called the nearest supply house that might have one about 85 miles away but they would have to order one if I could wait 2 weeks for it there would be no freight but if I needed it in 3 days or less it would cost me an additional $30.00 shipping. Forget that I said I could direct order one and have it in 3 or 4 days myself with no shipping charges.
    But I'm not going to do that either. I'm going to make a boring head that doesn't need a slide dove tail T slot or other. I'm going to make a double eccentric and I'm going to make one that anyone can make who has a lathe and a drill press but little other specialized tooling.
    to start off I cleaned up the slug to make it round with reasonably parallel ends. then I chucked it off center in my 3 jaw my reason for doing this was on my lathe it is a drama extreme to change from 3 to 4 jaw chucks then back again this can take an hour and a half due to the spindle nose on my Leblond lathe. Additionally I thought a lot of guys may not even have a 4 jaw chuck . To be honest after I had machined the eccentric bore I thought about I could have simply welded a short piece of shafting on the back of the cleaned up slug set off center where I wanted or needed it to be do the machining then saw it off LOL Hind sight always improves after the fact.
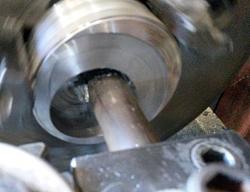
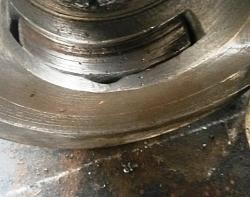
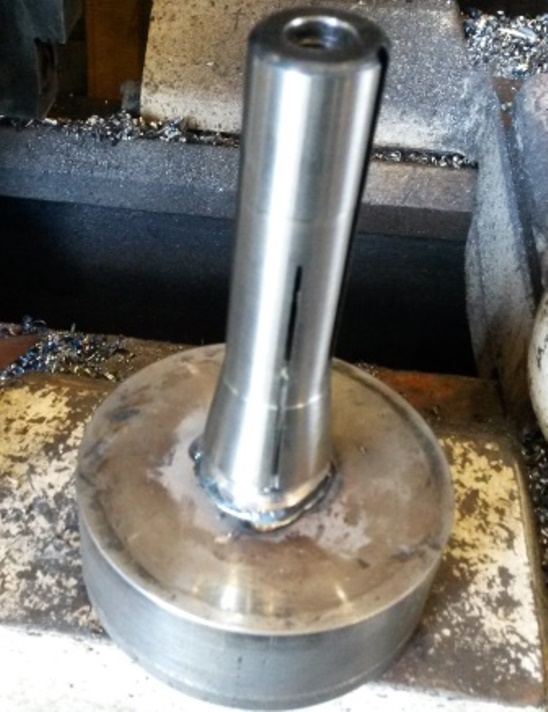
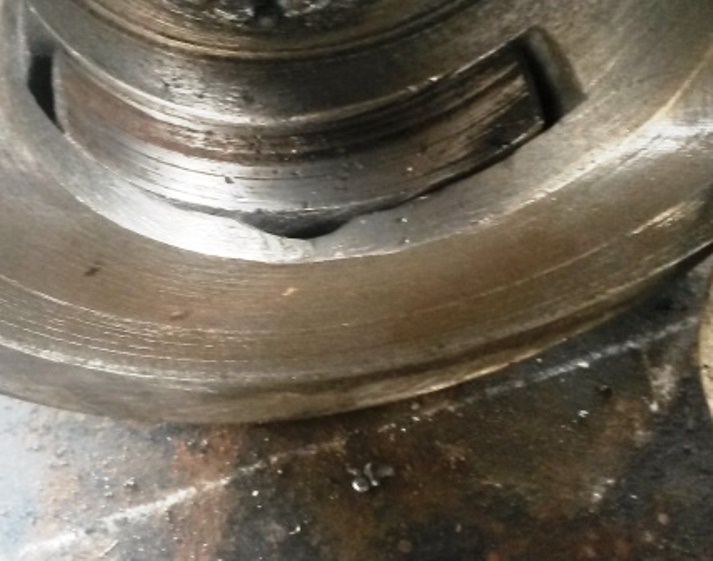
    Next I recenter the part and machined a .500" groove for the tool holder lock.
    Once that was done I cross drilled a 1/2" hole for the set screw I needed a 17/32" drill for the 5/8-11 thread but I don't have one, so I did the next best thing after drilling the 1/2" HOLE I ran a tapered reamer down it the reamer starts at .375 and ends at /625 I ran it in a little over half way then there was no problem tapping with a tapered starting tap
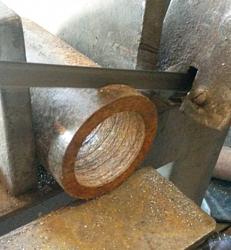
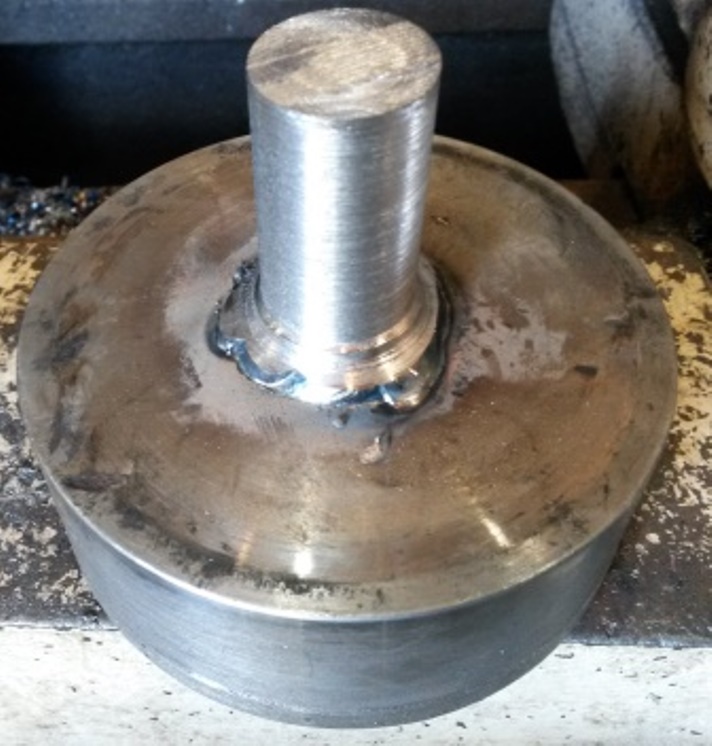
    Next I chucked my tool holder block again off centered After machining it I noticed I had missed the offset by a few.000" and did not get a full round clean up I was going to leave it until I also noticed that I had transposed the distance of the locking grove which meant I had the groove in the wrong place by .125" which would mean my crescent shaped lock piece was going to be a problem.
    New problem no more stock of this size so either have a sloppy under width lock crescent or weld up the surface and re machine it this would mean I could correct the previous offset mistake as well.
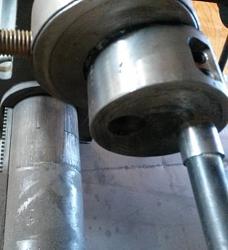
    welded up and re machined now to bore the tooling holes Since I needed to offset even further I could not use a space block under one of the jaws so I clocked #3 4 turns of the scroll #3 is the best jaw to clock since when removing them for cleaning #3 is the first one that comes off and the last one to be put back on.
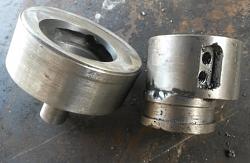
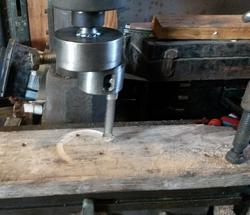
    Next I tried to mill 2 flats for the set screws to secure the cutter tooling. the only end mills I had were 20 pc a set that was given to me last Christmas unfortunately they are better suited for milling soft air than actually having to cut steel. I had used a couple of the 2 fluted ones on aluminum nut had never tried to mill steel other than what I knew to be mild steel or 1018 cold rolled On this stuff though even with coolant the HSS end mill only managed to make 1 cut before becoming so dull it wouldn't do anything. SO I put a short carbide tipped boring bar in a collet then finished making my flats then drilled the 4 holes with a 5/16" cobalt drill bit. Tapping to 3/8 16 was an adventure but I managed without breaking a tap
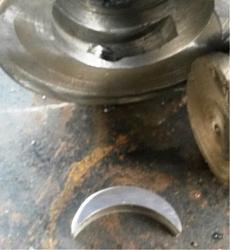
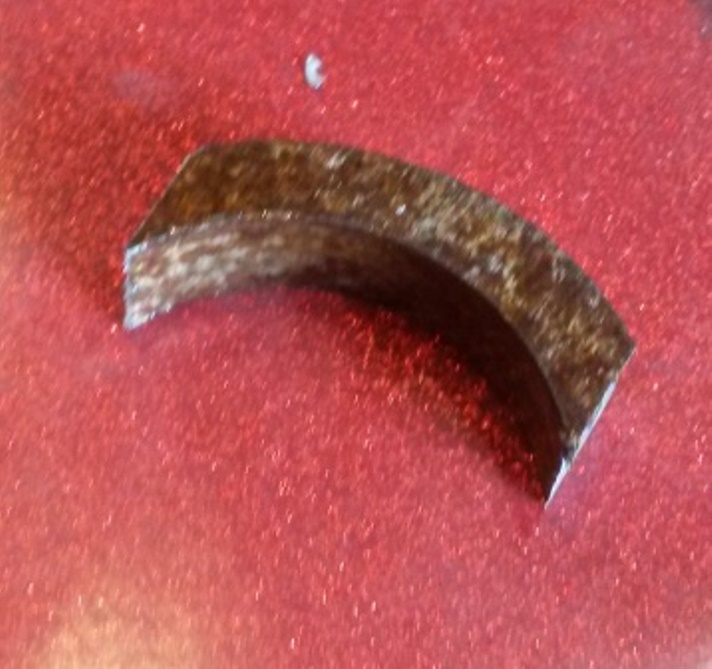
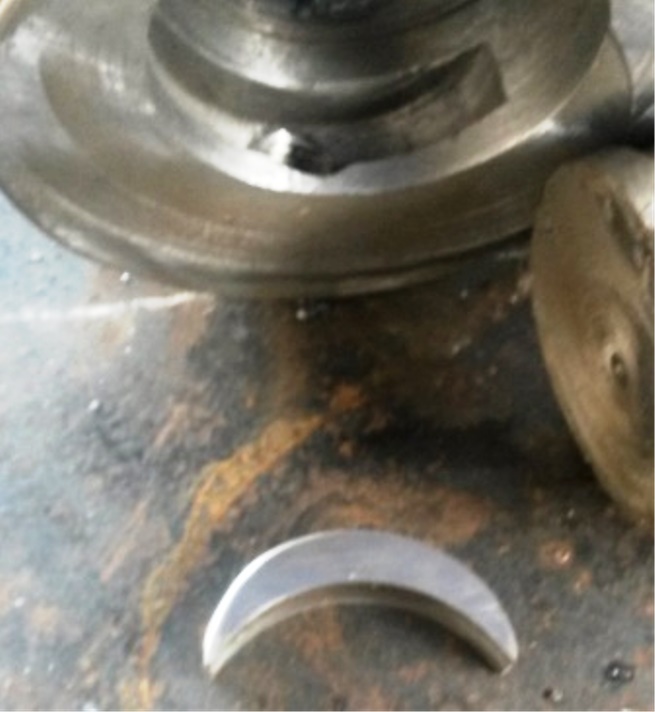
    Next was to make the crescent lock piece . this was made from a piece of cylinder I found laying around that had roughly the correct inside diameter I cut a segment then ground the outside to shape
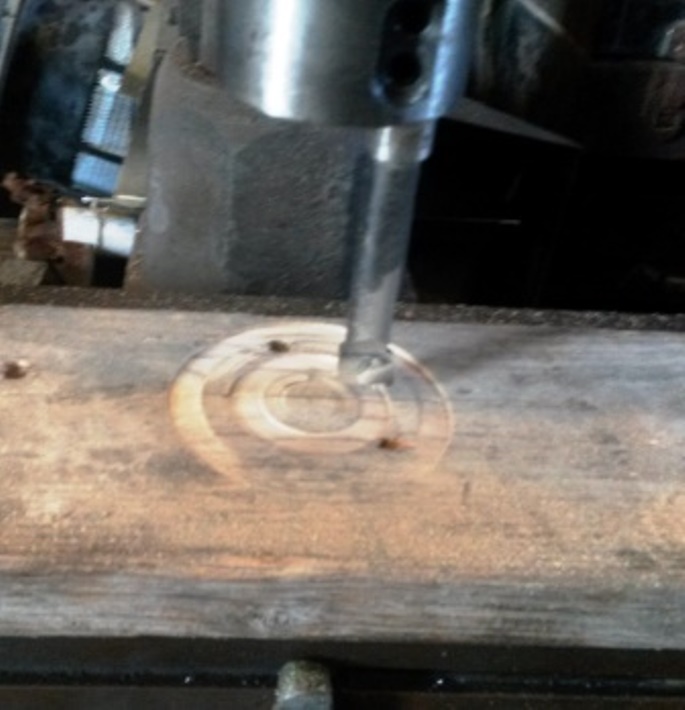
    Finally the assembly and a mock up test to check the cutting range. it turns out that in the outer most hole the range is from about 2.5 to 4.25"
    I'm happy and will be really happy when I see it bore the parts I need.
    A different style boring head-20170817_131015a.jpg A different style boring head-20170817_155130a.jpg A different style boring head-20170818_114341a.jpg A different style boring head-20170818_121151a.jpg A different style boring head-20170818_131732a.jpg A different style boring head-20170818_131745a.jpg A different style boring head-20170818_164625a.jpg A different style boring head-20170818_165921a.jpg A different style boring head-20170818_185301a.jpg A different style boring head-20170818_185343a.jpg A different style boring head-20170818_185417a.jpg A different style boring head-20170818_193148a.jpg A different style boring head-20170818_193240a.jpgA different style boring head-20170818_193754a.jpg
    Never try to tell me it can't be done
    When I have to paint I use KBS products

  2. The Following 18 Users Say Thank You to Frank S For This Useful Post:

    baja (Oct 16, 2019), Cascao (Aug 29, 2017), darkoford (Aug 25, 2017), emu roo (Aug 6, 2025), hemmjo (Oct 15, 2022), Jon (Aug 19, 2017), KustomsbyKent (Mar 28, 2022), LMMasterMariner (Aug 19, 2017), mwmkravchenko (Oct 15, 2019), NickP (Aug 20, 2017), olderdan (Aug 19, 2017), Paul Jones (Aug 28, 2017), Philip Davies (Mar 25, 2022), rossbotics (Aug 19, 2017), Scotty12 (Oct 15, 2019), Seedtick (Aug 20, 2017), Toolmaker51 (Mar 28, 2022), Tule (Oct 16, 2019)

  3. #2
    Supporting Member olderdan's Avatar
    Join Date
    Jun 2016
    Posts
    811
    Thanks
    1,479
    Thanked 1,790 Times in 522 Posts

    olderdan's Tools
    Nice original approach Frank, I would not have thought of that.
    Is desperation the mother of invention perhaps?.

  4. The Following User Says Thank You to olderdan For This Useful Post:

    emu roo (Aug 6, 2025)

  5. #3
    Supporting Member Frank S's Avatar
    Join Date
    Aug 2015
    Location
    Peacock TX
    Posts
    12,623
    Thanks
    2,679
    Thanked 11,120 Times in 5,397 Posts

    Frank S's Tools
    olderdan, to coin a phrase a mans got to do what a mans got to do. While it may not be as user friendly as a more conventional dovetailed slide it is very stable due largely to both eccentrics having a close fit and the crescent lock fits snugly in both the head body and the tool holder groves pressure from the set bolt which I will be changing out for a regular set screw the next time I manage to go to a good hardware store only needs light pressure to securely lock the 2 parts together.
    I figured out that later should I decide to do so I can mark indexing lines around the tool holder and place a single mark on the head which will make it easier to see how much to rotate the holder for a given bore diameter.
    I can put a real short carbide tool in it and use it as a single point surface or tramming mill head so I am more than pleased with the outcome even if it does look hoggy I wasn't tying to win a beauty contest with it
    Never try to tell me it can't be done
    When I have to paint I use KBS products

  6. The Following 2 Users Say Thank You to Frank S For This Useful Post:

    emu roo (Aug 6, 2025), mwmkravchenko (Oct 15, 2019)

  7. #4
    Supporting Member marksbug's Avatar
    Join Date
    Apr 2016
    Posts
    1,969
    Thanks
    822
    Thanked 499 Times in 402 Posts
    Quote Originally Posted by Frank S View Post
    olderdan, to coin a phrase a mans got to do what a mans got to do. While it may not be as user friendly as a more conventional dovetailed slide it is very stable due largely to both eccentrics having a close fit and the crescent lock fits snugly in both the head body and the tool holder groves pressure from the set bolt which I will be changing out for a regular set screw the next time I manage to go to a good hardware store only needs light pressure to securely lock the 2 parts together.
    I figured out that later should I decide to do so I can mark indexing lines around the tool holder and place a single mark on the head which will make it easier to see how much to rotate the holder for a given bore diameter.
    I can put a real short carbide tool in it and use it as a single point surface or tramming mill head so I am more than pleased with the outcome even if it does look hoggy I wasn't tying to win a beauty contest with it
    nice work,I ma ke most of my tooling. I would however drill through the center and use a resesed allen head locking bolt to pull the assy up to the main body firmly witch should take out any deflection/movement& possiably chatter. I suppose the key & groove could also of been tapered to help lock it down firmly not just size wize ( kinda like a lock down anglock vice) over all very nice work.I hate when you have to weld up stuff from a goof. I try to make prints and work it all out ahead of time, but that never works out 100% either. And there are always upgrades that come up during manufacturing when the brain kicks in to high gear.....or forgets important stuff.

  8. The Following User Says Thank You to marksbug For This Useful Post:

    emu roo (Aug 6, 2025)

  9. #5
    Supporting Member Frank S's Avatar
    Join Date
    Aug 2015
    Location
    Peacock TX
    Posts
    12,623
    Thanks
    2,679
    Thanked 11,120 Times in 5,397 Posts

    Frank S's Tools
    This thread is old enough now that I guess it needs an update. Some of my observations after I made it and used it several times. #1 it is not as easy to index for bore diameters as a dovetail head would be. #2 after through drilling it from the bottom part into the top part and threading it for a 5/16-18 clamping bolt it did help with stability #3 the range of adjustment as I made it was a little lacking This could have been overcome by making the whole thing a larger diameter with slightly more eccentric offset and if I were to make another one like it, I would make the eccentric stem longer for stability. However, if I were to make another, I probably wouldn't use the eccentric design at all just take the extra time and make a dovetail boring head, the problem with that though is I still don't have any dovetail cutters.
    Ther is a consolation to a design of this type though. For someone with limited tooling or experience a boring head such as this would be an easier build and with some careful measuring you can achieve satisfactory results for about any bore you need to make providing you take your time. I am a little too impatient at times when it comes to running a mill, I just want to hog my way through the initial cuts and do a single final cleanup like I can do on a lathe, which is not a good practice especially with smaller machines I'm a T50 or MT7 type guy. The concept of an ER11 collet is as foreign to me as a bb gun would be to a gunner's mate on a battleship
    Never try to tell me it can't be done
    When I have to paint I use KBS products

  10. The Following 2 Users Say Thank You to Frank S For This Useful Post:

    marksbug (Mar 25, 2022), Philip Davies (Mar 25, 2022)

  11. #6
    WmRMeyers's Avatar
    Join Date
    Dec 2014
    Posts
    885
    Thanks
    405
    Thanked 426 Times in 288 Posts

    WmRMeyers's Tools
    Quote Originally Posted by Frank S View Post
    This thread is old enough now that I guess it needs an update. Some of my observations after I made it and used it several times. #1 it is not as easy to index for bore diameters as a dovetail head would be. #2 after through drilling it from the bottom part into the top part and threading it for a 5/16-18 clamping bolt it did help with stability #3 the range of adjustment as I made it was a little lacking This could have been overcome by making the whole thing a larger diameter with slightly more eccentric offset and if I were to make another one like it, I would make the eccentric stem longer for stability. However, if I were to make another, I probably wouldn't use the eccentric design at all just take the extra time and make a dovetail boring head, the problem with that though is I still don't have any dovetail cutters.
    Ther is a consolation to a design of this type though. For someone with limited tooling or experience a boring head such as this would be an easier build and with some careful measuring you can achieve satisfactory results for about any bore you need to make providing you take your time. I am a little too impatient at times when it comes to running a mill, I just want to hog my way through the initial cuts and do a single final cleanup like I can do on a lathe, which is not a good practice especially with smaller machines I'm a T50 or MT7 type guy. The concept of an ER11 collet is as foreign to me as a bb gun would be to a gunner's mate on a battleship
    Sounds like you need a small shaper. They say you can make anything but money with a shaper, but there are some things you can't do with anything else, and the cutters are pretty cheap.

    Bill

  12. #7
    Supporting Member Frank S's Avatar
    Join Date
    Aug 2015
    Location
    Peacock TX
    Posts
    12,623
    Thanks
    2,679
    Thanked 11,120 Times in 5,397 Posts

    Frank S's Tools
    Quote Originally Posted by WmRMeyers View Post
    Sounds like you need a small shaper. They say you can make anything but money with a shaper, but there are some things you can't do with anything else, and the cutters are pretty cheap.

    Bill
    I have actually thought about buying or building a shaper Haven't found one that would be within my budget for one or found the extra time to construct one from scratch for two.
    Never try to tell me it can't be done
    When I have to paint I use KBS products

  13. #8
    Supporting Member Frank S's Avatar
    Join Date
    Aug 2015
    Location
    Peacock TX
    Posts
    12,623
    Thanks
    2,679
    Thanked 11,120 Times in 5,397 Posts

    Frank S's Tools
    marksburg the head works fine the lock key seems to hold it tight enough one problem I have with it is the Mill itself does not have a slow enough spindle speed for using a boring head in a torched cut hole. So to prevent knocking any more tops off of my boring bars I am going to have to pull the plates off the mill then run a cob grinder through them to remove the heat effected layer the steel plates are made out of ASTM 514 so it is hard and tough to begin with. I really need something in the 85 to 150 RPM range for making the first rough cuts instead of the 560RPM bottom speed of this mill. interrupted cuts are murder on cutters and couple that with a torch hardened surface of the inside of the holes it only gets worse from there.
    I may wind up and do a set up on my lathe with the boring bar I made for it to bore these plates I already know that works on hard tough steel such as this.
    I did a cad model of the boring head in Solidworks I looked at trying to use a bolt to lock the 2 parts of the head together but with a double eccentric there is no common center-line so the crescent lock key was about the only solution tapering it would not have improved it but placing 2 spaced 120° apart would have done some and if I see there is an issue later on I may add another groove and a 2nd lock as the head is figgley to make fine adjustments
    Never try to tell me it can't be done
    When I have to paint I use KBS products

  14. The Following 2 Users Say Thank You to Frank S For This Useful Post:

    emu roo (Aug 6, 2025), mwmkravchenko (Oct 15, 2019)

  15. #9
    Supporting Member marksbug's Avatar
    Join Date
    Apr 2016
    Posts
    1,969
    Thanks
    822
    Thanked 499 Times in 402 Posts

    just an option.

    also with the indexable inserts&bars there are somany different grades, you might just find one that will cut without dystroying it. rough cut, rotate insert,final finish cut.
    as for the mill speed, look at building a jack shaft& extra pully&belt to get the speeds you want, you have the brains&capability to do so!!! I too need a slower speed on my BP....well BP clone, 1979 millport 9x42 ,I did have a small auxzillary motor off the side of my small 1975 enco mill for slow speed stuff.But thats sitting un powered and in the way....along with a lot of stuff in the way.
    Last edited by marksbug; Aug 20, 2017 at 11:12 AM. Reason: left out somethen

  16. The Following User Says Thank You to marksbug For This Useful Post:

    emu roo (Aug 6, 2025)

  17. #10
    Supporting Member Frank S's Avatar
    Join Date
    Aug 2015
    Location
    Peacock TX
    Posts
    12,623
    Thanks
    2,679
    Thanked 11,120 Times in 5,397 Posts

    Frank S's Tools
    As far as carpentry goes I try to avoid it, That's not to say I can't do it I just prefer to burn wood rather than work with it
    Never try to tell me it can't be done
    When I have to paint I use KBS products

Thread Information

Users Browsing this Thread

There are currently 1 users browsing this thread. (0 members and 1 guests)

Bookmarks

Posting Permissions

  • You may not post new threads
  • You may not post replies
  • You may not post attachments
  • You may not edit your posts
  •