Free 186 More Best Homemade Tools eBook:  
Get 2,000+ tool plans, full site access, and more.

User Tag List

Page 1 of 2 1 2 LastLast
Results 1 to 10 of 17

Thread: A Drill Metal Cutter

  1. #1
    labhras773's Avatar
    Join Date
    Nov 2016
    Posts
    7
    Thanks
    22
    Thanked 0 Times in 0 Posts

    Question A Drill Metal Cutter

    Hi everyone, new to this forum and craft, so feel free to advise and critique away.
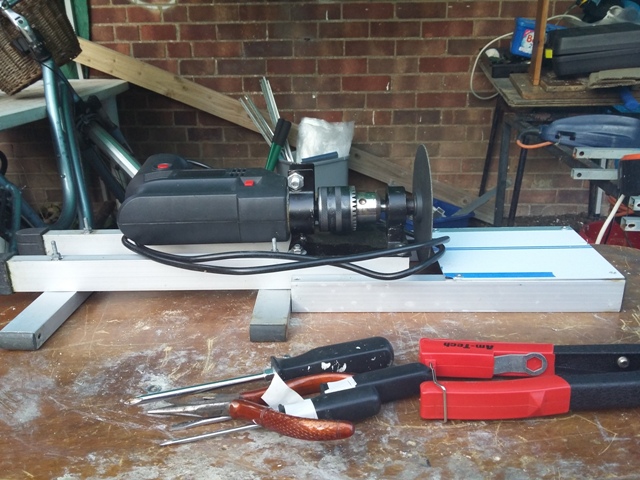
    Attached photo is a mock-up of what I have in mind to build. It's a drill operated metal cut-off tool. I've got it to what i want it to look like and now I'm stumped.
    1 - At present I'm using scrap Aluminium box sections on the mock-up, for the real unit can I still use aluminium or would steel be better?
    2 - Any suggestions on a blade guard -material -fastening?

    I do not have a welder, so I'm going to be either using rivets or bolts, so any feedback on those also very much appreciated.A Drill Metal Cutter-drill-metal-cutter-3.jpg

    186 More Best Homemade Tools eBook

  2. #2
    Supporting Member C-Bag's Avatar
    Join Date
    Aug 2015
    Location
    California, central coast
    Posts
    720
    Thanks
    689
    Thanked 876 Times in 471 Posts

    C-Bag's Tools
    Hi labhras773.

    It's a bit hard to see what you are about here, but one thing that jumps out is whatever your tool rest, it needs to be even or a little higher than your mandrel center. The way you have it now, whatever you try and cut is going to immediately jam between the blade and the rest. That's why bench grinder rests are close to center. You might consider mounting the drill with the handle going down because you could then have it below the table and give yourself more access to the blade. I hope you are only going to be cutting small stuff as it's tough to mount a drill like that steady with the plastic case as they were meant to be hand held. About the time you get it really well mounted it will crack the case. The first clamp needs to be right behind the chuck.

    Thin aluminum is not very strong and when you start talking the kind of stress if something jams up, especially with those kinds of cutoff blades, you are into dangerous territory. We used to call those suicide blades because they are hard to control especially on a drill and they want to twist. Don't trust them after you've got them bound up. You can lose digits and eyes in a heartbeat with those kinds of blades.

    Don't get in a hurry, make it 5x's stronger than you think you need, and safety first because eye patches and lost fingers are NOT sexy.

    2000 Tool Plans

  3. The Following 2 Users Say Thank You to C-Bag For This Useful Post:

    Frank S (Nov 8, 2016), labhras773 (Nov 10, 2016)

  4. #3
    Supporting Member Frank S's Avatar
    Join Date
    Aug 2015
    Location
    Peacock TX
    Posts
    11,224
    Thanks
    1,985
    Thanked 8,788 Times in 4,207 Posts

    Frank S's Tools
    As C-bag said there really in not enough information on what you are attempting to achieve.
    first do you want the drill solid mounted so you can move the work piece into the cut off blade or is your plans to make it with the drill mounted on an arm to allow it to be operated like a chop saw.
    Another big issue will be which ever method you decide the drill motor is going to be very short lived. The big problem is the design of any hand drill. none are designed to accept very much side loading at the chuck because the main shaft the chuck is mounted on is short meaning the bearings close together. In many cases the chuck is longer than the main shaft itself and by the time you mount an arbor with the cutting wheel or grinding disk on it you have created a tremendous moment arm which will quickly destroy the bearings in the drill. if any heavy cutting is done.
    This is why die or pencil grinders are not used as drill motors they are designed for side loading and not thrust loading they also have much higher RPMs making them suitable for cut off applications the higher speeds require less force applied for cutting as well but They have scary high RPMs in many cases
    That having been said for the occasional cut off use mounting a drill in a cradle hollowed out of hard wood then either solid mounted or using the wood as the swing arm works just fine Care has to be taken to allow enough air flow at the vent louvers of the drill or it will burn out A shaped cradle will offer good support while protecting the plastic case from breakage
    You can make a blade guard out of a thin aluminum sheet just cut a disk about 3/4"to 1" larger in diameter than the cut off wheel then cut that in half you can then find something about 1/4" larger than the cut off disk and clamp 1 half of the guard disk to that then using a small hammer, fold the exposed edge over the die.do this for both pieces then rivet them together making the guard trim the center to fit over the mandrel rivet another piece of aluminum to 1 side of the guard for the mounting tab then mount that to the drill mount. BY the time you have this done you will have an idea of how to proceed further.
    Never try to tell me it can't be done
    When I have to paint I use KBS products

  5. #4
    labhras773's Avatar
    Join Date
    Nov 2016
    Posts
    7
    Thanks
    22
    Thanked 0 Times in 0 Posts
    Frank S and C-Bag , thank you guys for your advice and input. Clearly I need to sit down and work out some kinks. I just put together something that I had in my head on the spot, all i did was drill and bolt using some scrap, but You guys certainly have given me enough to work on in planning to obtain what I want.

    And what I want is well because of mobility issues, I really want to be able to sit at a bench and cut some metal.I want to be able to just push/slide the work piece thru the blade. I work with pretty small pieces of Steel and aluminium, ranging from 2-4 mm and no bigger than 150 mm x 300 mm. It's all sheet off-cuts and the odd section or extrusion pieces that come by post so they're never going to be too big. I'm not going to be working on a lot of metal projects, but for ease of use i want to try and build something from the resources I have.
    For now though, I think it's back to the drawing board. Again many thanks

  6. #5
    Supporting Member C-Bag's Avatar
    Join Date
    Aug 2015
    Location
    California, central coast
    Posts
    720
    Thanks
    689
    Thanked 876 Times in 471 Posts

    C-Bag's Tools
    Labhras773 I'm glad you are taking a step back. The last thing I want to do is criticize and discourage. But I also want help and it takes a lot of courage to put yourself out there to strangers. Often the net is not a kind place. But I felt like a noob too when master Frank stepped in and pointed out by its very nature a drill is NOT meant for side loads, doh! We see periodically folks who want to for instance turn a drill press into a mill. Once again because the Chuck is only held on by a taper and the bearings are not set up for side loads, folks are trying to make a tool do what it was not designed to do. You can modify it to make it work, but IMHO it's cheaper to just buy used.

  7. #6
    Supporting Member Frank S's Avatar
    Join Date
    Aug 2015
    Location
    Peacock TX
    Posts
    11,224
    Thanks
    1,985
    Thanked 8,788 Times in 4,207 Posts

    Frank S's Tools
    One sure fire way to use a drill in the manor you are wanting would be to make an extended arbor with a bearing mounted very near the wheel then have the drill and the arbor bearing mounted to a common mounting.
    I will draw a rudimentary descriptive work piece with enough detail to give you or others a good idea of how to safely go about this
    Never try to tell me it can't be done
    When I have to paint I use KBS products

  8. The Following User Says Thank You to Frank S For This Useful Post:

    labhras773 (Nov 23, 2016)

  9. #7
    Supporting Member Frank S's Avatar
    Join Date
    Aug 2015
    Location
    Peacock TX
    Posts
    11,224
    Thanks
    1,985
    Thanked 8,788 Times in 4,207 Posts

    Frank S's Tools
    As promise here is a pic of one way to make your mount from here you can either drill 4 holes through the mount then use stand offs to mount it above a cut table to pass your work through, or mount it on a swing arm to make a chop saw out of it

    A Drill Metal Cutter-drill-chop-saw-mount.jpg

    A Drill Metal Cutter-drill-chop-saw.jpg
    Never try to tell me it can't be done
    When I have to paint I use KBS products

  10. The Following User Says Thank You to Frank S For This Useful Post:

    Valter (Dec 16, 2016)

  11. #8
    Supporting Member Frank S's Avatar
    Join Date
    Aug 2015
    Location
    Peacock TX
    Posts
    11,224
    Thanks
    1,985
    Thanked 8,788 Times in 4,207 Posts

    Frank S's Tools
    this is one possibility for a pass through drill metal cutting saw
    A Drill Metal Cutter-drill-motor-cut-off-saw.jpg
    Never try to tell me it can't be done
    When I have to paint I use KBS products

  12. The Following User Says Thank You to Frank S For This Useful Post:

    Valter (Dec 16, 2016)

  13. #9
    Supporting Member Frank S's Avatar
    Join Date
    Aug 2015
    Location
    Peacock TX
    Posts
    11,224
    Thanks
    1,985
    Thanked 8,788 Times in 4,207 Posts

    Frank S's Tools
    here is a model as a drill motor chop saw

    A Drill Metal Cutter-drill-chop-saw2.jpg
    Never try to tell me it can't be done
    When I have to paint I use KBS products

  14. The Following User Says Thank You to Frank S For This Useful Post:

    Valter (Dec 16, 2016)

  15. #10
    Supporting Member Frank S's Avatar
    Join Date
    Aug 2015
    Location
    Peacock TX
    Posts
    11,224
    Thanks
    1,985
    Thanked 8,788 Times in 4,207 Posts

    Frank S's Tools
    Now for a little explanation For this model I felt that should anyone desire to make one of these tools I designed it so that it would be within the realm of even the most modestly equipped home shops the arbor being one possible exception
    However even that can be made without special tools by using a threaded rod a few nuts and washers and a spacer bushing to fit the rod and the pillow-block bearing.
    the rest could be just about any materials on hand like hard wood
    The mount for the drill is purposely made from hard wood this way it can be cut and shaped to fit the drill easily
    either model has its merits depending on the user's requirement
    in the mounting of the drill I left this a bit vague most drills made today have a front handle mount just behind the chuck even full plastic models have a rudimentary forward protrusion that could have a clamp around them. back in the hand grip area the wooden mount should fit securely or be shimmed to fit other than that both models are pretty straight forward any sizing would have to be up to the builder
    I hope this offers some insight on a way to accomplish the build using a common hand drill.
    One more thing if someone were to look at this in another plane the drill mount could serve as a very light duty mill but it would require a more substantial pillow block bearing
    Or it could even be converted into a small lathe
    Last edited by Frank S; Nov 10, 2016 at 09:16 PM.
    Never try to tell me it can't be done
    When I have to paint I use KBS products

  16. The Following User Says Thank You to Frank S For This Useful Post:

    labhras773 (Nov 23, 2016)

Thread Information

Users Browsing this Thread

There are currently 1 users browsing this thread. (0 members and 1 guests)

Tags for this Thread

Bookmarks

Posting Permissions

  • You may not post new threads
  • You may not post replies
  • You may not post attachments
  • You may not edit your posts
  •