
 LinkBack URL
 About LinkBacks


Cutting slots in metal parts can be a challenge without a milling machine.
I am sure most of us have used a series of drilled holes and a file in the past to complete this task.
When multiple or odd shaped slots are required, layout can be very time consuming.
In the past I have used my printer to make patterns for various projects; lettering to trace onto wood for routing or jig sawing etc. Recently I have put it to use with a drawing application to create accurate patterns for hole layout. Print the pattern.
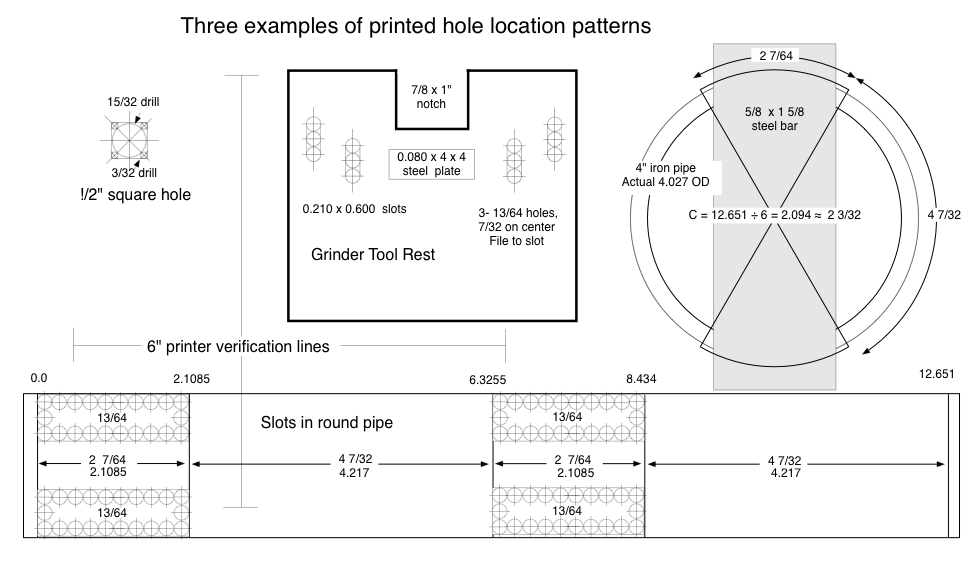
I needed to slide two 5/8 x 1 5/8 inch bars through a 4 inch iron pipe. This requires 4 slots around the circumference of a 4 steel pipe. It is time consuming to layout 1 slot on flat stock. Making 4 layouts around a pipe was a task I did not look forward to.
I measured the OD with a steel rule. Using 4 as the OD, the pattern I made did not fit properly on the pipe One of those DUH moments.
The actual OD is 4.027, making the circumference 12.651 circumference. The original was only 0.084 to short, but it was too short. Errors accumulate.
12.651 ÷ 6 segments = 2.1085 each segment (yes it seems silly to work to 0.0005 when measuring with a ruler, humor me a little)
It is just so easy to punch decimals into the drawing application and have it spit out what I need. My layout tools are fractional so I convert to fractions after the math is complete. (yes I know I metric is already decimal)
The strip shown was printed. Verify the print size is true. Then wrap around the pipe and tape into place. Prick punch through the part, then center punch. An optical center punch like several shown on the tool list would be helpful
I select a bit size a little smaller to leave a little material between holes. I am not good enough to drill 22 holes for each slot without a few wandering off course. Sometimes I work up in drill size, often skipping holes when I see holes are going to intersect which risks breaking the bit. Then go back if necessary to drill a smaller hole. It is easier to drill than to file.
Make sure you verify that your printer is accurate. If it is not you can scale the drawing or use the scale function when you print to get the correct size.
The drawing shows 3 examples how I have used this procedure.
Click to Enlarge


 Reply With Quote

Bookmarks