Free 186 More Best Homemade Tools eBook:  
Get 2,000+ tool plans, full site access, and more.

User Tag List

Page 1 of 3 1 2 3 LastLast
Results 1 to 10 of 24

Thread: ER16 Collet Chuck for Unimat M12X1 Spindle

  1. #1
    Supporting Member Paul Jones's Avatar
    Join Date
    May 2014
    Location
    Del Mar, California
    Posts
    1,231
    Thanks
    5,810
    Thanked 1,441 Times in 655 Posts

    Paul Jones's Tools

    ER16 Collet Chuck for Unimat M12X1 Spindle

    I have been using my Unimat E16 collet chuck to hold my ER16 collets but this is not a good long term solution. I finally decided to make an ER16 collet from a 1” diameter rod of 1144 stressproof steel. Usually the Unimat 3” swing lathes use M12X1 threaded chuck adapters (chuck backplate) to ensure concentricity of the chucks to the lathe spindle. I wanted to see if I could create an accurate ER16 collet chuck without resorting to using a chuck adapter (as used for the E16 collet). The collet chuck uses a commercially available ER16 collet nut with a M22X1.5 thread. The combined collet chuck and collet has a measured 0.0004” TIR.

    ER16 Collet Chuck for Unimat M12X1 Spindle-er16-collet-chuck-shars-collet-nut-mounted-unimat-milling-head.jpg

    ER16 Collet Chuck for Unimat M12X1 Spindle-er16-collet-chuck-generic-collet-nut-mounted-unimat-lathe.jpg

    ER16 Collet Chuck for Unimat M12X1 Spindle-er16-collet-chuck-collet-measures-0.0004-tir.jpg

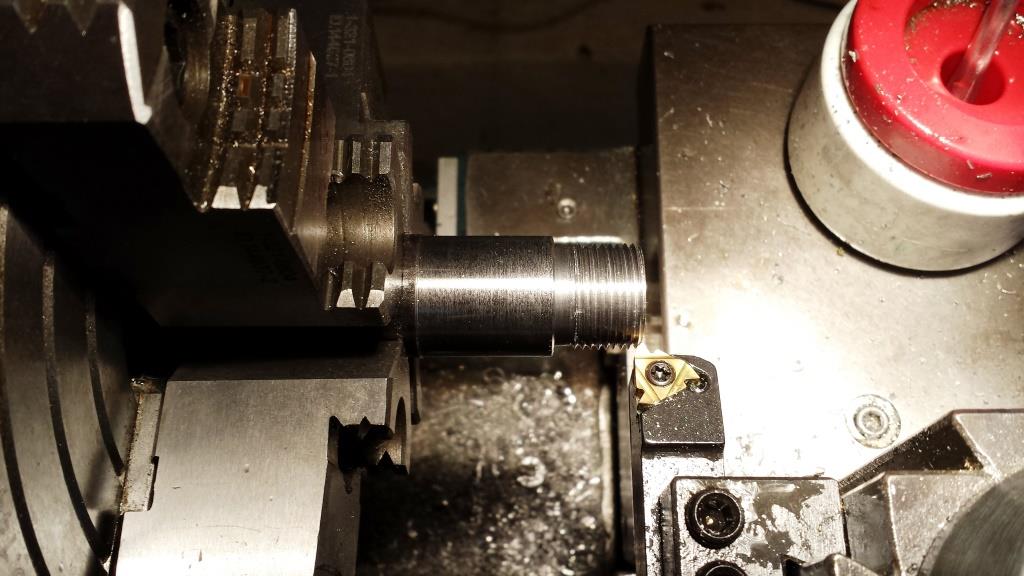
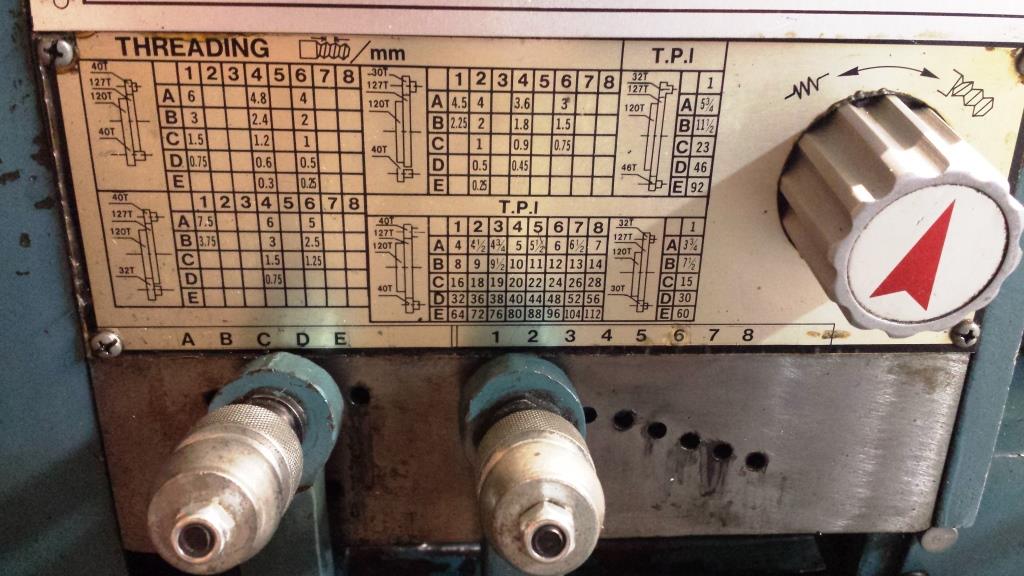
    I used the 12” swing lathe for the single point threading the M22X1.5 thread required for the collet nut. This lathe is designed to cut inch threads using a thread dial and engaging/releasing the lead screw half nut. Metric threading requires leaving the half nut engaged and reversing the lathe for each cutting pass (there are other ways to do this but this was the easiest way for the 0.700” length of thread). On the back side of the headstock, the lower 40T gear has to be reversed and adjusted to engage the 12OT gear (see the upper left hand Metric threading diagram in the lathe threading plate photo shown below).

    ER16 Collet Chuck for Unimat M12X1 Spindle-single-point-threading-m22x1.5-threads.jpg

    ER16 Collet Chuck for Unimat M12X1 Spindle-geared-head-lathe-thread-cutting-chart-set-position-c1-.jpg

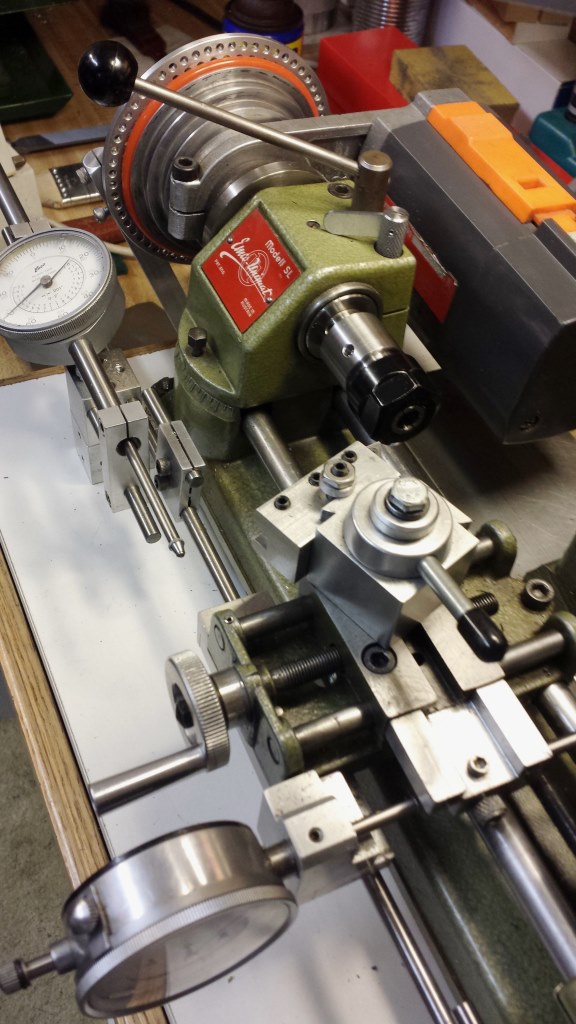
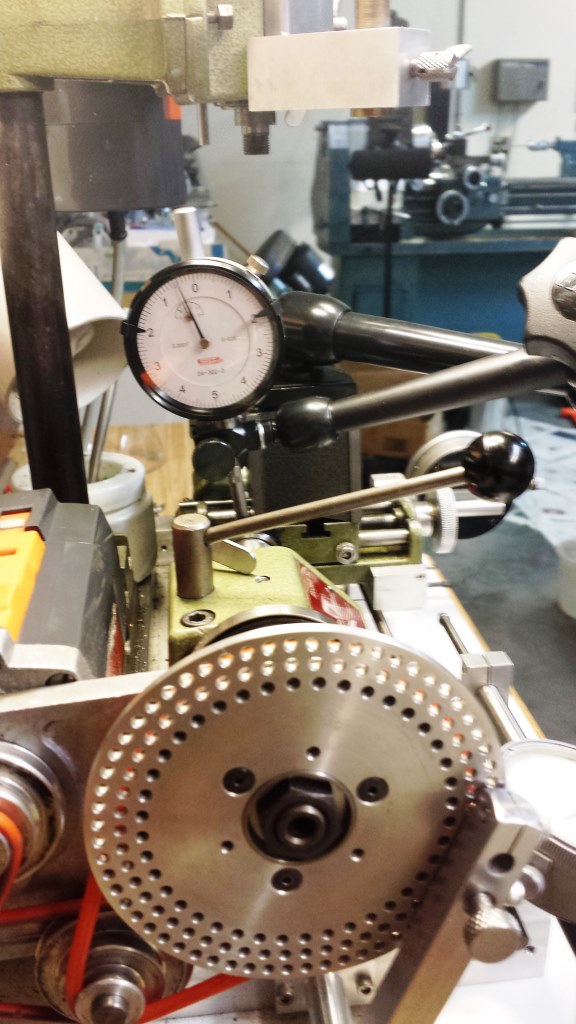
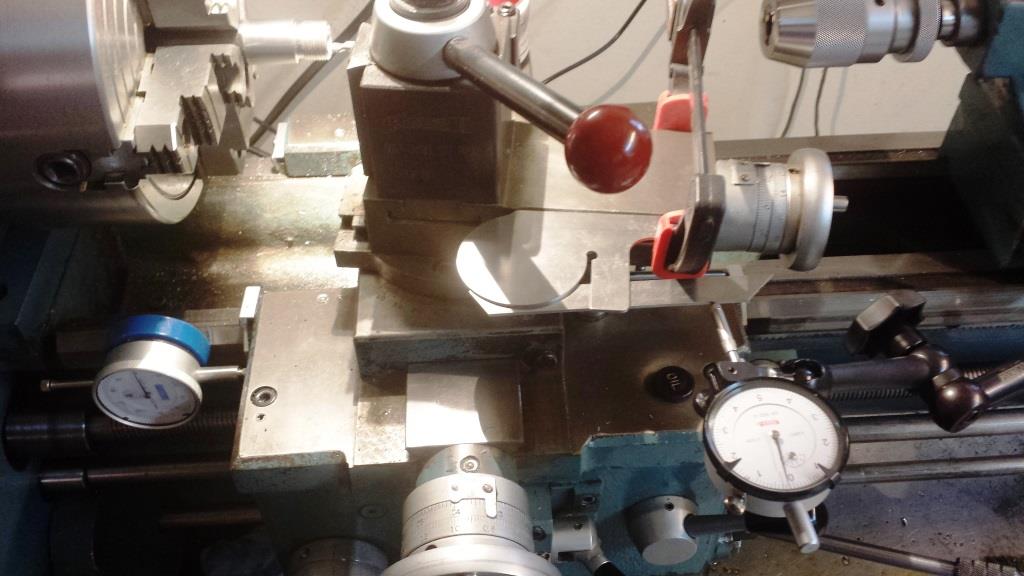
    Next I set up the lathe compound for boring an 8 degree taper required for the ER16 collets. I used a +/- 5 minute Vernier 6" precision angle protractor (made by Helios in Germany) and 0.0001” dial indicator to set the compound angle. A soft jaw adjustable clamp held the protractor and a 1-2-3 block ensure the protractor remained parallel to the lathe compound axis of cutting. An alternative would be a 5” sine bar and gage blocks for setting the 8 degree angle.

    ER16 Collet Chuck for Unimat M12X1 Spindle-setup-lathe-compound-angle-using-vernier-protractor.jpg

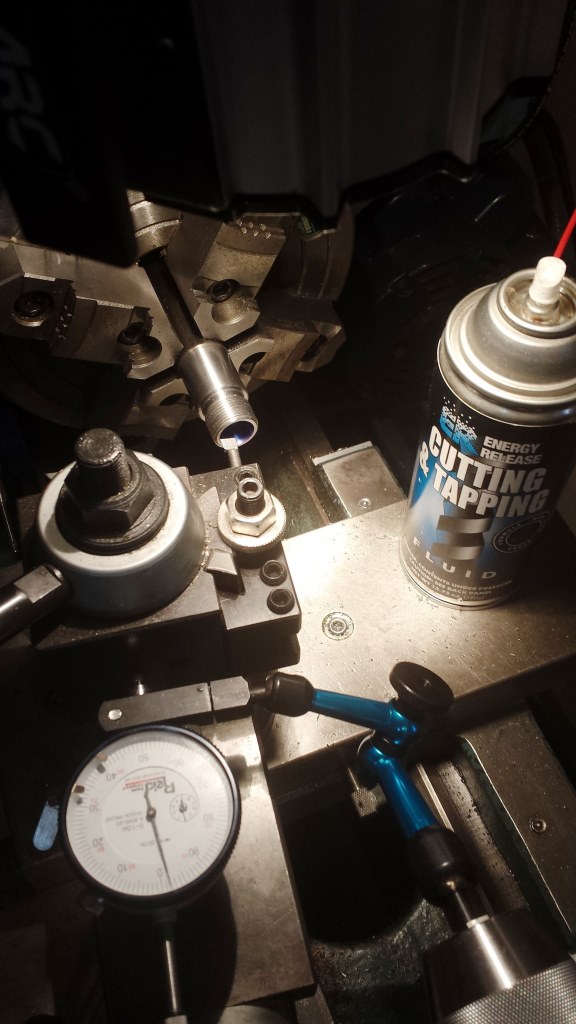
    The collet was drilled and bored the full length to 11 mm dia. hole for starting boring and later to tap a M12X1 thread. The “rough” 8 degree collet opening was bored with a cobalt HSS boring bar and the depth of bore measured with a 1" travel dial indicator to avoid crashing the boring bar.

    ER16 Collet Chuck for Unimat M12X1 Spindle-rough-boring-taper-er16-collet-chuck.jpg

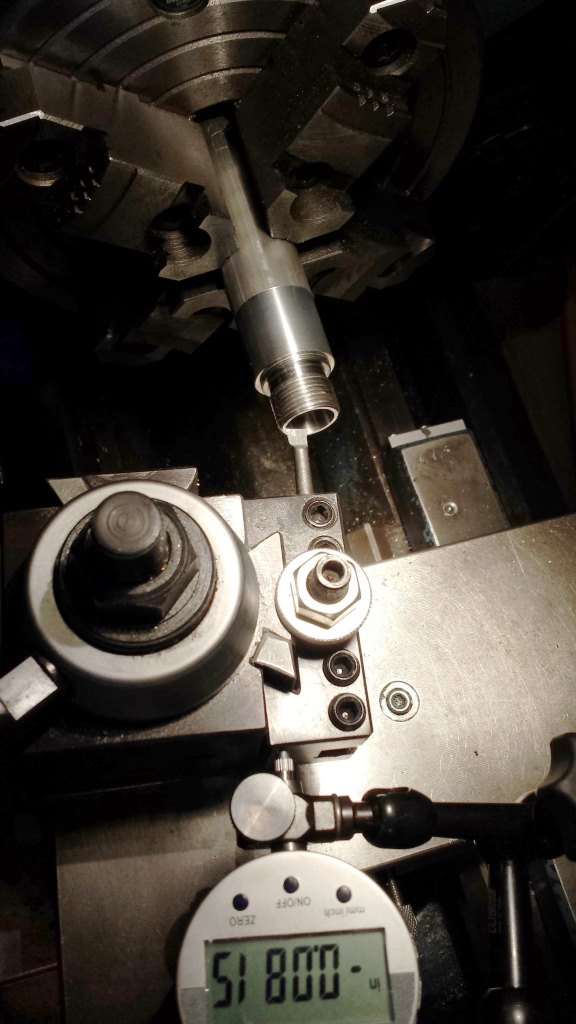
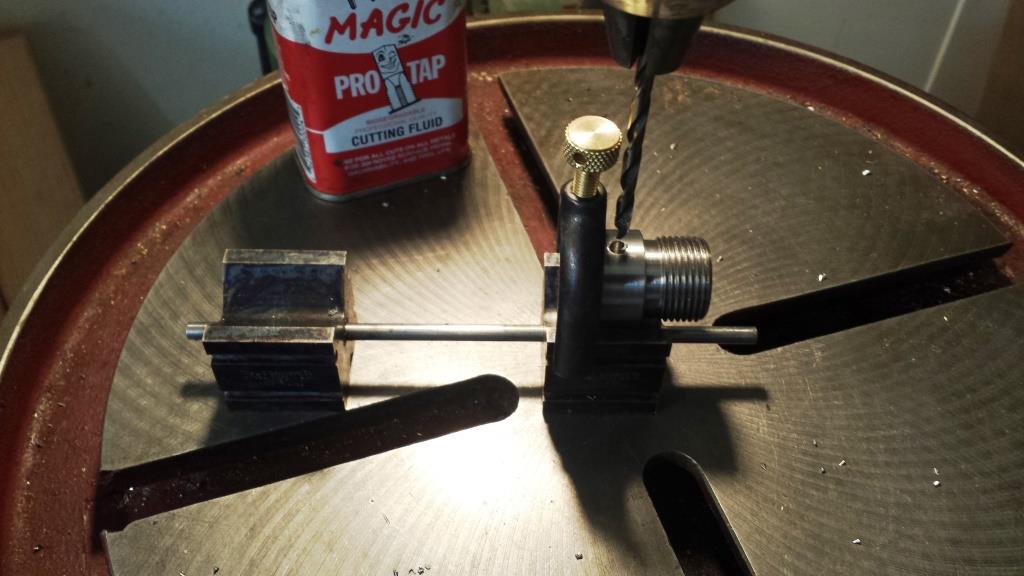
    Next the M12X1 tread for the 3” swing Unimat lathe was tapped to full depth from the open collet end to ensure the threads were very close to concentric and aligned with the collet axis. The lathe cut-off tool removed the roughed-in collet and the collet was then mounted on the Unimat lathe spindle after counterboring the threaded end to 12 mm x 4 mm deep.

    ER16 Collet Chuck for Unimat M12X1 Spindle-tapping-m12x1-thread-unimat-spindle.jpg

    At this point of the machining process the measured TIR is 0.0025” for a 0.250” gage pin mounted in the collet. That is the difficulty of machining the collet on the larger lathe because the M12X1 thread is not truly concentric with the 8 degree opening holding the ER16 collet (plus the high precision collets have a 0.0002” TIR when new and these are no longer new).

    Next I mounted the collet chuck back on the Unimat SL and used the Unimat lathe to true-up OD of the collet body to be concentric with the threaded lathe M12X1 spindle before returning and finishing the work on the larger 12"swing lathe. Before mounting the collet chuck in the larger 4-jaw chuck, I used 6061 aluminum bar stock to create a light press fit temporary chuck to hold the collet chuck back on the larger lathe while taking a final 0.004” skim cut off of the collet 8 degree opening. Using a temporary aluminum chuck allowed the ID to be bored concentric for holding the collet chuck and also prevented tool marks from 4-jaw chuck jaws.

    ER16 Collet Chuck for Unimat M12X1 Spindle-re-boring-collet-taper-using-aluminum-fixture.jpg

    After taking the skimming cuts, I used the lathe cutoff-tool to remove the collet with its surrounding press fit aluminum chuck “jacket”. The jacket was easily removed with a small brass hammer while holding the collet in the soft copper jaws of a bench vise.

    ER16 Collet Chuck for Unimat M12X1 Spindle-removing-er16-collet-aluminum-fixture.jpg

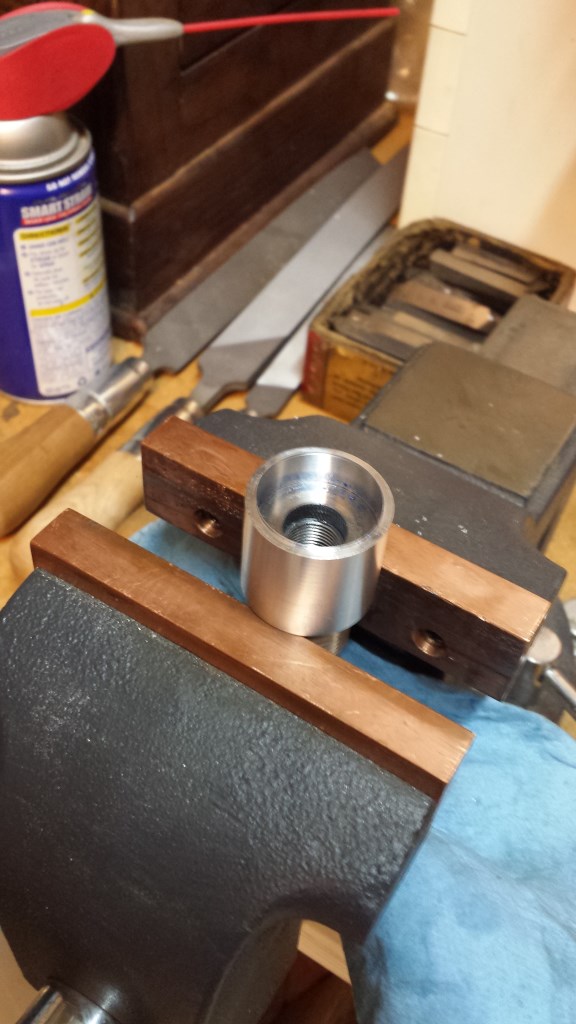
    Finally, 4mm tommy bar holes were drilled in the collet for removing the collet chuck from the Unimat spindle.

    ER16 Collet Chuck for Unimat M12X1 Spindle-drilling-tommy-bar-holes-er16-collet-chuck.jpg

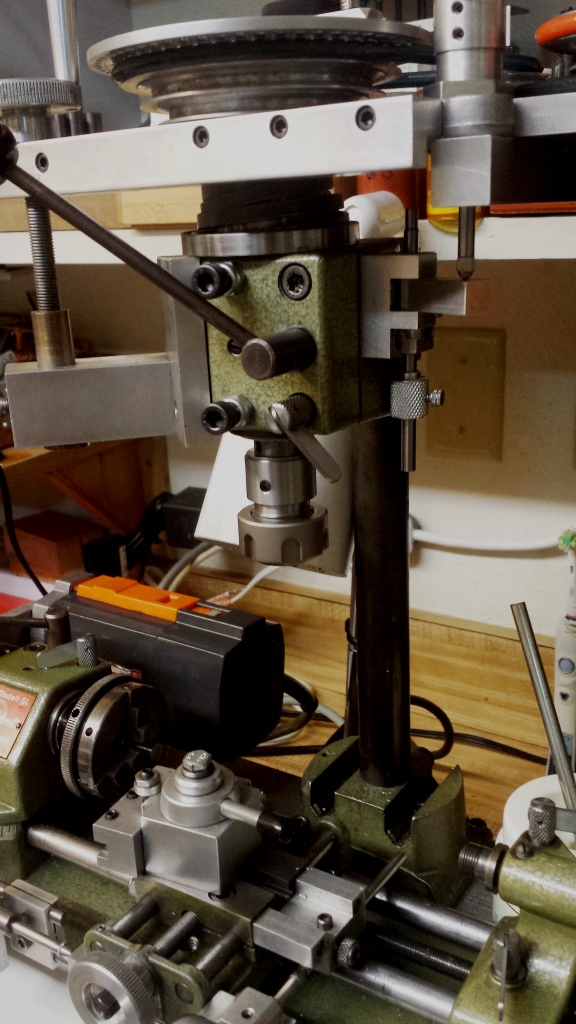
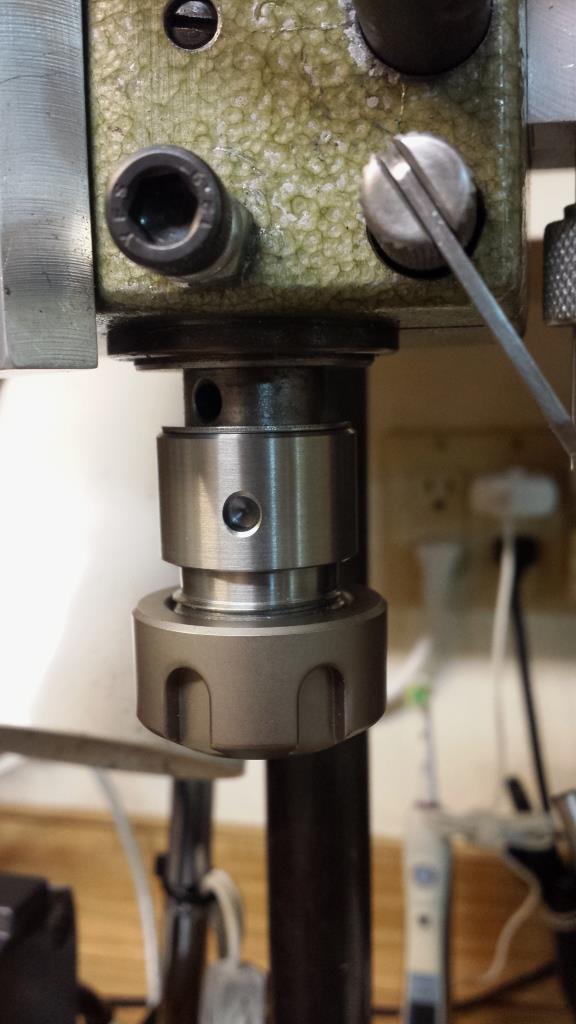
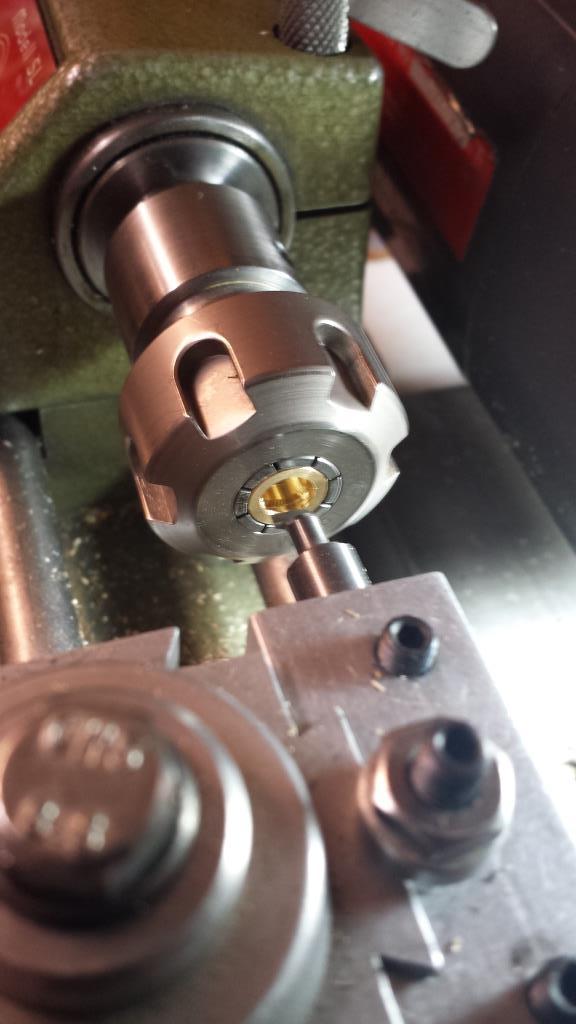
    The ER16 collet chuck is also used for milling operations on the Unimat. Below is a close-up photo of the collet chuck using a Shars ER16 collet nut. The Shars product is precisely made and not very expensive.

    ER16 Collet Chuck for Unimat M12X1 Spindle-er16-collet-chuck-installed-unimat-milling-head.jpg

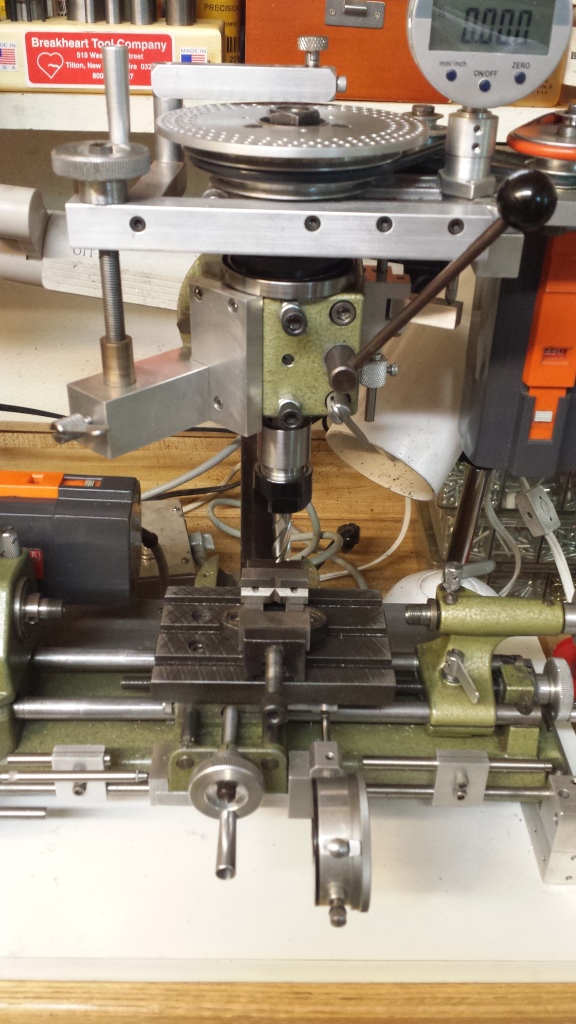
    The photo below shows the setup for milling with a 3/8" dia. four flute HSS cutter.

    ER16 Collet Chuck for Unimat M12X1 Spindle-er16-collet-chuck-holding-four-flute-milling-cutter.jpg

    The photo below shows the ER16 collet chuck installed on the Unimat SL1000 lathe and where it is used the most.

    ER16 Collet Chuck for Unimat M12X1 Spindle-using-unimat-machine-o-ring-groves-spider-adjustment-end-caps.jpg

    Thank you for looking,

    Paul Jones

    186 More Best Homemade Tools eBook
    Last edited by Paul Jones; Jan 26, 2018 at 09:32 PM.

  2. The Following 16 Users Say Thank You to Paul Jones For This Useful Post:

    C-Bag (Mar 17, 2016), Dazza (Dec 3, 2017), Harris Creek Central (May 28, 2017), Home-PC (Nov 2, 2022), Jon (Mar 16, 2016), kbalch (Mar 17, 2016), mister-pete (Nov 7, 2020), NeiljohnUK (Nov 6, 2018), NortonDommi (Dec 1, 2017), nova_robotics (Mar 11, 2023), Okapi (Feb 1, 2019), old_toolmaker (Dec 17, 2021), PJs (Mar 16, 2016), sparky42 (Nov 4, 2020), thevillageinn (Oct 30, 2022), Tonyg (Dec 17, 2021)

  3. #2
    Content Editor
    Supporting Member
    DIYer's Avatar
    Join Date
    Aug 2013
    Posts
    3,056
    Thanks
    773
    Thanked 1,852 Times in 1,653 Posts
    Thanks Paul! We've added your Unimat ER16 Collet Chuck to our Lathe Accessories category, as well as to your builder page: Paul Jones' Homemade Tools. Your receipt:


    2000 Tool Plans

  4. The Following User Says Thank You to DIYer For This Useful Post:

    Paul Jones (Mar 17, 2016)

  5. #3
    PJs
    PJs is offline
    Supporting Member PJs's Avatar
    Join Date
    Sep 2014
    Location
    Northern CA
    Posts
    1,841
    Thanks
    8,337
    Thanked 1,118 Times in 718 Posts

    PJs's Tools
    Wow Paul! Great build and write up with a lot of complex set ups to get it done. Also Really liked the idea of holding your DI holder in the tail stock chuck...have to borrow that one! And the press on sleeve was brilliant!

    A little confused about the about the M22X1.5 metric thread and the .0700 thread distance with your lathe settings. It looked to me you had it set at 16TPI which would be .0625 and when I converted the 1.5mm it was .591 (not .0700-Typo?). So the .0625 would change the engagement by a skosh but still decent engagement. I didn't calculated the percentage because it really doesn't matter based on your Amazing 4 tenths TIR with the collet and tolerance stack. WoW!

    I recently tried to cut a 25tpi thread (measured .040+, definitely not 1mm) on my peanut using the same continual engagement of the half nuts. With the gears I have I was able to get 24.93506 TPI. It came out close enough in pitch but was too unstable to turn between centers like I needed to...got to get a collet set! Inspired now!

    Congratulations on an awesome build!! Thanks for sharing! ~PJ
    ‘‘Always do right. This will gratify some people and astonish the rest.’’
    Mark Twain

  6. The Following User Says Thank You to PJs For This Useful Post:

    Paul Jones (Mar 17, 2016)

  7. #4
    Supporting Member Paul Jones's Avatar
    Join Date
    May 2014
    Location
    Del Mar, California
    Posts
    1,231
    Thanks
    5,810
    Thanked 1,441 Times in 655 Posts

    Paul Jones's Tools
    PJs,

    Thank you for the compliments but in this case I think I may have been luckier than smart in achieving the 0.0004" TIR. Next time, I plan to cut the 8 degree collet taper directly on the Unimat. The Unimat headstock swivels for the purpose of cutting tapers. Ironically, I was trying to avoid realigning the Unimat headstock because two years ago it took me several hours to perfectly align the headstock within in 0.0002" over 5". Next time I am only using the 12" geared-head lathe to single point thread the M22X1.5 OD thread and do the rest of the work on the Unimat. The M22X1.5 thread is the standard thread of ER16 collet nuts where the thread diameter is 22mm and the thread pitch is 1.5mm. All the various ER series of collet chucks have a specified thread.

    I added a better photo of the lathe thread selection chart. I was using the quick change gear selections shown in the upper left-hand panel (there are six panels of selections depending on the change gear setup used for the lathe headstock). When using the metric selections in the upper left hand panel, it shows the lower 40T gear is reversed on its drive shaft so it is being driven by the 120T gear which in turn is driven by the 127T gear (25.4mm = 1", and 127T gears work perfectly for metric conversions because 25.4 X 5 = 127, which is the closest whole number for gearing purposes (a millimeter is exactly equal to 5⁄127 inch)). When cutting most of the inch threads, the upper and lower 40T gears directly engage the 127T gear which becomes an idler gear (see my other posting at Homemade Change Gears details on the gear settings and much clearer photo of the quick change gear selection plate).

    The 0.700" distance is from the open end of the collet to the shoulder of the thread relief groove. My 12" swing lathe does not have a brake so when cutting metric threads with the half nut engaged and never released, I have to be very fast with my left hand backing out the cross slide while using my right hand on the on-off-reverse lever to turn off the motor. The lathe carriage keeps coasting to a slow stop so the cutting tool has to be completely clear of the thread relief shoulder or it will crash (nooo!).

    Thank you,
    Paul
    Last edited by Paul Jones; Mar 21, 2016 at 08:14 AM. Reason: added a millimetre is exactly equal to 5⁄127 inch

  8. #5
    Supporting Member rossbotics's Avatar
    Join Date
    Dec 2013
    Location
    Florida
    Posts
    731
    Thanks
    1,019
    Thanked 1,649 Times in 403 Posts

    rossbotics's Tools
    Great work, great write up Paul
    Love ingenuity
    Comments are always welcome
    Doug

    Subscribe to my you tube channel

    https://www.youtube.com/channel/UCDD..._as=subscriber


    Tool Plans for Sale by rossbotics


  9. The Following User Says Thank You to rossbotics For This Useful Post:

    Paul Jones (Mar 19, 2016)

  10. #6
    PJs
    PJs is offline
    Supporting Member PJs's Avatar
    Join Date
    Sep 2014
    Location
    Northern CA
    Posts
    1,841
    Thanks
    8,337
    Thanked 1,118 Times in 718 Posts

    PJs's Tools
    Thanks for the great explanation Paul. I get it now. The better picture gave the detail of the pitch and gear setup. Didn't realize the .700 was the length of thread and obviously added the "0" before the 7...my bad. That's some tedious stop action on multiple passes...Hats off to you!! Luck or not a Great Build!

    I also get the beauty of the Unimat adjustable head stock but can see the pain of getting it back to close tolerance angle on the run. Wonder if it would be possible to use a fine thread push-pull screw system with a DI or 2 and some trig to dial it in, then just use the nut to tighten it when getting there? Final clamping can also pull it a bit but could snug it then a final tightening. Could use a ground rod to length/known diameter to get it right over the run? I picked up a few pieces from McMaster that were dead on over the run of 8", 12", & 16" (as best I could measure in tenths) for pretty inexpensive a while back.

    Thanks Again. ~PJ
    ‘‘Always do right. This will gratify some people and astonish the rest.’’
    Mark Twain

  11. #7
    Supporting Member Paul Jones's Avatar
    Join Date
    May 2014
    Location
    Del Mar, California
    Posts
    1,231
    Thanks
    5,810
    Thanked 1,441 Times in 655 Posts

    Paul Jones's Tools
    PJs,

    I like your suggestion about the fine thread push/pull jig for the Unimat headstock. I made something like that for my 7" swing lathe tailstock adjustment and posted it on HomemadeTools. I think I could adapt something like that for the Unimat. That is great idea!

    I have been using "Unimatt Buddy Pin" (yes two Ts) for my general headstock alignments for many years and I highly recommend it for those using the Unimat SL 1000. It is fast and can get the alignment extremely close for most work. I use a ground test bar (remove the tailstock) and a 0.0001" dial indicator when I want the alignment close to perfect.

    Earlier this week I reviewed again the YouTube video by Tom Lipton where he shows how he aligned the lathe headstock after leveling the whole lathe. Tom uses an aluminum rod held in the chuck and with sufficient diameter so I doesn't flex due to its own weight. Tom removes material from most of the center length so just short sections on the two ends are left for making test cuts. Comparing the ODs at both ends measures the headstock alignment and how much to adjust.

    Yesterday I made a similar 6061-T6 aluminum test bar but only 1.125" in dia. and 5.25" long for the Unimat. It has an M12X1 internal thread to mount directly on the Unimat spindle (but could modified for holding in the chuck). I made the test bar with my 12" swing lathe and decided to check this lathe before I cut-off the part for use on the Unimat. I used a Mitutoyo 1" to 2" digital micrometer to make the measurements over a 5" center-to-center distance. I used a blue Sharpie to blue the surface, machined off a few tenths, and measured several times, after waiting for the part to cool (and turned of the halogen work light). Each time the difference measured at either 0.00010" or 0.00015" but I was using a carbide tool and probably should have used a honed HSS tool (and perhaps a 2" bar of aluminum). The 12" swing lathe was re-leveled a couple months ago and I am calling the 12" lathe alignment test good enough.

    I plan on posting in Homemadetools my Unimat alignment work but here are two photos from my work yesterday. The first photo is machining the test bar just before cut-off (and I forgot machine a 12mm x 4 mm deep counterbore in the spindle threaded end and had but back in the 4-jaw chuck, indicate again to a few tenths (more like chasing back and forth a few tenths))

    ER16 Collet Chuck for Unimat M12X1 Spindle-machining-unimat-sl-headstock-alignment-test-bar.jpg

    This is the Unimat aluminum test bar ready for mounting on the Unimat headstock where I will be taking a few test cuts to check headstock alignment.

    ER16 Collet Chuck for Unimat M12X1 Spindle-drilling-4mm-tommy-bar-holes-unimat-test-bar.jpg

    Thank you so much for your information and feedback.

    Paul

  12. The Following User Says Thank You to Paul Jones For This Useful Post:

    PJs (Mar 20, 2016)

  13. #8
    Supporting Member Paul Jones's Avatar
    Join Date
    May 2014
    Location
    Del Mar, California
    Posts
    1,231
    Thanks
    5,810
    Thanked 1,441 Times in 655 Posts

    Paul Jones's Tools
    Thanks Doug,

    The "ingenuity" was a round about way to improve the accuracy in machining the collet. Next I am going to try a more direct method for fabricating the ER16 collet chuck on the Unimat. If this works better, I will then make a collet chuck for the ER20 series.

    Good to hear from you and looking forward to seeing another on of your precision toolmaker tools.

    Regards, Paul

  14. #9
    Supporting Member Paul Jones's Avatar
    Join Date
    May 2014
    Location
    Del Mar, California
    Posts
    1,231
    Thanks
    5,810
    Thanked 1,441 Times in 655 Posts

    Paul Jones's Tools
    Doug,

    I think I just found a way to make the ER16 collet chuck with minimal run out. Tonight I mounted the ER16 on my Unimat SL spindle and took a couple thousands off the chuck OD. I cycled collet on and off the chuck about a dozen times and measured the TIR of the chuck OD. Each time the TIR measured less than 0.0002". This means I can rotate the Unimat head 6 degrees and use my Dremel tool holder and small grinding stone to dust off the ER16 ID taper surface. I am sure I can significantly reduce the TIR of the ER16 collet surfaces using this technique for the collet.

    Paul

  15. The Following User Says Thank You to Paul Jones For This Useful Post:

    PJs (Apr 4, 2016)

  16. #10
    Supporting Member NeiljohnUK's Avatar
    Join Date
    Dec 2017
    Posts
    625
    Thanks
    59
    Thanked 231 Times in 164 Posts

    NeiljohnUK's Tools
    Nice job, whilst I didn't do the whole thing, it did inspire me to buy a ready made er16 collet conversion chuck for an 8mm motor spindle then bore out and thread the internal to match my Emco Compact 5's mill head (14x1mm). The headstock spindle on the 5 is a bolt on flange design, so the next job is to make an adaptor and thread that to suit, though I may go for a much larger series, the 5 factory collet size was er25, so either 32 or even 40!

  17. The Following 2 Users Say Thank You to NeiljohnUK For This Useful Post:

    Paul Jones (Nov 9, 2018), PJs (Nov 6, 2018)

Thread Information

Users Browsing this Thread

There are currently 1 users browsing this thread. (0 members and 1 guests)

Bookmarks

Posting Permissions

  • You may not post new threads
  • You may not post replies
  • You may not post attachments
  • You may not edit your posts
  •