Free 186 More Best Homemade Tools eBook:  
Get 2,000+ tool plans, full site access, and more.

User Tag List

Results 1 to 4 of 4

Thread: Finger Plate with plans

  1. #1
    Supporting Member jjr2001's Avatar
    Join Date
    Jun 2016
    Posts
    915
    Thanks
    1,182
    Thanked 2,045 Times in 553 Posts

    jjr2001's Tools

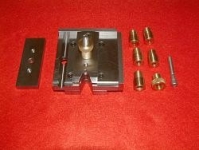
    Finger Plate with plans

    Holding small parts on the bench, mill, drill press or band saw is a bit risky.
    This is not a new tool at all just my version of the Finger Plate.
    Bushings are easily made for drill sizes from the small number drills up to
    about 7/16". Anything larger will need a change in design. I only made
    a few common sizes now and plan on more as needed.
    It would be easy enough to make one using a larger piece of steel and
    then providing larger clearance holes and bushing register in the finger arm.

    One difference in my version is the addition of the fences on two sides.
    This could come in handy for squaring up small parts. The fences are
    removable with two FH allens for each fence.

    Difference number two is the two piece base. The lower base is detachable with
    the removal of four 10-32 allen cap screws. Not only does the base allow
    the finger plate to be mounted in a vise but it also allows the use of small
    machinist clamps if the vise jaws are less than 3" wide.

    The Fp_a series photos detail the finished unit and the finished parts
    that make it up. One extra finger arm was made for future use. Only
    the center hole and the two 1/4-20 clamping screw holes were drilled.
    The clamping holes were also tapped so to be ready for use.

    The Fp_b series of photos detail the squared up parts and construction process.
    Fp_02 is the main plate with the 1/2" hole for drilling bushing clearance and
    a slot has been started for the vertical V groove. The four holes for the 10-32 allen
    cap head screws that will fix the lower base to the main plate are counter bored.
    Center hole has been drilled and the corner of the 45 degree cutout has been drilled.

    Fp_b03 shows the horizontal V groove has been completed.

    Fp_b04 is the lower plate that will be used to hold the finger plate in a vise
    or just used to lift the plate off the drill press table so machinist
    clamps can be used to secure flat parts.

    Fp_b06
    The main plate is shown on top of the lower (vise plate) and "pinned" with a 17/64"
    drill bit. Next we will put them in the mill vise and use a piece of paper shim. Now the
    # 21 drill bit is used to drill the holes for the 10-32 cap screws in both the top or
    main finger plate and the lower (vise clamping plate or base). I used a number 11
    drill bit to open up the clearance hole in the top or main plate. When assembly time came I
    found a perfect slip fit of the 10-32 screws in the main plate and the alignment
    of the top plate holes and vise plate was perfect. Well almost perfect. My granddaughter
    reminds me that nothing is actually perfect. Let's just say that the screws all lined up
    with their respective threads.

    Fp_b07 is re-drilling the horizontal V-groove corner to 1/4" I believe. Just wanted it
    a bit larger than shown on the plans.

    Fp_b09 is tapping the 10-32 holes in the vise or lower plate.

    Fp_c02 is just prior to band sawing out the horizontal V groove. The extra small V groove
    can be seen in this photo. I added it for securing small round parts that would not
    fill the main V groove.

    Fp_c03 is the V-groove cutter I used for the grooving. I think it was a re-purposed
    end mill from Dad's old tools. Seems to work great if a slot is cut first for clearance of the tip.

    Fp_c05 is the last of the threading. Putting in the 1/4-20 clamping screw threads.

    And that is all there was to it.

    I am including a file of the drawing that I made for this project. It is a DXF file and the free cad program Qcad can open it. It was created with TurboCad 21.

    Cheers, JR
    Attached Thumbnails Attached Thumbnails Finger Plate with plans-fp_a01.jpg   Finger Plate with plans-fp_a02.jpg   Finger Plate with plans-fp_a03.jpg   Finger Plate with plans-fp_a04.jpg   Finger Plate with plans-fp_b01.jpg  

    Finger Plate with plans-fp_b02.jpg   Finger Plate with plans-fp_b03.jpg   Finger Plate with plans-fp_b04.jpg   Finger Plate with plans-fp_b05.jpg   Finger Plate with plans-fp_b06.jpg  

    Finger Plate with plans-fp_b07.jpg   Finger Plate with plans-fp_b09.jpg   Finger Plate with plans-fp_c02.jpg   Finger Plate with plans-fp_c03.jpg   Finger Plate with plans-fp_c05.jpg  

    Attached Files Attached Files

    186 More Best Homemade Tools eBook
    Last edited by jjr2001; Apr 4, 2017 at 07:09 AM.

  2. The Following 3 Users Say Thank You to jjr2001 For This Useful Post:

    LMMasterMariner (Apr 4, 2017), mklotz (Apr 3, 2017), olderdan (Apr 4, 2017)

  3. #2
    Supporting Member mklotz's Avatar
    Join Date
    Aug 2015
    Location
    LA, CA, USA
    Posts
    3,438
    Thanks
    357
    Thanked 6,394 Times in 2,119 Posts

    mklotz's Tools
    Beautifully done, JR. I like it very much. It reminds me of my milling table...

    http://www.homemadetools.net/forum/m...ng-table-27312

    which I often use, mounted in the bench vise, as an impromptu finger plate.

    The separate baseplate gives you the option of using it in the milling machine vise. Adjust the base such that, when placed in the mill vise, the finger plate and its attached fences are aligned with the mill axes. (Perhaps, once this alignment is determined, drill for an alignment pin to remember the orientation.)

    You've done a fine job of titivating the venerable finger plate. I think you should submit this to one of the homeshop magazines.

    2000 Tool Plans
    ---
    Regards, Marv

    Home Shop Freeware
    https://www.myvirtualnetwork.com/mklotz

  4. The Following 2 Users Say Thank You to mklotz For This Useful Post:

    jjr2001 (Apr 3, 2017), LMMasterMariner (Apr 4, 2017)

  5. #3
    Supporting Member jjr2001's Avatar
    Join Date
    Jun 2016
    Posts
    915
    Thanks
    1,182
    Thanked 2,045 Times in 553 Posts

    jjr2001's Tools
    Thanks Marv, I like your mini milling table with the T-slots and then I noticed the
    plate with all the tapped holes. Very good idea there. I have some small eccentric
    clamps that would work great with that drilled and tapped plate. I was thinking of
    drilling a few holes in my plate for using the eccentric type clamps and may still
    go that route but an adapter plate like you used would work very well also.

    I have several larger milling plates that I use on my mini mill and a 15x15 inch one
    that I use on the CNC machine. My mill has a short y travel so I use a plate mounted
    in the machinist vise on the mill table to rotate the parts so I can mill the long side.
    Very handy accessories when working with small equipment.

    Thanks again,
    JR

  6. #4
    Content Editor
    Supporting Member
    DIYer's Avatar
    Join Date
    Aug 2013
    Posts
    3,056
    Thanks
    773
    Thanked 1,852 Times in 1,653 Posts


    Thanks jjr2001! We've added your Finger Plate to our Workholding category,
    as well as to your builder page: jjr2001's Homemade Tools. Your receipt:


    186 More Best Homemade Tools eBook

  7. The Following User Says Thank You to DIYer For This Useful Post:

    jjr2001 (Apr 4, 2017)

Thread Information

Users Browsing this Thread

There are currently 1 users browsing this thread. (0 members and 1 guests)

Tags for this Thread

Bookmarks

Posting Permissions

  • You may not post new threads
  • You may not post replies
  • You may not post attachments
  • You may not edit your posts
  •